Transcription
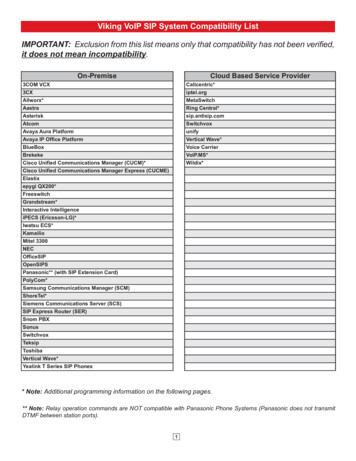
Viking VoIP SIP System Compatibility ListIMPORTANT: Exclusion from this list means only that compatibility has not been verified,it does not mean incompatibility.On-PremiseCloud Based Service Provider3COM VCX3CXAllworx*AastraAsteriskAtcomAvaya Aura PlatformAvaya IP Office PlatformBlueBoxBrekekeCisco Unified Communications Manager (CUCM)*Cisco Unified Communications Manager Express (CUCME)Elastixepygi QX200*FreeswitchGrandstream*Interactive IntelligenceiPECS (Ericsson-LG)*Iwatsu ECS*KamailioMitel 3300NECOfficeSIPOpenSIPSPanasonic** (with SIP Extension Card)PolyCom*Samsung Communications Manager (SCM)ShoreTel*Siemens Communications Server (SCS)SIP Express Router (SER)Snom PBXSonusSwitchvoxTeksipToshibaVertical Wave*Yealink T Series SIP PhonesCallcentric*iptel.orgMetaSwitchRing Central*sip.antisip.comSwitchvoxunifyVertical Wave*Voice CarrierVoIP.MS*Wildix** Note: Additional programming information on the following pages.** Note: Relay operation commands are NOT compatible with Panasonic Phone Systems (Panasonic does not transmitDTMF between station ports).1
Configuring Viking VoIP Phones and SIP ServersAllworx:Make “user ID” and “Login ID” the same in the user account.Callcentric as the SIP provider for Viking IP Products:An account must be set up with Callcentric. Go to www.callcentric.com to set up an account andupon completion, a SIP username and password will be assigned. With Callcentric service, the SIPserver will always be “callcentric.com”.The “In-band audio call progress” feature under phone settings must be enabled (if not already).When the Viking IP has placed a call and the remote party hangs up, it takes approximately 22seconds for the SIP server to pass the disconnect signal to the Viking IP phone.In our case, it was programmed to dial 715-386-4355, which is a test phone number here. Note thatCallcentric requires a “1” before the telephone number.2
Note that “In-Band Audio Call Progress” is enabled.Note the SIP server settings. When we set up our account with Callcentric, our SIP username was“17772685129” and our SIP password was “bear845464”.3
Cisco Unified Communication Manager:To connect a Viking VoIP Phone to Cisco’s Unified Communication Manager, it is important to knowthat the phone is set up as a third party SIP device without Authentication ID. Cisco has created awrite up for connecting most third party phones, which we have reformatted here specifically forViking equipment.Step 1.Gather the following information about the phone: MAC address Physical location of the phone Cisco Unified Communications Manager user to associate with the phone Partition, calling search space, and location information, if used Line number (DN) to assign to the phoneStep 2.Determine whether sufficient Device License Units are available. If not, purchase andinstall additional Device License Units. Third-Party SIP Devices (Basic) consume threeDevice License Units each.Step 3.Configure the end user. Viking VoIP Phones do not support an authorization ID (digestuser), so create a user with a user ID that matches the DN of the phone. For example,create an end user named 1000 and create a DN of 1000 for the phone. Assign this userto the phone (see step 9).Step 4.Configure the SIP Profile or use the default profile. The SIP Profile gets added to thephone that is running SIP by using the Phone Configuration window.Step 5.Configure the Phone Security Profile. To use digest authentication, you must configure anew phone security profile. If you use one of the standard (non-secure) SIP profiles thatare provided for auto-registration, you cannot enable digest authentication.Step 6.Add and configure the Viking VoIP Phone by choosing Third-party SIP Device (Basic)from the Add a New Phone Configuration window.Step 7.Add and configure lines (DNs) on the phone.Step 8.In the End User Configuration window, associate the Viking VoIP Phone with the user byusing Device Association and choosing the Viking VoIP Phone.Step 9.In the Digest User field of the Phone Configuration window, choose the end user that youcreated in step 3.Provide power, install, verify network connectivity, and configure network settings for theViking VoIP Phone.Step 10.Username should match the user that was created in step 3.Password should match the password created for the digest user.Step 11. Make calls with the Viking VoIP Phone.4
epygi:The Viking VoIP Phone can be configured easily with Epygi QX IP PBXs (herein QX) like other IPphones, to make and receive calls and to support different application scenarios. This guide providesinstructions how to configure Viking as an IP extension on QX. Based on this configuration simpleemergency call scenario and interconnection with the door strikes are described. Features, settings,applications and connections specific to the operation of Viking are beyond the scope of this document.The configuration described below is generic for all QX IP PBX models, such as the QX20, QX50,QX200, QX500, QX2000 and QXISDN4 .Requirements: QX connected to the network with all network settings properly configured. QX is running firmware version 6.1.2 or higher. Always use the latest available firmware to achievemaximum compatibility with the QX's features and settings. At least five IP extensions (phones) connected to QX as destinations for emergency call. Viking running VoIP FW version: IP R3.45.1541, Phone V3.3, connected to the LAN interface of QX. PC with MS Window and Viking IP programming V.1.1.2 SW installed for Viking configuration,connected to the QX LAN interface.Note: If Viking VoIP Phone is going to be connected to QX via WAN interface, ensure a filtering rule isenabled on the QX firewall for it (the unit's IP is added into Allowed IP List). Creating a rule is notrequired if the firewall on the QX is disabled or set to Low.A. Configuring an IP Extension on QX for Viking VoIP PhoneThe following main settings will be used in the example below for configuring Viking VoIP Phoneas an IP extension on QX.Username /User IDPasswordSIP Server, SIP PortAttached IP Line,ExtensionSIP Usernamelocext115*******172.30.0.1:5060IP Line 15, Ext.11520230@sip.epygi.comTo configure the QX, login into QX WEB GUI, select and configure an IP Line with extensionattached, that will be used for Viking VoIP Phone:Step 1.Go to the Interfaces - IP Lines page.Step 2.Select a free (inactive) IP line ( line # 13 in this example)and configure it as follows: Enable the IP Phone option. Select Other from the Phone Model drop down list. Specify the Username and Password fields (Figure 1).Note: Make a note of the specified Username and Password as they will be neededwhen configuring the Viking. It is suggested to use a good strong password, or usethe system generated one.Step 3.Go to the Extensions-Extensions page.Step 4.Click the Admin Settings icon for the Extension 115.Step 5.Go to the SIP Settings section (Figure 2) and register the extension on a SIP Server(sip.epygi.com in this example) to be able to make remote SIP calls to the unit (ifneeded).5
Figure 1: IP Line Settings pageFigure 2: SIP Settings section6
B. Configuring the Viking VoIP PhonePower on the unit and connect it to the LAN interface for QX. The settings of the unit will beconfigured through Viking IP programming SW application installed on PC with MS windows. Thefollowing configuration steps for Viking should be done:Step 1.Open the Viking VoIP Phone Programming software on the MS Windows PC that isconnected to the same LAN as the Viking phone to be programmed.Step 2.The window in the upper left corner of the menu will show you the Viking phone(s)that is connected to that LAN. Select the unit with the same MAC address, shown onthe label located on the top of the Ethernet connector on the Viking phone.Step 3.Click the Connect button. If a pop up window appears, enter the unit’s security code(845464 by default) then click OK.).Step 4.The program will then read and display the settings for Viking phone(s).Step 5.After adjusting the IP and other phone’s settings, click the “Write” button under eachcolumn of settings to send the programming commands to the connected unit.Step 6.Press IP Settings menu bar item and set the following parameters: SIP Server: 172.30.0.1 (the default LAN IP address of QX) Username: locext115 (the same as configured on QX IP line settings) Password: ******* (the same as configured on QX IP line settings)Step 7.Press Phone Number / Phone Codes menu bar item and define the QX extensionsthat should be called.Step 8.Press Phone Settings menu bar item and set the relay related parameters (Relaymode, Relay activation command, Relay Activation time, etc.).7
Configuring Viking IP phones with Grandstream PBX devices:1. Log into the Grandstream configuration tool in your browser:2. Click on “PBX” at the top, and then “Create New User” and “New SIP Extension”8
3. Put in your preference for “Extension” (which will be your username), “SIP/IAX Password” and“Voicemail Password”, along with “First Name” and “Last Name”. Click on “Save”.9
4. After saving, click on the “Apply Changes” button in the top right corner.5. You will then see the extension you set up under the list of extensions.6. Next, click on “Status” on the top, and on the left side, click on “System Status” and “Network”.Look for where it says “IP Address”. This is your SIP Server IP address that you will put in the VikingVoIP programming app.10
7. Open the Viking programming app, and find the unit you want to work with, then click “Connect”.Enter the Grandstreams IP as the domain. Enter valid extension and Password.iPECS (Ericsson-LG):Make sure 407 Register is “OFF’ otherwise it wants a proxy.11
Iwatsu ECS:To connect a Viking VoIP Phone to the Iwatsu ECS you can register the phone as a SIP extension.As of version 2.6 of the Viking VoIP Phone Firmware inbound calls to the door box are not supported.To connect the phone, please follow the following steps:Step 1.Gather the following information about the phone: MAC address Physical location of the Viking Voip Phone CCSU or LAN2 IP Address of the Iwatsu ECS System Extension Number for the phone or hunt group that will be called when the button is pressed Extension Number to assign to the Viking VoIP PhoneStep 2.Determine if the system is provisioned for SIP extensions; licenses are required tosupport SIP Phones on the Iwatsu ECS and they must be installed prior to deployment.Step 3.Configure the SIP Extension in the Iwatsu ECS. The username will be the extensionnumber and the password default is 1234.Step 4.Provide power, install, verify network connectivity, and configure network settings for theViking VoIP Phone.Username should match the user that was created in step 3.Password should match the password created for the extension.Step 5.Audio Call Progress must be set to ‘Enabled.’Step 6.Make calls with the Viking VoIP Phone.12
Multicast Paging:Standard: A Viking IP speaker can listen to up to 10 “Standard” multicasts, and play them based ontheir priority level (0 is the highest priority and 9 is the lowest). Enter the Multicast IP address andPort into the Paging sources fields. Any multicast at this address/port will be heard from the VikingSpeaker/Paging Adaptor.Polycom: Under the “Paging” Tab, “More Speaker Settings” select Polycom as the “Multicast PagingType”. Polycom phones will use 224.0.1.116 as the default IP Address and port 5001. Select thechannels you want to enable, channel 25 cannot be disabled as it is generally used for emergencybroadcasts. Any multicast page made from a Polycom phone (on the same LAN) to the desired IPaddress and port will be played from the Viking Speaker/Paging Adaptor. The priority of Polycomsources ranges from 1 (lowest) to 25 (highest). SIP paging and outbound SIP calls can have priorityover Polycom paging (factory setting). If the SIP priority is set to “None” than Sip paging/outboundcalls are not allowed during a Polycom multicast.13
RingCentral as the provider for Viking IP Products:Note – RingCentral requires the “outbound proxy” and “authentication ID” fields when a SIP device isconfigured for their service. Only MK64 version Viking devices have the capability to support thesefields. If you are not sure if the Viking device you have is compatible with RingCentral, contact VikingTechnical Support.Go to ringcentral.com to set up an account and select a service plan. Once you have created yourRingCentral account and are logged in to the account, go to “Phone System”, “Phones & Devices”and “Setup & Provision”.On the Setup & Provisioning page, click on “Other Phones” and the “select” by “Existing Phone”.14
They will then provide all of the values used to configure the Viking device. Click on the down arrowby “outbound proxy” and select from one of the choices based on your physical location. North America is either “sip10.ringcentral.com:5090” or “sip20.ringcentral.com:5090”. Print this RingCentral pageor note all of the values so you can use them when programming the Viking device.17159824355Open Viking IP Programming software, connect to the device you wish to configure with RingCentraland go to the “IP Settings” tab. The “SIP Domain” provided by RingCentral goes in the SIP Serverfield in IP Programming (the “:5060” port selection does not need to be entered as the Viking devicesdefault to port 5060). The “Outbound Proxy” provided by RingCentral goes in the Outbnd Proxy fieldin IP Programming (the “:5090” port selection must be entered). The “User Name” provided by RingCentral goes in the Username and Caller ID fields in IP Programming. The “Password” provided byRingCentral goes in the Password field in IP Programming. The “Authorization ID” provided by RingCentral goes in the Authentic. ID field in IP Programming.15
On the “Phone Settings” or “Speaker Settings” tab of the IP Programming software, make sure the“In-Band Audio Call Progress” feature is enabled.On the “Phone numbers” or “Numbers” tab of the IP Programming software, enter the phone numbersthe Viking device should call, if it will be used for outgoing calls. A “1” is not needed before thetelephone numbers.Apply your changes and you will be disconnected from the device. Reconnect to the device in the IPProgramming software and go to the “Alarm/Firmware” tab of the IP Programming software to see ifthe Viking device is now registered with the RingCentral service. If it is registered, the “SIP Registration Status” will be Registered and “Current Alarm Status” will be Idle, like this:16
If it is not registered, go back to the “IP Settings” tab in IP Programming software. Make sure you entered all of the SIP information correctly (without any typos) and included the “:5090” port selection atthe end of the outbound proxy field.ShoreTel Ring Group Limitation:Viking IP products are not capable of dialing the access code for a ShoreTel ring group but theShoreTel system can be programmed so that multiple phones ring at the same time when the IPproduct calls. This is how it is accomplished:Step 1.Create a “virtual” extension in the Shoretel system for our IP phone to call. The Viking IPproduct should be programmed to call the virtual extension.Step 2.Program all phones that need to ring when the IP product calls to “monitor” the virtualextension, so their phone rings any time the virtual extension rings.Viking IP products can then ring a number of phones at the same time. The call can be answered byany phone and the relay command can be dialed to release a door/gate. The extension of the VikingIP product can be called if a user wants to control the door/gate without receiving a call from theViking IP product.17
Vertical Wave:Go to “IP Telephony” and under “SIP”, “Advanced Authorization” and then “Global Adv. Parameters”uncheck “Authenticate Register”.Our username extension number of the wave phone.Our password SIP authentication password.VOIP.MS as the SIP provider for Viking IP ProductsAn account must be set up with VOIP.MS. Go to www.voip.ms to set up an account and upon completion, a SIP username and password will be assigned. Their account information page shows along list of available VOIP servers. You can pick any of these servers to be used as the SIP serverfor the Viking IP phone. We chose to use the “chicago4.voip.ms” server from that list, so our screenshot shows that particular server as the SIP server.The “In-band audio call progress” feature under phone settings must be enabled (if not already).When the Viking IP has placed a call and the remote party hangs up, it takes approximately 22 seconds for the SIP server to pass the disconnect signal to the Viking IP phone.In our case, it was programmed to dial 715-386-4355, which is a test phone number here.18
Note that “In-Band Audio Call Progress” is enabled.Note the SIP server settings. When we set up our account with VOIP.MS, our SIP username was“190106” and our SIP password was “Bear987654!”.19
Wildix:A Wildix Configeration:The Viking device must register with Wildix as a SIP trunk to make sure touch tones are provided tothe Viking IP product for relay control or other functions.SIP Trunk Configuration:Enter the same value in both the “Trunk name” and “Auth Login” fields, like the “9999” shown above.Note that the “Trunk name”, “Auth Login” and “Password” fields assigned on the “Edit Trunk” page willbe used in the “username”, “authentication ID” and “password” fields when configuring the Viking IPproduct.Make sure the trunk is configured to provide touch tones to the IP product:A dial plan must be created for the SIP trunk:20
B. Viking IP product configuration:Open Viking IP Programming software, connect to the device you wish to configure with Wildix and goto the “IP Settings” tab. Use the URL or IP address of the Wildix SIP server in the SIP Server field inIP Programming and leave the “Outbound Proxy” field blank. The “Trunk name” from the Wildix trunkconfiguration goes in both the Username and Caller ID fields in IP Programming. The “Password”from the Wildix trunk configuration goes in the Password field in IP Programming. The “Auth Login”from the Wildix trunk configuration goes in the Authentic. ID field in IP Programming.On the “Phone Settings” or “Speaker Settings” tab of the IP Programming software, make sure the“In-Band Audio Call Progress” feature is enabled.21
On the “Phone Numbers” or “Numbers” tab of the IP Programming software, enter the extensionnumbers or phone numbers the Viking device should call, if it will be used for outgoing calls.Apply your changes and you will be disconnected from the device. Reconnect to the device in the IPProgramming software and go to the “Alarm/Firmware” tab of the IP Programming software to see ifthe Viking device is now registered with the Wildix service. If it is registered, the “SIP RegistrationStatus” will be Registered and “Current Alarm Status” will be Idle, like this:10-29-201922DOD 944
Go to ringcentral.com to set up an account and select a service plan. Once ou have created our RingCentral account and are logged in to the account, go to “Phone Sste” “Phones& Devices” and “Setup & Provision” On the Setup & Provisioning page, clicon “OtherP

