Transcription
Table of kill levelOperating SystemInstallation ChecklistGeneral / Admin account of the WBE backend applicationWindows Server / Webserver:SSL certificates:Database platform:MySQLMicrosoft SQL ServerCustomer configuration1.4Landscape overview1.4.1Public Access1.5Required2 Installing a webserver2.1Windows System Environment variable2.2Add URL to your DNS2.3IIS with PHP 7.4 and a MS-SQLserver database2.3.1IIS install2.3.2Add additional components via Web Platform Installer (WPI)2.3.3Check PHP version2.3.4PHP configuration2.3.5PHP : TS or NTS database drivers ?2.3.6IIS : create site for WBE2.3.7Unzip the WBE extension zip file to the desired web-root location2.3.8Enable the DELETE and PUT method in IIS2.4Apache2 via XAMPP2.4.1Download and install XAMPP (Apache2, MySql, PHP)2.4.2XAMPP configuration2.4.3Unzip the WBE extension zip file to the desired web-root location2.4.4Configure MySQL2.4.5PHP Configuration2.4.6PHP : TS or NTS database drivers ?2.5Start Apache & MySQL at server boot2.6NGINX3 Configuration WBE Extension3.1Create and edit the ‘.env’ (environment) file3.2Copy your license into the LICENSE file3.3Preparing the WBE web-application3.4Start the WBE site in IIS3.5Test the WBE extension3.6Folder-permissions3.7Final Result4Troubleshooting4.1Database connection issues4.2Error during backend configuration4.3PHP related4.4Logfiles locationPage 2 of 267-4-2021
5Updates and support261 IntroThis document describes the installation and configuration of the Write-Back-Extreme (WBE) extension as aweb-application on Windows.You are free to choose your own installation methods and types, as long as in the end the WriteBack-Extremeweb-application runs; Being accessible via an URL, like https://writeback.yourcompany.com, based on PHP7.4 and an updatable database of your choice.As the WBE extension runs in a webserver as a PHP web-application, the installation of the mostcommon webservers on Windows is explained below, as a detailed example. See here for theinstallation & configuration on Linux.1.1Skill levelTo follow along, knowledge of installing the webserver, and companion parts, of choice on Windows isrequired. If company standards apply for deployment of web-server, they can fit in on various parts of theinstallation and configuration.In this document, the installation based on the following webservers is described: IIS Apache2 webserver, as part of the XAMPP package Nginx1.2 Operating SystemThis manual is written for Window Server 2016/2019.During the installation, a number of components might need to access the Internet to complete theinstallation, like database drivers and web-servers components. It is recommended that the installing useraccount has access to the Internet from the Windows server during installation.The installing user-account might also need ‘local administrator’ permissions during the installation andconfiguration.1.3 Installation ChecklistThe yellow marked fields are needed for completion of the installation and configuration.General / Admin account of the WBE backend applicationAdmin Account Emailaddress:Admin Account Name:Admin Password:Page 3 of 267-4-2021
Windows Server / Webserver: Minimal Server Resources: 2 vCPU, 8Gb, 100Gb diskspace, 100Mbps or 1Gbps NIC Adminprivileges to perform the installation.Firewall rules to permit access on port 443 (https) and ports to the database servers.Both internal and external firewall-appliances and builtin windows-firewall as well.Minimum version of PHP is 7.4.A x64 (64-bit) installation is preferred.PHP can be installed as a component of the webserver or separately.Windows version :Webserver type : PHPversion :Server Hostname :Web Application URL :Application port : 443 (https) or any other unused port (protocol will always be https)SSL certificates: A webdomain (example: https://writeback.your-company.com)Use of HTTPS is mandatory in all environments. Therefor a SSL-certificate is needed. And ithas to cover the web domain / application URL. It can be a wildcard certificate(“*.yourcompany.com”) or URL-specific (fi. “writeback.your-company.com”). Depending onthe type of webserver, the certificate-file (.crt), the private-key (.key) and certificate-chainfiles (often CAcert.crt) are needed to configure in NGINX / Apache Webserver. A windowscertificate file (often .pfx file) is needed for IIS. The .pfx must contain the private key as well.Domain needs to point to the webserver through DNS (internal and/or external)https://writeback.your-company.com is pointing to the document-root location on thewebserver (using virtual-hosts for example)HTTPS is functioning on above domainBe aware of stricter security policies of browsers nowadays, concerning CORS-policies,Xframe-headers or CSP-headers.Database platform:Among others the most used database for the WriteBackExtreme extension on windows are MySql/MariaDBand MS-SQLserver.MySQL Minimum version of MySQL is 5.7MySQL is runningMySQL root account and password (written down) to create an ‘admin’ account for thedatabase to be used by WBEMySQL read only user (test and access via Tableau to add datasources)You can connect to the MySQL database through commandline or phpmyadminMicrosoft SQL Server Minimum version of MS SQL Server 2016Page 4 of 267-4-2021
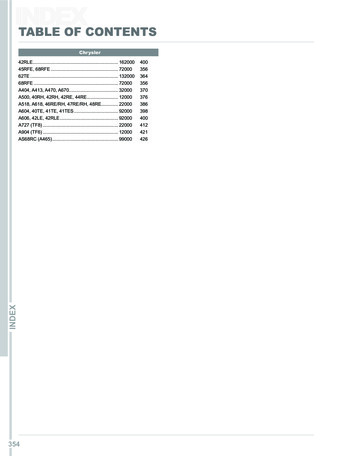
MSSQL is runningMSSQL db owner user account and password (written down)MSSQL read only user (on same database)You can connect to the SQL server database MS SQL Management StudioCustomer configurationThe database ‘admin’ account must be able to create objects (tables/indexes) in a schema/database in thedatabase platform:Database Platform and version:Admin Account (read/write/create) :Password :The read-only account will be used by tableau desktop developers to access the write-backextremeinformation, in order to incorporate that write-back information into a workbookdashboard.User Account (read only):Password :1.4Landscape overviewAlthough we are focusing on the WBE Extension installation, this picture shows the whole landscapeoverview.End-Users Browser : as end-users will browse dashboards served by tableau server. These dashboards mightcontain the WBE extension, which is displayed in an iframe of the tableaudashboard. So, from the tableaudashboard (-URL) the WBE-extension (-URL) is accessed in an iframe.Tableau Server : serves the tableau-dashboards to the end-users browsers.Page 5 of 267-4-2021
Tableau Desktop (user) : creates tableau dashboards which might include the WBE-extension through a .trexfile and publish it to Tableau Server.WBE extension : served by a separate web-server on a different server than the Tableau Server (web)Application. The WBE extension actually has two end-points:The extension itself on https://writeback.your-company.com/extensionThe configuration backend on https://writeback.your-company.com/backend WBERepository database : This is a database for WBE’s own administration. But if you wish, you can use thisdatabase also as a Write-Back database.Write-Back Database : the database(s) were schema’s are created to write-back the data entered through theWBE-extension in the Tableau dashboard. There can be multiple databases to writeback to and thesedatabase can be different from database-platform (MySQL/MariaDB, MS-SQL, PostgreSQL, Snowflake,Teradata, etc). For all used WBE database-types a database-drivers must be configured in the ‘php.ini’ file.1.4.1 Public AccessPublic access from the Internet is possible. For both Tableau Server as the WBE extension. Where as TableauServer has multiple user-authentication methods, such as local-user, Active-Directory, SAML and Open-ID,WBE has no user-authentication mechanism.The extension-API of Tableau does not support any type of authorization in the extension itself. To access theWBE-extension from the Internet, you might want to deploy a reverse-proxy in your DMZ, in front of the WBEextension. It could prohibit unauthorized access by deploying a SingleSign-Authentication method,supported by your company. (Strongly advised to be the same authentication-method as Tableau Server forthe purpose of SSO).For example an Azure Application Proxy, with Pre-Authentication enabled. In AWS, you can deploy a webapplication proxy for that. The reverse-proxy configuration is not part of this installation instruction, is bestdiscussed with your cloud-platform team.1.5 RequiredBefore starting the installation, a checklist of things you need:a) Windows Server 2012 R2, 2016 or 2019 Standard Editionb) WBE zip-package or download link, provided by App4Tableau / Infotopicsc) Access to at least one (1) database-platform through an account which is ‘administrator’ on anexisting, but empty, schema/databased) Firewalls rules applied to allow access to the WBE-extension-URL and database(s)e) Administrator permissions during installationf) Internet access during installationg) Download links for your web-server of choice and other web-server componentsh) LICENSE file received from Apps4Tableau / Infotopicsi) SSL certificate including the private key2 Installing a webserverIn this chapter, you can find three (3) installation & configuration examples.IIS with PHP 7.4 and a MS-SQLserver database Apache2 via XAMPP, with PHP and a MySQL/MariaDB database NGINX webserver, with PHP and a PostgreSQL databasePage 6 of 267-4-2021
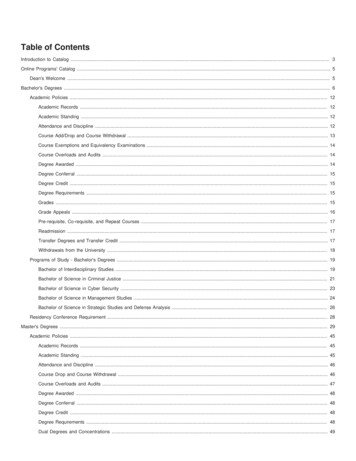
We hope these examples supply you with enough details how to install and configure WBE in yourenvironment, even in a different combination of web-server and database-platform.2.1 Windows System Environment variableWe need to specify a Windows System Environment variable ‘BOX REQUIREMENT CHECKER’, set to 0 (zero).Type R and enter ‘sysdm.cpl’. Select the ‘Advanced’ tab and then the ‘Environment Variables’ button.In the section 'System Variables', press ‘New’ and define the variable correspondingly.To be sure the variable applied and available system-wide, please reboot your windows server.If you will be using Apache2 with XAMPP, you can reboot your server at a later moment.2.2 Add URL to your DNSAsk your IT DNS-administrator to add the URL in your company’s DNS with the IP-address of your windowsserver. And to the public ‘internet’ DNS, if your Tableau Server and WBE extension are public facing.Type ‘nslookup writeback.your-company.com’ in a dos-cmd-box and it should be found and point to yourwindows-server’s IP-address.Page 7 of 267-4-2021
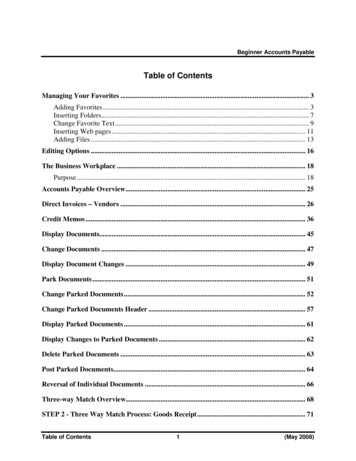
2.3 IIS with PHP 7.4 and a MS-SQLserver database2.3.1 IIS installIn the ‘Server Manager’ click ‘Manage’ and choose ‘Add Roles and Features’Be sure to select the windows servers where you want to install IIS, while clicking ‘Next’ to get to the ‘ServerRoles’ page.Only check the box in front of IIS. (No other Role is selected). Wait until IIS is installed.You can start the ‘IIS Manager’ via the ‘Server Manager’ -- ‘Tools’ button or via the ‘Windows Start’ buttonor via the ‘Administrative Tools’Page 8 of 267-4-2021
After ‘IIS Manager’ is started, a popup may appear toinstall the Web Platform Installer.Please install WPI for the next steps.2.3.2 Add additional components via Web Platform Installer (WPI)Start ‘Web Platform Installer’ from within the ‘IIS Manager’.If not installed yet, Install Web Platform Installer 5.1 (WPI) via this link.In WPI, use the search-feature to find and select the next components for install: PHP 7.4.1 (x64) Microsoft Drivers 5.8 (x64) for PHP 7.4 for SQL Server in IIS or Microsoft Drivers 5.9 (x64) for PHP 7.4 for SQL Server in IIS URL rewrite 2.1 (might be installed already) Application Request Routing 2.5 with KB2589179 (needed for URL Rewrite) IIS: CGI (alternative via ‘add Roles and Features’ -- Web Server (IIS) -- Web Server-- ApplicationDevelopment-- CGI)Page 9 of 267-4-2021
It might select additionalpackages to install due todependencies.Some packages may fail, butthese 2 are not needed and canbe ignored.2.3.3 Check PHP versionOpen a dos-cmd prompt (you will need it later, too; leave it open) and type the command:php --versionIn case of this error message like above, install the ‘Microsoft Visual C redistributable’ version 2019 ornewer.Solve this error by installing Microsoft Visual C Redistributable for Visual Studio 2019 (VC redist.x64.exe).Page 10 of 267-4-2021
2.3.4 PHP configurationIn the dos-cmd type the command:where phpIn the reported folder, you will find a file named ‘php.ini’. Please make a copy of it to ‘php.ini – original’.Then edit ‘php.ini’ file (with notepad ) and make the next changes:post max size 20Mupload max filesize 20M(about line 694)(about line 844)Error to console instead of logfile.display errors On; error log C:\Windows\Temp\PHP74x64 errors.log(about line 482)(about line 1921; comment out by ‘;’ in front)At the bottom, add ‘fileinfo’ and ‘sqlsrv’ dll’s to be loaded in the ‘ExtensionList’.[ExtensionList] .extension php fileinfo.dllextension php pdo sqlsrv 74 nts x64.dllextension php sqlsrv 74 nts x64.dll extension php pdo pgsql.dllextension php pgsql.dllThe both ‘sqlsrv’ dll’s are there, to load the ms-sqlserver drivers in php. These are installed on the correctlocation by the WPI-installer (sub-folder ‘ext’ from the folder where ‘php.ini’ file is found).For example, when you find the ‘php.ini’ file in ‘C:\Program Files\PHP\v7.4\’ the dll’s for databasedrivers (andother dll’s) are installed/copied to ‘C:\Program Files\PHP\v7.4\ext’.The ‘pgsql’ dll’s are for PostgresSQL (but might need to be downloaded and installed/copied to the extensionfolder of PHP; see also later in the NGINX section).2.3.5 PHP : TS or NTS database drivers ?Some database drivers come in two (2) different type: TS and NTS. TS means Thread-Secure and NTS meansNon-Thread-Secure. It depends on the version of PHP, which type you need to use.In this case a ‘NTS’ version of database drivers needs to be specified in the ‘php.ini’ file.2.3.6 IIS : create site for WBEIn ‘IIS Manager’ create a site for WBE web-application.Page 11 of 267-4-2021
First specify a site-name.Then the physical path, wherewe located the source-files ofWBE. Please note that ‘\public’is at the end of the path.Then specify the binding info.The hostname is yourwebdomain URL. And specify thecorresponding SSL-certificate.The SSL-certificate should beinstalled upfront into thewindows certificate store.(double click the .pfx file andchoose ‘install’ in the ‘computeraccount’ or ‘local machine’; not‘current user’!).2.3.7 Unzip the WBE extension zip file to the desired web-root locationCopy the downloaded or received WBE zip-file to a TEMP-folder. And unzip it there.You will get two (2) files: writeback-extreme 1.0.7.gwe writeback-extreme 1.0.7.md5Rename the .gwe to .zip and unzip/extract it again.Copy the unzipped files and folders from the second unzip to the specified folder in the sitebinding.But one (1) folder above ‘ .\public’.Using the example ‘D:\webiis\writeback version \public’, then place the unzip-files in‘D:\webiis\writeback version \’. The folder ‘public’ is also present in the unzip-files, so it matchesthe site-binding physical path.2.3.8 Enable the DELETE and PUT method in IIS(in future releases this step will be obsolete)Basic configuring the WBE website for the usage of DELETE and PUT method is fairly easy.Select the WBE site in IIS and double-click ‘Handler Mappings’.Page 12 of 267-4-2021
Click ‘Request Restrictions’ and the ‘Verbs’ tab. Add ‘,DELETE,PUT’ as highlighted.Page 13 of 267-4-2021
Click ‘Request Restrictions’ and the ‘Verbs’ tab. Add ‘,DELETE,PUT’ as highlighted.When trying to save the changes, please enclose the exe-pathname for php with double-quotes (ashighlighted below).Now you are ready to configure the WBE Extension.Page 14 of 267-4-2021
2.4 Apache2 via XAMPP2.4.1 Download and install XAMPP (Apache2, MySql, PHP)Download the XAMPP installer onto your server and run ‘as administrator’. Select‘Apache’, ‘MySQL’, ‘PHP’ and ‘phpMyAdmin’ to install.Select your installation-folder, and installation language (English), but un-check the ‘start theControl Panel’ at the end of the install. The control-panel should be started by running‘C:\xampp\xampp-control.exe’ as an administrator.2.4.2 XAMPP configurationPage 15 of 267-4-2021
First click the ‘Config’ button, to adjust a couple settings like your favorite editor (notepad ) and ports forApache and MySQL. Preferable for Apache are port 80 (http) and 443 (https). Standard port for MySQL is3306. You can check with the ‘Netstat’ button if these ports are free to use.If you change the default http port (from 80 to 81), please edit ‘C:\xampp\apache\conf\httpd.conf’ file andchange the lines (about 60 and 228):Listen 81ServerName localhost:81If you want/need to change the default https port (from 443 to 8443, for example), edit the . (You might want to save a copy before editing the file). Andchange lines (about line-numbers 36, 121 and125)Listen 8443 VirtualHost default :8443 Servername localhost:8443You might also want to adjust the SSL-certificate files as shown later in the ‘http-vhosts.conf’ file as well.And change the Servername correspondingly.To add the WBE web-application URL to the XAMPP/Apache2 configuration edit the f’. Again, you might want to save a copy before editing. Andadd the following lines:## VirtualHost writeback.your-company.com:443 VirtualHost *:443 ##ServerName writeback.your-company.com:443ServerName writeback.your-company.comDocumentRoot "c:/xampp/htdocs/writebackextreme/public" Directory "c:/xampp/htdocs/writebackextreme/" Options Indexes FollowSymLinks MultiViewsAllowOverride AllRequire all granted /Directory ServerAdmin admin@example.comErrorLog "c:/xampp/apache/logs/error wbe.log"TransferLog "c:/xampp/apache/logs/access wbe.log"Page 16 of 267-4-2021
SSLEngine onSSLOptions ExportCertData StrictRequire OptRenegotiate StdEnvVarsSSLCertificateFile "c:/xampp/apache/conf/ssl.crt/writeback yourcompany com.crt"SSLCertificateKeyFile "c:/xampp/apache/conf/ssl.key/writeback yourcompany com.key"SSLCertificateChainFile "c:/xampp/apache/conf/ssl.crt/CACert.crt" /VirtualHost Change the URL ‘writeback.your-company.com’ to the desired URL. And the location of files and foldersdepending on the install-folder ‘C:\xampp’ (or D:\xampp).Adjust the SSL-certificates file accordingly. If the SSL-certificate is installed in your Windows CertificateStore (hopefully with the private key), you can use a free utility like ‘DigiCertUtil’ to export the SSL-certificateto the files needed for Apache and place them in the corresponding folders.2.4.3 Unzip the WBE extension zip file to the desired web-root locationCopy the downloaded or received WBE zip-file to a TEMP-folder. And unzip it there.You will get two (2) files: writeback-extreme 1.0.7.gwe writeback-extreme 1.0.7.md5Rename the .gwe to .zip and unzip/extract it again.Copy the unzipped files and folders from the second unzip to the specified folder in the sitebinding. But one(1) folder above ‘ .\public’.Using the example ‘C:\xampp\htdocs\writebackextreme\public’, then place the unzip-files in‘C:\xampp\htdocs\writebackextreme’. The folder ‘public’ is also present in the unzipped content, so itmatches DocumentRoot-path.2.4.4 Configure MySQLFirst start MySQL and Apache.And access https://localhost/phpmyadmin from a browser on the server. You will be automatically loggedin as ‘root’ to MySQL (root is the administrator user of MySQL). And first we want to set a password for this‘root’ account in MySQL.Page 17 of 267-4-2021
Select the ‘User Accounts’ tab and click the ‘edit privileges’ button for ‘root’ on the ‘localhost’.Then click the ‘Change Password’ button and specify a new password. Store this password in your passwordsafe. It will not be used much often.Next change is to edit the file ‘C:\xampp\phpMyAdmin\config.inc.php’And change the ‘auth type’ and ‘Al
Page 4 of 26 7-4-2021 Windows Server / Webserver: Minimal Server Resources: 2 vCPU, 8Gb, 100Gb diskspace, 100Mbps or 1Gbps NIC Admin privileges to perform the installation. Firewall rules to permit access on port 443 (https) and ports to the database servers. Both internal and external