Transcription
WinPlus Remote iPad Prompter Control SolutionWinPlus RemoteiPad Prompter Control SolutionPart Nos. WP-REMENwww.autoscript.tv
Copyright 2015All rights reserved.Original Instructions: EnglishAll rights reserved throughout the world. No part of this document may be stored in a retrieval system,transmitted, copied or reproduced in any way, including, but not limited to, photocopy, photograph,magnetic or other record without the prior agreement and permission in writing of the Vitec Group plc.DisclaimerThe information contained in this manual is believed to be correct at the time of printing. Vitec VideocomLtd reserves the right to make changes to the information or specifications without obligation to notify anyperson of such revision or changes. Changes will be incorporated in new versions of the publication.We are making every effort to ensure that our manuals are updated on a regular basis to reflect changesto product specifications and features. Should this manual not contain information on the core functionalityof your product, please let us know. You may be able to access the latest revision of this manual from ourwebsite.Vitec Videocom Ltd reserves the right to make changes to product design and functionality withoutnotification.TrademarksAll product trademarks and registered trademarks are the property of The Vitec Group Plc.Apple, iPad, and Lightning are trademarks of Apple Inc., registered in the U.S. and other countries. AppStore is a service mark of Apple Inc.All other trademarks and registered trademarks are the property of their respective companies.Published by:Vitec Videocom LtdSupports Technical Publications DepartmentWestern Way, Bury St EdmundsSuffolk IP33 3TBUnited KingdomEmail: technical.publications@vitecgroup.com
ContentsSafety. . . . . . . . . . . . . . . . . . . . . . . . . . . . . . . . . . . . . . . . . . . . . . . . . 2FTP Logging Enabled . . . . . . . . . . . . . . . . . . . . . . . . . . . . 14About this Guide . . . . . . . . . . . . . . . . . . . . . . . . . . . . . . . . . . . . . . . 3Additional Save Features . . . . . . . . . . . . . . . . . . . . . . . . . 14System Requirements . . . . . . . . . . . . . . . . . . . . . . . . . . . . . . . . . . . 3Operation . . . . . . . . . . . . . . . . . . . . . . . . . . . . . . . . . . . . . . . . . . . . 16Components and Connections . . . . . . . . . . . . . . . . . . . . . . . . . . . . 4Using the iScroll . . . . . . . . . . . . . . . . . . . . . . . . . . . . . . . . . . . . 16iScroll . . . . . . . . . . . . . . . . . . . . . . . . . . . . . . . . . . . . . . . . . . . . . 4Prompter Text Control . . . . . . . . . . . . . . . . . . . . . . . . . . . . 16iGlue . . . . . . . . . . . . . . . . . . . . . . . . . . . . . . . . . . . . . . . . . . . . . . 4Function Buttons. . . . . . . . . . . . . . . . . . . . . . . . . . . . . . . . 16Box Contents . . . . . . . . . . . . . . . . . . . . . . . . . . . . . . . . . . . . . . . 5Changing the Scroll Control Preferences . . . . . . . . . . . . . 17Installation . . . . . . . . . . . . . . . . . . . . . . . . . . . . . . . . . . . . . . . . . . . . 6Lanyard Strap . . . . . . . . . . . . . . . . . . . . . . . . . . . . . . . . . . 17Downloading and Installing the iPad App . . . . . . . . . . . . . . . . . . 6Maintenance . . . . . . . . . . . . . . . . . . . . . . . . . . . . . . . . . . . . . . . . . . 18WinPlus Remote Software . . . . . . . . . . . . . . . . . . . . . . . . . . . . . 6WinPlus Remote Security Dongle . . . . . . . . . . . . . . . . . . . . 6Installing WinPlus Remote Software . . . . . . . . . . . . . . . . . . 6Installing the iPad Prompter Hardware . . . . . . . . . . . . . . . . . . . . 7Connecting the Controller Hardware . . . . . . . . . . . . . . . . . . . . . 8Connecting the iGlue . . . . . . . . . . . . . . . . . . . . . . . . . . . . . 8Connecting the iGlue - Lightning Connector . . . . . . . . . . . . 8iGlue Indicator LED . . . . . . . . . . . . . . . . . . . . . . . . . . . . . . . 9iPad Charging Through the iGlue . . . . . . . . . . . . . . . . . . . . 9Connecting the iScroll . . . . . . . . . . . . . . . . . . . . . . . . . . . . . 9Extending the iScroll Connection . . . . . . . . . . . . . . . . . . . 10Connecting Two iPad Prompters. . . . . . . . . . . . . . . . . . . . 10System Connections Overview. . . . . . . . . . . . . . . . . . . . . . . . . 11Configuration . . . . . . . . . . . . . . . . . . . . . . . . . . . . . . . . . . . . . . . . . 12WinPlus Remote Configuration. . . . . . . . . . . . . . . . . . . . . . . . . 12Upload Control . . . . . . . . . . . . . . . . . . . . . . . . . . . . . . . . . 131
SafetyImportant information on the safe installation and operation ofthis product. Read this information before operating the product.For your personal safety, read these instructions. Do not operatethe product if you do not understand how to use it safely. Savethese instructions for future reference.Warning Symbols Used in these InstructionsSafety cautions are included in these instructions. These safetyinstructions must be followed to avoid possible personal injury andavoid possible damage to the product.WARNING!Where there is a risk of personal injury or injury to others,comments appear supported by the warning triangle symbol.Where there is a risk of damage to the product, associatedequipment, process or surroundings, comments appearsupported by the word ‘Caution’.ELECTRIC SHOCKWhere there is a risk of electric shock, comments appearsupported by the hazardous voltage warning triangle.Intended UseThe WinPlus Remote system has been designed to provide an iPad based prompter control and display solution as part of a high qualityteleprompting facility for television broadcasting.The system is intended for use by television presenters and cameraoperators, installed within a television studio environment, or on outsidebroadcasts (OB) when equipment is protected from weather by asuitable waterproof cover.2Electrical ConnectionWARNING! Risk of electric shock. Always check cables forsigns of damage. Damaged cables can cause personal injuryand/or damage the equipment.CAUTION! The products must be connected to a powersupply of the same voltage (V) and current (A) as indicatedon the products. Refer to the technical specifications for theproducts.CAUTION! Only use the connecting cables specified for theproducts and certified for the country of use.CAUTION! Using alternative power sources will invalidatethe system EMC liability.Water, Moisture and DustWARNING! Protect the product from water, moisture anddust. The presence of electricity near water can bedangerous.WARNING! When using this product outside, protect fromrain using a suitable waterproof cover.Mounting and InstallationWARNING! Always ensure that all power and auxiliarycommunications cables are routed so that they do notpresent any danger to personnel. Take care when routingcables in areas where robotic equipment is in use.
Safety and About this GuideOperating EnvironmentCAUTION! The product should not be used outside theoperating temperature limits. Refer to the product technicalspecifications for the operating limits for the product.CleaningWARNING! Risk of electric shock. Always disconnect andisolate the product from the power supply before cleaning.CAUTION! Do not use solvent or oil-based cleaners,abrasives or wire brushes.MaintenanceWARNING! Servicing or repair of this product must only beperformed by qualified and trained electrical engineers.WARNING! The fitting of non-approved parts andaccessories, or the carrying out of non-approved alterationsor servicing can be dangerous and could affect the safety ofthe product. It may also invalidate the terms and conditionsof the product warranty.About this GuideThis guide describes the installation, configuration and operation of theWinPlus Remote system and associated products as part of an iPadbased prompting system.System RequirementsThe WinPlus Remote system has the following minimum requirementsto function correctly: A host PC running the WinPlus Remote software A WinPlus Remote USB security dongle installed on the host PC An iPad with the picoPrompt and picoScroll applicationspurchased and installed from the Apple App StoreSM A prompter hardware setup compatible with the iPad Access to a File Transfer Protocol (FTP) site An internet connection at the location of the host PC and the iPadprompter (minimum 2G connection standard for mobile data)3
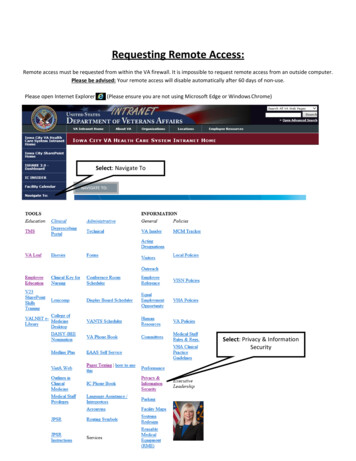
Components and ConnectionsiScrolliGlue112354234641Next page/story/marker button1Indicator LED2Previous page/story/marker button2iPad connector3Top of script/call script update button3Mini USB socket4Scroll control knob4Power and data socket5Lanyard attachment loop6Power and data socket
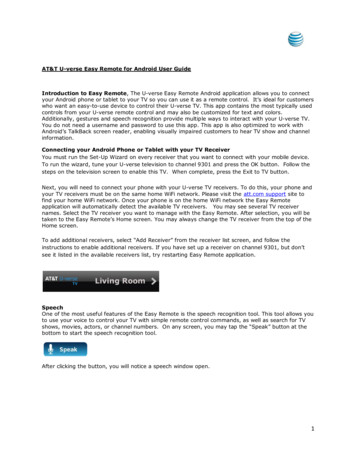
Components and ConnectionsBox Contents2136No.PartDescription1TC-REMTravel case (containing items 2 to 6)2IGLUEiGlue interface3ISCROLLiScroll hand control4MJ-PICO3.5 mm iGlue to iScroll connecting cable5WPI-KWinPlus Remote USB security dongle6A5000-5937WinPlus Remote software installation CD545
InstallationDownloading and Installing the iPad AppWinPlus Remote Security DongleFor the prompting system to function in partnership with picoPrompt, anapp must be downloaded and installed on the iPad/iDevice. The app iscalled picoPrompt prompting display appThe WinPlus Remote software will not function unless the suppliedsecurity dongle is used.The picoPrompt app is available for download from the Apple AppStore. It is developed and supported by Teleprompting TechniquesLimited.For more information on the configuration and operation of picoPrompt,refer to the picoPrompt handbook available for download fromwww.allaboutprompting.com.When prompted in step 5 of the installation procedure below, insert thesecurity dongle into a spare convenient USB socket on the host PC/laptop.Installing WinPlus Remote Software1. Insert the Autoscript software CD.2. Either use the AutoRun feature or browse the CD and install theWinPlus software (version uau9974.exe or later).WinPlus Remote SoftwareWinPlus Remote is a software and hardware application which enablesscripted text, which is imported into the WinPlus Software applicationrunning on a PC/laptop, to be exported via an FTP site to an iDeviceand then prompted.Changes to the scripted text are automatically uploaded to the FTP siteat a predetermined interval and can then be displayed on an iDevicewhich is also connected to the FTP site.To import scripted text and enable the script upload the minimumrequirements are: WinPlus software version uau9974.exe or later PC/laptop running Windows XP, Vista, 7 or 8 USB security dongle (WPI-K) An available USB port on the PC/laptop63. Follow the installation prompts. This will install the WinPlussoftware and drivers. Allow time for the installation to run fully.4. If the default installation location is not chosen, make a note ofwhere the application has been installed.5. Insert the WPI-K intoan available USB slot.
Installation6. The PC/laptop may ask for the drivers. In this case the HardwareWizard will launch. Select Browse my computer for driversoftware.Installing the iPad Prompter HardwareInstall the iPad and anyprompter hardware such as amounting system or hood ontothe camera support. Refer tothe specific manufacturers’documentation and safetyguidelines for additionalinformation.7. Browse to the installation location:a) If the default installation location was selected, browse to thepath: C:\Program Files (x86)\Pciwplus32U\AutoscriptDevice Drivers.b) If the default installation location was not chosen, browse tothe alternative location.8. Ensure that Include subfolders is selected.9. Click Next and follow the instructions to fully install WinPlus.7
InstallationConnecting the Controller HardwareThe iGlue is an interface adaptor which plugs into the 30 way dockconnector on the iPad.The iScroll hand control is specifically designedfor the prompter app picoPrompt running on the iPad.More recent versions of the iPad (4th generation onwards) have alightning connector and this requires an adaptor to connect the iGlue.Connecting the iGlueConnecting the iGlue - Lightning ConnectorCAUTION! Risk of product failure. Only use therecommended original Apple Lightning adaptors.When connecting the iGlue to an iPad fitted with a Lightning connector,an adaptor is required. Two adapters* are available from Apple:MD823ZM/ASolid enclosure adapterMD824ZM/A0.2 m adaptor cable* Only Apple 30-pin to Lightningproducts should be used.Failure to use Apple connectoradaptors may result in the lossof some functionality.MD823ZM/AMD824ZM/AThe iGlue can be connected to the iPad at any time(powered up or down).8
InstallationiGlue Indicator LEDConnecting the iScrollWhen the iGlue has been connected and the iPad is powered up, anLED will flash three times to indicate device authentication has beensuccessful and that the iGlue is active.The iScroll is connected to the iGlue by means of a 3.5mm jack cable(provided).MJ-PICOiPad Charging Through the iGlueA mini USB port is available on the iGlue for pass through charging.This enables a standard mini USB power supply to be connected to theiGlue to charge the iPad during prompting activities.9
InstallationExtending the iScroll ConnectionThe connection to the iScroll can be extended by up to 25 metres inlength using a suitable high quality 3.5 mm jack extension cable.25 m (82 ft)Connecting Two iPad PromptersTwo iPads running picoPrompt can be controlled by a single iScrolldevice by using a second iGlue, an additional MJ-PICO cable, and a 3.5mm jack cable splitter adaptor.MJ-PICO x23.5 mmSplitter10
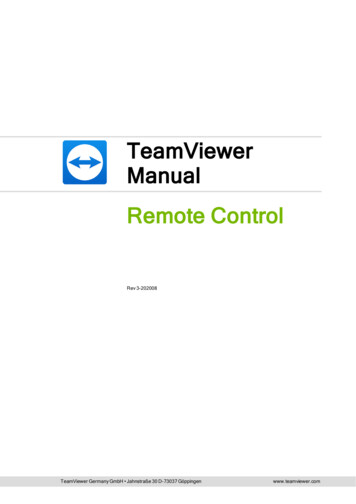
InstallationSystem Connections OverviewFTP SiteNewsroom/Studio ServerHost PC/LaptopInternetconnectioniPad Prompter ionWinPlus and WinPlusRemote installed andrunning with securitydonglepicoPrompt installed andrunning with iScroll connected11
ConfigurationWinPlus Remote ConfigurationWP-Rem Tab ConfigurationWhen WinPlus and the WPI-K dongle are installed, WinPlus Remotesettings can be configured. This is done via the WinPlus configuration.When the WP-Rem tab has been selected, all the settings relevant toWinPlus Remote can be configured or changed.1. To access the configuration, launchRemote FTPEnter the Username,Password and IP Addressor Hostname for the FTPsite.WinPlus from the desktop icon.2. To open the configuration window either click to select Options Configuration from the main menu, or click on the icon on theright side of the toolbar.3. All settings can be found under the WP-Rem tab in the WinPlusConfiguration.12Local FTPThese settings specify thedirectory on the local computerwhere the script or story fileswill be stored. This can be usedin conjunction with thepicoServe FTP server software,(available from Apple App Store, developed and supported byTeleprompting techniques Limited) which in turn interfaces withWinPlus Remote.WP-Rem Auto UploadThis function enables a scriptor individual stories to beuploaded at specified timeintervals to the FTP site.
ConfigurationUpload ControlThe Upload Control area on the WP-Rem tab is used to configure howscripts are sent and handled at the remote location.DirectoryThis field specifies the FTP directory to which the script or story file isto be sent. So, if required, script or story files created as a result ofdifferent Slugline Markers can be sent to different FTP directories.Base FilenameWhen the Mode is set to Single Script File, this parameter forms thebase part of the filename to which the date is appended. The resultantfilename is that used to save the script on the FTP site.When the Mode is set to Individual Story Files, only the first entry inthe Upload Control grid is used. This means that only one SluglineMarker is available and all the stories will be sent to the directoryspecified in the first row. The filename for each story is constructed fromthe Slugline text and not from the Base Filename.Slugline MarkerThis field is used to specify which stories are to be sent to the FTP site.When configured to upload the script as a single file, only the requiredstories are added to the file. If configured to upload individual stories,then only matching stories are sent to the FTP site.The Slugline Marker can be any number of characters and a positivematch will occur if the initial characters of the story Slugline match.Typically, the filter would be set to a character such as an asterix *. Allstories that have a Slugline starting with a * would then be included inthe script for upload to the FTP site.If the Slugline Marker field is blank, the filter is turned offand all stories will be included in the FTP transfer.Upload Control ButtonsThe Add, Edit and Delete buttons can be used to create, modify orremove entries from the Upload Control grid. Double clicking on anexisting entry will also invoke the Edit mode. The matching process is case sensitive. Some newsroom systems do not allow certain charactersto appear in the Slugline of story text. ENPS for exampledoes not allow any invalid filename characters. Although the configuration for WinPlus Remote is enabled,a USB dongle is required for all of the WinPlus Remotefunctions to become operational.13
ConfigurationFTP Logging EnabledEnabling this option will store allFTP activity to be logged into a filein the HistoryLog directory.The file will be named picoftplog****.txt, where **** is arepresentation of the date.Additional Save FeaturesAdditional script and story saving features are available by clicking toselect File Other Save Functions from the menu.Save Script To WP-Rem (Local*)This function saves the entirescript to the directory specified inthe Local FTP section of the WPRem tab. The default basedirectory is C:\picoPromptRootand the subdirectory is specifiedby the user. The script is saved as a .ppf file to be compatible with thepicoPrompt application. The user is prompted to enter a filename forthe script.Save Story To WP-Rem (Local*)This function saves a single storyto the directory specified in theLocal FTP section of the WPRem tab. The default basedirectory is C:\picoPromptRootand the subdirectory is specifiedby the user. The story is saved as a .ppf file to be compatible with thepicoPrompt application. The story filename will be constructed from theSlugline.* The local save functions are used in conjunction with the picoServeFTP server application (available from Apple App Store, developedand supported by Teleprompting techniques Limited) running on theLAN which interfaces to picoPrompt.14
ConfigurationSave Script To WP-Rem (Remote)This function saves the entirescript to the directory specified inthe Remote FTP section of theWP-Rem tab. The script will besaved as a .ppf file to becompatible with the picoPromptapplication. The user is promptedto enter a filename for the script.Save Story To WP-Rem (Remote)This function saves a single storyto the directory specified in theRemote FTP section of the WPRem tab. The story will be savedas a .ppf file to be compatiblewith the picoPrompt application.The story filename is constructedfrom the Slugline.15
OperationUsing the iScrollFunction ButtonsThe hand controller allows total freedom for the operator to movearound and discreetly control the speed of the prompted text. Theprompted text is controlled using a rotary knob for scroll control, with acentre stop. Three push buttons are provided for script and story controland configuration functions.The iScroll has three control buttons which perform the following defaultfunctions.Prompter Text ControlScroll ControlWith the default configuration settings, the script advances when theiScroll control knob is rotated clockwise and reverses when turned anticlockwise. Turning the knob further in either direction increases thescroll speed. The control knob is sensitive and requires minimummovement to have an effect. There is a stationary null point betweenforwar
WinPlus Remote Configuration When WinPlus and the WPI-K dongle are installed, WinPlus Remote settings can be configured. This is done via the WinPlus configuration. 1.To access the configuration, launch WinPlus from the desktop icon. 2.To open the configuration window either click to select Options Configuration. WinPlus Remote.