Transcription
Re-imagingCompactFlashCardsTutorialUG252 (v1.0) April 5, 2006R
RXilinx is disclosing this Document and Intellectual Property (hereinafter “the Design”) to you for use in the development of designs to operateon, or interface with Xilinx FPGAs. Except as stated herein, none of the Design may be copied, reproduced, distributed, republished,downloaded, displayed, posted, or transmitted in any form or by any means including, but not limited to, electronic, mechanical,photocopying, recording, or otherwise, without the prior written consent of Xilinx. Any unauthorized use of the Design may violate copyrightlaws, trademark laws, the laws of privacy and publicity, and communications regulations and statutes.Xilinx does not assume any liability arising out of the application or use of the Design; nor does Xilinx convey any license under its patents,copyrights, or any rights of others. You are responsible for obtaining any rights you may require for your use or implementation of the Design.Xilinx reserves the right to make changes, at any time, to the Design as deemed desirable in the sole discretion of Xilinx. Xilinx assumes noobligation to correct any errors contained herein or to advise you of any correction if such be made. Xilinx will not assume any liability for theaccuracy or correctness of any engineering or technical support or assistance provided to you in connection with the Design.THE DESIGN IS PROVIDED “AS IS” WITH ALL FAULTS, AND THE ENTIRE RISK AS TO ITS FUNCTION AND IMPLEMENTATION ISWITH YOU. YOU ACKNOWLEDGE AND AGREE THAT YOU HAVE NOT RELIED ON ANY ORAL OR WRITTEN INFORMATION ORADVICE, WHETHER GIVEN BY XILINX, OR ITS AGENTS OR EMPLOYEES. XILINX MAKES NO OTHER WARRANTIES, WHETHEREXPRESS, IMPLIED, OR STATUTORY, REGARDING THE DESIGN, INCLUDING ANY WARRANTIES OF MERCHANTABILITY, FITNESSFOR A PARTICULAR PURPOSE, TITLE, AND NONINFRINGEMENT OF THIRD-PARTY RIGHTS.IN NO EVENT WILL XILINX BE LIABLE FOR ANY CONSEQUENTIAL, INDIRECT, EXEMPLARY, SPECIAL, OR INCIDENTAL DAMAGES,INCLUDING ANY LOST DATA AND LOST PROFITS, ARISING FROM OR RELATING TO YOUR USE OF THE DESIGN, EVEN IF YOUHAVE BEEN ADVISED OF THE POSSIBILITY OF SUCH DAMAGES. THE TOTAL CUMULATIVE LIABILITY OF XILINX IN CONNECTIONWITH YOUR USE OF THE DESIGN, WHETHER IN CONTRACT OR TORT OR OTHERWISE, WILL IN NO EVENT EXCEED THEAMOUNT OF FEES PAID BY YOU TO XILINX HEREUNDER FOR USE OF THE DESIGN. YOU ACKNOWLEDGE THAT THE FEES, IFANY, REFLECT THE ALLOCATION OF RISK SET FORTH IN THIS AGREEMENT AND THAT XILINX WOULD NOT MAKE AVAILABLETHE DESIGN TO YOU WITHOUT THESE LIMITATIONS OF LIABILITY.The Design is not designed or intended for use in the development of on-line control equipment in hazardous environments requiring failsafe controls, such as in the operation of nuclear facilities, aircraft navigation or communications systems, air traffic control, life support, orweapons systems (“High-Risk Applications”). Xilinx specifically disclaims any express or implied warranties of fitness for such High-RiskApplications. You represent that use of the Design in such High-Risk Applications is fully at your risk. 2006 Xilinx, Inc. All rights reserved. XILINX, the Xilinx logo, and other designated brands included herein are trademarks of Xilinx, Inc.PowerPC is a trademark of IBM, Inc. All other trademarks are the property of their respective owners.Revision HistoryThe following table shows the revision history for this document.DateVersion04/05/061.0RevisionInitial Xilinx release.Re-imaging CompactFlash Cardswww.xilinx.comUG252 (v1.0) April 5, 2006
Table of ContentsPreface: About This GuideAdditional Resources . . . . . . . . . . . . . . . . . . . . . . . . . . . . . . . . . . . . . . . . . . . . . . . . . . . . . . . . 5Conventions . . . . . . . . . . . . . . . . . . . . . . . . . . . . . . . . . . . . . . . . . . . . . . . . . . . . . . . . . . . . . . . . . 5Typographical . . . . . . . . . . . . . . . . . . . . . . . . . . . . . . . . . . . . . . . . . . . . . . . . . . . . . . . . . . . . . 5Online Document . . . . . . . . . . . . . . . . . . . . . . . . . . . . . . . . . . . . . . . . . . . . . . . . . . . . . . . . . . 6Re-imaging CompactFlash CardsIntroduction . . . . . . . . . . . . . . . . . . . . . . . . . . . . . . . . . . . . . . . . . . . . . . . . . . . . . . . . . . . . . . . . .Cautionary Notes . . . . . . . . . . . . . . . . . . . . . . . . . . . . . . . . . . . . . . . . . . . . . . . . . . . . . . . . . . . .Requirements . . . . . . . . . . . . . . . . . . . . . . . . . . . . . . . . . . . . . . . . . . . . . . . . . . . . . . . . . . . . . . . .Procedure . . . . . . . . . . . . . . . . . . . . . . . . . . . . . . . . . . . . . . . . . . . . . . . . . . . . . . . . . . . . . . . . . . . .7778Setting Up the Files . . . . . . . . . . . . . . . . . . . . . . . . . . . . . . . . . . . . . . . . . . . . . . . . . . . . . . . . 8Creating a Checksum for an Image File . . . . . . . . . . . . . . . . . . . . . . . . . . . . . . . . . . . . . . 11Re-imaging CompactFlash CardsUG252 (v1.0) April 5, 2006www.xilinx.com3
R4www.xilinx.comRe-imaging CompactFlash CardsUG252 (v1.0) April 5, 2006
RPrefaceAbout This GuideMany Xilinx evaluation and prototyping boards are equipped with System ACE CompactFlash interfaces. This guide takes you through the steps necessary to safelyre-image a CompactFlash card.Additional ResourcesTo find additional documentation, see the Xilinx website at:http://www.xilinx.com/literature/index.htm.To search the Answer Database of silicon, software, and IP questions and answers, or tocreate a technical support WebCase, see the Xilinx website at:http://www.xilinx.com/support.ConventionsThis document uses the following conventions. An example illustrates each convention.TypographicalThe following typographical conventions are used in this document:ConventionMeaning or UseExampleCourier fontMessages, prompts, andprogram files that the systemdisplaysspeed grade: - 100Courier boldLiteral commands that youenter in a syntactical statementngdbuild design nameCommands that you select froma menuFile OpenKeyboard shortcutsCtrl CHelvetica boldRe-imaging CompactFlash CardsUG252 (v1.0) April 5, 2006www.xilinx.com5
RPreface: About This GuideConventionMeaning or UseExampleVariables in a syntax statementfor which you must supplyvaluesngdbuild design nameReferences to other manualsSee the Development SystemReference Guide for moreinformation.Emphasis in textIf a wire is drawn so that itoverlaps the pin of a symbol, thetwo nets are not connected.An optional entry or parameter.However, in bus specifications,such as bus[7:0], they arerequired.ngdbuild [option name]design nameA list of items from which youmust choose one or morelowpwr {on off}Separates items in a list ofchoiceslowpwr {on off}Vertical ellipsis.Repetitive material that hasbeen omittedIOB #1: Name QOUT’IOB #2: Name CLKIN’.Horizontal ellipsis . . .Repetitive material that hasbeen omittedallow block block name loc1loc2 . locn;Italic fontSquare brackets[ ]Braces { }Vertical bar Online DocumentThe following conventions are used in this document:Convention6Meaning or UseExampleSee the section “AdditionalResources” for details.Blue textCross-reference link to alocation in the currentdocumentRed textCross-reference link to alocation in another documentSee Figure 2-5 in the Virtex-IIHandbook.Blue, underlined textHyperlink to a website (URL)Go to http://www.xilinx.comfor the latest speed files.www.xilinx.comRefer to “Title Formats” inChapter 1 for details.Re-imaging CompactFlash CardsUG252 (v1.0) April 5, 2006
RRe-imaging CompactFlash CardsIntroductionCompactFlash cards can be reformatted and re-imaged to easily convey new or upgradedinformation to the embedded PowerPC processors within Virtex -II Pro and Virtex-4FPGAs on such boards as the ML310, ML410, ML421, and others.This guide is a step-by-step tutorial that takes you through the re-imaging procedure.These steps must be followed carefully to avoid unintended consequences, such as erasingthe contents of a drive other than the intended target. The dd command is a destructive deleteutility and can erase any hard drive. Xilinx takes no responsibility for lost data or damagedhard drives.Cautionary Notes1.To avoid losing the data on the CompactFlash card, always make a backup copy of thecard’s contents before reformatting.2.Device numbers sometimes change when a computer is restarted. Always verify thedrive number before reformatting and re-imaging to avoid reformatting your primarydrive. The reformat and re-image utilities do not check for improper use.3.Make sure that you are imaging the correct disk. Choosing the wrong disk numberwill result in the loss of data and/or an unbootable system on your host machine.4.Before removing the CompactFlash card from your CompactFlash adapter orPCMCIA slot, always properly eject the disk and wait for the message that indicates itis safe to remove the device. USB readers may not return a safe to remove message, inwhich case the device can be removed unless an error message or warning isdisplayed. Microsoft Windows 2000 or Windows XP CompactFlash or PCMCIA adapter attached to a computer Image file suited to the specific development board you are usingRequirements See Xilinx On Board (www.xilinx.com/xob) to navigate to the board-specificdocumentation pages that contain the pertinent image filesCommand line utilities dd and mount and checksum application Re-imaging CompactFlash CardsUG252 (v1.0) April 5, 2006See ww.xilinx.com7
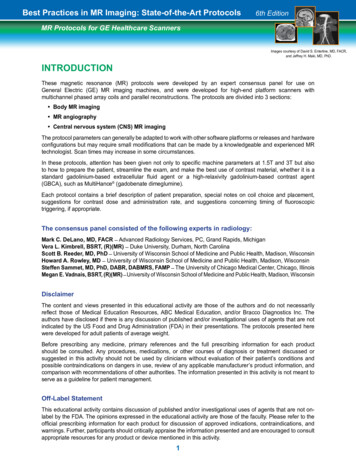
RProcedureProcedureTable 1 lists the files contained in the ug252.zip file that accompanies this user guide.Table 1:Files Included in ZIPNameDescriptioncygwin1.dllCygwin library required to run UNIX-style applicationsdd.exeDisk imaging executablemount.exeDisk mount executableumount.exeDisk unmount executablemd5sum.exeChecksum generation executableSetting Up the Files1.Make a backup copy of the CompactFlash card that you will be imaging.2.Download the utilities and image files that accompany this procedure. See“Requirements,” page 7.3.Extract the utilities and image zip files to a temporary directory. This tutorial uses adirectory called c:\imagetools. In this tutorial, the cf image.zip refers to the ZIPfile that contains the image to be transferred to the CompactFlash card. The image filefor your board might be named differently.4.(Optional) Run md5sum.exe on the image to calculate the checksums. See “Creating aChecksum for an Image File,” page 11.5.Determine the drive number of the CompactFlasha.Right-click My Computer Manage.b.Select Storage Disk ManagementIn the lower right window pane, locate the disk number of the CompactFlashdrive. In the example in Figure 1, the CompactFlash drive is Disk 2, Removable486 MB Online, with two partitions. On other systems the disk number and disksize are likely to be different.8www.xilinx.comRe-imaging CompactFlash CardsUG252 (v1.0) April 5, 2006
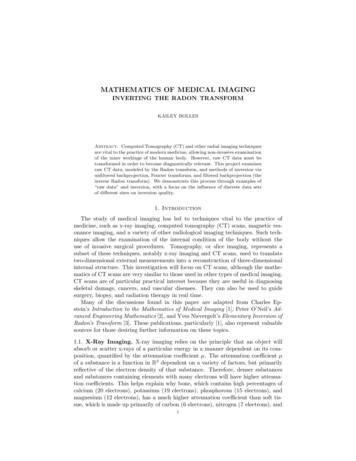
RProcedureCaution! Carefully review the system and determine the disk number of the CompactFlashdrive each time you re-image a device. Failure to do so can result in reformatting a disk drive,including the primary C drive.CompactFlash Disk NumberUG252 01 021606Figure 1: Locate the Disk Number6.Mount the CompactFlash card.Start a Windows command shell and CD to the temporary directory (imagetools in thisexample). Mount the CompactFlash card, replacing each x with your CompactFlashdisk number. (See step 5, page 8 for instructions on how to locate your CompactFlashdisk number.)mount -b -s -f //./PHYSICALDRIVEx /dev/hd0xIn the example in Figure 2:C:\imagetools mount -b -s -f //./PHYSICALDRIVE2 /dev/hd02UG252 02 021606Figure 2:Re-imaging CompactFlash CardsUG252 (v1.0) April 5, 2006Mount the CompactFlash Cardwww.xilinx.com9
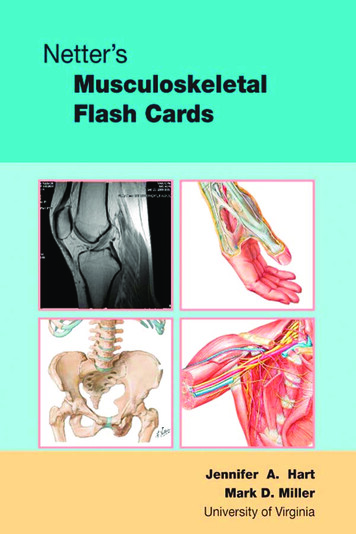
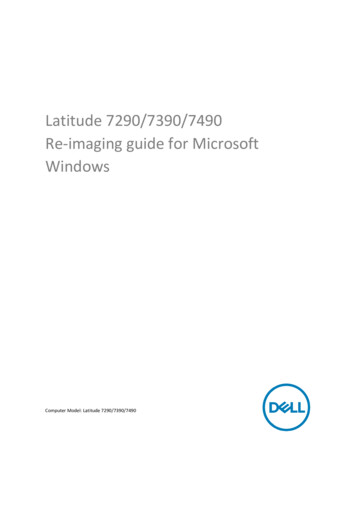
RProcedure7.Write the disk image to the CompactFlash card, again replacing the x with yourCompactFlash disk number.dd bs 256 if image filename of /dev/hd0xCaution! Failure to type the correct disk number will result in reformatting the wrong drive,even your primary drive. See step 5, page 8.In the example in Figure 3:C:\imagetools dd bs 256 if cf image.img of /dev/hd02UG252 03 021606Figure 3: Write Disk Image to the CompactFlash CardNote: Do not remove the CompactFlash card or close the command shell until the records inand records out are displayed, indicating the process if finished.8.Unmount the CompactFlash card, again replacing the x with your CompactFlash disknumber.umount -s /dev/hd0xIn the example in Figure 4:C:\imagetools umount -s /dev/hd02UG252 04 021606Figure 4:10Unmount the CompactFlash Cardwww.xilinx.comRe-imaging CompactFlash CardsUG252 (v1.0) April 5, 2006
RCreating a Checksum for an Image File9.Stop and/or eject the CompactFlash card before removing it to ensure data integrity.a.First, right-click on the CompactFlash drive and select Eject. Wait until a messageindicates it is safe to remove the card.UG252 05 021706Figure 5: Eject Hardwareb.Then, if using a PC card adapter, stop the CompactFlash hardware beforeremoving it from the PC. From the system tray, use the Unplug or Eject Hardwareicon.UG252 06 021706Figure 6: Stop or EjectCreating a Checksum for an Image FileChecksums are used to verify that a file has not been corrupted or modified. When creatingan image file, use the md5sum.exe file to generate a checksum. From a command line:md5sum.exe filename Copy the resulting output checksum, which is a 32-character hex number, into a text file(md5.txt, for example) and add it to the zip file along with the image. The checksumnumber can also be posted next to a link in a webpage.Re-imaging CompactFlash CardsUG252 (v1.0) April 5, 2006www.xilinx.com11
a. Right-click My Computer Manage. b. Select Storage Disk Management In the lower right window pane, locate the disk number of the CompactFlash drive. In the example in Figure 1, the CompactFlash drive is Disk 2, Removable 486 MB Online, with two partitions. On other systems the disk number and disk size are likely to be different.