Transcription
Epic Reference Guide – Medical StudentEpic Help . 4Contact the Help Desk . 4Haiku & Canto . 5Install Haiku on Android Phone . 5Install Haiku on iPhone . 6Install Canto on iPad . 7Using Netscaler for Remote Access . 8Netscaler for iOS & Android Devices . 8Installing Netscaler for Windows Explorer . 8Personalization & Setup.11Choosing Your Login Department . 11Log Out . 11Reviewing Your Patients Information From the Schedule .12The schedule . 12At-A-Glance Information In The Schedule . 12The Status Column Updates Automatically Through Events Triggered In The System . 13Update Patient Status on the Schedule (Dots) . 14Appointment Comment Column . 15Preview Pane. 15Search For Schedule Columns . 16Pre-Charting (FYI: Providers find this most helpful) .17HIPPA and Break-the-Glass .182019 Hospital National Patient Safety Goals: . 19MyCooper .20Find Patient Information Fast with Chart Search .21Try It Out. 21You Can Also. . 22Adding SmartTexts (student note templates) as Favorites . 23Additional Epic Tips .25Jump Start Routine Notes with Speed Buttons . 251
Search a Patient's Chart . 26Create Quick Filters in Chart Review . 27Patient Status on the Schedule (Dots) . 28Care Everywhere - Review clinical data from outside organizations . 29Useful SmartLinks .30Using SmartLinks . 31Allergies. 31Date and time . 31Demographics . 31Diagnoses . 32Future appointments . 32Generic reference to patient . 32Growth chart . 34Health Maintenance . 34History . 34Immunizations . 35Letters-related . 35Medications . 36Obstetrics . 36Orders . 36Patient instructions . 37Results . 37Visit information . 37Vitals. 37Navigation.39Navigate General Epic Workflows With The Keyboard . 39Navigate An Encounter With The Keyboard . 40Enter Dates And Times Using Shortcuts . 40Ambulatory - Glossary .41Activity . 41Activity Toolbar . 41Addendum. 41After Visit Summary (AVS) . 41Completion matching. 41Encounter . 41Epic button . 412
Filter . 42Flowsheet . 42Historical medication . 42Hyperspace . 42Hyperspace toolbar . 42In Basket pool. 42Macro . 42Log out vs. Secure . 43Mark as Done . 43Mark as Reviewed . 43Navigator. 43Patient header . 43Patient Lookup window . 43Report toolbar. 44Selection button . 44Sidebar . 44SmartLink . 44SmartLink/Phrase Butler . 44SmartList . 44SmartPhrase . 45SmartSet . 45SmartText . 45SmartTools . 45Staff message . 45Workspace . 453
Epic HelpContact the Help DeskIf you ever forget your Epic password or have a question about Epic, call the Help Desk.1. Call (856) 968-71662. If they ask you for your computer’s IP Address, here is how to find it:o All Programs Cooper Tools My Computer Info4
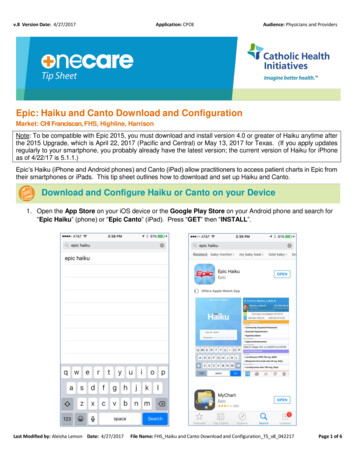
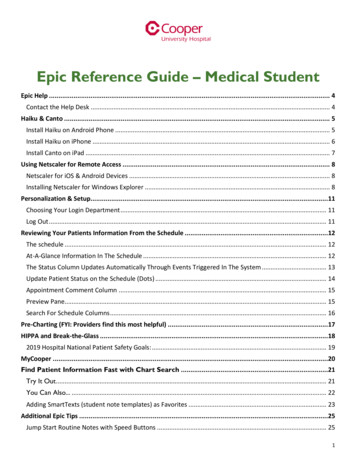
Haiku & CantoHaiku is Epic’s mobile app for Android or iOS phones. Canto is Epic’s mobile app for use with the Apple iPad.Install Haiku on Android Phone1. Enter the Play Store2. Search for Haiku and select Epic Haiku3. Install Epic Haiku and then open the app4. Once the app is open, select the 3 dot menu5. Select Settings6. Enter the following settings:a. Server: mobileapps.cooperhealth.edub. Path: Haiku-mobilec. HTTPS: check the boxd. Remember User ID: check the box if you want the app to remember your user ID each time7. Select Back to return to the log in page8. Enter your user ID and password and select Log In5
Install Haiku on iPhone1. Go to the App Store2. Search for Haiku and select Epic Haiku3.4.5.6.Install Epic HaikuGo to Settings from the Home screenFind Haiku in the list of appsEnter the following settings:a. HTTPS: slide to On (green)b. Server: mobileapps.cooperhealth.educ. Path: Haiku-mobile7. Find and launch the installed Haiku app from your Home screen8. Enter your user ID and password and select Go6
Install Canto on iPad1. Go to the App Store2. Search for Canto3.4.5.6.Install Epic CantoGo to Settings from the Home screenFind Canto in the list of appsEnter the following settings:a. HTTPS: slide to On (green)b. Server: mobileapps.cooperhealth.educ. Path: Haiku-mobile7. Find and launch the installed Canto app from the Home screen8. Enter your user ID and password and select the Go arrow7
Using Netscaler for Remote AccessNetScaler is an application system which provides remote access to your Cooper applications and E-mail, aswell as the Cooper Portal.Netscaler for iOS & Android DevicesNetscaler can be accessed on iPhone, iPad and Android devices.1. Go to the App Store (iOS) or Play Store (Android) and download the Citrix Receiver app.2. Enter the following General settings for the Citrix Receiver:a.b.c.d.e.Host: Remote.Cooperhealth.eduUser Name: Cooper User Name (Last-First)Password: Cooper PasswordDomain: CHSMAILSecurity Token: Default settingIf you have any issues with the Citrix Receiver, please uninstall and re-install the appInstalling Netscaler for Windows Explorer0. Open Internet Explorer and type in the NetScaler URL: http://remote.cooperhealth.edu1. Enter Cooper Username and Password2. Review the next screen regarding the download to check your system for compatibility8
3. ANALYSIS INSTALLATION: Select Install and follow the instructions. Then select Finish.4. CLIENT DOWNLOAD AND INSTALL: Select the checkbox and click Download.ActiveX Prompt: If prompted to run ActiveX Control add-on, click on the Information Bar(at the top of the page) and select Run ActiveX Control from the menu.5. Once you are logged in, take note of the two tabs at the top: Applications and Desktopa. Applications- this tab will give you access to the applications that you have access to9
b. Desktop- this tab will give you access to Windows Desktop, which acts as a remote computersession that mimics a generic Cooper computer with Microsoft Office and access to work filesIf you have any questions or concerns, please contact our Helpdesk at (856)-968-716610
Personalization & SetupChoosing Your Login DepartmentWhen you first log into Epic, you will see a red stop sign in the Department field. This means that thedepartment is a required field.1. Click the magnifying glass in the Department field, allowing search for the appropriate department2. Your login department will differ depending on if you are logging into the inpatient or ambulatoryenvironment.3. Your login department is the location where you are working. This would include the mnemonic forthe location and the specialty.i. For example: Nephrology staff may select KHM Nephrology (Cherry Hill), NESNephrology (Mannington), GRA Nephrology (Thorofare), etc.Anyone currently working in the ambulatory office will be able to tell you what to typeat the department prompt. It is important to log onto the correct department!Log OutAlways remember to Log Out/Swipe Out when you are ready to step away from the workstation! This helps tomaintain patient confidentiality. In addition, you do not want another user to do anything in Epic with your logon information.11
Reviewing Your Patients Information From theSchedule Quickly review and find meaningful patient information from the schedule.The schedule You can review high level information about an individual patient Reports: review pertinent results or reminders regarding the patient from the SnapShot report. Can customize which reports are available as buttons using the wrench iconAt-A-Glance Information In The ScheduleAbsorb patient and appointment information. Color-coded statuses tell you where yourpatients are in their visit.To view your calendar and department folders, select the arrow next toYou can pin the calendar and folders to the side by clicking the pushpin. To hide the calendarand folders just click the pushpin again.12
The Status Column Updates Automatically Through EventsTriggered In The SystemWaiting status, may appear if the patient is waiting to be roomed, once the MA and/orprovider documents on the encounter the status will update auto
2. Your login department will differ depending on if you are logging into the inpatient or ambulatory environment. 3. Your login department is the location where you are working. This would include the mnemonic for the location and the specialty. i. For example: Nephrology staff may select KHM Nephrology (Cherry Hill), NES