Transcription
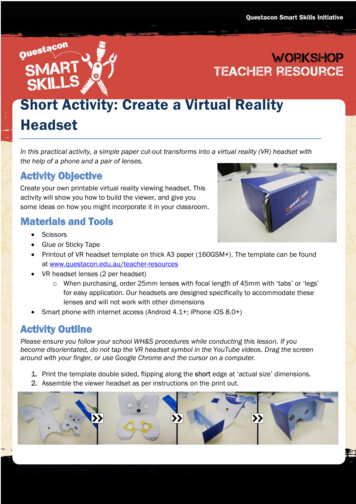
Short Activity: Create a Virtual RealityHeadsetIn this practical activity, a simple paper cut-out transforms into a virtual reality (VR) headset withthe help of a phone and a pair of lenses.Activity ObjectiveCreate your own printable virtual reality viewing headset. Thisactivity will show you how to build the viewer, and give yousome ideas on how you might incorporate it in your classroom.Materials and Tools ScissorsGlue or Sticky TapePrintout of VR headset template on thick A3 paper (160GSM ). The template can be foundat www.questacon.edu.au/teacher-resourcesVR headset lenses (2 per headset)o When purchasing, order 25mm lenses with focal length of 45mm with ‘tabs’ or ‘legs’for easy application. Our headsets are designed specifically to accommodate theselenses and will not work with other dimensionsSmart phone with internet access (Android 4.1 ; iPhone iOS 8.0 )Activity OutlinePlease ensure you follow your school WH&S procedures while conducting this lesson. If youbecome disorientated, do not tap the VR headset symbol in the YouTube videos. Drag the screenaround with your finger, or use Google Chrome and the cursor on a computer.1. Print the template double sided, flipping along the short edge at ‘actual size’ dimensions.2. Assemble the viewer headset as per instructions on the print out.
3. With your smart phone, visit YouTube and search for “Step inside the Large Hadron Collider(360 video)”.a. Once the video starts, tap the VR headset icon (circled yellow in the image below).b. You will need to calibrate your phone to your headset the firsttime you use it. After pressing the VR icon, press the settingsbutton (the cog) on the top right of the video, select “Headset,”and then “Scan QR Code,” and scan the image on the rightusing your phone’s camera, this code will provide the exactdimensions of your headset, to correctly position each imageon your phone screen.4. Place the phone into the front of your headset viewer and bring it to your eyes. Rememberto tap the cardboard headset icon before you put it into your own headset.5. With the headset over your eyes, move your head and the headset about to look aroundwhile the video plays.6. If the image is unclear or doubled when viewing through the headset, you may need totweak your calibration. Refer to Appendix A (below) for troubleshooting details.
Further InvestigationThe VR Headsets can be used to explore a range of VR applications and videos with an educationalfocus and support your lessons. The list below is a great place to start.Apps to download:a) Google Expeditions – Designed for classrooms, you become the guide while yourstudents look through their headsets at 360 photos from all over the world. With eachlocation there are several topics which can be discussed, each with a description thatcan be read out and the ability to highlight to the students where they should be looking.b) Cardboard Camera – Take photos of interesting places in 360 format and share! Askstudents to share a location special to them by getting them to take a 360 photo.YouTube has some fantastic options; search for “virtual reality video,” “VR video,” or “360 Video.”There are heaps of videos available, which cover topics including Earth Sciences, Biology, Design,and Technology!Here are some we recommend:a) Cellscape VR –Tour the inside of a human cellb) Virtual Plant Cell Cell Explore – Choose your own adventure of the plant cellc) Explore the Solar System by Crash Course – Guided tour of the solar systemd) Step inside the Large Hadron Collider (360 video) - BBC Newse) Mythbusters 360 - various videos of their experiments and behind the scenesInnovate!Some apps require a button to interact. Challenge your students to modify headsets using simplematerials to incorporate a functional button (Here’s some inspiration from YouTubewww.bit.ly/qssiVRbutton for inspiration). You could even make your own headsets and lenses froma plastic drink bottle (www.bit.ly/qssiVRbottle).
Curriculum LinksOur resources provide a framework for classroom activities and lesson plans that link to theAustralian Curriculum in both the Science, and Design and Technology streams. Some of thesecurriculum links are highlighted below.Science Inquiry SkillsScience Inquiry Skills can beincorporated across all yearlevels depending on the typesof videos chosen. The varietyof Mythbusters videos areuseful for further inquiry.Science as a Human EndeavourThe diversity of free VR videos canlink to Science as a HumanEndeavour Strand. Topics to do withthe development of the sciencefields can be supported byinformation in Expeditions.Year 7:Expeditions: ACSHE223, ACSHE120Mythbusters: ACSHE121Year 8:Expeditions: ACSHE134, ACSHE226Hadron Collider: ACSHE136Year 9:Mythbusters: ACSHE157, ACSHE160,ACSHE228Hadron Collider: ACSHE158Year 10:Mythbusters: ACSHE192, ACSH194Design and TechnologiesProcesses and Production SkillsBuilding and modifying headsets provides hands-onengagement and skills and aligns with projectmanagement, design, and production with emphasison evaluation while calibrating the device.Years 7 & 8: ACTDEP036, ACTDEP039Years 9 & 10: ACTDEP049, ACTDEP050Science UnderstandingThe diversity of topics thatMythbusters cover mean that anarray of subjects could be exploredand discussed in further depth afterwatching the video in VR.Year 7:Mythbusters: ACSSU113, ACSSU115,ACSSU117Year 8:Mythbusters: ACSSU149Hadron Collider: ACSSU155Cells: ACSSU150Year 9:Mythbusters: ACSSU175, ACSSU177,ACSSU178Year 10:Mythbusters: ACSSU185, ACSSU187,ACSSU229Space: ACSSU188Design and TechnologiesKnowledge and UnderstandingFacilitating further discussion after watching VR videos(such as the Mythbusters series) could focus on theimpact cultural, financial, ethical and social factorscould have on the environment, food and materialresources depending on the experiment.Years 7 & 8: ACTDEK029, ACTDEK031, ACTDEK032,ACTDEK033Years 9 & 10: ACTDEK040, ACTDEK041, ACTDEK043,ACTDEK044, ACTDEK045, ACTDEK046, ACTDEK047Any questions? Just email teachers@questacon.edu.au.
Appendix ACalibrationIf you are experiencing doubled or out-of-focus images, try the following steps:1. Check that the phone is centred in the viewer. Try holding the phone itself, not the headset.2. The headset is sensitive to slight misalignments. Be precise with the fold lines whenconstructing the headset and double check the tabs of the headsets are securedaccurately.3. If the cardboard is bending slightly, the lenses may be pushed out of alignment. Tryreducing the pressure on the headset, or lightly squeezing edges to realign.4. When printing, select the printing option print “actual size” instead of “fit to page.” Thisshould result in a headset that matches the QR code we’ve provided!If you’ve tried these steps and still experience blurry images, you might need to customise thecalibration code to the dimensions of your printout. The QR code we provided containsmeasurements accurate to the millimetre for the headset, but they can vary from printer to printer,or from one printing material to the next.Measuring and generating a new calibration code is easy. Using a computer, generator.The help button provides comprehensiveinformation on which parts of your headset printout you’ll need to measure.We recommend measuring a fresh printout rather than an already constructed headset. Measureand adjust the values at the webpage above, and see the effects live in your constructed headset.For reference, our measurements are as follows: Screen to lens distance: 47mm Inter-lens distance: 60mm Screen vertical alignment: Bottom Tray to lens-centre distance: 35mm K1 distortion coefficient: 0.150 K2 distortion coefficient: 0.030
around with your finger, or use Google Chrome and the cursor on a computer. 1. Print the template double sided, flipping along the short edge at ‘actual size’ dimensions. 2. Assemble the viewer headset as per instructions on the print out.