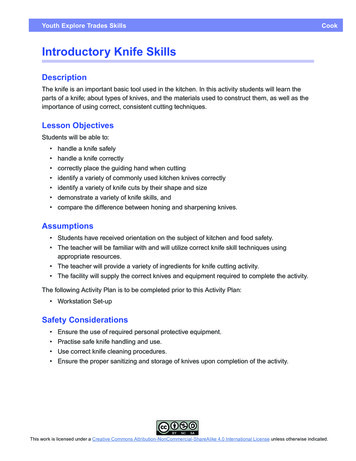
Transcription
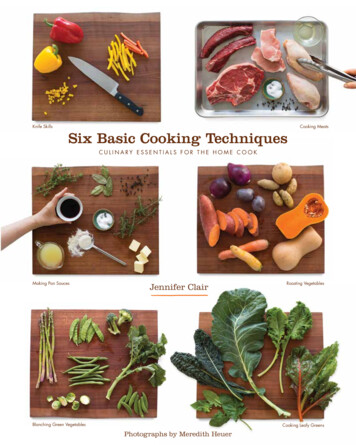
Knife SkillsCooking MeatsSix Basic Cooking TechniquesCULINARY ESSENTIALS FOR THE HOME COOKMaking Pan SaucesJennifer ClairBlanching Green VegetablesRoasting VegetablesCooking Leafy GreensPhotographs by Meredith Heuer
Six Basic Cooking TechniquesSee cover file
Six Basic Cooking TechniquesPEOPLE?CULINARY ESSENTIALS FOR THE HOME COOKJennifer ClairPhotographs by Meredith HeuerString Beans with Gremolata - Pg TK
Table of ContentsCopyright 2017 by Jennifer ClairAll rights reserved. No part of this book may be reproduced in any form or by any electronicor mechanical means, including information storage and retrieval systems, without permissionin writing from the author. The only exception is the use of brief quotations in a book review.Photographs by Meredith Heuer, meredithheuer.comMaking Friends with Your Chef’s KnifeCooking Meat to PerfectionMince, chop, and slice like a pro.Make restaurant-quality meals in your own home.0000Book design by Dan Weise, thundercut.comPrinted in the United StatesFirst Printing: 2017HCNY Press158 Grand StreetNew York, NY 10013www.homecookingny.comHCNY Press is a division of Home Cooking New York, LLCISBN 978-0-9989792-0-5Making Pan SaucesRoasting VegetablesIt’s all about the fond.Coax out their natural sweetness.0000Blanching Green VegetablesCooking Leafy GreensVivid and crisp-tender every time.Listen to your mother and “eat your greens.”0000E-ISBN 978-0-9989792-1-2Library of Congress Control Number: 2017915302For my mother, Phyllis Herman,who prepared home-cooked mealsevery night of my childhood, with love.Recommended Kitchen EquipmentHaving the right tools really makes a difference005
Recipes to Practice Your Cooking TechniquesKNIFE SKILLSThe Best Vegetable Soup You’ll Ever Make00MEATS AND PAN SAUCESSteak with Classic Red Wine Sauce00Pan-Roasted Chicken with Sherry-Thyme Gravy00Pan-Roasted Lemon-Rosemary Chicken00Chicken Piccata with Capers and Caramelized Lemons00Pork Tenderloin with Bacon-Apple Cider Pan Gravy00Pork Chops with Grape-Rosemary Reduction00Fresh Green Herb Sauce00Fluffy Mashed Potatoes00ROASTED VEGETABLESRosemary-Roasted Potatoes, Butternut Squash, and Red Onion00Curry-Roasted Delicata Squash00Smoky Sweet Potato Fries00Roasted Ratatouille with Olives and Basil00Roasted Cauliflower with Tomatoes and Capers00Chile-Roasted Broccoli with Garlic00BLANCHED GREEN VEGETABLESSnappy Peas with Orange Sesame Butter00Garlicky Broccoli Rabe00Asparagus with Orange-Smoked Paprika Vinaigrette00Broccoli Amandine (with Toasted Almonds)00Brussels Sprouts with Bacon, Red Onion, and Toasted Pecans00String Beans with Lemon Gremolata00LEAFY GREENS6Garlicky Broccoli Rabe with Chickpeas - Pg TKTuscan Kale with Almonds and Raisins00Swiss Chard Puttanesca00Gingery Bok Choy with Tomatoes and Sesame00Escarole with Cannellini Beans00Creamy Lemon Spinach00Braised Collard Greens with Bacon and Onions007
IntroductionYou are holding a cookbook that has been informed by thousands of home cooks justlike you who have taken this Six Basic Cooking Techniques class at our cooking school.That school is Home Cooking New York, in downtown Manhattan, where this has beenour best-selling class since 2002. So, behold! Our first cookbook -- an encapsulation ofthese six vital techniques interwoven with the questions and answers that pepper a liveclass, so you can benefit from years of student queries. Their voice is your voice, andwe have made sure that it is loud and clear throughout the book’s chapters, each onehighlighting a cooking technique that is instrumental to a solid culinary foundation.We made sure the photographs clearly illustrate each technique, as if you were inthe classroom with us. The recipes were written with home cooks in mind, so you canpractice these six techniques while simultaneously cooking delicious meals for yourself(and lucky loved ones). The “Students Ask” and “Chefs Say” columns in each chapteralso grant you inside access to the types of Q&A and kitchen advice that is coveredduring our cooking classes. We hope that every page of this book answers a culinaryquestion you didn’t even know you had. After years of teaching, we’ve heard them all-- and collected them here -- just for you.8Steak with Red Wine Reduction - pg xxHanger Steak with Green Herb Sauce - pg TK9
MakingFriends withYourChef’s KnifeIt is no surprise that this is the first chapterof the book. Every home-cooked mealbegins with the grip of your chef’s knifeas you mince, chop, and slice your way todinner. So grab hold of the most importanttool in your kitchen and let’s learn how toget along.Materials8-inch chef’s knifeCutting board(we prefer wood or bamboo)Handheld 2-stage sharpenerSerrated knife3 1/2-inch paring knifeChoosing a Chef’s KnifeTHINGS TO KEEP IN MIND A knife is a lifetime investment, so don’t be discouraged that a good chef’s knifemay run you upwards of 70. You only really need 3 good knives to cover mostkitchen tasks: An 8-inch chef’s knife, a 3 ½-inch paring knife, and a serrated knife(for thick-skinned foods like bread, bagels, and tomatoes). The best chef’s knives are made from hefty high-carbon steel, a strong metal thatprovides durability and a sharp edge that lasts longer than lower-priced knivesmade from softer stainless steel. Make sure your knife also has a “full tang,”meaning the metal goes through the entire handle. If you can see metal rivetsalong the handle or a strip of metal running along the top of the handle, it hasa full tang. Remember, you only need to buy ONE good chef’s knife in your lifetime,so make it count!BRANDS WE LIKE:10Six Basic Cooking TechniquesWusthof, Henckels, Mundial.11
CHEFS SAYSharpeningCHEFS SAY:Stabilize your cutting board.To prevent your board from moving while youare chopping, place it on top of a single, wetpaper towel or a reusable rectangle of non-slipdrawer liner. A steady board makes for saferknife work.Since it is easier to cut yourself with a dull knife (it doesn’t go where you are aimingit), you need to own one sharpening tool to keep your knife’s edge in good shape.(You can also have your knife professionally sharpened at a cookware store; mostof them offer this service.) For home cooks, we recommend a handheld 2-stagesharpener. With this, you’ll have a new edge on your knife in a few minutes.Please note: This is only for smooth, straight-edged knives; do not sharpen a serratedknife with this sharpener or you will mar its scalloped edge. Also, good sharpeningis not easy on the ears; expect to hear the jarring sound of grinding metal in orderto create a new “edge” on your knife.1. Hold your knife horizontally andusing gentle pressure, pull itthrough the 2 slots (stage I thenstage II), from the heel to the tipof the knife, 10 times each.CHEFS SAY:Steady round food.2. Make sure to press down firmlyon the knife during the wholeprocess, so the entire blade issharpened evenly. The first slotshaves fine metal filings from theknife and the second slot smoothsit down for a finished edge.For rounded ingredients (like onions, potatoes, andzucchini), cut a small slice off one side (or just cut inhalf) so they lay flat on the cutting board for a stablecutting foundation.CHEFS SAY:Don’t mince basil, mint, or sage.These delicate herbs turn black (oxidize) withevery cut of the knife. To avoid ending up witha pile of blackened herbs, make a chiffonade(pg xx) instead. This creates thin ribbons ofherbs that maintain more of their green color.12Six Basic Cooking Techniques13
HoldingResist the temptation to extend your indexfinger out over the top of the blade. Ratheruse it with the thumb to pinch either sideof the top heel (widest part) of the knifeblade, just forward of the handle (this willgive you the most control over the blade).The remaining 3 fingers should cradle theunderside of the handle itself.Slicing SafelyMincing1. ALWAYS hold your knife with the tipsafely positioned downward.2. When slicing, the knife should ALWAYSmove in a forward motion, never backtoward your body (to avoid jamming thehandle into your gut) and never verticallystraight up and down off the cuttingboard, which dulls the blade when itlands flat on the board.3. When you are holding something tobe cut, ALWAYS tuck your fingertipsunder and pop your knuckles out, so theside of the blade rubs against yourknuckles keeping your fingertips safe.ATTE N TION!THIS IS NOT A KNIFE SHARPENER!Contrary to a whole lot of popular belief, this longhoning steel does not actually sharpen your knife.Instead, it is designed to straighten the edge ofyour knife in between sharpenings (over time, aknife’s fine edge will bend with normal use). Usingthe steel can temporarily make your knife feelsharper (further compounding this confusion) whenactually your knife is just straighter.14 Place your ingredients in the center of a cuttingboard. Place the palm of your left hand (or right,if you are left-handed) on the back of the knife’stip with the fingers extended straight out. Place the ingredients to be minced under the back3 inches of the knife; this is where the greatestcutting force is exerted and the part of the knifethat makes solid contact with the cutting board.Do not place food under the front tip of the knife,which pops up when the knife is level with theboard. Cut down with a rapid chopping motion. Don’tlet the front of the blade lose contact with thecutting board (your palm will remind you to keepit down). As the pieces scatter, use the knife’s edge(you won’t damage it) to gently scrape them backto the center of the board and continue mincinguntil the ingredients are the size you want.Fresh herbs should be minced until they fall like snowwhen sprinkled. Garlic should be minced into 1/4inch pieces; mince more finely if using raw. To minceginger, first slice into coins, then finely mince to breakdown its fibrous material.15
STUDENTS ASKSTUDENTS ASK:How often do I sharpen my knife?The best test is to sharpen your knife right now.Then cut something up. Doesn’t that feel amazing,how easily it glides through? That is how yourknife should always feel. You cannot over-sharpenyour knife, so sharpening it will never be thewrong decision.STUDENTS ASK:How do I remove the smell of garlic frommy hands?Garlic’s potent scent lies in its sticky oils and needsa good scrub with an abrasive to remove it, alongwith hot water and soap. Your best bet is thescrubby part of the sponge, rubbing each fingertipagainst the coarse texture to remove the fragrantoil. Rubbing your hands against a cut lemon orsomething stainless steel (under running water)also does the trick.STUDENTS ASK:How do I keep from crying when cuttingan onion?16We have tried it all (putting the onion in thefreezer, wearing goggles), but if you aresensitive to onion’s sulfuric fumes, your tears aregoing to flow. Our method for chopping onionsis quick and efficient (see page xx), so cryingtime is at a minimum. If you are particularlysensitive, makes sure to rinse your cutting boardand knife after cutting an onion, so the fumesdon’t continue to make you tear up.Six Basic Cooking Techniques17
Julienning and DicingCutting an Onion1. Cut the onion in half from top tobottom (so a small piece of the rootend is attached to both halves).2. Place the halves, cut-side down, ona board. Cut off the tip of the stemend so you have a small corner tomore easily peel back the papery skin.1. Slice the vegetableslengthwise (you cancut long vegetables likecarrots and zucchini inhalf first to make themmore manageable).2. Stack a few slices on topof each other and slicethem into rectangularpieces, the same widthas their height, called“julienne.”3. Gather the matchstickstogether and chopcrosswise into cubes,called “dice.”Making a ChiffonadeThis technique for making thin strips of leaves is primarily used when cutting herbs thatneed a gentle touch -- like basil, mint, and sage -- to prevent these oxidizing leaves fromturning black. Mincing is too rough on them, and only results in a pile of blackened herbs.It is also helpful for cutting large cooking greens -- like Swiss chard, kale or collards -down to size for cooking (see “Shredding the Leaves,” pg TK).3. With the root end away from you,make lengthwise cuts all the waythrough to the board, leaving about1/4-inch of the onion still attachedat the root (back) end; this will hold theonion together in one piece as youdice it.4. Rotate the onion 90 and cutperpendicular to the cuts you justmade, to make diced onion.181. First, stack severalleaves on top of eachother, with the largeston the bottom.2. Roll them up crosswise.3. Thinly slice crosswisefrom one end of the rollto the other.19
CHEFS SAY101CHEFS SAY:Garlic skin begone.To remove the tight, papery skin from garlic cloves, find anobject with a flat base (the flat edge of your knife, an olive oilbottle, a can of beans) and gently crush it. When the skin splits,you can easily remove it in one piece. Remove the woody basefrom the clove before mincing.8927CHEFS SAY:Peeling ginger is optional.Really! The thin, papery skin is flavorless and you will never detectit after it is finely minced. You can trim away any particularly roughappendages and dried areas, but otherwise, just wash the gingerbefore slicing and mincing.6345CHEFS SAY:Mise en place!This is a popular French culinary term, which translates to“put everything in its place.” Before you start cooking, haveall your ingredients chopped and measured and “in theirplace,” in bowls or arranged on your cutting board. Thenyou can act like you’re on cooking show, throwing this andthat into your pan as you effortlessly cook your dish. This isa cooking game changer.CHEFS SAY:Visual Glossary of Knife Cuts1M I N C E D PA R S L E Y5JULIENNED PEPPER910 Z U C C H I N I H A L F - M O O N S2MINCED GARLIC6DICED PEPPER3DICED ONION7DICED CARROT4JULIENNED CARROT8BASIL CHIFFONADESLICED ONIONCan I use my garlic press to mince garlic?No, unless you are going to use that garlic raw (as in a saladdressing or to make gremolata (see pg xx). The aromatic oils storedinside garlic are sensitive to heat, so pressed garlic will quicklybrown in hot oil, marring the sharp, pungent flavor for which it isbeloved.20Six Basic Cooking Techniques21
The Best Vegetable Soup You’ll Ever MakeWe make this soup during our Knife Skills 101 class, adding each vegetable to the potas students finish practicing on them. It is a great excuse to practice your own knife skills.Consider it a delicious final exam. You can omit a few of these vegetables if you don’tfeel like chopping 8 different vegetables. But don’t skimp on the anchovies or ParmigianoReggiano cheese rind; they are essential to the deep flavor of this soup.SERVES 84 tablespoons extra-virgin olive oil,plus more for drizzling1 medium onion, diced small1 fennel bulb, cored and slicedvery thin3 cloves garlic, minced3 anchovy fillets(or 1 teaspoon miso paste)2 teaspoons minced rosemary2 large ripe tomatoes, cut into1-inch dice or one 14-ouncecan diced tomatoes1 red, orange, or yellow bell pepper,julienned2 medium carrots, cut in thirds andjulienned2 medium turnips or potatoes1. In a large, heavy soup pot, heat the oil over medium-highheat. Add the onions and fennel and cook untiltranslucent, about 5 minutes. Add the garlic, anchovies,and rosemary, and cook until the garlic starts to color andthe anchovies have begun to dissolve, about 2 minutes.Add the tomatoes, pepper, carrots, turnips, beans, broth,wine, cheese rind, and 1 teaspoon salt. Add enoughbroth so the liquid level is 1 inch below the top ofthe vegetables.2. Bring to a boil, then reduce heat to medium-low, andsimmer, covered, until all the vegetables are tender, atleast 25 minutes. Add the kale after 15 minutes ofcooking, to preserve its color and texture. Discard thecheese rind and stir in the lemon juice. Season to tastewith salt, pepper, and more lemon juice, as needed toperk it up.3. Serve the soup hot or at room temperature with ahealthy drizzle of olive oil and a very generous gratingof Parmigiano-Reggiano cheese.(about ½ pound), peeled and cutin ½-inch dice1 14-ounce can cannellini beans,drained but not rinsed1 quart chicken broth, as needed½ cup white wine (optional)1 2-ounce piece ParmigianoReggiano cheese, rind removedand reserved, cheese shaved witha vegetable peeler22PA RM I G I A N O - R E G G I A N O VS. PA R M E SA N C H E E SEParmesan cheese is a hard, salty, dry-aged cow’s milkcheese. Parmigiano-Reggiano is the king of this cheesevariety; it is made exclusively in Italy and aged for atleast 2 years. Its nutty flavor and granular texture areincomparable to domestic Parmesan, which is aged formuch less time. Please avoid the non-refrigerated, gratedParmesan sold in supermarkets; it contains a fair amountof non-cheese additives. Look for Parmigiano-Reggianoin the cheese department, with its name stamped on therind, so you know you are buying the real thing. It isworth making a staple in your refrigerator.Six BasicTechniques TheCookingBest VegetableSoup You’ll Ever Make23
CookingMeat toPerfectionA perfectly cooked piece of meat is wellwithin the reach of every home cook. Allyou need is a little know-how (all includedin this chapter) and an instant-readthermometer. The days of poking your steakor slicing it open to see if it’s “done” areover. It’s time to cook meat like a chef.Materials12-inch stainless steel sauté pan(with a metal handle)TongsInstant-read thermometerCutting board with a wellIngredientsMeat(steaks, chops, tenderloins,chicken pieces on the bone)High-temperature oil(see pg TK)Kosher salt and a pepper mill24Steak with Red Wine Reduction - pg xx25
Preparing1. M A K E SU R E T H E M E AT I S D RY.If not, remove from its wrapping and let itair-dry, uncovered, on the counter (up to 2hours) or the refrigerator (up to 24). Iftime is of the essence, you can blot it drywith paper towel.2. SE A SO N W E L L W I T H SA LT A N D P E P P E R .“Season high” (about 8 inches above themeat for an even coating, and onlyseason one side to start. You’ll place themeat seasoned-side down in the hot panand then continue seasoning the secondside once it is face up in the pan.Heating the PanHeat the pan over medium-high heat, then add the oil to the hot pan (heating the panfirst creates a more nonstick surface). To determine when the oil is hot enough to addthe meat, tilt the pan and watch the oil. If it moves in thin, fast ripples, then it is ready.If the oil is slow and smooth, keep heating. (If you are cooking meat that is thicker than1-inch or chicken on the bone, preheat your oven to 375o at this time, because you willneed to finish cooking it in the oven.)BrowningUsing tongs, carefully transfer the meat tothe hot pan, seasoned-side down. Now,salt and pepper the unseasoned side (nowface up). Turn on your exhaust fan now,if you have one.TurningWhen the underside of the meat is crispand deeply browned, 4 to 5 minutes,turn it over. Do not flip the meat over andover, or you will leave too much of itsappealing crust on the bottom of the pan.Flip once.2627
CHEFS SAYCHEFS SAY:Make a salt cellar.You want a one-handed way to add salt toyour food when cooking. We recommend a saltcellar, ramekin, or tea cup filled with koshersalt, so your fingertips can easily reach in andgrab what you need. Keep it out on your counterso everyone knows you mean business in thekitchen.Cooking Meat More Than 1-Inch ThickIf the meat is thicker than 1 inch (including all chicken on the bone), additional cookingin the oven is required to cook the meat through without burning the crispy surface.Preheat the oven to 375o at the same time you start heating your pan, so it is readywhen you are finished with the browning step. Make sure your pan has a metal,oven-proof handle; otherwise you’ll need to transfer your meat to a sheet pan beforeputting in the oven. To gauge how much more cooking in the oven is needed, check thetemperature of the meat before transferring to the oven.Allow 5 minutes of cooking for every 10 to 15 degrees you need to achieve.Checking for DonenessCHEFS SAY:Please don’t wash your chicken.Use a thermometer and the chartbelow to determine when the meat isproperly cooked. Make sure to insert thethermometer through the side of the meat,so the entire probe is touching the centerof the meat, avoiding any bones. You areconcerned with the temperature in thecenter only.Holding your chicken under running water greatlyincreases the risk of cross-contaminating your sink areawith droplets of raw chicken juice. We recommendblotting the chicken dry with paper towel if it isparticularly juicy. If you must wash it, make sure yoursink is empty of dishes and that you thoroughly wipedown the surrounding surfaces afterwards. The onlyway to kill harmful bacteria is to cook the chicken;washing it may only spread it around.How to Know When Meat Is DoneCHEFS SAY:Crisp that chicken skin.Chicken skin takes longer to crisp up to cracklydeliciousness than the bare surface of meat.When cooking chicken with the skin on, give itcloser to 8 minutes on the skin side for the mostimpressive result.28STEAK140 medium 145 medium125 rare 130 mediumwellrareLAMB CHOPS & DUCK BREAST130 mediumrarePORK CHOPS & TENDERLOIN145 - 150 CHICKEN160 Breasts 165 Thighs& Legs29
CookingMeat toPerfectionKOSHER SALTSEA SALTFLAKY SEA SALTCooking with SaltWe recommend cooking with kosher salt for its soft and coarse texture. It is perfectfor pinching and sprinkling over food, because you can feel it in your fingertips andsee it with your eyes. We don’t recommend table salt for use in the kitchen; it is hard tohold in your fingertips, dissolves too quickly to see where you’ve sprinkled it, and leavesbehind the trace metallic tang of iodine (most table salt is iodized). Sea salt is greatfor seasoning a dish just before serving (especially a salad and sliced meats) so you canenjoy the clean, briny crunch for which sea salt is prized. Our favorite is flaky sea salt;the soft white crystals can easily be crushed with your fingertips over a finished dish.RestingOnce the meat is perfectly cooked, it needs to rest for 5 minutes before slicing. The meatneeds this time to redistribute juices to its extremities, which have contracted during cooking.This allows more of the juices to stay in the meat during slicing, as opposed to rushing outonto your cutting board. If you are not eating after the 5 minute resting period, tent the meatloosely with foil. The temperature will hold for about 15 minutes.SlicingIt’s all about “the grain.” Before slicing,you need to determine if the steak indeedhas a “grain,” a distinct direction to themeat’s fibers. Flank, hanger, and skirtsteaks all have grains. Hold your knifeperpendicular to the direction of the grainand slice into ½-inch pieces to achieve themost tender cut. If the steak has no grain,cut it in any direction you like.30Understanding High-Heat OilsNature’s unprocessed choices (extra-virgin olive oil and butter)aren’t able to withstand the high heat needed to properly searsteaks, deep-fry, or cook food in a hot wok. Since most highheat oils are processed and refined (which is required to removeevery natural particle that might burn), your best choice is tobuy a bottle of “neutral” oil (meaning no flavor), like avocado,grapeseed or safflower that is:1. SOLD IN A GLASS BOTTLE(no leaching of plastic chemicals)2. EXPELLER-PRESSED OR COLD-PRESSED(extracted by pressing as opposed to chemical solvents)3. ORGANIC(ensuring that it is not a GMO, genetically modified organism)Note: Sautéing vegetables and lightly browning pieces of meatis not high-heat cooking and flavorful, unprocessed oils, like extra-vriginolive oil and butter, are fine for this type of cooking.31
STUDENTS ASKSTUDENTS ASK:Should I cover my pan to reduce splatter?No. When you cover your pan, water vapor collectsunder the lid and falls back onto your food, steamingit instead of browning it. Instead, use a splatterscreen, an immensely handy kitchen tool that trapscooking splatter and keeps your arms and stovetopfree of hot spits of oil. The screen allow steam from thecooking meat to pass through so it does not hinder thebrowning process.STUDENTS ASK:Can I use a non-stick pan?This question is asked once every class. Andwe understand; no one likes scrubbing. But wedon’t recommend non-stick cookware for cookinganything but eggs, potatoes, and pancakes.Everything else benefits from the beautifulcaramelization that happens when food brownsonto the bottom of a pan, especially meat.A little liquid will always remove (deglaze)browned-on bits of the bottom of a pan. Checkout “The Clean Pan Club” (pg TK)!STUDENTS ASK:When should I use my convection oven?If you have this setting on your oven, use it everytime you cook. This setting activates a small fan builtinto the back of the oven, circulating the air duringcooking. This results in better browning and a moreefficient cooking time. If using convection, shave off10 minutes for every hour of cooking time, makingsure to check your food in advance of the recipe’stiming. For baking, lower the oven temperature by 25degrees, because ingredients like butter and sugarbrown more quickly than meats and vegetables.32Pan-RoastedChickenwith Sherry-Thyme Gravy - pg xxSix BasicCookingTechniques33
MakingPan SaucesIt’s all about the fond. Fond, the browned-onmeaty juices that stick to the bottom of yourpan after cooking a piece of meat, is thebeginning of every good pan sauce. There aretwo kinds of pan sauces: reduction sauces andthickened sauces (read: gravies). They varyin texture and intensity, and both allow you toharness the flavor left behind on the bottomof the pan and return it to where it rightfullybelongs: on your food.MaterialsA fond-covered panLiquid measuring cupFlat-edged utensil, for scraping up fondIngredientsWineChicken brothFresh herbs(thyme, rosemary, bay leaf)Unsalted butter(only for reductions)Flour(only for gravies)Kosher salt and a pepper mill3435
36Making a Reduction SauceMaking a GravyThis is the quickest and easiest of the pan sauces. Just add some liquid to your fondfilled pan over medium-high heat, scrape the bottom of the pan clean, reduce by half,then remove from heat and swirl in some butter. Voila!Gravy is a pan sauce distinguished by the addition of flour, which thickens it toa consistency that is beloved for blanketing everything from pork chops to yourThanksgiving mashed potatoes.D E G L A ZI N GMAKING A ROUXWith your pan over medium heat, add the sauceliquids to the hot pan. The liquid will beginto work its magic on the fond immediately,loosening and liquefying it, hence the term“deglazing.” Using a flat-edged utensil, gentlyclean the fond off the bottom of the pan so it canbe incorporated into the sauce.You will need a fat to flour ratio of 1:1 to makea proper roux. If you have fat left over in the panfrom cooking meat, that is the ideal fat to use. Ifnot, you will add more fat to your fond-coveredpan (butter or olive oil will do). With your panover medium heat, sprinkle the flour over the hotfat and stir until all the flour has dissolved, about1 minute.REDUCINGDEGLAZINGAllow the liquid to reduce by half, about 4minutes. Boiling off half the water contentconcentrates the sauce’s flavor.Add the sauce liquids to the hot pan. Theliquid will begin to work its magic on the fond,loosening and liquefying it, hence the term“deglazing.” Using a flat-bottomed utensil, gentlyclean the fond off the bottom of the pan so it canbe incorporated into the sauce. Please note: Ifyou are using wine, add it to the hot pan first andallow to cook down for 1 minute before addingany additional liquid. This cooks off the alcoholand caramelizes the wine’s fruity flavors.FINISHINGTHICKENINGRemove your pan from the heat and addunsalted butter to the pan. Allow it to meltslowly, swirling the pan to fully incorporate thebutter into the sauce. Please note: Adding butterto a simmering sauce will cause it to melt too fastand “break” out of its emulsified state, leavingbehind an oily pool instead of the desiredbuttery creaminess.When the gravy comes to a boil, the starch in theflour swells up and thickens the sauce. Once itthickens, continue cooking, stirring frequently, todevelop the flavor, about 2 minutes more.SEASONINGStart tasting! The gravy will likely need some salt(especially if you used unsalted broth). A goodgravy should make you smile when you taste it.37
STUDENTS ASKCookingMeat toPerfectionSTUDENTS ASK:What kind of wine should I use for cooking?The answer is simple: Cook with wine you like todrink; the varietal doesn’t matter. That doesn’tmean your finest bottle, but it should be palatableand not “cooking wine” from the supermarket,which has added salt and preservatives and isliterally undrinkable. Purchasing single-servingwine bottles from a wine shop is a great way tohave smaller quantities of wine on hand to avoidhaving to open up a whole bottle for a single recipe.STUDENTS ASK:What can I substitute for wine in a pan sauce?If you are not inclined to use alcohol, you cansubstitute 3/4 teaspoon vinegar (red wine, white wine,sherry, apple cider, or rice) or lemon juice for 1/3 cupof wine (do not attempt this substitution if the saucecalls for more than 1/3 cup wine). Taste, adding ¼teaspoon more at a time until the sauce tastes bright.Flavorful Liquids Delicious SaucesSTUDENTS ASK:Try these liquid combos to make either a reduction sauce or a gravy. For these liquidquantities, a gravy will need 1 tablespoon of flour to start (added to 1 tablespoon of hotfat) and a reduction will need 1 tablespoon of unsalted butter swirled in at the end (offthe heat).How do I choose the best meat?When possible, you want to buy your meatfrom a butcher (in-store butchers are fine), soyou can ask all the questions you have about itsquality. For chicken and pork, the most importantdescriptors are “pasture-raised,” “organic,”“antibiotic-free,” and “humanely-raised.” Forbeef, “grass-fed” is the golden rule, along withthe same keywords listed above. “Organic
like you who have taken this Six Basic Cooking Techniques class at our cooking school. That school is Home Cooking New York, in downtown Manhattan, where this has been our best-selling class since 2002. So, behold! Our first cookbook -- an encapsulation of these six vital techniques interwoven with the questions and answers that pepper a live