Transcription
DCCN Docker Swarm ClusterDocumentationRelease 1.0.0Hurng-Chun LeeNov 30, 2018
Contents1Introduction to Docker Swarm1.1 Docker in a Nutshell . . . . . . . . . . . . . . . . . . . . . . . . . . . . . . . . . . . . . . . . . . .1.2 Docker swarm cluster . . . . . . . . . . . . . . . . . . . . . . . . . . . . . . . . . . . . . . . . . .1112Terminology33Docker swarm cluster at DCCN3.1 System architecture . . . . . . . . . . . . . . . . . . . . . . . . . . . . . . . . . . . . . . . . . . .3.2 Image registry . . . . . . . . . . . . . . . . . . . . . . . . . . . . . . . . . . . . . . . . . . . . . .3.3 Service orchestration . . . . . . . . . . . . . . . . . . . . . . . . . . . . . . . . . . . . . . . . . . .55664Swarm cluster operation procedures4.1 Cluster initialisation . . . . . .4.2 Node operation . . . . . . . . .4.3 Service operation . . . . . . . .4.4 Stack operation . . . . . . . . .4.5 Emergancy shutdown . . . . . .4.6 Disaster recovery . . . . . . . .9910131415165Docker swarm health monitoring6Tutorial: basic6.1 Preparation . . . . . . . . . .6.2 The Dockerfile . . . . . . . .6.3 Building the container image .6.4 Running the container . . . .6.5 Network port mapping . . . .6.6 Data persistency . . . . . . .19191920222323Tutorial: single-host orchestration7.1 Preparation . . . . . . . . . .7.2 The docker-compose file . . .7.3 Building services . . . . . . .7.4 Bringing services up . . . . .7.5 Bringing services down . . .7.6 Exercise: HAProxy . . . . . .27272830303031717i
8iiTutorial: Docker swarm8.1 Preparation . . . . . . . . . .8.2 Architecture . . . . . . . . .8.3 Creating a cluster . . . . . . .8.4 Join tokens . . . . . . . . . .8.5 Adding nodes . . . . . . . . .8.6 docker-compose file for stack8.7 Launching stack . . . . . . .8.8 Service management . . . . .8.9 Node management . . . . . .35353637373839404445
CHAPTER1Introduction to Docker Swarm1.1 Docker in a Nutshell what is docker? Learning docker1.2 Docker swarm cluster docker swarm overview Raft consensus Swarm administration guide1
DCCN Docker Swarm Cluster Documentation, Release 1.0.02Chapter 1. Introduction to Docker Swarm
CHAPTER2TerminologyDocker engine is the software providing the libraries, services and toolsets of Docker. It enables computer to buildDocker images and lauch Docker containers. Docker engine has two different editions: the community edition(Docker CE) and the enterprise edition (Docker EE).Docker node/host is a physical or virtual computer on which the Docker engine is enabled.Docker swarm cluster is a group of connected Docker nodes. Each node has either a manager or worker role in thecluster. At least one master node is required for a docker swarm cluster to function.Manager refers to the node maintaining the state of a docker swarm cluster. There can be one or more managers in acluster. The more managers in the cluster, the higher level of the cluster fault-tolerance. The level of fault-tolerance isexplained in this document.Worker refers to the node sharing the container workload in a docker swarm cluster.Docker image is an executable package that includes everything needed to run an application–the code, a runtime,libraries, environment variables, and configuration files.Docker container is a runtime instance of an image. A container is launched by running an Docker image.Docker service is a logical representation of multiple replicas of the same container. Replicas are used for serviceload-balancing and/or failover.Docker stack is a set of linked Docker services.3
DCCN Docker Swarm Cluster Documentation, Release 1.0.04Chapter 2. Terminology
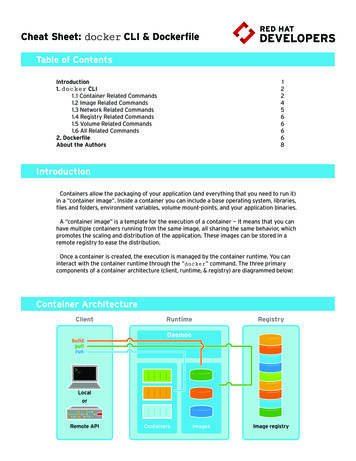
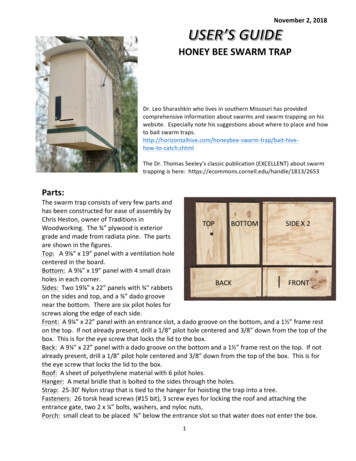
CHAPTER3Docker swarm cluster at DCCNThe first swarm cluster at DCCN was developed in order to deploy and manage service components (e.g. DICOM services, data streamer, data stager) realising the automatic lab-data flow. The inital setup consists of 8 nodes repurposedfrom the HPC and the EXSi clusters.3.1 System architectureAll docker nodes are bare-matel machines running CentOS operating system. The nodes are provisioned using theDCCN linux-server kickstart. They all NFS-mount the /home and /project directories, and use the active directoryservice for user authentication and authorisation. Only the TG members are allowed to SSH login to the docker nodes.All docker nodes also NFS-mount the /mnt/docker directory for sharing container data. The figure below showsthe architecture of the DCCN swarm cluster.Fig. 3.1: The DCCN swarm cluster - a simplified illustration of the architecture.5
DCCN Docker Swarm Cluster Documentation, Release 1.0.03.2 Image registryWithin the swarm cluster, a private image registry is provided to as a central repository of all container images. Thedata store of the registry is located in /mnt/docker/registry which is a shared NFS volume on the centralstorage.The registry endpoint is docker-registry.dccn.nl:5000. It requires user authentication for uploading (push)and downloading (pull) container images. New user can be added by using the script r.sh.An overview of image repositories can be browsed here.Note: For the sake of simplicity, the internal private registry is using a self-signed X.509 certificate. In order totrust it, one needs to copy the certificate of the docker registry server to the docker host, under the directory, 00/ca.crt.3.3 Service orchestrationFor deploying multiple service components as a single application stack, the docker compose specification v3 is usedtogether with the docker stack management interface (i.e. the docker stack command).An example docker-compose file for orchestrating three services for the data-stager application is shown below:1version: "3"23services:4db:5image: docker-registry.dccn.nl:5000/redisvolumes:- t:aliases:- stagerdb4uideploy:placement:constraints: [node.labels.function production]678910111213141516service:image: docker-registry.dccn.nl:5000/stager:1.7.0ports:- 3100:3000volumes:- /mnt/docker/data/stager/config:/opt/stager/config- /mnt/docker/data/stager/cron:/cron- /mnt/docker/data/stager/ui/log:/opt/stager/log- /project:/project- /var/lib/sss/pipes:/var/lib/sss/pipes- :aliases:- stager4ui171819202122232425262728293031(continues on next page)6Chapter 3. Docker swarm cluster at DCCN
DCCN Docker Swarm Cluster Documentation, Release 1.0.0(continued from previous page)environment:- REDIS HOST stagerdb4ui- REDIS PORT 6379depends on:- dbdeploy:placement:constraints: [node.labels.function 152535455ui:image: - 3080:3080volumes:- onfignetworks:default:aliases:- stager-uidepends on:- servicedeploy:placement:constraints: [node.labels.function production]565758networks:default:Whenever the docker compose specification is not applicable, a script to start a docker service is provided. It is a bashscript wrapping around the docker service create command.All the scripts are located in the /mnt/docker/scripts/microservices directory.3.3. Service orchestration7
DCCN Docker Swarm Cluster Documentation, Release 1.0.08Chapter 3. Docker swarm cluster at DCCN
CHAPTER4Swarm cluster operation procedures4.1 Cluster initialisationNote: In most of cases, there is no need to initialse another cluster.Before there is anything, a cluster should be initialised. Simply run the command below on a docker node to initialisea new cluster: docker swarm init4.1.1 Force a new clusterIn case the quorum of the cluster is lost (and you are not able to bring other manager nodes online again), you needto reinitiate a new cluster forcefully. This can be done on one of the remaining manager node using the followingcommand: docker swarm init --force-new-clusterAfter this command is issued, a new cluster is created with only one manager (i.e. the one on which you issued thecommand). All remaining nodes become workers. You will have to add additional manager nodes manually.Tip: Depending on the number of managers in the cluster, the required quorum (and thus the level of fail tolerance)is different. Check this page for more information.9
DCCN Docker Swarm Cluster Documentation, Release 1.0.04.2 Node operation4.2.1 System provisioningThe operating system and the docker engine on the node is provisioned using the DCCN linux-server kickstart. Thefollowing kickstart files are used: /mnt/install/kickstart-*/ks-*-dccn-dk.cfg: the main kickstart configuration file lection: main script to triggerpost-kickstart scripts /mnt/install/kickstart-*/setup-docker-*: the docker-specific post-kickstart scriptsConfigure devicemapper to direct-lvm modeBy default, the devicemapper storage drive of docker is running the loop-lvm mode which is known to besuboptimal for performance. In a production environment, the direct-lvm mode is recommended. How toconfigure the devicemapper to use direct-lvm mode is described here.Before configuring the direct-lvm mode for the devicemapper, make sure the directory /var/lib/docker isremoved. Also make sure the physical volume, volume group, logical volumes are removed, e.g. ol/dev/docker/thinpoolmetadocker/dev/sdbHereafter is a script summarizing the all steps. The script is also available at .1#!/bin/bash23456if [ # -ne 1 ]; thenecho "USAGE: 0 device "exit 1fi789# get raw device path (e.g. /dev/sdb) from the command-line argumentdevice 110111213141516# check if the device is availablefile -s {device} grep 'cannot open'if [ ? -eq 0 ]; thenecho "device not found: {device}"exit 1fi171819# install/update the LVM packageyum install -y lvm2202122# create a physical volume on devicepvcreate {device}232425# create a volume group called 'docker'vgcreate docker {device}2627# create logical volumes within the 'docker' volume group: one for data, one for metadate(continues on next page)10Chapter 4. Swarm cluster operation procedures
DCCN Docker Swarm Cluster Documentation, Release 1.0.0(continued from previous page)28293031# assign volume size with respect to the size of the volume grouplvcreate --wipesignatures y -n thinpool docker -l 95%VGlvcreate --wipesignatures y -n thinpoolmeta docker -l 1%VGlvconvert -y --zero n -c 512K --thinpool docker/thinpool --poolmetadata docker/thinpoolmeta3233343536373839# update the lvm profile for volume autoextendcat /etc/lvm/profile/docker-thinpool.profile EOLactivation {thin pool autoextend threshold 80thin pool autoextend percent 20}EOL404142# apply lvm profilelvchange --metadataprofile docker-thinpool docker/thinpool4344lvs -o seg monitor45464748495051525354555657# create daemon.json file to instruct docker using the created logical volumescat /etc/docker/daemon.json EOL{"hosts": ["unix:///var/run/docker.sock", "tcp://0.0.0.0:2375"],"storage-driver": "devicemapper","storage-opts": ["dm.thinpooldev /dev/mapper/docker-thinpool","dm.use deferred removal true","dm.use deferred deletion true"]}EOL5859606162# remove legacy deamon configuration through docker.service.d to avoid confliction with daemon.jsonif [ -f /etc/systemd/system/docker.service.d/swarm.conf ]; thenmv /etc/systemd/system/docker.service.d/swarm.conf /etc/systemd/system/ docker.service.d/swarm.conf.bkfi636465# reload daemon configurationsystemctl daemon-reload4.2.2 Join the clusterAfter the docker daemon is started, the node should be joined to the cluster. The command used to join the cluster canbe retrieved from one of the manager node, using the command: docker swarm join-token managerNote: The example command above obtains the command for joining the cluster as a manager node. For joining thecluster as a worker, replace the manager on the command with worker.After the command is retrieved, it should be run on the node that is about to join to the cluster.4.2. Node operation11
DCCN Docker Swarm Cluster Documentation, Release 1.0.04.2.3 Set Node labelNode label helps group nodes in certain features.Currently, the node in production is labled withfunction production using the following command: docker node update --label-add function production NodeName When deploying a service or stack, the label is used for locate service tasks.4.2.4 Leave the clusterRun the following command on the node that is about to leave the cluster. docker swarm leaveIf the node is a manager, the option -f (or --force) should also be used in the command.Note: The node leaves the cluster is NOT removed automatically from the node table. Instead, the node is marked asDown. If you want the node to be removed from the table, you should run the command docker node rm.Tip: An alternative way to remove a node from the cluster directly is to run the docker node rm command on amanager node.4.2.5 Promote and demote nodeNode in the cluster can be demoted (from manager to worker) or promoted (from worker to manager). This is done byusing the command: docker node promote WorkerNodeName docker node demote ManagerNodeName 4.2.6 Monitor nodesTo list all nodes in the cluster, do docker node lsTo inspect a node, do docker node inspect NodeName To list tasks running on a node, do docker node ps NodeName 12Chapter 4. Swarm cluster operation procedures
DCCN Docker Swarm Cluster Documentation, Release 1.0.04.3 Service operationIn swarm cluster, a service is created by deploying a container in the cluster. The container can be deployed as a singelinstance (i.e. task) or multiple instances to achieve service failover and load-balancing.4.3.1 Start a serviceTo start a service in the cluster, one uses the docker service create command. Hereafter is an example forstarting a nginx web service in the cluster using the container image docker-registry.dccn.nl:5000/nginx:1.0.0:123456789 docker login docker-registry.dccn.nl:5000 docker service create \--name webapp-proxy \--replicas 2 \--publish 8080:80/tcp \--constaint "node.labels.function production" \--mount "type bind,source /mnt/docker/webapp-proxy/conf,target /etc/nginx/conf.d" \--with-registry-auth \docker-registry.dccn.nl:5000/nginx:1.0.0Options used above is explained in the following mountfunctionset the service name to webapp-proxydeploy 2 tasks in the cluster for failover and loadbalancemap internal tcp port 80 to 8080, and expose it to the worldrestrict the tasks to run on nodes labled with function productionmount host’s /mnt/docker/webapp-proxy/conf to container’s /etc/nginx/conf.dMore options can be found here.4.3.2 Remove a serviceSimply use the docker service rm ServiceName to remove a running service in the cluster. It is notnormal to remove a productional service.Tip: In most of cases, you should consider updating the service rather than removing it.4.3.3 Update a serviceIt is very common to update a productional service. Think about the following conditions that you will need to updatethe service: a new node is being added to the cluster, and you want to move an running service on it, or a new container image is being provided (e.g. software update or configuration changes) and you want to updatethe service to this new version, or you want to create more tasks of the service in the cluster to distribute the load.4.3. Service operation13
DCCN Docker Swarm Cluster Documentation, Release 1.0.0To update a service, one uses the command docker service update. The following example update thewebapp-proxy service to use a new version of nginx image docker-registry.dccn.nl:5000/nginx:1.2.0: docker service update \--image docker-registry.dccn.nl:5000/nginx:1.2.0 \webapp-proxyMore options can be found here.4.3.4 Monitor servicesTo list all running services: docker service lsTo list tasks of a service: docker service ps ServieName To inspect a service: docker service inspect ServiceName To retrieve logs written to the STDOU/STDERR by the service process, one could do: docker service logs [-f] ServiceName where the option -f is used to follow the output.4.4 Stack operationA stack is usually defined as a group of related services. The defintion is described using the docker-compose version3 specification.Here is an example of defining the three services of the DCCN data-stager.Using the docker stack command you can manage multiple services in one consistent manner.4.4.1 Deploy (update) a stackAssuming the docker-compose file is called docker-compose.yml, to launch the services defined in it in theswarm cluster is: docker login docker-registry.dccn.nl:5000 docker stack deploy -c docker-compose.yml --with-registry-auth StackName When there is an update in the stack description file (e.g. docker-compose.yml), one can use the same commandto apply changes on the running stack.Note: Every stack will be created with an overlay network in swarm, and organise services within the network. Thename of the network is StackName default.14Chapter 4. Swarm cluster operation procedures
DCCN Docker Swarm Cluster Documentation, Release 1.0.04.4.2 Remove a stackUse the following command to remove a stack from the cluster: docker stack rm StackName 4.4.3 Monitor stacksTo list all running stacks: docker stack lsTo list all services in a stack: docker stack services StackName To list all tasks of the services in a stack: docker stack ps StackName 4.5 Emergancy shutdownNote: The emergency shutdown should take place before the network and the central storage are down.1. login to one manager2. demote other managers3. remove running stacks and services4. shutdown all workers5. shutdown the manager4.5.1 Reboot from shutdownNote: In several network outage in 2017 and 2018, the cluster nodes were not reacheable and required hard (i.e.push the power button) to reboot. In this case, the emergancy shutdown procedure was not followed. Interestingly,the cluster was recovered automatically after sufficient amount of master nodes became online. All services were alsore-deployed immediately without any human intervention.One thing to notice is that if the network outage causes the NFS mount to /mnt/docker not accessible, one mayneed to reboot the machines once the network connectivity is recovered as they can be irresponsive due to the hangingNFS connections.1. boot on the manager node (the last one being shutted down)2. boot on other nodes3. promote nodes until a desired number of managers is reached4. deploy firstly the docker-registry stack4.5. Emergancy shutdown15
DCCN Docker Swarm Cluster Documentation, Release 1.0.0 cd /mnt/docker/scripts/microservices/registry/ sudo ./start.shNote: The docker-registry stack should be firstly made available as other services/stacks will need to pullcontainer images from it.5. deploy other stacks and services4.6 Disaster recoveryHopefully there is no need to go though it!!For the moment, we are not backing up the state of the swarm cluster. Given that the container data has been stored(and backedup) on the central storage, the impact of losing a cluster is not dramatic (as long as the container data isavailable, it is already possible to restart all services on a fresh new cluster).Nevertheless, here is the official instruction of disaster recovery.16Chapter 4. Swarm cluster operation procedures
CHAPTER5Docker swarm health monitoringVarious management and monitoring web-based tools can be found on http://docker.dccn.nl.The health of the swarm nodes are monitored by the Xymon monitor.17
DCCN Docker Swarm Cluster Documentation, Release 1.0.018Chapter 5. Docker swarm health monitoring
CHAPTER6Tutorial: basicThis tutorial is based on an example of building and running a container of the Apache HTTPd server which serves asimple PHP-based helloworld application. Throught the tutorial you will learn: the docker workflow and basic UI commands, network port mapping, data persistency6.1 PreparationFiles used in this tutorial are available on GitHub. Preparing those files within the /tmp using the commands below: mkdir -p /tmp cd /tmp wget setup/raw/master/doc/ tutorial/centos-httpd/basic.tar.gz tar xvzf basic.tar.gz cd basic lsDockerfile Dockerfile php htmldoc run-httpd.sh6.2 The DockerfileBefore starting a container with Docker, we need a docker container image that is either pulled from a image registry(a.k.a. docker registry), such as the Docker Hub, or built by ourselves. In this exercise, we are going to build acontainer image ourselves.For building a docker image, one starts with writing an instruction file known as the Dockerfile.Dockerfile is a YAML document describing how a docker container should be built. Hereafter is an example of theDockerfile for an Apache HTTPd image:19
DCCN Docker Swarm Cluster Documentation, Release 1.0.012345FROM centos:7MAINTAINER The CentOS Project cloud-ops@centos.org LABEL Vendor "CentOS" \License GPLv2 \Version 2.4.6-40678910RUN yum -y --setopt tsflags nodocs update && \yum -y --setopt tsflags nodocs install httpd && \yum clean all1112EXPOSE 8013141516# Simple startup script to avoid some issues observed with container restartADD run-httpd.sh /run-httpd.shRUN chmod -v x /run-httpd.sh1718CMD ["/run-httpd.sh"]The Dockerfile above is explained below.Each line of the Dockerfile is taken as a step of the build. It started with a keyword followed by argument(s).Line 1: all container images are built from a basis image. This is indicated by the FROM keyword. In this example,the basis image is the official CentOS 7 image from the Docker Hub.Line 2-3: a container image can be created with metadata. For instance, the MAINTAINER and LABEL attributes areprovided in the example.Line 8-10: given that we want to build a image for running the Apache HTTPd server, we uses the YUM packagemanager to install the httpd package within the container. It is done by using the RUN keyword followed by theactual YUM command.Line 12: we know that the HTTPd service will run on port number 80, we expose that port explicitly for the connectivity.Line 14: comments in Dockerfile are started with the #.Line 15: the run-httpd.sh is a script for bootstraping the HTTPd service. It is the main program to be executed afterthe container is started. In order to make this script available in the image, we use the ADD keyword here. The examplehere can be interpreted as copying the file “run-httpd.sh” on the host to file “/run-http.sh” in the container image.Line 16: here we make the bootstrap script in the container image executable so that it can be run directly. It is doneusing the RUN keyword again.Line 18: the keyword CMD specifies the command to be executed when the container is started. Here we simply runthe bootstrap script we have just copied into the container.6.3 Building the container imageWith the Dockerfile in place, we can proceed for building the container image. Make sure you are in the basic folder,and run the following command: docker build -t httpd:centos .Here we give the image a name:tag with the -t option. With that, the image can be later referred by httpd:centos.Keep your eyes on the output of the build process. You will find the steps in the Dockerfile are executed sequencially,and some output (e.g. the output from yum install) looks like as if you are running in a CentOS7 system.20Chapter 6. Tutorial: basic
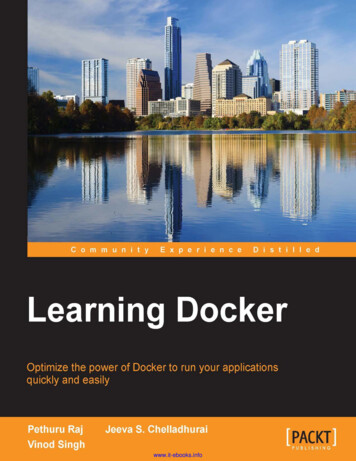
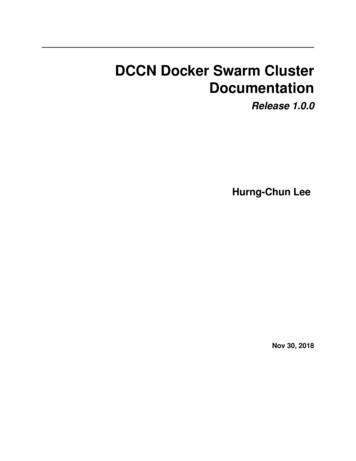
DCCN Docker Swarm Cluster Documentation, Release 1.0.0What interesting to notice are lines with hash strings. For example:--- 5182e96772bfStep 2/8 : MAINTAINER The CentOS Project cloud-ops@centos.org --- Running in 52daee99ca6cRemoving intermediate container 52daee99ca6c--- cf9a7fe73efc6.3.1 Image layersDuring the build process, each step in the Dockerfile triggers creation of two image layers. One intermediate layer forexecuting the step; the other is a persistent layer containing results of the step. Those layers are indicated by the hashstrings we see in the output snippet above.The intermediate layer is forked from the persistent layer of the previous step, except for the first step on which thepersistent image is always from an existing image built somewhere else (a reason that we always see keyword FROMas the first step in the Dockerfile). The intermediate layer is removed after the execution of the step.Each persistent layer only consists of the “delta” to the one from its previous step. As illustrated in Fig. 6.1, the finalimage is then constructed as a stack of those persisten layers; and it is locked for read-only.Fig. 6.1: an illustration of the Docker image and container layers. This figure is inspired by the one on the Dockerdocument.6.3. Building the container image21
DCCN Docker Swarm Cluster Documentation, Release 1.0.0Persistent layers are reused when they are encountered in different/independent build processes. For example, the persistent layer created by the first step (FROM centos:7) is very likely to be reused for building a variety of containerimages based on CentOS 7. In this case, Docker will reuse the image downloaded before instead of duplicating it forusing the host’s storage efficiently.The image layers of a final docker image can be examinated by the docker history image name:tag command. For example, docker history httpd:centos6.4 Running the containerWith the image built successfully, we can now start a container with the image using the docker run [options] image name:tag command. For example, docker run --rm -d -p 8080:80 --name myhttpd httpd:centosLet’s connect the browser to the URL http://localhost:8080. You will see a default welcome page of the ApacheHTTPd server.A few options are used here:Option --rm instructs Docker to remove the container layer (see below) when the container is stopped.Option -d instructs Docker to run the container in a detached mode.Option -p instructs Docker to map the host’s network port 8080 to the container’s network port 80 so that this serviceis accessible from the host’s external network.Option --name names the container so that the container can be later referred easily.6.4.1 Container layerWhen running the container from a image, Docker creates a new writable layer (a.k.a. container layer) on top of theimage layers. Changes made within the container are delta to the image layers and kept in this container layer. Inthis way, Docker makes the image layers read-only; and thus can be used by multiple independent containers withoutinterference.Note: In fact, the way Docker organise deltas in the image layers and the container layer is similar to how theLinux life CD manages the filesystems. They are both based on a stackable filesystem with the Copy-on-Write (CoW)strategy.The concept of the image layers and the container layer is illustrated in Fig. 6.1.6.4.2 Exercise: PHP with MySQL supportCan you extend/modify the Dockerfile and build a image called php:centos? In this image, we want to addPHP with MySQL support to the Apache HTTPd server.The container should be started with docker run --rm -d -p 8080:80 --name myphp php:centos22Chapter 6. Tutorial: basic
DCCN Docker Swarm Cluster Documentation, Release 1.0.0Hint: In a CentOS system, one can just run yum -y install php php-mysql to add PHP with MySQLsupport to the Apache HTTPd server.To verify the PHP support, you can create a file /var/www/html/index.php in the container, and visit the pagehttp://localhost:8080/index.php. Hereafter is an example: docker exec -it myphp bash cat /var/www/html/index.php EOF ?php phpinfo(); ? EOF6.5 Network port mappingNetworkk port mapping is the way of making the container service accessible to the network of the host.In the Dockerfile example above, we explicitly expose the port 80 as we know that the HTTPd will listen on this TCPport.However, the container runs in an internal virtual network, meaning that our HTTPd service is not accessible from thenetwork on which the host is running.To make the service accessible externally, one uses the -p option to map the host’s port to the container’s port. Forinstance, the option -p 8080:80 implies that if the client connects to the port 8080 of the host, the connection willbe redirected to the port 80 of the container.6.5.1 Exercise: networkHow do you make the HTTPd container accessible on port 80?6.6 Data persistencyThe default welcome page of the Apache HTTPd is boring. We are going to create our own homepage.Let’s access to the bash shell of the running httpd container: docker exec -it myphp bashIn Apache HTTPd, the way to replace the default homepage is creating our own index.html file within the folder/var/www/html. For example, using the command below to create a HTML form in /var/www/html/index.html: cat /var/www/h
Docker images and lauch Docker containers. Docker engine has two different editions: the community edition (Docker CE) and the enterprise edition (Docker EE). Docker node/host is a physical or virtual computer on which the Docker engine is enabled. Docker swarm cluster is a group of connected Docker nodes.