Transcription
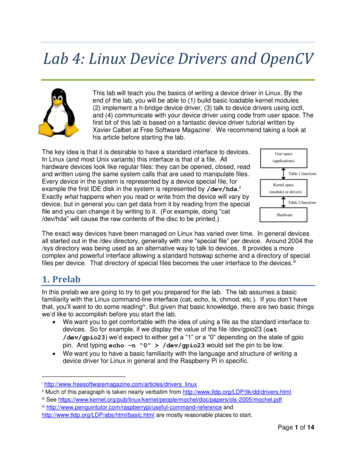
Lab 4: Linux Device Drivers and OpenCVThis lab will teach you the basics of writing a device driver in Linux. By theend of the lab, you will be able to (1) build basic loadable kernel modules(2) implement a h-bridge device driver, (3) talk to device drivers using ioctl,and (4) communicate with your device driver using code from user space. Thefirst bit of this lab is based on a fantastic device driver tutorial written byXavier Calbet at Free Software Magazinei. We recommend taking a look athis article before starting the lab.The key idea is that it is desirable to have a standard interface to devices.In Linux (and most Unix variants) this interface is that of a file. Allhardware devices look like regular files: they can be opened, closed, readand written using the same system calls that are used to manipulate files.Every device in the system is represented by a device special file, forexample the first IDE disk in the system is represented by /dev/hda.iiExactly what happens when you read or write from the device will vary bydevice, but in general you can get data from it by reading from the specialfile and you can change it by writing to it. (For example, doing “cat/dev/hda” will cause the raw contents of the disc to be printed.)The exact way devices have been managed on Linux has varied over time. In general devicesall started out in the /dev directory, generally with one “special file” per device. Around 2004 the/sys directory was being used as an alternative way to talk to devices. It provides a morecomplex and powerful interface allowing a standard hotswap scheme and a directory of specialfiles per device. That directory of special files becomes the user interface to the devices.iii1. PrelabIn this prelab we are going to try to get you prepared for the lab. The lab assumes a basicfamiliarity with the Linux command-line interface (cat, echo, ls, chmod, etc.). If you don’t havethat, you’ll want to do some readingiv. But given that basic knowledge, there are two basic thingswe’d like to accomplish before you start the lab. We want you to get comfortable with the idea of using a file as the standard interface todevices. So for example, if we display the value of the file /dev/gpio23 (cat/dev/gpio23) we’d expect to either get a “1” or a “0” depending on the state of gpiopin. And typing echo –n “0” /dev/gpio23 would set the pin to be low. We want you to have a basic familiarity with the language and structure of writing adevice driver for Linux in general and the Raspberry Pi in cles/drivers linuxMuch of this paragraph is taken nearly verbatim from http://www.tldp.org/LDP/tlk/dd/drivers.htmliii See hel/doc/papers/ols-2005/mochel.pdfiv mand-reference andhttp://www.tldp.org/LDP/abs/html/basic.html are mostly reasonable places to start.iiPage 1 of 14
To accomplish the above things we’d like you to read the Wikipedia page on device files andthen answer the following questions (most of which you’ll likely need to do a web search toanswer). We’re also going to get you to do some work needed to get your Pi on the room’snetwork.Q1. Please fill in the spreadsheet mentioned on Piazza with your MAC address of your Pi ifyou haven’t already.Q2. In the context of Linux device drivers, what is a major number? What is a minornumber?Q3. Give an example of a device file and a hardware device for (a) a character device fileand (b) a block device file.Q4. What is a pseudo-device, and how is it different from a normal device? Give anexample of a pseudo-device in Linux.Q5. Find the GPIO reference for your Raspberry Pi. Where on the board is GPIO23?GPIO24? Provide the processor pin number and expansion header number.In addition, we will be doing some very basic work with OpenCV and SQLite in part F. DownloadpartF.py and take a look at the code. Answer the following questions:Q6. In the main while loop of the script, we use the function cvtColor(frame,cv2.COLOR BGR2HSV) after capturing an image. What does this function do? Feelfree to peruse the OpenCV documentation to answer this question.Q7. What are the ranges of OpenCV HSV values? Using an online tool or a program suchas GIMP, provide an estimated range of correctly scaled HSV values we would use todetect a yellow object, such as a tennis ball.Q8. Why do we use HSV and not RGB?Q9. Look at the OpenCV findContours subroutine. Describe in your own words each of theinput arguments. Again, the OpenCV documentation will be invaluable in answeringthis question.Q10. Consider the CREATE TABLE SQL statement. What SQL command would create a 2column table to track a 10-bit accelerometer reading and an associated timestamp?Q11. Now consider the SELECT SQL statement. Using the table from the previousquestion, what SQL command would select all IMU readings between the value 128and 512?In addition you will find it helpful to take a look at these links before you come to lab. The first part of http://squidge.sourceforge.net/gpio/ (up to, but not including, “Findthat GPIO rs h03.pdfPage 2 of 14
Raspberry Pi setupYou are going to install Raspbian with OpenCV. This task is a part of the prelabAt home instructions for connecting to RPi: berry-pi-without-an-externalmonitor-or-keyboard lesson-6-using-ssh/enabling-ssh1. Download Raspbian and write the image to an SD cardRaspbian with the PIXEL GUI, along with OpenCV is around 8GB so make sure yourmicroSD card is at least 16GB. Write the Raspbian image to an SD card using an imagewriting tool of your choice. See the following link if you need tallation/installing-images/README.md.You will want to install the Raspbian Stretch with desktop image2. Insert SD card and boot up your PiIf you haven’t already, make sure you have registered your MAC address as per theinstructions in Q1 of the prelab. This allows you to SSH into your Pi over the University’snetwork. You can complete a majority of this lab through SSH, but when using openCVat the end, you will need to plug in a monitor and keyboard in order to visualize theprogram and calibrate some parameters.3. Make certain that your Raspberry Pi is not being under-voltagedIf you see the following image anywhere on the GUI for your Raspberry Pi:Then it is not being supplied 5V. This can be due to wires with highresistance, or power supplies that cannot source enough current. If thisimage pops up, use a different power supply or get a different cable topower your Pi; otherwise, you may have issues with your system spuriously restartingand corrupting your file system.4. Download and install OpenCVRun the following commands to install OpenCV:Page 3 of 14
1) sudo apt-get install libhdf5-dev libhdf5-serial-dev libhdf5-100 libqtgui4libqtwebkit4 libqt4-test python3-pyqt5 libatlas-base-dev libjasper-devsqlite32) wget https://bootstrap.pypa.io/get-pip.py3) sudo python3 get-pip.py4) sudo pip3 install opencv-contrib-python5) sudo pip3 install imutilsThese commands downloaded required libraries for OpenCV, downloaded the pip utility,and then used pip to install. We will be using Python3 for the duration of this lab. Inorder to make this easier, we suggest adding alias python python3 to /.bashrc.Q12. Try to run partF.py. What is the error? How did you fix it?2. InlabThis lab is broken into a number of small parts. First, you’ll need to get install Raspbian anddownload the kernel source using some handy scripts obtainable from Github.Once that’s done, parts A, B and the first subsection of C get you familiar with the Linuxdevice driver environment. We supply all needed code for the pseudo devices you’ll build inthose parts—you “just” need to get them up and running. The remainder of part C will have youmodifying our pseudo device to create a more advanced pseudo device.In part D you’ll start working with GPIO. You will interact with GPIO from user space as wellas kernel space. You will complete an implementation of an h-bridge device driver. In part E youwill be use ioctl to expand customizability of your device driver. In part F, you will be introducedto OpenCV.We’d love to do more; there are large chucks of information missing that you’ll need if youdo embedded systems development in Linux. In particular we have to entirely skip interrupts.The post lab will get you at least vaguely familiar with interrupts. Feel free to ask your labinstructor for more details.Page 4 of 14
A. The "Nothing" driverviThe purpose of this section is to familiarize yourselfwith the tools you will need to build more excitingdevice drivers in the later sections. In this section weare going to build the simplest driver there is--a driverthat does nothing. The point of the exercise is tounderstand the “scaffolding” associated with building aLinux device driver.In an empty folder, create a new file called "nothing.c".#include linux/module.h MODULE LICENSE("Dual BSD/GPL");As discussed in class, MODULE LICENSE is a way for the kernel to know if it has been taintedwith proprietary code. (As an additional exercise, consider checking what happens when you tryto insert the module without specifying the license.)Next, create the following simple Makefile. obj-m (object-module) provides a list of the kernelmodules to build during make:viiobj-m : nothing.oall:make -C /lib/modules/4.14.67-v7 /build M (shell pwd) modulesclean:make -C /lib/modules/4.14.67-v7 /build M (shell pwd) cleanBe sure that you have tabs, and not spaces, before the lines that start with “make” (as perstandard Makefile rules).We need to compile our module with the same kernel that will be receiving our module.Q1. Answer the followinga. What does uname –r output? Try running this command.b. What is the purpose of the –C option and its arguments in the Makefile?c. What does the obj-m syntax mean?Now run make in the same directory as your nothing.c and Makefile. Notice that make producesa “nothing.ko” file; this file is our kernel module. To insert the module into the kernel runinsmod using sudo on the Pi as follows (note, that after this we’ll leave out the sudoviMany tasks done in the following sections are easily automated with bash scripts, bash functions andaliases in your .bashrc file. If you find yourself typing the same long string over-and-over (to copy files orwhatever) you should consider how to avoid having to do that!vii Note, it really should be “make -C /lib/modules/(shell uname –r)/build M (shell pwd) clean”, but unameisn’t acting as expected.Page 5 of 14
command as you may end up doing something to remove the need for sudo). sudo insmod nothing.koQ2. What is a .ko file? Why didn't we just compile our code into an executable?Use lsmod to check that your module has been inserted correctly. You should a "nothing" entryin the list of modules. lsmodUse the following command to remove the module, with sudo. Verify that the module has beenremoved from the list with lsmod. rmmod nothingB. The “Hello World!” driverIn this section, you will write a device driver that prints simple messages to the kernel duringmodule insertion and removal.Create a new "hello.c" file in the same directory as our nothing module on the host:#include linux/init.h #include linux/module.h #include linux/kernel.h MODULE LICENSE("Dual BSD/GPL");static int hello init(void) {printk(" 1 Pork chop sandwiches!\n");return 0;}static void hello exit(void) {printk(" 1 What are you doing? Get out of here!\n");}module init(hello init);module exit(hello exit);Add hello.o to the list of object modules in the Makefile:obj-m : nothing.o hello.oPage 6 of 14
After you build and insert the module into the kernel on the target, you can view the module'sprintk messages by running the following command: dmesg tail –n# n being the number of kernel messages to printQ3. What do the functions module init and module exit do? When are they called?When is hello init called?C. Memory moduleIn this section, we will write a driver that will allow us to read andwrite a character to a pseudo-device. Download the memorymodule code (partC.c) from the website, build it and insert it intothe kernel as you did the nothing driver.After you’ve inserted the memory module into the kernel, we needto create a device file on the Pi that will let us interact with ourdriver from userspace. In the command below, we’re telling mknod(make node) to create a new character device file (c) with majornumber 60 and minor number 0: mknod /dev/memory c 60 0We also need to unprotect the device file before normal users can interact with it: chmod 666 /dev/memoryWe should now be able to echo characters to our device file from the terminal. In your terminal,type the following command: echo -n honeybadger /dev/memoryQ4. What does the “-n” with the echo command do? Why do we want it here?To check the contents of our memory driver, use the cat command: cat /dev/memoryQ5. What was the output of cat, and why did it output this letter?G1. Write a userspace program in C that opens your memory driver as a file, writes the string“Honey badger”, reads a character back, and prints that character to the terminal.Now go back and look carefully at that code. In the case of read, you are effectively sendingback three values (buf, f pos, and the actual return value) and you’ll need to understand themto be able to do the next. At least read over the section inPage 7 of 14
df on “read and write” (starts on page 63) butlooking over that whole chapter might be good.G2. Modify the memory driver so that it inputs (‘echo’) and outputs (‘cat’) the last 5characters sent to it where the most recent character is on the left (you could think of itas a LIFO). To illustrate the expected behavior, we’ve provided examples a and b:a. If you do an echo –n “ABC” to the device and then read from it, you shouldget “CBA”.b. If you do an echo –n “ABCDE” to the device and then echo –n “XY” to it,you should get out “YXEDC” when you read from it.Test it with both your userspace program (from G1) and by using the examples abovefrom the command line to insure you are getting the correct behavior. Demonstrate it toyour lab instructor.D. GPIO and the H-bridge device driverThe Raspberry Pi has a fair bit of general purpose I/O. In this section we will work with that I/Ofirst by using sysfs kernel drivers in user space, and then in kernel space. In the past, this labalso included an introduction to other methods of controlling GPIO, namely remapping virtualaddresses from user space and directly accessing GPIO from kernel space using logicaladdresses. We have removed these sections because of time constraint. If you are interested,they are in the appendix at the end of the lab.D1: Driving GPIO in user space using sysfsHere we’ll interface with a GPIO device driver using sysfs. Let’s use GPIO23. Look in/sys/class/gpio on the target. You should see a few files in there, including export, butno gpio23. Type echo 23 export when you are in that directory. Now a gpio23 directoryshould show up. Change directory into gpio23 and you’ll see a few device files. Read the firstpart of http://squidge.sourceforge.net/gpio/ for a background of these files and directories (thatdocumentation is for a different board, but it’s the best explanation we’ve found). Note, writing a“0” to the “value” interface will cause the wire to go low, any non-zero value will cause it to gohighx unless the string sent is too long in which case you just get an error.Now write a short C program which toggles GPIO23, using stdio.h, as fast as you can using thedevice files in /sys/class/gpio/gpio23.Q6. Take the following measurements:a. What period does the signal have?b. What is the longest period you get in 10K gpio/sysfs.txt has a more detailed description of the gpiointerface including what causes the pin to go high or low.Page 8 of 14
c. Use the trigger tool on the scope to trigger if the pulse width is 2x the averageyou’ve measured above (yes, we measured period above, but we can’t triggeron period, so use pulse width and common sense). Use the “single” run-controloption to see what is going on. Either download or sketch the signal.d. Explain the results you saw in part b and c.e. Why might the above parts indicate a significant problem with using theRaspberry Pi with Linux as the basis for an embedded system?Q7. Briefly look over the lab appendix at other methods of controlling GPIO. What are themain pros and cons of using those methods in comparison to using sysfs and prewritten kernel drivers?G3. Show your GSI that you can capture an instance of the period being significantly largerthan it should be.D.2: Implement an H-bridge device driverConsider the code in partD2.c, found on the course website. It is a simpleport of the H-bridge code in lab 1 from Arduino to C, with many of thesame functions. Examine the code to identify any relevant differences.You will need to complete the two subroutines setPin() andremovePin(). You should communicate with GPIO using linux/gpio.h, apre-written header file for communicating with GPIO from kernel space.The function setPin() should first check if the pin is valid, request thepin, set the direction, and then export the pin. The function removePin()should set the pin value to 0 before unexporting and freeing the pin.Now connect your Raspberry Pi to the h-bridge used in the previous labs.See the pin mappings for the Pi3 to the right. Using your new foundknowledge of creating memory modules from part C, complete themodule so that writing the characters ‘F’, ‘B’, ‘R’, ‘L’, and ‘S’ to yourdevice driver sets the GPIO pins to control the H-bridge as expected.G4. Show that you can control your robot by writing characters to yourdevice driver.E. IOCTLWhile we can communicate to our device through the device driver, we currently have no way ofcommunicating with the device driver itself. For example, we might have a CD-ROM driver thatcan read and write blocks of data, but have no natural way to request that the driver eject thedisc. For this purpose, Linux provides the ioctl syscall. We can define request codes that wepass through ioctl from user space to implement device-specific functions. To request aparameter or data structure from the device driver, we can pass in a reference to that datastructure through ioctl.Page 9 of 14
Modify the H-bridge device driver by adding the provided code in partE.c. Once you’ve donethat install it in the same way you did the single-character driver from part C. Now build and runthe following code on the Raspberry Pi:#include sys/ioctl.h #include stdio.h #include fcntl.h main(){int a open("/dev/memory",O RDWR);ioctl(a,0,0);}Q8. What does the userspace program do? What is the value of cmd that memory ioctl isseeing?Once you have a basic understanding of memory ioctl, modify the device driver code so that anioctl() call from user space is able to change the pin settings for the h-bridge. You should beable to alter the polarity of each motor in addition to switching the effects of command ‘L’ and‘R’.G5. Show that you can alter the polarity of the motors using ioctl() calls from a userspaceprogram.Page 10 of 14
F. OpenCVCovid optionalBecause not all of you will have easy access to a webcam that will work with the RPi, we aremaking this section optional. But be aware: using the RPi to do computer vision is often*the* reason to use Linux in this class. If your group is doing computer vision, you’ll reallywant to do this part.Now you will write a user space program in python that will communicate with your h-bridgedevice driver in addition to implementing basic blob detection using OpenCV.At a high level, we want our robot to find a green pingpong ball, determine its distance, and move towards it.Download partF.py from the course website to find asimple implementation of blob detection. At this point, youwill need to plug in a webcam, monitor, and keyboard toyour Pi in order to calibrate a few parameters.Examine the code to determine which conditional determines the color of the drawn circle.Modify the python code so that it writes the proper commands to your h-bridge device driver tomove toward the ball.In addition, we would like you to implement one additional feature. For example, improve thecode we have given you so that it is less likely to detect false circles. Or, find out how to detectwhen the circle detected is off center and have the robot turn to compensate.Q9. In two sentences or less, what is the calibration function doing?Q10. Describe what the following OpenCV functions do in the script we provided. We arelooking for an understanding of what each step is trying to accomplish cv2.inRange( ) cv2.erode( ) cv2.dilate( )G6. Demonstrate your completed robot to your GSI. Show that your robot will move forwardtowards a tennis ball and stop when it moves within a certain distance.Very optional—you don’t need to do this, but if you are going to use a database for theproject, you might want to.Q11. Now consider the updated code in partF2.py. What are we tracking in the exampletable? When do we insert new values into this table?Page 11 of 14
Q12. What does the adapt array() and convert array() functions do? If we wantedto avoid using these functions, how would inserting images into our tables change?Q13. After running partF2.py and populating the example table, consider database.py.What command would select the oldest image in your database? Run this command.Page 12 of 14
3. Postlab (note, you’ll need a Pi to do Q13)Q14. Find another device that uses ioctl. Why does it use it? In general, you’ll find thatpeople using ioctl have been pushed toward using sysfs instead. How is it that sysfscan do anything close to what ioctl can do?We really need to cover interrupts, but (as we’re sure you’ll agree) this lab is already too long.But for now, take a look at chapter 10 of http://lwn.net/Kernel/LDD3/ and answer a fewquestions.Q15. On the Raspberry Pi, what do you get when you type cat /proc/interrupts? What doesthat output mean?Q16. Consider the function short interrupt(). In your own words, what is thisfunction’s purpose?4. AppendixThis material was in previous versions of the lab. It’s mildly useful and you may want to look atit if you are planning on doing significant embedded Linux work. But it’s just here for reference.In addition to driving GPIO using pre-written drivers from kernel space, there are additionalways to control GPIO. There are limitations with each method.1. User space: direct access using user virtual addresses.2. Kernel space: direct access using kernel logical addresses.A: User space virtual addressesSee the example code below. It opens /dev/mem to provide a direct map into physical memory,but is using placeholders for some values. The basic goal of the code is to provide access tospecific physical addresses. The documentation for our processor is 12/02/BCM2835-ARM-Peripherals.pdf. Youcan use this to find the memory location do the GPIO registers start, from the prospective of theprocessor? (Hint: go to the GPIO section and section lude#include errno.h stdio.h stdlib.h string.h sys/types.h sys/stat.h unistd.h Page 13 of 14
#include fcntl.h #include sys/mman.h #define MMAP SIZE fill in #define MMAP OFFSET fill in volatile unsigned long* init memmap(){int mem fd open("/dev/mem", O RDWR O SYNC);if (mem fd 0) {printf("/dev/mem error: %d, errno: %d, meaning: %s\n",mem fd,errno, strerror(errno));exit(0);}volatile unsigned long *gpio (unsigned long*) mmap(NULL, MMAP SIZE,PROT READ PROT WRITE, MAP SHARED, mem fd, MMAP OFFSET);if (gpio MAP FAILED) {printf ("GPIO Mapping failed, error: %s\n",strerror(errno));close(mem fd);exit(0);}return gpio;}B: Kernel space logical addressesInstead of using the prewritten drivers to access GPIO from kernel space, it is also possible toaccess I/O memory directly. Depending on the platform used, we may need to use kernelfunctions such as ioremap() to make I/O memory addresses accessible. Readhttp://www.makelinux.net/ldd3/chp-9-sect-4. You should copy your memory device (either whatyou gave you or what you had when you finished part C) and use that as a basis for your driver.Try to create a simple driver so that a write of a “0” to it should drive GPIO23 low, a “1” shoulddrive the gpio line high, and reading from it should give the current value of the line.Page 14 of 14
Lab 4: Linux Device Drivers and OpenCV This lab will teach you the basics of writing a device driver in Linux. By the end of the lab, you will be able to (1) build basic loadable kernel modules (2) implement a h-bridge device driver, (3) talk to device drivers using ioctl, and (4) communicate with your device driver using code from user space.