Transcription
prEditprEdit allows you to create a paper edit from speech transcriptions, and export it as an editedsequence to Premiere Pro or Final Cut Pro.Workflow .1Working with Text Transcriptions .2Working with JSON Transcriptions .3Creating Adobe Speech Transcriptions .3Making Corrections to a Transcript .4Starting a new prEdit project in Final Cut Pro .5Starting a new prEdit project in Premiere Pro .5Using the Transcript View .5Using the Story View .7Using Preview Windows .9Preferences .10Activating prEdit .11Moving prEdit to another computer .11WorkflowprEdit works with transcripts that allow editing of video using text as the primary interface.After preparing transcripts the media and transcription information is imported to prEdit.In prEdit interviews can easily be broken into paragraphs, which are effectively subclips, andmetadata or log notes added. These subclips can be searched and built into a story beforebeing exported to Final Cut Pro, Premiere Pro or a range of other export formats.Prepare TranscriptsprEdit will work with almost all current transcription formats that include time stamps ortimecode. You can move a project into prEdit without any loss of entered log notes: these willbe preserved, displayed in prEdit, and returned to the NLE using your existing transcripts.Alternatively, if you’re creating new transcripts, we recommend 3PlayMedia.com and theirJSON format as the transcription format that has the most accuracy within prEdit, with theminimum effort.prEdit also supports transcripts coming from the Adobe speech analysis feature: either usingthe automatic transcription, with a script fed to Premiere Pro or Soundbooth, or using atranscript through an Adobe Story OnLocation Premiere Pro CS5 workflow, that preservesnames and punctuation.
Edit transcripts to selects and add log notesIn the Transcript View, you move between clips, choose a paper color for the clip. In this viewyou can add log notes, additional to what has been entered in the NLE. The interface designmakes prEdit the fastest place to enter log notes because it fully supports auto-complete.Individual clips can be played at any time.Edit selects into a StoryIn the Story View, you can search through the selects using any of the log note criteria, or bysearching through the text. Stories are built from these selects by moving a select from theSelects List to the Story. Selects can be further edited within the story view to trim the select,moving unwanted material back to the Selects List. Selects can be moved around freely withinthe Story Narration can be added to a sStory and temp audio will be created.ExportFrom prEdit, the results can be sent directly Final Cut Pro, exported as XML for Final Cut Proor Premiere Pro. The text can be output to a text file or a voice-over script ready forrecording containing all the narrative material from the Story.Working with Text TranscriptionsprEdit supports a number of transcription formats and workflows and it looks for the“sidecar” file (.txt, .rtf, .doc or .docx) in the same folder as the media file. prEdit will workwith most “industry standard” timecode-stamped transcriptions. This includes files withtimecode or time stamps at the start of every paragraph or where the time stamps are midparagraph. The more time stamps in the transcript, the more accurately the video will matchthe text. You can use the Preview window to trim video to match the transcript (see UsingPreview Windows).prEdit can recognize time stamps in various formats separated by “:” or “;” or “.” andoptionally surrounded by square brackets []. For example: 01:23:45 or 01:23:45:21 or1:23:45 or 1.23.45 or 1:23:45.420If you have transcripts, they simply need to be named tomatch the media file name. These files are placed in thesame folder as the media file and will be automaticallyrecognized by prEdit. You may choose to remove anyheader or footer material irrelevant to the transcript sothat this text is not added to your transcript in prEdit.Advantages: Minimal variation from currentworkflows. Uses transcripts you already have; workwith the same vendors you currently do; pick up aproject and move it from FCP to prEdit without losing any work: all log notes alreadymade in FCP will be visible and editable in prEdit.Disadvantage: The time stamps are not “per word” so there will be some variabilitywhen creating new subclips. This can be corrected within the prEdit viewer.
Working with JSON Transcriptions3PlayMedia.com and MediaSilo.com can provide transcripts in multiple formats, includinghuman-readable formats, but specifically a JSON (JavaScript data format) version that hastime-stamps for every word. Like text transcriptions prEdit looks for the “sidecar” JSON file inthe same folder as the media file.Both 3PlayMedia.com and MediaSilo.com offer a range of services beyond transcriptions.These transcription files simply need to be named to match the media file name (exceptwith .json at the end, not .mov or other suffix). These files are placed in the same folder asthe media file and will be automatically recognized.Advantages: Higher accuracy when making subclips. Most accurate, with least work,workflow.Disadvantages: A new vendor relationship may need to be created.Creating Adobe Speech TranscriptionsWith the available Adobe Production Suite tools there are three ways that the time stamps canbe generated and embedded in the file ready for prEdit:1. Use Speech Analysis in Premiere Pro or Soundbooth CS5;2. Use a human-derived transcription to drive the speech analysis in Premiere Pro orSoundbooth CS5; or3. Use a human-derived transcription and format the text in Adobe Story as a singlescene film script; embed the script into the media file with Adobe OnLocation andanalyze the speech in Premiere Pro.Note: Premiere Pro CS5 is required to export Final Cut Pro XML for prEdit.We have tested these three workflows and would make the following comments before goinginto details of each. Speech Analysis in CS5 is highly variable in result. In our testing results varied fromvery good (close to 95% accurate) down to 15-20% accurate on some speakers. BothPremiere Pro and Soundbooth provide the ability to correct text to match the speechinside the application’s Speech Analysis (Metadata) window. This is definitely viablewhen you have a “good” speaker relatively accurately analyzed. Where the results from Speech Analysis are unlikely to be accurate (or have provennot to be) it is part of the Adobe workflow to provide it with a human-derivedtranscription as a “guide”. This is supposed to provide a word-accurate transcriptionlocked to the transcript but in our testing it was close, but not precisely accurate. In neither 1 nor 2 workflows did we ever experience Speech Analysis accuratelydetermining speaker identity. When multiple speaker analysis is turned on, therewere usually many more speakers identified than were in the interview. Workflow 3, while a little more effort, pays off when imported to prEdit because thefull grammar is retained, and speakers are accurately identified, which allows prEditto automatically split each speaker into subclips at each speaker change.Note: Further instruction on using Soundbooth and Premiere Pro for speech transcription canbe found at http://help.adobe.com/en 66767.html
1. In Adobe Soundbooth CS4/CS5 or Premiere Pro CS5, open the media files (video audio or audio-only) you want to transcribe, then in the Metadata panel (Window Metadata) click the Transcribe button. More accurate speech analysis can beachieved by adding a script that matches the recorded dialog in Premiere Pro orStory.2. Correct the transcript in Soundbooth by double-clicking on a word to edit it;Control-click on a word and from the contextual menu choose Insert Word Before,Insert Word After, Delete Word, Merge With Next Word or Merge With PreviousWord; optionally add punctuation and capitalization. (See a video 03.html for more details.)Tip: Soundbooth CS5 and Premiere Pro CS5 support multiple workflows for increasing theaccuracy of a transcription by feeding it an existing transcription obtained via moreconvention means. Soundbooth can import a text transcript or file from Adobe Story that will improve accuracybut not preserve punctuation. In Soundbooth each media file is processed individually. Premiere Pro CS5 can batch process media files for transcription using Adobe MediaEncoder. If the transcription is imported first to Adobe Story, then empty Clips created in Adobe OnLocation, and merged in Premiere Pro CS5 and sent to AME for encoding, then punctuationand capitalization are maintained.Making Corrections to a TranscriptCorrections to a transcript can be made either in Premiere Pro/Soundbooth or in prEdit. Corrections that add, remove, combine or split a word should be done in Soundbooth. Thegoal for corrections is to associate words in the transcript with areas of the waveform. Whenyou click the Play button in the Metadata window, the appropriate word should highlight asthe audio plays. Corrections of punctuation or capitalization can be made either in Soundbooth or in prEdit:1. In prEdit’s Transcript list or Story list, select a word or words.2. Control-click to open the contextual menu. This gives you access to Look Up inDictionary, Spelling and Grammar Tools, Substitutions and Transformations.Tip: Since prEdit has the easiest correction workflow, our recommendation is: Do all corrections that require splitting or adding words in Soundbooth; then Do all other corrections in prEdit. prEdit will reject edits that change the word countin a transcript. However you can add a word and maintain the word count by usingthe underscore character between words like this.
Starting a new prEdit project in Final Cut Pro1. In Finder arrange your media files and their corresponding “sidecar” text or JSONfiles. (You can mix-and-match transcript formats: prEdit will first look for Adobespeech transcription in the media file, then for a JSON sidecar file, then for a textsidecar file.)2. In Final Cut Pro, import the media files.3. (Optional) Create multiclips from each camera angle.4. (Optional) Create a new empty sequence with your desired sequence settings.Tip: Drag a clip with the most common format into the empty sequence. If thesequence settings need to change, Final Cut Pro will offer to change the sequenceto match. Then delete the clip to leave an empty sequence.5. Select the clips and sequence in the Browser window (or an enclosing Bin) thenchoose the File menu, and from the Export submenu select XML 6. Name and save the clips XML file.7. In prEdit, click the Import Clips XML. button and select the exported XML file.Important: The clips must be online when importing XML into prEdit.8. Choose the File menu and select Save. Name and save the prEdit project.Starting a new prEdit project in Premiere Pro1. If you’re using sidecar transcripts, in Finder arrange your media files and theircorresponding “sidecar” text or JSON files. (You can mix-and-match transcriptformats: prEdit will first look for Adobe speech transcription in the media file, thenfor a JSON sidecar file, then for a text sidecar file.)2. In Premiere Pro CS5, select the transcribed clips (or Bin of clips) in the Browserwindow; then choose the File menu, and from the Export submenu select Final CutPro XML 3. Name and save the clips XML file.4. In prEdit, click the Import Clips XML button and select the exported XML file.Important: The clips must be online when importing XML into prEdit.5. Choose the File menu and select Save. Name and save the prEdit project.Using the Transcript ViewThe Transcript View is where you create subclips (also called selects) from the transcript ofeach media file, and add logging information and comments to the subclips.1. You can add logging information and comments for the entire clip. If any logginginformation or comments were added to the clip before exporting XML, they willappear in the appropriate fields. Final Cut Pro’s Label 2 field is used for Priority,and its master comments fields are used for Story Keywords, Location, the Personspeaking, and the Event or Theme. Logging information appears in both PremierePro and Final Cut Pro, but the Comments fields are only visible in Final Cut Pro (seeAbout Master Comments).
2. You can change the paper color for the selected transcript from the color popupmenu.Tip: Set a different paper color for each interview subject.3. To break the clip into subclips, double-click on the transcript text to enter editingmode, then place the cursor between some words and press the Return key: theclip splits into two subclips. Spelling corrections, capitalization and punctuation canalso be added in editing mode (see Making Corrections to a Transcript).Tip: When splitting a clip, the subclips get the same logging information, commentsand paper color as the parent clip. To save time, enter common information (suchas person, location and event) for the original clip before splitting it into subclips.4. Adjacent subclips can be rejoined by selecting both subclips and clicking the Joinbutton.5. Initially, each subclip is marked as Good. To remove interviewer questions, falsestarts and bad takes, select one or more subclip transcripts and turn the Goodcheckbox off (or type G). The transcript’s text changes to grayed out, so youalways see the full transcript for a clip.6. Subclips can have different subclip names, logging information, comments andpaper colors. If you select multiple subclips, logging information and commentscan be added to all the selected subclips (provided the field doesn't already havean entry for any of the selected subclips). To make entry of Logging Informationand Comments faster and more consistent, either: click the popup menu beside the field to choose from a list of previous entries;or start typing in the field and it will autocomplete with the closest match.7. Story Keywords and Person can have multiple comma-separated entries, so theseare handled in a different way to the other Comments fields: start typing in the field and the possible matches appear in a list underneath; type a comma after the text to turn it into a “token”; type ? to see a popup menu of all Story Keywords or People.8. To preview the video of a subclip, select it in the Transcript list and click thePreview button, or press the Space bar. The subclip video plays in a Previewwindow (see Using Preview Windows).9. If the subclip’s video doesn’t match its transcript, you can use the Trim sliders inthe Preview window to adjust the in and out point by up to 2 seconds (see UsingPreview Windows).10.Use the search field to filter the subclips to show only those with the searchword(s). Using the popup menu you can limit the search to Transcript, StoryKeywords, Location, Person, Event or Theme, or Everywhere (see About MasterComments). The search is not case-sensitive. Recent search word(s) can beaccessed from the search field popup menu.11.To change to another media file, select it in the Clips list.12.When two or more prEdit project are open, you can copy clips from one project toanother by clicking the Copy Clips button. From the popup menu of open prEditprojects, choose the project to send the clips to.
About Master Comments Story Keywords (Master Comment 1): This is where you enter keywords, or tags, for thissubclip. You can enter multiple keywords separating with a comma. When multiplewords are entered, each item between commas is identified as a keyword and turnedinto a token. Location (Master Comment 2): An identifier for where this clip was shot. Person – who’s on camera (Master Comment 3): Enter the name of the subclip's speakeron camera. If the shot starts on one speaker and ends on another, enter both nameswith a comma in between. Each name is turned into a token. Event or Theme (Master Comment 4): Provides an overall context for this clip – wheredoes it fit within the overall story arc, or what is being referred to in this clip? The Eventor Theme tag is used to provide context for the clip when being edited and is oftenrelated to the question asked by the interviewer.Using the Story ViewOnce the transcripts have been broken down into subclips, change to the Story View. Hereyou build the Story from your Selects.1. Click the Story View toolbar button to change to Story View. The Selects list on theleft initially contains all the subclips from the Transcript lists that were marked asGood.2. To find the selects you want, use the search field above the Selects list to filter thesubclips to show only those with the search word(s). Using the popup menu you canlimit the search to Transcript, Story Keywords, Location, Person, Event orTheme, or Everywhere (see About Master Comments). The search is not casesensitive. Recent search word(s) can be accessed from the search field popup menu.3. To preview the video of a subclip, select it in the Selects list and click the PreviewSelect button, or press the Space bar. The subclip video plays in a Preview window.You can have multiple Preview windows open at the same time.4. Selects are moved from the Selects list to the Story list on the right by selectingthem in the list and clicking the Add button; or you can simply drag them over tothe Story list. The story duration updates at the top of the Story list.5. Subclips in the Story list can be rearranged by dragging and dropping them.6. To remove a subclip from the Story list, select it and click the Remove button; ordrag it back to the Selects list. The story duration updates at the top of the Storylist.7. As you build your story, you may find that your initial subclips are too long. Likethe Transcript list, subclips in the Story list can be trimmed by typing a Return inthe transcript text when in editing mode. The unwanted parts of the transcript canbe removed from the Story list by sending them back to the Selects list. They canalso be removed from the Selects list by turning their Good checkbox off (or type G).Tip: Because you can split and join subclips in the Story list, use the Transcript listto do the initial division into subclips and then refine further in the Story list.
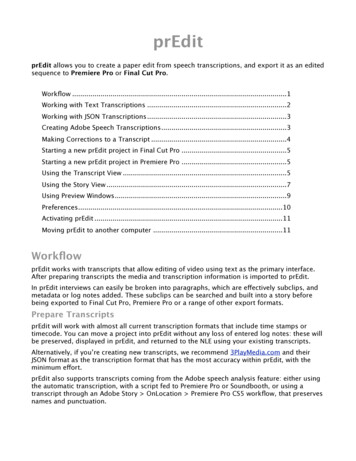
8. Adjacent subclips from the same clip can be rejoined by selecting those adjacentclips and clicking the Join button.9. To add a voice over script to the story, select a subclip in the Story list and click theAdd V.O. button. An empty Voice Over clip is added below the selected subclip.Type in your voiceover text and a placeholder voice over file will be created (seeAbout Voice Overs).10.To preview part of the story as video, select one or more subclips in the Story listand click the Preview Selected button, or press the Space bar. The Preview windowwill play the selected subclips in the order they appear in the Story list (see UsingPreview Windows).11.To preview the paper edit as video, deselect any selected subclips by clicking theDeselect All button (or Esc key), then click the Preview Story button (or Spacebar). The Preview window will play the Story list subclips in order (see Using PreviewWindows).12.Once the Story has been built, you can export the paper edit by clicking the Exportbutton. Choose your Frame Rate from the popup menu and choose between SaveExcel Spreadsheet, Send to Final Cut Pro, Save XML for Premiere Pro, Savezipped XML file (for emailing to an editor), Save Text Transcript, or Save VoiceOver Script (the temporary audio that needs to be replaced). If saving a spreadsheet, name and save the Excel file. The spreadsheet hascolumns for Subclip Name, Source In, Source Out, Duration, Person,Transcript, and File Path. The .xls spreadsheet created by prEdit can beopened by Excel, Numbers, Open Office or Google Docs. If sent to Final Cut Pro, choose theoriginal project in the Import XMLdialog’s Destination popup menu,and either: use your currentsequence preset by leaving theSequence Settings popup menu setto (auto); or select the appropriatesequence preset from the SequenceSettings popup menu and click theOverride with settings from XMLcheckbox “off”.Each “Good” select is added to theproject as a subclip in a bin namedfor the master clip with the logginginformation and comments enteredfor it. The new sequence contains thesubclips in Story list order withsequence markers containing theperson speaking and speechtranscript marking the duration of thespoken transcript.IMPORTANT NOTE: Final Cut Pro by default will import the sequence to yourcurrent Sequence Preset setting (Final Cut Pro Audio/Video Settings.)unless you choose a different setting in the Import XML window. If you findthat the sequence requires rendering, open the Sequence Settings window
(Sequence Settings. or Command-0) and change the Compressor tomatch your media, or select a new preset by clicking the Load SequencePreset button. You can change any settings except for Editing Timebase. If saving for Premiere Pro, name and save the XML file. In Premiere Pro choosethe File menu and select Import. Each “Good” select is added to the project asa subclip (in a bin named for the master clip) with the logging informationentered for it. The new sequence contains the subclips in Story list order, andthe transcript is available in the Metadata window. If saving a zipped file, name and save the .zip file. If saving a text transcript or Voice Over script, name and save the text file.Each subclip’s transcript appears as a separate paragraph with the Personname and start timecode above.About Voice Overs A Voice Over is a clip where you don’t have media recorded yet, so prEdit creates aplaceholder in the Story list and an AIFF file from the script using Mac OS X’s Text toSpeech. The AIFF file is recreated any time the script is edited, and is saved with yourother media files. Voice Over clips can have logging info and comments entered in the Transcript view justlike any other subclip. To change the Text to Speech settings, open System Preference’s Speech panel and clickthe Text to Speech tab. You can choose a voice and adjust the speaking rate. “Alex” and“Vicki” are the highest quality voices. To recreate all your voice overs with new Text to Speech settings, click the Remake V.O.button (you may need to click Deselect All to change the button from Add V.O. toRemake V.O.).Using Preview WindowsPreview Windows are separate windows that play a subclip, selected subclips or the Story. Previews and thumbnails are only available if the original media files are online.Tip: You can continue to use prEdit for logging, breaking down clips into subclips andbuilding the paper edit even if the media files are offline. You can have multiple Preview windows open at the same time. Use the Space bar to play and pause video in the frontmost Preview window. The Preview windows can be resized. The title of the Preview window playing a subclip will bethe subclip name if set, or the clip name; the title of thePreview window playing the story will be “Story”.Tip: Use the Window menu to switch between Previewwindows and prEdit project windows; or use to cyclebetween the windows. You can adjust a single subclip’s in or out points byusing the Trim In and Trim Out sliders so that the videomatches the transcript.
PreferencesChoose the prEdit menu and select Preferences to open the Preferences window.AutosavingUse the popup menu to choose an interval for automatically saving changes to your prEditproject. Larger projects can take several seconds to save, and the application may becomemomentarily unresponsive (spinning beach ball) during an autosave.Software UpdatesUse the Check at Launch checkbox to choose whether to automatically check for softwareupdates. You can manually check for software updates by clicking the Check now button, orby choosing the prEdit menu and selecting Check for Updates
Activating prEditAfter you install prEdit onto a computer, it will need to be activated with a Serial Numberbefore it can be used. Each serial number can be used to activate only one computer at atime. If you want to activate the software on another computer, you’ll need to deactivate itfirst. See Moving prEdit to another computer for details.You’ll temporarily need internet access for the activation so that the software can connect toour server and confirm the serial number. When the software is first run it will display a Software License Agreement. Read thelicense agreement and click the I Agree button at the bottom of the page. Enter the Serial Number that was given to you and click the Activate button. Thesoftware will send the serial number to our server for confirmation. You’ll get a message in green saying that you’ve successfully activated your license.Click the Continue button.If the software could not be activated with the Serial Number, you’ll get a message in redexplaining the reason, such as: This is not a valid Serial Number - check to make sure you have entered the serialnumber correctly; This is not a Serial Number for prEdit - make sure you’re entering a serial numberthat can be used to activate prEdit; The Serial Number has already been activated - if you want to activate prEdit on thiscomputer you'll need to deactivate the other installation before activating this one, orpurchase another serial number.Moving prEdit to another computerTo move prEdit from one computer to another, you'll deactivate it on the first computer, thenactivate the installation on the second computer.To deactivate the software on one computer and activate it on a different computer, bothcomputers will temporarily need internet access. On the first computer, choose Deactivate from the application menu. Confirm that you want to deactivate the software by clicking the Deactivate button. You’ll receive a message in green saying that you’ve successfully deactivated yourlicense. On the second computer, run prEdit, and follow the instructions for Activating prEdit.
1. In Adobe Soundbooth CS4/CS5 or Premiere Pro CS5, open the media files (video audio or audio-only) you want to transcribe, then in the Metadata panel (Window Metadata) click the Transcribe button. More accurate speech analysis can be achieved by adding a script that matches the recorded dialog in Premiere Pro or