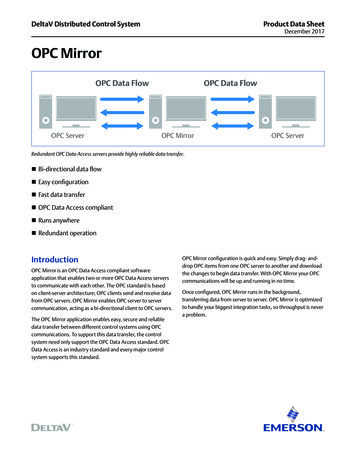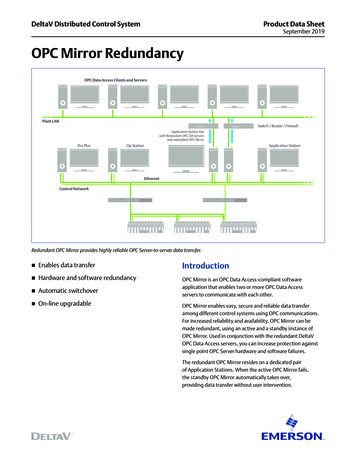
Transcription
System Platform and OPC DataHubBasic OPC Connectivity
Page 2 of 29Table of ContentsINTRODUCTION3Intended Audience3OPC DATAHUB SETUP4CONFIGURING SYSTEM PLATFORM7System Objects Configuration7Device Integration Object Configuration10Remote OPC Connections and DCOM12Browsing the OPC DataHub Address Space13Adding Scan Group Items via OPC Browsing15Assigning the OPCClient Object19Application Object Configuration20Deploying the Configured Galaxy Objects24Viewing Data25SUMMARY29Contact Us29
Page 3 of 29IntroductionThe purpose of this guide is to demonstrate how to make a basic OPC connection to the OPC DataHub withWonderware’s System Platform 3 (Archestra). We will use System Platform to refer to version 3 and allprior versions (formerly known as IAS/Industrial Application Server). There are a number of different waysSystem Platform can connect to I/O tags. This basic example uses an Application Integration (AI) Objectconnecting to an OPC Device Integration (DI) Object which connects to the OPC DataHub.The OPC DataHub in this example will use the DataSim simulator included with the OPC DataHub install.The assumption of the document is that you have a fully configured OPC, DDE or ODBC data sourceconnected to the OPC DataHub. Therefore we will only show how to connect System Platform to the OPCDataHub. If you do not already have the OPC DataHub installed, the free one-hour demonstration versioncan be downloaded at http://www.softwaretoolbox.com/opcdatahub. This version functions the same as afully licensed version within the one-hour demo mode. Stop the OPC DataHub and restart it for anotherhour of runtime.This guide will also demonstrate how to connect System Platform tags to OPC DataHub points and thus topoints in your data source. For more detailed information on OPC DataHub configuration, refer to the helpfile or the training resources on the website link above.The information provided here is not a substitute for your System Platform documentation. This procedureis being demonstrated in order to show a complete connection, not to provide comprehensive training onhow to build System Platform projects.Intended AudienceThis guide is intended for Wonderware System Platform users who are new to OPC DataHub. Thisdocument makes the assumption that you have some familiarity with System Platform and have fullyconfigured your data source so that the OPC DataHub is successfully connected to the data source.OPC DataHub is a product of Cogent RealTime Systems (http://www.cogent.ca) brought to you by SoftwareToolbox Inc. (http://www.softwaretoolbox.com). System Platform, Archestra and Industrial ApplicationServer are products of Wonderware (http://www.wonderware.com).
Page 4 of 29OPC DataHub SetupWhen connecting an OPC client through the OPC DataHub to your data source the OPC Settings are theonly essential settings to the client, and therefore, are all that will be covered here. With the OPC DataHub,you can connect a variety of data sources: OPC Server, DDE Server, ODBC databases, or any other datasource that can accept a TCP Socket connection. For this example, you will need to open both the OPCDataHub (Start Programs Cogent OPC DataHub OPC DataHub) and the DataSim (Start Programs Cogent Simulated Data DataSim).Figure 1: Launching OPC DataHubWhen the Data Simulator opens, you will see the interface below and you will notice a status of Connectedif you have a successful connection.Figure 2: Data Simulator Interface
Page 5 of 29When the OPC DataHub opens you will see the User Interface as shown in Error! Reference source notfound. on page 5.As you can see in Error! Reference source not found., OPC DataHub opens to the general settings and hasa number of different settings. The settings we are concerned with are the OPC settings.Figure 3: OPC DataHub InterfaceIn this case because we are using the DataSim, which uses a TCP connection, we also must go to theTunnel/Mirror settings and select one setting.
Page 6 of 29Because the Data Simulator uses a TCP connection, we must make sure that “Accept plain-textconnections on service/port” is checked and that the port matches that of the port in DataSim.Figure 4: Tunnel/Mirror OptionsWe have assumed that the user has previously configured a connection to the data source (if you are notusing the data simulator shown in this example). We now need the OPC DataHub to act as an OPCServer. This is so that System Platform can connect to OPC DataHub using the OPCClient DI object. Thisis done by checking the “Act as an OPC Server” check box below.Figure 5: OPC DataHub OPC Settings
Page 7 of 29Configuring System PlatformSystem Objects ConfigurationThis example starts with the ArchestrA IDE open using a new Galaxy. Refer to your Wonderwaredocumentation for instruction on how to create a new System Platform Galaxy. For the purposes of thistutorial, we will be using the Deployment View in our sample Galaxy, SWTB1, as seen in Figure 6 below.Figure 6: Deployment ViewThe first step in configuring a new project begins with the System Object in the Template Toolbox. Expandthe System Object and highlight the WinPlatform template object, as shown in Figure 7 below.Figure 7: WinPlatform
Page 8 of 29Drag and drop the WinPlatform template object under the Galaxy in the Deployment View as shown inFigure 8 below. This example will use the default names, but you can name these objects as needed foryour project.Figure 8: Adding WinPlatformThe AppEngine is the next System Object we need to create for this project. Drag and drop the AppEngine template object under the Unassigned Host folder to create your AppEngine 001 object asshown in Figure 9 below.Figure 9: Adding AppEngine
Page 9 of 29The final System Object required is the Area Object. Drag and drop the Area template System Object tothe Unassigned Host folder under the Deployment View to create the Area 001 object as shown in Figure10 below.Figure 10: Adding Area ObjectRefer to your Wonderware documentation for a better understanding of how these logical objects work andhow to best name them for your system.The AppEngine 001 object can now be assigned under the WinPlatform 001 object and the Area 001object can be assigned under the AppEngine 001 object, as shown in Figure 11 below. There is noconfiguration of these objects required for this example.Figure 11: Assigning System ObjectsNow that our System Objects are created and in place we can configure our DI or Device Integration object.
Page 10 of 29Device Integration Object ConfigurationWe start by selecting our template object from the Device Integration section of the Template Toolbox asshown in Figure 12 below. The OPCClient object template is selected because this exampledemonstrates an OPC connection to the OPC DataHub.Figure 12: OPCClient DI ObjectDrag and drop the OPCClient template object to the Unassigned Host folder in the Deployment View asshown in Figure 13 below to create our OPCClient 001 DI Object.Figure 13: Adding OPCClient DI Object
Page 11 of 29Double-clicking the OPCClient 001 object under the Unassigned Host will open the object properties to theright of the Template Toolbox as shown in Figure 14 below.Figure 14: OPCClient Object PropertiesClick on the Ellipses Button ( ) to the right of the “Server node” text field, as shown in Figure 15 below.Figure 15: Selecting a Server NodeThe Browse Node dialog box will open. You can select the Domain of the computer node where The OPCDataHub is installed. This will then display a list of available computer node names that are available in that
Page 12 of 29domain. The name of the node for this example is “KMR-IAS-TEST”, so we will highlight that node nameand select OK, as shown in Figure 16 below.Figure 16: Browsing NodesRemote OPC Connections and DCOMFor this example, the node “KMR-IAS-TEST” is the local machine where both System Platform and OPCDataHub are installed. Connecting to a node with OPC DataHub installed that is not the same node whereSystem Platform is installed will involve a remote OPC connection. This means Windows DCOM SecuritySettings will play a factor in the success of your connection to OPC DataHub. The tunneling abilities of theOPC DataHub can be used to avoid the need for DCOM configuration across a network.If you want to use DCOM, please refer to our DCOM Tutorial Videos and Guides, available at:http://www.softwaretoolbox.com/dcom.
Page 13 of 29Browsing the OPC DataHub Address SpaceOnce the Server node is selected, you will be able to browse for the available OPC Servers (the OPCDataHub is acting as an OPC Server in this case) on the node selected by expanding the dropdown menubeside the Server name field as shown in Figure 17 below.Figure 17: Browsing for OPC ServersThe options you have in your OPC Server list will depend on the number of OPC Servers installed on thatmachine. For connections to OPC DataHub, you will always select “Cogent.OPCDataHub.1” from the list.Problems browsing for OPC Servers typically indicate DCOM issues; please refer to the section of thisdocument entitled Remote OPC Connections and DCOM for details on how to address this problem. Ifyou are using the OPC DataHub in demo, please make sure the demo period had not ended. You can stopthe DataHub and restart it and try the connection again.Once OPC DataHub has been selected, we can now proceed to the Scan Group tab of the OPCClient 001object as shown in Figure 18 below.
Page 14 of 29Figure 18: Scan Group ConfigurationSystem Platform requires that at least one Scan Group be configured. If all of your items will need thesame Update Interval, you would only need one Scan Group, unless you wanted to group your items in acertain way. The Scan Group Update Interval will only effect how often data is returned to the SystemPlatform. The OPC DataHub does not pass update rates from OPC Clients to the OPC Server. The ratethe Data Source is requested to provide data is set in the OPC DataHub. Please see the information in thehelp file for the specific data source you are requesting data from to determine how this is set.If different items need different Update Intervals, you would configure multiple Scan Groups using adifferent Update Interval for each. For the purposes of this example, we will only be configuring one ScanGroup.To add a new Scan Group, click the blue “ ” symbol above the “Available scan groups” section, asdisplayed in Figure 19 below.
Page 15 of 29Figure 19: Adding a New Scan GroupThis will allow you to give your Scan Group a meaningful name and define the rate at which SystemPlatform will request updates for the items in this Scan Group, as seen in Figure 20 below.Figure 20: New Scan Group "Group1"For the purposes of this example, the Scan Group has been named “Group1” and uses the default UpdateInterval of 500 milliseconds (which is automatically used if you do not specify an Update Interval).With a Scan Group configured, there are now two options for adding items to the group.1. We can browse the OPC Server tag database for items to add.2. We can import a .CSV file containing the tag information.The following sections will demonstrate both methods.Adding Scan Group Items via OPC BrowsingFirst, we will add an item by browsing the OPC DataHub tag database. Highlight the scan group you havejust created, and then click the blue “ ” symbol above the “Associated attributes” section, as shown inFigure 21 below.
Page 16 of 29Figure 21: Adding Group AttributesThis will add a new “Attribute” to the scan group we have created. You are given the option of defining aname for this attribute or you can skip this step, in which case the full address including the Domain andTag Name from OPC DataHub will be used once an item is selected.To browse the tag database of OPC DataHub, click the Ellipses Button ( ) to the far right of the ItemReference column for the Attribute you are adding and this will open the OPC Item Browser, shown inFigure 22 below.Figure 22: OPC Item BrowserThe branch we are interested in is the “DataSim” branch, which you will notice is the name of the domainthat is configured in OPC DataHub as you can see in Figure 23 below.
Page 17 of 29Figure 23: Browsing BranchesHighlighting the “DataSim”, we are able to view and select the tags in the DataSim domain of the OPCDataHub, as you can see in Figure 24 below.Figure 24: Browsing OPC TagsTo add an item to the scan group, we must first add the desired item or items to the Basket area of the OPCItem Browser. The easiest way to do this is by selecting the item and dragging and dropping the desireditem into the Basket area, as shown in Figure 24 above.Once the desired item or items are added to the Basket area, clicking OK will add the basket items to theAssociated Attributes for the scan group, as seen in Figure 25 below.Figure 25: Attribute ListFor the purpose of this example, we will change the attribute name to “Ramp” to match the tag name inOPC DataHub. This name can be any meaningful name you would like, though. To change the attribute
Page 18 of 29name, simply highlight the Attribute and click the current attribute name, then enter the desired name, asshown in Figure 26 below.Figure 26: Changing Item NamesSince we are only adding one item for this example, we are finished configuring the OPCClient object.Save the changes made to the OPCClient object and close the configuration screen by clicking the Saveicon at the top, as shown in Figure 27 below.Figure 27: Save OPCClient ObjectYou will then be prompted to “Check In” the changes that have just been made. You can enter an optionalcomment here as well. Check in the changes by clicking the “OK” button, as shown in Figure 28 below.Figure 28: Check-In Object Changes
Page 19 of 29Assigning the OPCClient ObjectNow that the OPCClient Device Integration Object has been configured, it needs to be assigned. TheOPCClient Object needs to be assigned underneath the AppEngine 001 System Object that wasconfigured earlier. Assign the object by dragging OPCClient 001 from the Unassigned Host folder toAppEngine 001, as shown in Figure 29 below.Figure 29: Assigning DI Object
Page 20 of 29Application Object ConfigurationThe final object needed in order to connect to the OPC DataHub is the Integer Application Template,shown in Figure 30 below. We are using this object because the tag in the OPC DataHub we will beconnecting to in this example is an Integer. See your Wonderware documentation for more information onApplication Objects.Figure 30: Integer Application ObjectDrag and drop the Integer Application Object under the Unassigned Host folder, as shown in Figure 31below, to create the Integer 001 Application Object.Figure 31: Integer 001 Object
Page 21 of 29Open the Integer 001 Application Object properties, as shown in Figure 32 below, by double-clicking theInteger 001 Object.Figure 32: Integer 001 PropertiesIn the properties of our Integer object, we need to assign an item from our scan group in the OPCClientobject. This assignment is made in the “PV Input Source” field, shown in Figure 33 below.Figure 33: PV Input Source
Page 22 of 29Items added to the Scan Group under the OPCClient Object can be browsed and selected. To browsethose items, click the Ellipses ( ) Button next to the “PV Input Source” field. This will open the GalaxyBrowser as shown in Figure 34 below.Figure 34: System Platform Galaxy BrowserTo browse the item in the scan group in the OPCClient Object, we will simply highlight the OPCClient 001object, as shown in Figure 35 below.Figure 35: Browsing Scan Group ItemsAs you can see, the item in the scan group we configured earlier shows up in the list to the right of the“Instances” view. If multiple items had been added to the scan group, they would all show up here. Toassociate the item with our Integer 001 object, simply highlight the item and click OK.
Page 23 of 29This will populate the “PV Input Source” field with the tag, as shown in Figure 36 below.Figure 36: PV Input Source SelectedNow that the “PV Input Source” has been assigned, the Integer 001 object needs to be saved. Click theSave/Close button at the top right of the Integer 001 Properties, as shown in Figure 37 below.Figure 37: Saving Integer 001 PropertiesYou will be prompted to “Check In” the changes and need to do so by clicking OK. The Integer 001 objectnow needs to be assigned to the Area 001 System Object in the Deployment View. This is accomplishedby dragging and dropping the Integer 001 object from the Unassigned Host folder onto the Area 001object, as shown in Figure 38 below.Figure 38: Assigned Integer 001 ObjectAll objects have now been configured and assigned, so the next step is to deploy the galaxy.
Page 24 of 29Deploying the Configured Galaxy ObjectsTo collect live data from OPC DataHub, the configured objects must now be deployed. To do so, right-clickon the WinPlatform 001 object in the Deployment View and select Deploy, as shown in Figure 39 below.Figure 39: Deploying ObjectsThis will open the Deploy dialog box, as shown in Figure 40 below.Figure 40: Deploy WindowYou will want to use the default settings, which will deploy all of the objects we have configured. To do so,click the OK button at the bottom of the dialog box. The deploy status window will open and you will see thestatus bar as the various deployment steps are taken.
Page 25 of 29Once the deployment is completed at 100%, click the Close button, as shown in Figure 41 below.Figure 41: Deployment CompleteViewing DataYou can now view data updates for the item we have configured by opening the System Platform ObjectViewer. Highlight the Integer 001 object in the Deployment View and go to the Object menu of theArchestrA IDE interface. Select “View in Object Viewer” as shown in Figure 42 below.Figure 42: Opening Object Viewer
Page 26 of 29This opens the Object Viewer where you can view the value and quality of the item we have configured, asshown in Figure 43 below.Figure 43: Viewing DataAs you can see, the quality for the item “Ramp” is "Good" and the value is “0”. This shows the presentvalue. To subscribe to changing values for this item, right-click on the attribute and select “Add to Watch”,as shown in Figure 44 below.Figure 44: Add Attribute to Watch
Page 27 of 29This adds the attribute to the watch window at the bottom of the interface where it will receive value updatesfor the item at the update rate configured for the scan group, if the value changes, as shown in Figure 45below.Figure 45: Viewing Live Data ValuesIf the item is not added to the watched list, the item will not receive updates unless the Value field isspecifically clicked.You can also write values to Read/Write eligible items from System Platform. This is accomplished byselecting the “PV” attribute, right-clicking and selecting “Modify”, as shown in Figure 46 below.Figure 46: Open Modify Numeric Value Window
Page 28 of 29This opens the “Modify Numeric Value” window, where a value can be entered and written to the item byclicking Apply and then OK, as shown in Figure 47 below.Figure 47: Writing a ValueAfter the write to the item has succeeded, you will see the value in the Watch List change for the item, asshown in Figure 48 below.Figure 48: Successful Write
Page 29 of 29SummaryThis guide has demonstrated the basic steps for configuring an OPC Client connection from SystemPlatform to the OPC Data Hub. If you do not have the OPC DataHub but, would like to evaluate what it canoffer as a robust, reliable, and diverse OPC tool, you can download a free one hour demonstration of OPCDataHub at http://www.softwaretoolbox.com/opcdatahub. This demonstration version is fully functional,only requiring that you restart it at the end of the one hour demonstration period.The OPC DataHub also fully supports DDE client connections in addition to OPC. If you have furtherquestions or need assistance, our experienced staff is here to assist you. We can be contacted in themethods outlined below.Contact UsIf you have any questions or are seeking further information and help:Online Support:http://support.softwaretoolbox.com/Email Support:support@softwaretoolbox.comPhone Support: 1 (704) 849-2773Fax: 1 (704) 849-6388Mailing Address:Software Toolbox, Inc. 148A East Charles Street, Matthews, NC, 28105 USA
connecting to an OPC Device Integration (DI) Object which connects to the OPC DataHub. The OPC DataHub in this example will use the DataSim simulator included with the OPC DataHub install. The assumption of the document is that you have a fully configured OPC, DDE or ODBC data source connected to the OPC DataHub.