Transcription
December 2017QIAamp 96 DNAQIAcube HT HandbookFor automated purification of total DNA fromblood and tissue using QIAcube HT andQIAcube HT Prep Manager SoftwareSample to Insight
ContentsKit Contents . 4Storage . 5Intended Use . 5Safety Information . 6Quality Control. 6Introduction . 7Principle and procedure . 7Equipment and Reagents to Be Supplied by User . 9Important Notes . 11Starting materials . 11RNase digestion . 12Processing fewer than 96 samples per run . 12Preparing reagents . 12Assembling the vacuum chamber. 14QIAamp DNA Protocol. 16Important points before starting . 16Things to do before starting . 16Preparation of blood and cell samples . 17Preparation of tissue samples . 17Lysis of tissue . 19QIAamp DNA Protocol on the QIAcube HT . 20Cleaning the instrument after completing a run . 24QIAamp 96 DNA QIAcube HT Handbook 12/20172
Optional steps. 25Advanced options . 27Troubleshooting Guide . 31Appendix A: Determination of Concentration, Yield, Purity and Length of DNA . 34Determination of concentration, yield and purity . 34Determination of DNA length . 34Ordering Information . 35Quick-Start Protocol . 373QIAamp 96 DNA QIAcube HT Handbook12/2017
Kit ContentsQIAamp 96 DNA QIAcube HT KitCatalog no.(5)51331Number of prepsQIAamp 96 platesBuffer ATL48052 x 50 mlBuffer VXL*2 x 30 mlBuffer ACB* (concentrate)†QIAGEN Proteinase K 2 x 60 ml2 x 6 mlBuffer AW1*‡ (concentrate)2 x 98 mlBuffer AW2‡ (concentrate)2 x 66 mlBuffer AETopElute FluidQuick-Start Protocol2 x 110 ml60 ml1* CAUTION: Contains a chaotropic salt. Take appropriate laboratory safety measures and wear gloves when handling.Not compatible with disinfectants containing bleach. See page 6 for safety information.†Before using for the first time, add isopropanol as indicated on the bottle to obtain a working solution.‡Before using for the first time, add ethanol (96–100%) as indicated on the bottle to obtain a working solution.QIAcube HT PlasticwareCatalog no.Number of prepsS-BlocksFilter-Tips OnCor C(480)95006748059 x 96Tape Pad1Elution Microtubes RS (EMTR)58-Well Strip Caps for EMTR120The following components can also be ordered separately: S-Blocks and Elution MicrotubesRS (including caps for strips). See “Ordering Information,” page 35.QIAamp 96 DNA QIAcube HT Handbook 12/20174
StorageQIAamp 96 plates and all buffers are stable for 1 year at room temperature (15–25 C) anddry conditions without affecting performance.QIAGEN Proteinase K can be stored at room temperature (15–25 C). To store for extendedperiods of time, or if the ambient temperature often exceeds 25 C, we recommend storing at2–8 C.Intended UseThe QIAamp 96 DNA QIAcube HT Kit is intended for the automated extraction of DNA usingthe QIAcube HT instrument. The QIAamp 96 DNA QIAcube HT Kit is intended for molecularbiology applications. This product is not intended for the diagnosis, prevention, or treatmentof a disease.All due care and attention should be exercised in the handling of the products. We recommendall users of QIAGEN products to adhere to the NIH guidelines that have been developed forrecombinant DNA experiments, or to other applicable guidelines.5QIAamp 96 DNA QIAcube HT Handbook12/2017
Safety InformationWhen working with chemicals, always wear a suitable lab coat, disposable gloves andprotective goggles. For more information, please consult the appropriate safety data sheets(SDSs). These are available online in convenient and compact PDF format atwww.qiagen.com/safety where you can find, view and print the SDS for each QIAGEN kitand kit component.CAUTION: DO NOT add bleach or acidic solutions directly to the samplepreparation waste.Buffer VXL and Buffer AW1 contain guanidine hydrochloride and Buffer ACB containsguanidine thiocyanate, which can form highly reactive compounds if combined with bleach.If liquid containing these buffers is spilled, clean with suitable laboratory detergent and water.If the spilled liquid contains potentially infectious agents, clean the affected area first withlaboratory detergent and water, and then with 1% (v/v) sodium hypochlorite.Quality ControlIn accordance with QIAGEN’s ISO-certified Quality Management System, each lot of QIAamp96 DNA QIAcube HT Kit is tested against predetermined specifications to ensure consistentproduct quality.QIAamp 96 DNA QIAcube HT Handbook 12/20176
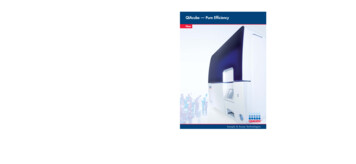
IntroductionThe QIAamp 96 DNA QIAcube HT Kit uses well-established technology for purification of totalDNA (e.g., genomic, mitochondrial and pathogen) from a variety of sample sources includingfresh or frozen tissues and cells, blood or bacteria. The procedure yields high-quality DNAthat performs well in PCR and other enzymatic reactions.The QIAamp 96 DNA QIAcube HT Kit combines the selective binding properties of silicabased membrane with a high-throughput 96-well format, and is designed for fully automated,simultaneous processing of 24–96 samples of 200 µl in volume, on the QIAcube HT instrumentsystem (in increments of 8). Easy operation of the QIAcube HT instrument is allowed by thevirtual worktable in the QIAcube HT Prep Manager Software that reflects the worktable on theinstrument. Blood and buffy coat samples for processing can be fresh or frozen, provided theyhave not been frozen and thawed more than once (see “Important Notes,” page 11). Theprocedure can be used for samples treated with citrate, heparin, or EDTA. Purification requiresno organic extraction or alcohol precipitation. DNA is eluted in Buffer AE, and is free ofproteins, nucleases and other contaminants or inhibitors. It is ready for use in enzymaticreactions, such as PCR, or storage at –15 to –30 C. DNA purified using the QIAamp 96 DNAQIAcube HT Kit is up to 50 kb in size, with fragments of approximately 20–30 kbpredominating. DNA of this length denatures completely during thermal cycling and can beamplified very efficiently.The fully automated procedure requires 2 hours to process 96 samples, with no hands-ontime.Principle and procedureThe QIAamp 96 DNA QIAcube HT procedure is simple (see flowchart on the next page).Samples are first lysed using QIAGEN Proteinase K. Buffering conditions are adjusted toprovide optimal DNA binding conditions and the lysate is loaded onto the QIAamp 96 plate.7QIAamp 96 DNA QIAcube HT Handbook12/2017
During vacuum, DNA is selectively bound to the QIAamp membrane as contaminants passthrough. Remaining contaminants and enzyme inhibitors are removed in three efficient washsteps. Pure DNA is eluted under vacuum in a single step in approximately 200 µl of Buffer AEequilibrated to room temperature (15–25 C). DNA recovery is enhanced by overlaying theelution buffer with TopElute Fluid. QIAamp purified DNA has A260/A280 ratios of 1.7–1.9, andabsorbance scans show a symmetric peak at 260 nm, confirming high purity.QIAamp 96 DNA QIAcube HT Handbook 12/20178
Equipment and Reagents to Be Supplied by UserWhen working with chemicals, always wear a suitable lab coat, disposable gloves andprotective goggles. For more information, consult the appropriate safety data sheets (SDSs),available from the product supplier.For all protocols: Pipets and disposable pipet tips with aerosol barriers (20–1000 µl) Isopropanol (100%) Ethanol (96–100%) * Phosphate-buffered saline (PBS), pH 7.2 (50 mM potassium phosphate, 150 mM NaCl) QIAcube HT Instrument QIAcube HT Prep Manager Software QIAcube HT Reagent Troughs† VortexerFor purification from tissue samples Collection Microtube Racks† Collection Microtube Caps† Tissue disruption system such as TissueLyser II† 5 mm stainless steel beads† Centrifuge* Do not use denatured alcohol, which contains other substances such as methanol or methylethylketone.†For ordering, see “Ordering Information” on page 35.9QIAamp 96 DNA QIAcube HT Handbook12/2017
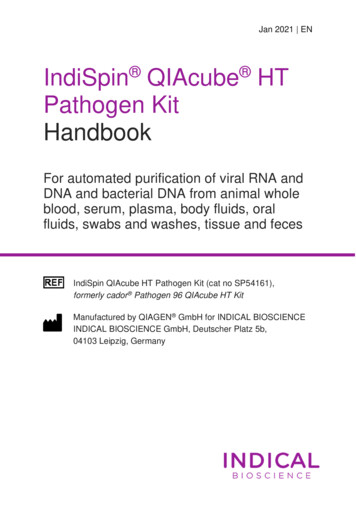
TissueLyser IIThe TissueLyser II includes a number of different accessories for ease of use with differentsample sizes and throughputs. The TissueLyser Adapter Set 2 x 96 allows simultaneousprocessing of up to 192 samples in collection microtubes. Stainless steel beads with a diameterof 5 mm provide optimal disruption of human and animal tissue. The TissueLyser 5 mm BeadDispenser, 96-Well, is also available to conveniently deliver 96 beads in parallel intocollection microtubes. See “Ordering Information,” page 35.QIAamp 96 DNA QIAcube HT Handbook 12/201710
Important NotesStarting materialsBloodWhole blood samples treated with EDTA, citrate or heparin can be used, and may be freshor frozen. Yield and quality of the purified DNA depend on storage conditions of the blood.Fresher blood samples yield better results. For long-term storage, we recommend collectingblood samples in tubes containing anticoagulant and storing at ––65 to 90 C.Repeatedly frozen and thawed samples, samples stored at room temperature (15–25 C) forextended periods, or samples containing visible precipitates should not be processed.Processing of samples containing visible precipitates can lead to reduced DNA size. Use ofpoor-quality starting material will also lead to reduced length and yield of purified DNA.Tissue and cellsTo obtain optimum DNA yield and quality, it is important not to overload the QIAamp 96plate, as this can lead to significantly lower yields than expected. For samples with very highDNA content (e.g., spleen, which has a high cell density, and cell lines with a high degree ofploidy, as well as lung and liver tissue), less than the recommended amount of 20 mg shouldbe used. If you have no information regarding DNA content, we recommend beginning withless than 10 mg of starting material. Depending on the yield obtained, the sample size canbe increased in subsequent preparations. After proteinase K digestion, tissue samples can alsobe stored in Buffer ATL for up 6 months at ambient temperature without any reduction in DNAquality.11QIAamp 96 DNA QIAcube HT Handbook12/2017
RNase digestionAs an optional step, it is possible to remove RNA from the purified samples via RNasedigestion. If RNA-free genomic DNA is required, add 4 µl RNase (100 mg/ml) to each sample.Note: Generally, the QIAamp 96 DNA QIAcube HT Kit co-purifies DNA and RNA. For certainDNA applications that might be sensitive to presence of RNA, removal may be desirable.Processing fewer than 96 samples per runIf processing fewer than 96 samples, reuse of unused portions of QIAamp 96 plates, S-Blockand EMTR is possible up to three times.Note: We recommend using fresh plasticware for every run. If reusing, take extreme care to preventcross-contamination. Store plates in a way that separates the outlet nozzles under the plate, for example, inthe S-Block used in the same run or in a fresh 96-well microtiter plate. Cover unused wells of the S-Block and QIAamp 96 plate with a tape sheet at all times.Preparing reagentsQIAGEN Proteinase KThe QIAamp 96 DNA QIAcube HT Kit contains ready-to-use QIAGEN Proteinase K suppliedin a specially formulated storage buffer. The activity of the QIAGEN Proteinase K solution is600 mAU/ml.QIAGEN Proteinase K is stable for at least 1 year after delivery when stored at roomtemperature (15–25 C). To store for more than 1 year or if ambient temperature often exceeds25 C, we recommend storing QIAGEN Proteinase K at 2–8 C.QIAamp 96 DNA QIAcube HT Handbook 12/201712
For processing blood and cells, add proteinase K to Buffer VXL immediately before starting theprotocol.For processing human and animal tissue, the proteinase K digestion is carried out in ATL bufferprior to the purification protocol.Buffer ACBBuffer ACB is supplied as a concentrate. Before using for the first time, add isopropanol(100%) as indicated on the bottle to obtain a working solution. Tick the check box on the bottlelabel to indicate that isopropanol has been added. Mix well after adding isopropanol.Buffer AW1Buffer AW1 is supplied as a concentrate. Before using for the first time, add ethanol (96–100%) as indicated on the bottle to obtain a working solution. Tick the check box on the bottlelabel to indicate that ethanol has been added. Mix well after adding ethanol.Buffer AW2Buffer AW2 is supplied as a concentrate. Before using for the first time add ethanol (96–100%) as indicated on the bottle to obtain a working solution. Tick the check box on the bottlelabel to indicate that ethanol has been added. Mix well after adding ethanol.TopElute FluidTopElute Fluid is used during elution of nucleic acids from the QIAamp membrane. It enablesapplication of a stable and high vacuum and results in equal eluate volumes. In addition,TopElute Fluid eliminates the formation of drops of elution buffer at the outlet nozzles of theQIAamp 96 plates.TopElute Fluid might be found as a top layer over the elution buffer. It is inert and has noeffects on downstream applications.13QIAamp 96 DNA QIAcube HT Handbook12/2017
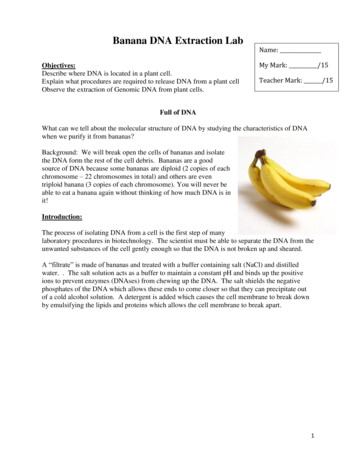
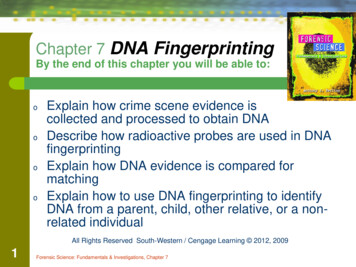
Important: Please ensure that you only take the eluate from below the top layer.Assembling the vacuum chamberFigure 1 illustrates the assembly of the vacuum chamber. For further information, please referto the QIAcube HT User Manual.1. Insert the channeling block holder into the left (waste) chamber of the vacuum chamber.2. Press firmly on the sides of the channeling block holder to seat it in the chamber, sealingthe O-ring on the spigot into the drain.3. Then, place the channeling block into the channeling block holder.4. Place the QIAamp 96 plate in the transfer carriage. Load the carriage with the QIAamp96 plate into the left (waste) chamber of the vacuum chamber.5. Ensure that the carriage is positioned to the left inside the vacuum chamber. Place theriser block EMTR in the right (elution) chamber of the vacuum chamber with the pin of theriser block EMTR in the top right position.6. Load an elution microtubes rack (EMTR) into the elution chamber.QIAamp 96 DNA QIAcube HT Handbook 12/201714
96-well plate(e.g., QIAamp 96 plate)Transfer carriage(cat. no. 9022654)Channeling adapter(cat. no. 9022656)Contains:Channeling block(cat. no. 9022665)Channeling block holder(cat. no. 9022664)Elution microtubes (EMTR)Riser block EMTR(cat. no. 9022655Vacuum chamberFigure 1. Assembling the vacuum chamber.15QIAamp 96 DNA QIAcube HT Handbook12/2017
QIAamp DNA ProtocolThis protocol is for purification of genomic DNA from up to 96 samples from starting materialsincluding blood, cells (maximum 5x10⁶) and soft tissues (maximum 20 mg) such as biopsies,mouse tails, brain, liver and muscle.Starting material can be fresh or frozen whole blood, buffy coat or cell samples. If you wantto use frozen tissue samples (maximum 20 mg) such as biopsies, mouse trails, brain, liver andmuscle, be sure that you carry out sample pre-treatment before starting the purificationprotocol.Important points before starting Read “Important Notes” on page 11. Do not overload the QIAamp membrane as this can lead to impaired nucleic acidextraction and/or performance in downstream assays. Avoid repeating freezing and thawing of samples as this may reduce nucleic acid yieldand quality. For tissue samples, you will also need the following: Collection Microtube Racks (cat. no.19560) and Collection Microtube Caps (cat. no. 19566).Things to do before starting Ensure all reagents and samples are equilibrated to room temperature (15–25 C). Check for precipitates in reagents. If a reagent contains precipitates, incubate at 37 Cwith gentle shaking to dissolve precipitates. Avoid vigorous shaking, which causesfoaming. Check that Buffer ACB, Buffer AW1 and Buffer AW2 have been prepared according tothe instructions in ”Preparing reagents” (page 12).QIAamp 96 DNA QIAcube HT Handbook 12/201716
When working with difficult samples, use a vacuum performance check to check if allliquid has passed through the membrane. Ensure that the relevant version of the QIAamp 96 DNA QIAcube HT protocol is availableon the computer.QIAcube HT Prep Manager protocol files (file extension *.qpmx), which contain all theinformation required to perform a run on the QIAcube HT instrument, are available fromwww.qiagen.com/p/QIAcubeHT, under the Resources tab. Ensure that QIAcube HT Prep Manager Software is installed. Ensure that you are familiar with operating the instrument. Refer to the QIAcube HT UserManual for operating instructions.Preparation of blood and cell samples1. Add 200 µl of each sample to the selected S-Block wells.Note: If the volume of the samples is less than 200 µl, add PBS or 0.9% NaCl to a finalvolume of 200 µl.Note: If working with cultured cells, centrifuge the appropriate number of cells (maximum5 x 106) for 5 min at 300 x g . Resuspend each pellet in 200 µl PBS.2. Optional: If RNA-free genomic DNA is required, add 4 µl RNase A (100 mg/ml) to eachsample and incubate for 2 min at room temperature.3. Proceed with “QIAamp DNA Protocol on the QIAcube HT” on page 20.Preparation of tissue samplesTissue disruption can be performed manually or with a tissue homogenizer such as theTissueLyser instrument. Tissue disruption using the TissueLyser facilitates the digestion processand shortens the time required for digestion (see “Option 2: Sample disruption andhomogenization using the TissueLyser II” on page 18).17QIAamp 96 DNA QIAcube HT Handbook12/2017
Option 1: Manual treatment1. Cut up to 20 mg tissue into small pieces. For rodent tails, place one (rat) or two (mouse)0.4–0.6 cm lengths of tail into a collection microtube. Earmark the animal appropriately.Note: The maximum amount of starting material that can be processed is 20 mg. Forsome tissues (spleen, lung and liver), using more than 10 mg may lead to incompletelysate transfer due to highly viscous lysates.2. Prepare a proteinase K – Buffer ATL working solution containing 20 µl proteinase K stocksolution and 180 µl Buffer ATL per sample, and mix by vortexing.3. Immediately pipet 200 µl of the proteinase K – Buffer ATL solution into each wellcontaining the cell or tissue samples. Seal the microtubes properly with the collectionmicrotube caps.4. Place a clear cover of collection microtubes over each rack, and mix by inverting therack of collection microtubes.5. Briefly centrifuge the collection microtubes to collect any solution from the caps. Allow thecentrifuge to reach 3000 rpm, and then stop the centrifuge. Proceed to “Lysis of tissue”on page 19.Important: It is essential that the samples are completely submerged in the proteinase K–Buffer ATL working solution after centrifugation.Option 2: Sample disruption and homogenization using the TissueLyser IIWe recommend using the TissueLyser II for disruption and homogenization of up 192 samplesin parallel. This protocol describes DNA purification from flash-frozen tissue using theTissueLyser II.1. Place 5 mm stainless steel beads into the collection microtubes (1 bead per tube).2. Determine the amount of tissue per sample by weighing the samples. Do not use morethan 20 mg tissue cut into small pieces. Transfer tissue to a collection microtube. Forrodent tails, place one (rat) or two (mouse) 0.4–0.6 cm lengths of tail into a collectionmicrotube. Earmark the animal appropriately.QIAamp 96 DNA QIAcube HT Handbook 12/201718
Important: The maximum amount of starting material that can be processed is 20 mg. Forsome tissues (spleen, lung and liver), using more than 10 mg may lead to incompletelysate transfer due to highly viscous lysates.3. Cover the tissue with 180 µl Buffer ATL and seal the microtubes properly with collectionmicrotube caps.4. Sandwich each rack of collection microtubes between TissueLyser Adapter plates and fixinto TissueLyser clamps as described in the TissueLyser User Manual. Operate theTissueLyser II for 20 s at 15 Hz.Note: Exceeding this time and intensity may lead to significant fragmentation of genomicDNA.5. Centrifuge the collection microtubes briefly to collect any solution from the caps.6. Add 20 µl proteinase K to each sample.7. Proceed with “Lysis of tissue” on page 19.Lysis of tissue1. Incubate samples at 56 C overnight or until the samples are completely lysed. Place aweight on top of the caps during the incubation. Mix occasionally during incubation todisperse the sample, or place on a rocking platform.2. Ensure that the microtubes are properly sealed to avoid leakage during shaking. Place aclear cover over each rack of collection microtubes and shake the racks vigorously upand down for 15 s.3. Briefly centrifuge the collection microtubes to collect any solution from the caps. Allow thecentrifuge to reach 3000 rpm, and then stop the centrifuge.4. Add 200 µl of each lysed sample from the collection microtubes into a fresh S-Block well.5. Optional: If RNA-free genomic DNA is required, add 4 µl RNase A (100 mg/ml) to eachwell and mix carefully by pipetting.19QIAamp 96 DNA QIAcube HT Handbook12/2017
6. Optional: For RNA digestion, incubate for 5 min at room temperature.7. Proceed with “QIAamp DNA Protocol on the QIAcube HT” as shown below.QIAamp DNA Protocol on the QIAcube HT1. Switch on the QIAcube HT instrument and the connected laptop computer. Werecommend leaving the vacuum station switched on at all times.2. Launch the QIAcube HT Prep Manager Software.3. On the Home screen, select QIAamp 96 DNA experiment.4. Enter the kit information.5. Select the type of sample to be processed. Sample types are combined in categories.Select the category that best fits your sample type.6. Select the pre-treatment from the drop-down menu.Note: The selected sample type will determine which pre-treatment options appear.Note: The sample type and pre-treatment information are only for documentation and donot influence the purification protocol.7. The QIAamp DNA protocol appears.8. Optional: Set optional steps for checking vacuum performance.Note: The run script provided by QIAGEN includes all necessary steps to guarantee bestperformance. Nevertheless, there is the possibility to check the vacuum performanceduring the run. If this option is selected, the instrument will pause after the binding step,so you can check if any wells may be clogged. For more information, see section“Vacuum performance check” on page 25.9. Click Next.10. Optionally, click Save. The QIAcube HT Prep Manager Software allows to save anexperiment at any step during the run setup procedure.11. In the Labware Selection screen, select Use sample ID or existing sample input file anddefine the samples.QIAamp 96 DNA QIAcube HT Handbook 12/201720
To enter sample IDs manually or to automatically generate sample IDs, select Entersample IDs. Then, start naming the samples by clicking Define Samples. For informationabout how to automatically create sample IDs, refer to the QIAcube HT User Manual.Alternatively, to load an existing sample file select Load existing sample files and theneither click Load sample file or use the Scan button to import the data.Note: Changing the input labware is not recommended by QIAGEN.12. In the Plate Assignment screen, select the samples from the input and assign them to theoutput plate. Then, click Next.The input plate is set according to your definition in the Labware selection screen. Selectthe sample columns on the input labware and then click Assign to assign them to theoutput plate.It is possible to change the assignment, if required. Select the columns on the outputlabware and click Remove assignment. Press and hold the left mouse button to mark thecolumns and rearrange them as needed.13. In the Worktable setup screen, select any virtual worktable position marked by yellowcolor and follow the instructions to set up the instrument worktable.Important: All positions to be used on the instrument worktable must be calibrated. If theCalibrate Labware button appears yellow, calibration is required. For further information,see the QIAcube HT User Manual.14. Ensure that the liquid level in the waste bottle matches the indicated level on the virtualdesktop. The level is displayed by a color code: green indicates that no action isnecessary; yellow indicates that the bottle is almost full, but the run can be started; redindicates to empty the bottle before starting the run.15. Place the tip chute on the worktable so that the chute is over the tip disposal box.Ensure that the tip chute is open and unblocked. Remove the UV protective cap from thetip chute. Ensure that the tip disposal box is empty and that the opening is aligned withthe tip chute.16. Prepare the vacuum chamber as shown in Figure 1 on page 15. This assembly is alsodescribed in the QIAcube HT User Manual.21QIAamp 96 DNA QIAcube HT Handbook12/2017
Important: If fewer than 12 columns (96 wells) are to be processed, seal the unusedcolumns of the QIAamp 96 plate with adhesive tape (supplied). Unused wells must besealed to ensure proper vacuum operation.Note: Trim any excess tape.Note: When reusing a QIAamp 96 plate, S-Block or elution plate, take care to avoidcross-contamination.Note: Make sure the QIAamp 96 plate is aligned to the left in the carriage and that thecarriage is positioned to the left inside the vacuum chamber.17. Load the tips in the indicated positions and remove the lids from the tip boxes. Ensurethat there is a sufficient number of tips to follow the protocol at least up to completion oflysate transfer.Check that the number and position of available and unused tips on the instrumentworktable is the same as the displayed tips on the virtual worktable.If more tips are required, you will be prompted to replace empty tip racks with new tipracks during the run. Information about the approximate time for refill will be given in therun screen. For more information, see the QIAcube HT User Manual.18. Transfer the indicated volumes of all reagents except the Buffer VXL Mixture into thecorresponding reagent troughs. Close the lids and place the troughs in the indicatedpositions on the worktable.19. Prepare a mixture of Buffer VXL and proteinase K according to Table 1 on page 23.Note: If you use tissues, proteinase K is already used during sample disruption. In thiscase, load only an appropriate amount of Buffer VXL as indicated on the virtualworktable.Important: Prepare the VXL mixture immediately before starting the run.For the QIAamp DNA protocol, place the VXL mixture in the indicated positions on theworktable.QIAamp 96 DNA QIAcube HT Handbook 12/201722
Table 1. Preparation of Buffer VXL and proteinase K.Number of samplesBuffer VXL (ml)QIAGEN Proteinase K 20. Add the samples (as shown on the virtual worktable) to the selected S-Block wells. Placethe S-Block in the indicated position of the QIAcube HT worktable.Note: Samples are processed in columns of 8 wells. We recommend covering unusedwells during pipetting so that unused S-Block wells can be used in subsequent runs.Note: If fewer than 8 samples in a column are to be processed, add water or buffer tothe unused wells in the column. To avoid foaming, the volume of water or buffer addedto the unused wells should be the same as the sample volume.21. Close the instrument hood and start the run by clicking Start run.22. The protocol run begins.Important: At the beginning of each run, an open circuit test and a plate detection testare performed automatically. If the QIAamp 96 plate in the transfer carriage isimproperly aligned to the left compartment of the vacuum chamber, you will be promptedto position it correctly. After adjusting the position, click Retry to initiate the tests again.For more information about the system tests, see the QIAcube
The QIAamp 96 DNA QIAcube HT Kit is intended for the automated extraction of DNA using the QIAcube HT instrument. The QIAamp 96 DNA QIAcube HT Kit is intended for molecular biology applications. This product is not intended for the diagnosis, prevention, or treatment of a disease.