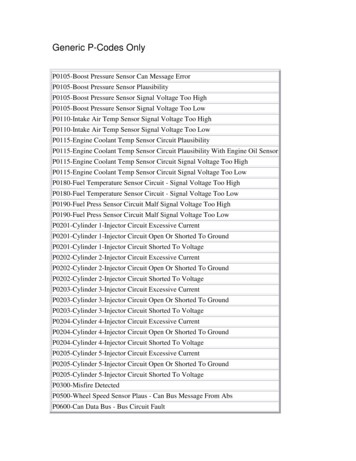
Transcription
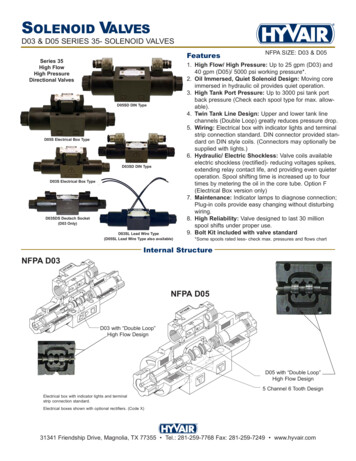
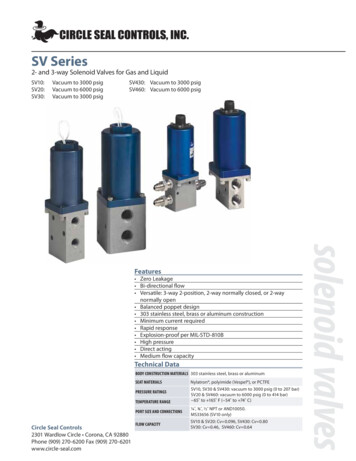
STC 2H012-016 Series Stainless Steel Solenoid Valves2 Way, High Pressure, Direct Acting, Normally Closed2H012-016 High Pressure Solenoid ValveValve Model2H012-1/82H016-1/4Port Size1/8” NPT1/4” NPTOrifice1.2mm1.6mmFlow Coefficient (Cv)0.050.09Valve Type2 Way, Normally Closed (NC)ActionDirect Acting (Poppet)Fast Response Time: 20msecValve Body:Seal:Armature Assembly:Wetted SurfacesSeal MaterialStandard Option:Upgrade Option:OperatingTemperatureMedia with Viton Seal:Media with PTFE Seal:304 Stainless SteelViton (FKM), PTFE (Teflon)Stainless SteelViton (FKM)PTFE (Teflon)5 F to 248 F (-15 C to 120 C)-4 F to 356 F (-20 C to 180 C)Operating Pressure0 PSI to 1000 PSIElectrical ConnectionsDIN 43650, Form AAC Coil:DC Coil:Coil Power33VA13-20WCoil Duty100% ED (Continuous Duty)Voltage Options12VDC, 24VDC, 24VAC, 110/120VAC (50/60Hz), 220/240VAC (50/60Hz)Voltage Tolerance 10% of Specified VoltageIngress ProtectionIP65Insulation ClassF ClassInstallationNo Orientation RequirementOptimum Position: Flow Horizontal and Solenoid VerticalServiceLiquid, Water, Oil, Air, Gas, Cryogens12H012-016.pub tel: (650) 856-8833www.StcValve.com Version 1.2, 9/21/2021
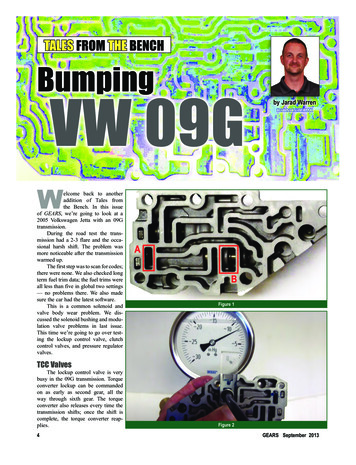
2H012-016 Series Solenoid Valve ComponentsTerminal BlockEncapsulatedSolenoid CoilDIN Enclosure(Plastic)O-Ring Coil Seal(Silicone)Armature Tube Assembly(Stainless Steel)Spring(Stainless Steel)Plunger(Stainless Steel)Gasket(PTFE/Teflon)Valve Body(Stainless Steel)22H012-016.pub tel: (650) 856-8833www.StcValve.com Version 1.2, 9/21/2021
Material Test ReportsThis document certifies that STC products have been subjected to quality assurance procedures and meet thematerial and performance specifications published by Sizto Tech Corporation (STC). The products have beenmanufactured, processed, inspected, and tested according to STC internal requirements and ISO 9001 standards.ISO 9001:2015 Certificate Number:Qnb17180318Date of Issue:01, March, 2018Valid Until:28, February, 2021Individual materials and components used in this product have been tested and conform to applicable publishedstandards according to chart below. Please be advised that STC does not conduct its own material analysis of allraw materials, rather, STC relies on the statements of its material suppliers & reserves the rights to independentlytest raw materials if necessary. Material Test Reports may be available for specific products upon request.MaterialUse LocationMaterial Standard316 Stainless SteelMetal Fittings, Valves, Air CylindersASTM A240/A2666304 Stainless SteelValves, Air CylindersASTM A240/A666CF8M Stainless SteelValvesASTM A351/A743BrassValvesASTM B36/B62Nickel-Plated BrassComposite FittingsASTM B456/B927Acetal Homopolymer (Delrin)ValvesASTM D4181/D6778—14Acetal Copolymer (POM)Composite FittingsASTM D4181/D6778—14FKM (Viton)SealsASTM D1418PTFE (Teflon)Valves, SealsASTM D3294—15NBR (Buna N)SealsASTM D1387—06EPDMSealsASTM D3568—03Polybutylene Terephthalate (PBT)Composite FittingsASTM D400032H012-016.pub tel: (650) 856-8833www.StcValve.com Version 1.2, 9/21/2021
Installation & OperationTo Connect the Valve Inlet & Outlet: Connect the inlet & outlet to the valve ports according to the flow direction arrow marked on the valveTo Install the Coil: Put the coils on to the armature tube of the valve. Place the lock washer & nut on to the armature tube.Hand tighten the nut, then use a wrench to tighten the nut another quarter-turn. Do not over-tightenthe nut, as it may cause the armature tube to fail prematurely.To Connect a DIN Coil:1.Remove the Philips-head screw from the plastic DIN housing & unplug it from the DIN coil2.From the screw opening, push the terminal block out from the plastic DIN housing.3.Note the “1”, “2”, and ground “ ” symbols on the underside of the DIN enclosure.4.For DC DIN Coils, connect “1” to your Positive Lead & “2” to your Negative lead.5.For AC DIN Coils, connect “1” to your HOT lead, “2” to your Neutral lead, & “ ” to your ground ifrequired.Do not energize the coil without installing it onto the valve or connect the coil to a different voltage thanspecified. This will burn the coil and could create fire hazards.Safety Note: Standard valves are supplied with continuous duty coils. The proper class of insulation for the serviceis indicated on the coil body. The coil temperature may rise significantly if energized for extended periods—this isnormal. Although the coil is made of flame-retardant material, misuse of the coil could create fire hazards &generate smoke and/or a burning odor. If these conditions are encountered, the coil temperature has risen abovesafe levels and the power should be disconnected immediately.Operation: This valve is a two-way, normally closed, direct-acting valve & does not require a minimum differentialpressure to operate. As shown in the diagrams below, when the coil is de-energized (left diagram), the plunger restson the main orifice & is held in place by the plunger spring force, sealing the valve. When the coil is energized (rightdiagram), the solenoid lifts the plunger & allows the working medium to flow through the orifice. The workingmedium & flow direction are indicated in purple in the diagrams.42H012-016.pub tel: (650) 856-8833www.StcValve.com Version 1.2, 9/21/2021
2H012-016 Series Solenoid Valve Dimensions2H012-016 Dimensions [mm]ModelPortOrificeCvABCDEF2H012-1/81/8” NPT1.2 mm0.0580.024.572.434.535.625.02H016-1/41/4” NPT1.6 mm0.0982.328.572.434.535.625.0Note: Dimensions are for reference only. Field verify dimensions prior to installation for critical dimensions.52H012-016.pub tel: (650) 856-8833www.StcValve.com Version 1.2, 9/21/2021
2-Way Direct Acting ValvesMaintenance & Troubleshooting GuideWarning: DO NOT over tighten the nut holding the coil to the armature tube. Over tightening may result in damageto the welded joint.Attaching a Coil to a Valve: After wiring the coil, fit the coil assembly over the armature tube. Ensure that the threads of the tube areaccessible. Fit the spring or lock washer over the assembly. For spring washers, the concave side should be oriented toward the coil.Tighten the nut over the washer by hand. For standard washers, tighten the nut an additional ¼ turn with a wrench if necessary. For spring washers, continue to tighten the nut until the spring washer is almost completelycompressed.Installation Procedure: Connect the default outlet to the outlet port indicated by an arrow or the number “1” on the valve body. Connect the default inlet to the pressure port indicated by the tail of the arrow or a “P” on the valve body. The arrow marked on the valve body indicates the direction of flow.Notes: After an extended period of operation, the solenoid coil may burn out. This commonly occurs when inputvoltages are higher than the coil’s specifications. If the valve does not make a clicking sound when energized/de-energized, the coil likely needs to be replaced. If you are using the valve at a low temperature, it may exhibit a small leak when first activated. To fix this, cyclethe valve at the highest available operating pressure until there is no longer a leak. This process will create aproper mating surface between the seal and the orifice.Maintenance Procedure:1.Turn off the power supply to the valve & ensure it is safely locked-out.2.Remove any coils attached to the valve.3.Unscrew the holding plate (if applicable) and the armature tube assembly and remove it from the valve body.The plunger & spring are not fastened to the tube and will fall out.4.Check for any debris that may have collected on the plunger & the hole in the center of the valve. Clean anydirty surfaces or debris with clean water.5.Place the spring back in the plunger & insert the plunger back into the armature tube.6.Screw the armature tube & holding plate back into the valve.7.Please refer to the diagram on Page 2 of this document for a breakdown of individual components.For tips, maintenance guides, & procedural videos, visit us at www.youtube.com/users/STCValves62H012-016.pub tel: (650) 856-8833www.StcValve.com Version 1.2, 9/21/2021
Electrical ConnectionsTo Connect a DIN Coil: Remove the Philips screw from the plastic housing & unplug from the DIN coil. Use the removed screw to push the terminal block out of the plastic DIN housing. Note the “1”, “2”, and ground “ ” symbols. For DC DIN Coils, connect “1” to your positive lead & “2” to your negative lead. For AC DIN Coils, connect “1” to your HOT lead, “2” to your NEUTRAL lead, and “ ” to your groundlead, if required.To Connect a Grommet Coil: For DC Coils, connect the red wire to your positive lead & the black wire to your negative lead. For AC Coils, connect the black wire to your HOT lead & the white wire to your NEUTRAL lead. For Coils provided with Molded Cables, the color of the wire indicates the type of lead: GREEN Ground Wire BLUE Positive or HOT Wire BROWN Negative or Neutral WireDIN CoilEncapsulatedCoilTerminalBlockDIN HousingGrommet CoilLead Wires72H012-016.pub tel: (650) 856-8833www.StcValve.com Version 1.2, 9/21/2021
Terms & ConditionsBy purchasing from SIZTO TECH CORPORATION (STC), you agree to these TERMS AND CONDITIONS. No other terms shallapply except as agreed in writing & signed by STC. We reserve the right to correct typographic errors and reject orders.SHIPMENTS:All shipments are F.O.B. 892 Commercial Street, Palo Alto, CA 94303, USA. Most orders are shipped via UPS Standard Groundunless instructions accompany order. Outside the UPS zones, shipment will be made Best Way. The responsibility for goodsdelay, lost or damaged in transit rests with the carrier and purchaser. Purchaser may purchase shipping insurance to cover lostor damaged products caused by shipping.RETURN OF MERCHANDISE:No merchandise is accepted for return 30 days after delivery date. No credit allowed on merchandise shipped as ordered andreturned without obtaining an authorization number IN ADVANCE. A 20% restocking charge applies to all returns, andtransportation charges must be fully prepaid. We will pay ground transportation charges on re-sent or returned merchandisedue to STC's error.Shortages & Mis-Shipments: Any shortages or mis-shipments must be reported within 15 days.CANCELLATION POLICY:Blanket orders can be canceled 90 days before scheduled ship date. There will be a 10% charge if a blanket order is canceledwithin 90 days of scheduled ship date, and a 20% charge if canceled within 60 days. Regular orders for non-custom parts canbe canceled any time before the order is shipped. For custom parts, a 30% down payment is required either at the time of orderor 90 days prior to scheduled ship date, whichever comes later.Remittances should be sent to:Sizto Tech Corporation, 892 Commercial Street, Palo Alto, CA 94303, USACredit Card Payments: Visa, MasterCard, Discover, or American Express acceptedInternational Customers: Advance Payment Required via Bank Wire, Cashier's Check or Approved Credit Card.Credit Application: To establish a net 30 day account, please mail or fax three trade references with complete mailingaddresses and account numbers, or request an STC Credit Application.LIMITED WARRANTY – IMPORTANT NOTICE TO PURCHASER:Sizto Tech Corporation (STC) only warrants this product to be free from defects in materials and workmanship at the time ofshipment. This limited warranty expires one year after delivery to the end-user. STC’s entire obligation to the Purchaser forbreach of this limited warranty shall be limited to replacement of the defective product or refund of the original purchase price ofthis product, at STC’s option. Purchaser has thirty (30) days to return the goods after STC has agreed to accept the return. Allfreight charges on returned material shall be paid by the Purchaser. STC’s limited warranty shall not apply, however, to theproduct that have been subjected to misuse, alteration, accident or negligence during handling or storage.DISCLAIMER OF IMPLIED WARRANTIES:All implied warranties, which may arise by implication of law or application of course of dealing or usage of trade, including, butnot limited to, implied warranties of merchantability or fitness for a particular purpose are expressly excluded. There are nowarranties, which extend beyond the description of the faced hereof. The end user is solely responsible for the suitability andfitness of this product selected for a particular application.OBLIGATIONSYou warrant, represent and agree: (1) to comply with all laws; (2) that our sale and shipment of the product will not, by exportthereof, your legal status or otherwise, cause us to violate any law; and (3) to indemnify us against any losses from a failure byyou or a third party to comply with law or these terms and conditions, or from use of the product.SAFETYWARNING: Improper Selection or Failure to follow Usage Instructions of the products described on the Sizto Tech Corporation(STC) Internet Site and its related publications can cause Death, Personal Injury, and Property Damage. All system set-upsrequire the supervision of a qualified individual who is familiar with installation, inspection and testing through training orexperience.IMPORTANT NOTICE:All prices are subject to change without notice. We continuously improve the products, and we reserve the right to changespecifications without incurring any obligation to incorporate new factors in equipment previously sold.Information contained herein may be changed without prior notification.Sizto Tech Corporation892 Commercial StreetPalo Alto, CA 94043 USATel: 650-856-8833 Fax: 650-856-8811Email: Sales@StcValve.com www.StcValve.com8www.StcValve.com
2 Way, High Pressure, Direct Acting, Normally Closed 1 2H012-016 High Pressure Solenoid Valve STC 2H012-016 Series Stainless Steel Solenoid Valves Valve Model 2H012-1/8 2H016-1/4 Port Size 1/8" NPT 1/4" NPT Orifice 1.2mm 1.6mm Flow Coefficient (Cv) 0.05 0.09 Valve Type 2 Way, Normally Closed (NC) Action Direct Acting (Poppet)