Transcription
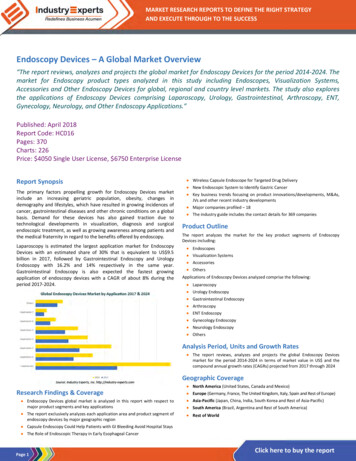
ORTHOPAEDICJOInT REPlACEmEnTAESCUlAP VEGA System knEE ARTHROPlASTyOperating Technique with IQ Instruments
Aesculap Vega System 1 COntent21Content22The IQ Instruments43Introduction64Indications Patient Selection85Preoperative Planning96Approach6.1 Medial parapatellar arthrotomy6.2 Mid-vastus arthrotomy6.3 Sub-vastus arthrotomy6.4 Final exposure10111111117Assembly Instructions andInstrument Handling128Workflow Synopsis18
91011TIBIA PREPARATIOn9.1 Extramedullary referencing9.2 Intramedullary referencing9.3 Tibia resection9.4 Tibia keel preparation9.5 Tibia stem preparation22222628293121DImEnSIOnS6322OVERVIEW OF PATEllA SIzES6423OVERVIEW OF EXTEnSIOn STEmlEnGTHS64FEmUR PREPARATIOn10.1 Femur intramedullaryalignment10.2 Distal resection10.3 Femur A / P sizing and rotation10.4 Femur anterior, posterior andchamfer resections10.5 PS box preparation333324lOAnER SETS DEmO CASE6525ImPlAnT mATRIX6626lITERATURE68GAP BAlAnCInG11.1 Tibia first –measurement with spacers11.2 Optional tibia first –measurement with distractor11.3 Femur first –measurement with spacers11.4 Strategies34353739414142434412PATEllA PREPARATIOn4513TRIAl REDUCTIOn4714PREPARATIOn AnD ASSEmBly OFEXTEnSIOn STEmS4815COmPOnEnT ImPlAnTATIOn4916CEmEnTInG TECHnIQUE5217ClOSURE5318InSTRUmEnTS5419OPTIOnAl InSTRUmEnTS6020SAWBlADES623
Aesculap Vega System 2 The IQ InstrumentsThe IQ InstrumentationThe IQ VEGA System instrumentation has beendesigned to facilitate the workflow not only forthe surgeon, but the operating room (OR) teamas a whole, by enhancing ergonomics and operativeefficiency. IQ stands for “Intuitive and Quick“. Thesystem offers multiple options covering differentimplantation philosophies that allow each surgeonto follow his / her preferred surgical technique.··Precise and less instruments,··Quick couplings,··Ergonomic handles and··Colour codingare some aspects that will facilitate the surgical processin the operating room.4
IQ – Intuitive & QuickLess is moreThe instruments as well as the instrument trays arecolour coded to enease instrumentation and organization during the complete workflow:··red femur··blue tibia··yellow general··grey patellaThe IQ VEGA System instruments are stored in thespecially developed Aesculap OrthoTray. Both together,the IQ instruments plus Aesculap OrthoTray offer ahigh end reprocessing solution. The trays not only storethe instruments in a secure and safe manner but alsoclearly facilitate the reprocessing procedure for theCentral Sterilization Unit (CSU) as the instruments canremain in the tray during the washing process. This timesaving solution generates an economic advantage andeliminates a potential source of error as complete setreassembling is needless.The Aesculap RESETAesculap RESET is an intelligent improvement of theAesculap OrthoTray configuration. All size-specificinstruments are packed such that only the sizes desiredby the surgeon are used. Thus, the instrument and trayvolumes in the entire instrument cycle are reducedby up to 50 %. Aesculap facilitates, as size-specificstorage and washing system, the work of all the participants in the entire process. For further informationplease contact your responsible sales person.NOTEThis wash tray system is only approved for the use withthe cleaning validated instruments from Aesculap.Complex instruments, e.g. cutting guides or instrumentsthat are introduced in the intramedullary (IM) canalduring the procedure as drills and reamers require amanual pre-cleaning according to standard requirements.5
Aesculap Vega System 3 introduction6
VEGA SystemAesculap OrthoTrayThe VEGA System is a posterior stabilized fixed platform knee endoprosthesis that has been developed toaddress modern arthroplasty requirements of surgeonsand patients from all around the world.An international group of experienced surgeons led byDrs. Saleh and Mihalko, have collaboratively combinedtheir expertise and knowledge to design the next generation of knee implant systems – the VEGA System.The VEGA System advanced technologies includethe AS multi-layer coating and the unique kinematicdesign, which makes the system a first-choice forsurgeons and patients alike.The extensive range of femoral and tibial componentsize options allows for ideal gender, stature and morphotype matching.The VEGA System IQ instrumentation has beendesigned to facilitate the workflow not only for thesurgeon, but the OR team as a whole, by enhancingergonomics and operative efficiency. The systemoffers multiple options covering different implantationphilosophies that allow each surgeon to follow theirpreferred surgical technique. Precise instruments, quickcouplings, ergonomic handles, and color coding aresome aspects that will facilitate the surgical processin the operating room.7
Aesculap Vega System 4 Indications Patient SelectionThe VEGA System PS is indicated for nearly allpatients who are candidates for a primary TKA.Patients presenting with metal sensitivity can bepreferred treated with the AS coated VEGA Systemimplants.For more information about indications and contraindications, please refer to the instructions for useTA012000.8
5 Preoperative PlanningThe following X-ray images are required to conductthe radiographic analysis:Knee joint in A / P projection: knee extended,centered over the distal patella.Knee joint in lateral projection: knee in 30 flexion,centered above the distal patella.Image of the whole leg (from hip to ankle)in monopodal stance.Patella-tangential image (Merchant View)with the knee at 30 flexion.········The angle between the mechanical and anatomicalfemur axes is measured with the combination templatefor axis measurements. The center of the joint, the jointline and the mechanical femur axis can be measured.To determine the tibia resection, the template showingrepresentations of the tibial components is superimposed over and aligned with the X-ray image. Theresection height is given at a 10-20 mm graduation.A complete set of radiographic templates is providedfor the preoperative determination of the appropriateimplant sizes. The localization of the osteophytes facilitates their removal, improving the mobility of the joint.For every Total Knee Arthroplasty, careful preoperativeX-ray planning is recommended in order to determineprecisely the following parameters:Varus / Valgus deformityAngle between the anatomical and mechanicalfemoral axesEntry point(s) of the intramedullary alignment rods(manual IM technique)Joint line levelFemur resection heightsTibia resection heightsComponent sizingImplant positioningPotential areas of bone losses and location he VEGA System knee system provides a completeset of radiographic templates in different magnitudes(1.1 and 1.15).The results of the preoperative planning should bedocumented in the patient’s file and should be available during the operative procedure for reference.9
Aesculap Vega System 6 ApproachThe VEGA System IQ instrumentation is designed foruse with or without the use of OrthoPilot Navigation,for both conventional and less invasive approaches tothe knee.The initial skin incision is a straight midline or slightlyoblique parapatellar skin incision starting 2 to 4 cmproximal to the superior pole of the patella andextending distally to the medial aspect of the tibialtubercule. The surgeon should decide on a patientbasis how long the incision is necessary for propervisualization of the knee anatomy. A parapatellar skinincision will be of benefit to patients when attemptingto kneel after the operation.10The length range of the incision is generally between8 and 14 cm symmetrically distributed above andbelow the joint line. Extension of the skin incisionmay be necessary during the procedure dependingon the patient anatomy, the soft tissues and the skintension.Three basic types of arthrotomies are recommendedfor use to carry out the intra-articular exposure: themedial parapatellar, the mid-vastus or the sub-vastus.1,2
Skin incisionMedial parapatellar arthrotomyMid-vastus arthrotomySub-vastus arthrotomy6.1 Medial parapatellar arthrotomy6.3 Sub-vastus arthrotomyWith the knee in flexion or extension, the arthrotomyis performed starting proximal to the superior pole ofthe patella, incising the rectus femoris tendon longitudinally. Continuing the arthrotomy distally aroundthe medial aspect of the patella, and ending medialto the tibial tubercule is then carried out.With the knee in flexion, the arthrotomy is performedstarting with a 4 to 6 cm incision of the fascia at theinferior border of the VMO, running horizontal to themedial aspect of the patella, continuing and endingdistally medial to the medial tubercule.6.4 Final exposure6.2 Mid-vastus arthrotomyWith the knee in flexion, the arthrotomy is performedstarting by a split of the fibers from the vastus medialisoblique (VMO), continuing distally around the medialaspect of the patella, and ending medial to the tibialtubercule.A fat pad excision is performed in order to facilitatethe exposure and to improve the patella mobility.Perform the necessary medial release at this time thatcorresponds to the deformity. The patella can then beeverted or sub-luxated laterally.11
AESCUlAP VEGA System 7 ASSEmBly InSTRUCTIOnS AnD InSTRUmEnT HAnDlInG65431122ATIBIA EXTRA-mEDUllARyAlIGnmEnT13BTIBIA InTRA-mEDUllARyAlIGnmEnT14CFEmUR InTRA-mEDUllARyAlIGnmEnT14DA / P AnD ROTATIOn AlIGnmEnTBlOCk15ETIBIAl / DISTAl CUTTInG GUIDE17
A Tibia Extra-Medullary Alignment – Assembly Instructions1··Press the upper button on thebimalleolar clamp.··Engage the support in the groove.··When the neutral position isreached, release the button.42··Turn the wheel of the tibial align-··Push on the handle adjusting··········56ment handle to the open position,“OP-EN” will be displayed.Engage the handle onto thebimalleolar support.Adjust to the neutral position.··Engage the holding rod in one of··The proximal fixation is set····the connection squares of thetibial cutting guide.Lock the assembly by turning thefrontal wheel.3through the proximal openingof the holding rod.Turn the tab into a horizontalposition to fix the assembly.wheel to release the lockingmechanism.Engage the holding rod in thehandle.Release the wheel when thedesired level is reached.Turning the wheel will allow afine adjustment of the height.··The connection square of thestylus is engaged in one of theconnection squares of the tibialcutting guide.The connection is fixed bylocking the wheel on the stylus.The resection height is adjustedto the desired bone cut level.The stylus can be placed overthe proximal fixation.······13
Aesculap Vega System B Tibia Intra-Medullary Alignment··Push on the button of theT-handle to release the lockingmechanism.Couple the T-handle to the IMrod.Release the button to lock theassembly.······Choose the IM orientation sleevecorresponding to the desiredposterior slope resection of thetibia (default is 0 sleeve; sleeveswith 3 , 5 and 7 posterior slopeare available).Connect the sleeve to the IMalignment system.····Mount the assembly into thealignment block.··Connect the alignment system tothe tibia cutting guide in one ofits connection squares.Fix the connection by locking thewheel.··C Femur Intra-Medullary Alignment··Push on the button of theT-handle to release the lockingmechanism.Couple the T-handle to the IMrod.Release the button to lock theassembly.····14··Choose the IM orientation sleevecorresponding to the desiredvalgus alignment (standard:5, 6, or 7 ).Connect the sleeve to the IMalignment system.Connect a distal femur contactplate (small or large).······Mount the assembly into thealignment system.··Connect the alignment system tothe tibia cutting guide in thecentral connection square.Fix the connection by locking thewheel.··
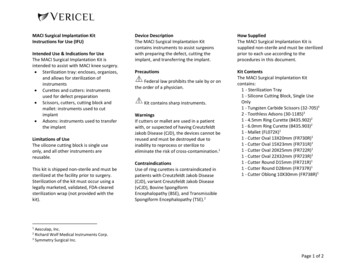
D A / P and Rotation Alignment BlockScrew for fixation / release(rotation and translation)of the anterior stylusSize markings in A / Pand proximal-distalScrew for A / P slidingfixation / releaseSlots for control of theanterior cut level withcheck plateHoles for placement ofheadless pins after finalorientationPosterior fixationholes for enhancedstabilityAdjustment screwfor setting the axialrotation··Option 1: the rotation is pre-fixed to a desiredvalue before the block is put in place.··Option 2: the rotation is free and the block is placedin contact with the distal femur and the posteriorcondyles; the rotation can be tuned by turning theposterior wheel, checking the alignment of the A / Pwindow with the femur A / P plane (Whiteside line).Due to the fixed distance between the pin placementholes and the anterior cortex stylus, the placed pinscan be used for any femoral size chosen by the surgeon. Oversizing or downsizing the femur is achievedsimply by choosing a different 4-in-1 cutting guidesize and placing on the same previously placed pins.··2115
Aesculap Vega System D A / P and Rotation Alignment Block··The anterior point to be palpated is located on the lateral anteriorcortex, avoiding the risk of anterior notching.··If the palpation is done at the middle of the anterior femur,the grand piano sign will be bigger providing a larger surface ofcontact.The stylus can be adjusted in the caudo-cranial direction inorder to get a congruence between the A / P sizing and theproximo-distal sizing determined by the scale on the upperpart of the stylus.····After defining the right axial rotation of the block, if anexact femoral size is measured like in the example on the left,fix the A / P sliding by tightening the corresponding screw,place 2 headless pins in the placement holes.By loosening the screws, and, if used, removing the posteriorenhanced fixation pins, remove the orientation block.····After defining the right axial rotation of the block, if the mea-sured size is in between two exact sizes like in the example onthe left, fix the A / P sliding by tightening the correspondingscrew, place 2 headless pins in the placement holes.By loosening the screws, and, if used, removing the posteriorenhanced fixation pins, remove the orientation block.In this case, choose the direct upsize or downsize based on theassessment of the medio-lateral dimension and the flexionextension gap situation. A smaller size will enlarge the flexiongaps; a bigger size will reduce the flexion gaps.····16
E TIBIAl / DISTAl CUTTInG GUIDEDistal resection or tibial resection with a standard approachThe connection to the alignment system to be used is the centralone marked “C”, denoted by the green square in the left picture.The fixation holes for the headless pins to be used correspondto the groups marked “C”, shown by the red circles on the leftpicture.Enhanced fixation is achieved with one or two converging pinsin the holes marked with the blue circles.···Right knee tibial resection with a less invasive approachThe connection to the alignment system to be used is the onemarked “R”, shown by the green square in the left picture.The fixation holes for the headless pins to be used correspondto the groups marked “R”, shown by the red circles in the leftpicture.Enhanced fixation is achieved with one converging pin in thehole marked with the blue circle.···Left knee tibial resection with a less invasive approachThe connection to the alignment system to be used is the onemarked “l”, shown by the green square in the left picture.The fixation holes for the headless pins to be used correspondto the groups marked “l”, shown by the red circles in the leftpicture.Enhanced fixation is achieved with one converging pin in thehole marked with the blue circle.···17
AESCUlAP VEGA System 8 WORkFlOW SynOPSIS – FEmUR FIRST1 Femur Im alignment2 Distal resection3 Femur A / P sizing and rotation4 Femur APC resections5 PS box preparation18
or6a Tibia EM alignment6b Tibia IM alignmentoptional7 Tibia resection8 Gap measurementoptional9 Tibia keel and stem preparation10 Patella preparation11 Trial reduction12 Component implantation19
Aesculap Vega System 8 workflow synopsis – Tibia firstor1a Tibia EM alignment1b Tibia IM alignment2 Tibia resection3 Femur IM alignmentoptional4 Distal resection6 Femur A / P sizing and rotation205 Gap measurement
7 Femur APC resections8 PS box preparationoptional9 Tibia keel and stem preparation10 Patella preparation11 Trial reduction12 Component implantation21
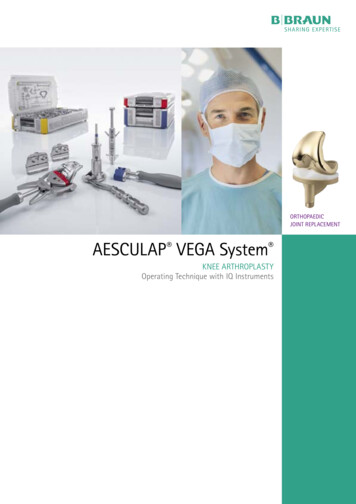
AESCUlAP VEGA System 9 TIBIA PREPARATIOn9.1 Extramedullary referencing· The Em alignment system assembly is placed in a parallelfashion with the frontal tibia with the leg positioned in flexion.· The bimalleolar clamp, previously set in a neutral position,··is fixed around the lower limb just above the ankle joint andcentered on the tibio-tarsian joint.Proximally, the Em alignment system can be stabilized with theproximal fixation first by engaging the longest spike betweenthe tibia spines.When the rotation has been adjusted to the mid-third of thetibial tuberosity and the second toe axis (or according to thepatients individual anatomy since these landmarks may not bein line with the mechanical axis of the tibia), the second spikecan be impacted defining the final tibia rotation.InSTRUmEnTSBimalleolar clamp nS345R22Bimalleolar clamp supportnS344RAlignment system handlenS342RHolding rod for cuttingguide nS341RTibia cutting guidenS334RProximal fixation nS343R
Varus / valgus alignmentPushing the knob (1) at the bimalleolar clamp, and sliding thealignment system medially or laterally allows to adjust thevarus / valgus of the proximal tibia resection. The distancebetween the laser marked lines on the scale corresponds toa 1 adjustment for a 40 cm long tibia.1Tibia slope alignmentReleasing the fixation wheel (2) at the bottom part of the alignment system (by aligning OP-EN), the alignment system can beshifted anteriorly in order to increase the slope of proximal tibiaresection. The distance between the laser marked lines on thescale corresponds to a 1 adjustment for a 40 cm long tibia.2Tibia stylus NS347R23
AESCUlAP VEGA System 9 TIBIA PREPARATIOnHeight adjustment (3)3· The resection height is determined in preoperative planning.The aim is to remove any defect on the tibial joint surface ascompletely as possible in order to create a bed for the tibiaplateau on intact bone for optimal support of the implant.· The planned value is set on the stylus, which is then mounted·into the tibia cutting guide. The extramedullary alignmentinstrument is then lowered until the stylus comes into contactwith the chosen point.Referencing the healthy tibia plateau is helpful to determinethe level of the joint line. Referencing the deepest point of theworn side of the tibia helps to reduce the cut by resecting only2 mm. Preoperative planning and surgeon preference are usedto determine which reference to use.InSTRUmEnTSBimalleolar clamp nS345R24Bimalleolar clamp supportnS344RAlignment system handlenS342RHolding rod for cuttingguide nS341RTibia cutting guidenS334RProximal fixation nS343R
· The cutting guide is fixed with two headless pins in position “0”.The / -2 mm pinholes are available on the resection blocks tofurther adjust the resection level if needed. To avoid movementsduring the resection, additional pins are set in convergent holesas marked.· The Em tibia alignment system is then disconnected from thetibia cutting guide by turning the connecting wheel counterclockwise. The proximal fixation can be removed by disengagingthe spike from the tibial spine.Tibia stylus nS347RHeadless pins 63 mmnP583RPin driver nP613RAcculan drill25
AESCUlAP VEGA System 9 TIBIA PREPARATIOn9.2 Intramedullary referencing· The medullary canal of the tibia is opened with the Ø 9 mmstarting drill bit. The surgeon has to pay close attention on thedrilling direction in order to avoid cortical violation of the posterior metaphysis.· The intramedullary rod is inserted into the prepared canal,after the contents are irrigated and suctioned, with the help ofthe T-handle. Once the T-handle is removed, the intramedullaryalignment system is mounted on the rod with the chosen posterior slope angle sleeve (0, 3, 5, or 7 ) and the cutting guide.ATTEnTIOnBig tibia slope may create an anterior cortex conflict when (long)extension stems are used!InSTRUmEnTSDrill Ø 9 mm nS330R26T-handle nE198RIm alignment rod nS331RIm alignment systemnS332RTibia cutting guidenS334RTibia Im stylus for orientation sleeves nS847R
· The stylus is set on the deepest point of the tibia plateau todefine the 0-level cut. The height of the cut is then adjusted byturning the tuning wheel to the desired amount of resection inmillimeters.nOTEThe surgeon should realize that the matched implant resection forthe tibia is 10 mm.· The alignment of the cutting guide can be checked with thealignment rod.Alignment rod longnP471RTibia orientation sleeve0 , 3 , 5 , 7 nS843RnS846R27
AESCUlAP VEGA System 9 TIBIA PREPARATIOn· The cutting guide is fixed with two headless pins in position·“0”. The / -2 mm pinholes are available on the resectionblocks to further adjust the resection level if needed. In orderto avoid movements during the resection, additional pins areset in convergent holes.The Im tibia alignment system is removed in one step with theT-handle after unlocking the cutting guide from the alignmentsystem by turning the locking wheel in a counterclockwisedirection.9.3 Tibia resection· Once the cutting guide is positioned and fixed, the proximaltibial resection is performed. (See note)· After performing the proximal tibial resection the block isremoved and the resected bone taken away. A careful inspectionof the peripheral resection is mandatory in order to check thatno remaining bone stock is present. Further removal of meniscalremnants and osteophytes that encroach the posterior capsuleis then performed.nOTEThe protection of the surrounding soft tissue sleeve of the knee jointis paramount. A special attention has to be paid: use of Hohmannretractors, collaterals retractors, PCl retractor is recommended inorder to protect the ligaments during the resection.InSTRUmEnTSIm alignment rod nS331R28Im alignment systemnS332RTibia Im stylus for orientation sleeves nS847RTibia cutting guidenS334RHeadless pins 63 mmnP583RTibia orientation sleeve0 , 3 , 5 , 7 nS843RnS846R
9.4 Tibia keel preparation· The size of the tibia is determined by superposing the different··tibia preparation plateau sizes onto the created surface tryingto reach the best bony coverage with the proper transverserotational alignment of the trial baseplate while avoiding m / land A / P overhang. As the design of the VEGA System tibiaplateau is symmetric a perfect tibial coverage and a correcttibial rotation cannot be reached at the same time. Wrongrotational alignment should be avoided.The chosen tibia trial preparation is placed flush onto the tibiaresection and the rotation is assessed with the help of the Emrod placed through the holder. References for the rotation arethe mid-third of the anterior tuberosity and the second toe axisof the leg. These two landmarks are often not coincident withmechanical axis of the tibia and the surgeon should considerthe rotation with respect to the tubercle to maintain extensormechanism alignment. The plateau is fixed by the short headedpins in the marked holes.Another option consists in building the tibia and femur trialimplant with the adequate trial gliding surface. By exercisingflexion extension movements combined with slight rotationalstresses, the tibia plateau will find a natural position under thefemur trial. This position is marked anteriorly using the electriccautery right where the plateau has a central anterior lasermarking. Care should be taken to assess the stability of theextensor mechanism before accepting this “free float” alignment of the tibial baseplate.mediallateralinternally rotatedmedialAcculan drillAcculan sawTibia trial / preparationplateau nS349R-nS359RTibia trial / preparationplateau holder nQ378RlateralHeaded pins 30 mmnP585RPin driver nP613R29
AESCUlAP VEGA System 9 TIBIA PREPARATIOn· The holder is removed. The guiding tower is placed on the tibia··plateau by engaging the posterior teeth first. The anterior partcan be maintained steady by replacing and locking the holderback in place.The 12 mm drill with stop is first used to prepare the bone forthe winglet chisel.If the PEEk plug is used the stem has to be prepared until themarking on the drill is reached. The drill length until the stoppresents the length of the tibial site with the 12 mm short stem.In case of the use of the obturator screw the stem preparationwill be prepared until the stop like with the 12 mm stem.· The wing stem preparation is performed by using the wingletchisel connected to its handle through the guiding tower downto the stop. There is a small winglet rasp for tibia size T0-T2 and a big winglet rasp for tibia size T3-T5 available as the tibiawing stem of the final implant is growing for the bigger tibiasizes. The winglet rasp can stay in place for the trial reductionor can be removed by using the slap hammer.InSTRUmEnTSTibia trial / preparationplateau nS1081RnS1085R30Headed pins 30 mmnP585RGuide for winglet chiselnS1033RDrill with stop Ø 12 mmnS1029RAcculan drill
9.5 Tibia stem preparation· In case of poor bone quality, the primary fixation can beenhanced by using a stem extension. According to thesurgeon’s philosophy, a cemented stem or a cementlessstem can be chosen.Option 1: priority to the tibia resectionIn this case, the tibia preparation is performed following thesteps described previously (chapter 9.1 to 9.4). At the last stage,instead of using the standard Ø 12 mm drill, a long drill is usedfor preparing the site of the future stem.length and diameter of this long drill should be assessed on thepre-operative X-rays. The drilling is performed through inserts forthe guiding tower and the diameter (Ø 12, 14 or 16 mm) correspondsto the trial stem diameter. For cemented stems, the drills are 2 mmwider than the final tibial stem to prepare a 1 mm surroundingcement mantle (1 mm on each side 2 mm). For the preparationof cementless stems, the drill diameter fits to the diameter of thestems. Two laser markings are available on the drill in order todefine the right depth for short or long stems. For the wingletpreparation, the corresponding trial tibia stem is connected tothe winglet chisel for the final preparation.mediallateralPlease note that this option is indicated for cemented stems.internally rotatednOTEVEGA System implants have a symmetric tibia plateau. Thereforeit is essential to reach a good transverse rotational alignment.A perfect bony coverage is not aspired (see picture beside).Winglet chisel / Trial keelnS1031R, nS1032ROsteodenser holdernQ378RTibia drill sleeve forcemented stemnS1034R-nS1036RmedialDrill for cementedstem nS376R-nS377R,nS380RlateralTrial stem cementednS384T-nS386T,nS387T-nS389T31
AESCUlAP VEGA System 9 TIBIA PREPARATIOnOption 2: priority to the extension stem fixationIn this case, the medullary canal of the tibia is opened accordingto the preoperative planning (entry point) with the Ø 9 mm drill.The thinnest reamer is then coupled to the T-handle and insertedinto the tibia medullary canal as deep as possible until a primarystability is achieved and a depth laser marking reaches the estimated level of the tibia resection (short or long stem). If primarystability is not sufficient, a thicker diameter is used until stabilityis achieved. Once the T-handle is removed, the intramedullaryalignment system is mounted on the reamer with the 0 anglesleeve (angled sleeve for slope is not possible here!) and thecutting guide. The stylus is set on the deepest point of the tibiaplateau to define the 0-level cut.The height of the cut is then adjusted by turning the tuning wheel.The alignment of the cutting guide can be checked with the Emalignment rod. The cutting guide is fixed with two headless pins inposition “0”; the / -2 mm pinholes are available on the resectionblocks to further adjust the resection level if needed. In order toavoid movements during the resection, additional pins are setin convergent holes if necessary. The Im tibia alignment systemis removed in one step with the T-handle after unlocking thecutting guide from the alignment system. Please note that thisoption is indicated for cementless stems and the surgeon musttake into account the alignment of the tibia as directed by thecementless stem since it may not coincide with the mechanicalaxis of the tibia.InSTRUmEnTSReamer for cementlessstem nS391R-nS393R32Im alignment rod nS331RIm alignment systemnS332RTibia Im stylus for orientation sleeves nS847RTibia orientation sleeve0 , 3 , 5 , 7 nS843RnS846RTibia cutting guidenS334R
10 FEmUR PREPARATIOn10.1 Femur intramedullary alignment· The medullary canal of the femur is opened according to the·preoperative planning (entry point) with the drill Ø 9 mm. Therod is inserted into the intramedullary canal using the T-handle.Once the rod is inserted, the T-handle can be removed.In order to compensate the anatomical valgus angulation ofthe femoral bone relative to the mechanical axis, the appropriateangle sleeve 5 , 6 or 7 according to the preoperative planningis set into the intramedullary alignment system. The distal femurcontact plate and the cutting guide are connected to this system.The assembly is placed on the Im rod in contact with at leastone distal condyle.· The planned height of the distal resection is adjusted by turningthe wheel (1) until the desired thickness matches the anteriorlaser marking. The standard resection is 9 mm and correspondsto the distal thickness of the implant. Contact plate has to beassembled to be in full contact with nS332R.Drill Ø 9 mm nS330RAcculan drillT-handle nE198RIm alignmentsystem nS332R1Distal femur contactplate nS333R,nS834RFemur orientingsleeve nS335RnS337RCutting guidenS334R33
AESCUlA
AESCUlAP VEGA System knEE ARTHROPlASTy Operating Technique with IQ Instruments . 2 1 COnTEnT 2 2 THE IQ InSTRUmEnTS 4 3 InTRODUCTIOn 6 4 InDICATIOnS PATIEnT SElECTIOn 8 5 PREOPERATIVE PlAnnInG 9 6 APPROACH 6.1 medial parapatellar arthrotomy 6.2 mid-vastus arthrotomy 6.3 Sub-vastus arthrotomy 6.4 Final exposure 10 11 11 11 11 7 ASSEmBly InSTRUCTIOnS AnD InSTRUmEnT HAnDlInG 12 8 WORkFlOW .