Transcription
AccessDataFTK ImagerUser Guide 1
AccessData Legal and ContactInformationDocument date: March 21, 2012Legal Information 2012 AccessData Group, LLC All rights reserved. No part of this publication may be reproduced, photocopied,stored on a retrieval system, or transmitted without the express written consent of the publisher.AccessData Group, LLC makes no representations or warranties with respect to the contents or use of thisdocumentation, and specifically disclaims any express or implied warranties of merchantability or fitness for anyparticular purpose. Further, AccessData Group, LLC reserves the right to revise this publication and to makechanges to its content, at any time, without obligation to notify any person or entity of such revisions or changes.Further, AccessData Group, LLC makes no representations or warranties with respect to any software, andspecifically disclaims any express or implied warranties of merchantability or fitness for any particular purpose.Further, AccessData Group, LLC reserves the right to make changes to any and all parts of AccessDatasoftware, at any time, without any obligation to notify any person or entity of such changes.You may not export or re-export this product in violation of any applicable laws or regulations including, withoutlimitation, U.S. export regulations or the laws of the country in which you reside.AccessData Group, LLC.384 South 400 WestSuite 200Lindon, Utah 84042U.S.A.www.accessdata.comAccessData Trademarks and Copyright Information AccessData Distributed DNA Network Attack is a registered trademark of AccessData Group, LLC.is a registered trademark of AccessData Group, LLC. Forensic FTK is a registered trademark of AccessData Group, LLC.Toolkit is a registered trademark of AccessData Group, LLC.is a registered trademark of AccessData Group, LLC. Password PRTK Recovery Toolkit is a registered trademark of AccessData Group, LLC.is a registered trademark of AccessData Group, LLC. RegistryViewer is a registered trademark of AccessData Group, LLC.AccessData Legal and Contact InformationLegal Information 2
A trademark symbol ( , , etc.) denotes an AccessData Group, LLC. trademark. With few exceptions, andunless otherwise notated, all third-party product names are spelled and capitalized the same way the ownerspells and capitalizes its product name. Third-party trademarks and copyrights are the property of the trademarkand copyright holders. AccessData claims no responsibility for the function or performance of third-partyproducts.Third party acknowledgements: FreeBSD Copyright 1992-2011. The FreeBSD Project . AFF and AFFLIB Copyright 2005, 2006, 2007, 2008 Simson L. Garfinkel and Basis TechnologyCorp. All rights reserved. Copyright 2005 - 2009 Ayende RahienDocumentation ConventionsIn AccessData documentation, a number of text variations are used to indicate meanings or actions. Forexample, a greater-than symbol ( ) is used to separate actions within a step. Where an entry must be typed inusing the keyboard, the variable data is set apart using [variable data] format. Steps that required the user toclick on a button or icon are indicated by Bolded text. This Italic font indicates a label or non-interactive item inthe user interface.A trademark symbol ( , , etc.) denotes an AccessData Group, LLC. trademark. Unless otherwise notated, allthird-party product names are spelled and capitalized the same way the owner spells and capitalizes its productname. Third-party trademarks and copyrights are the property of the trademark and copyright holders.AccessData claims no responsibility for the function or performance of third-party products.RegistrationThe AccessData product registration is done at AccessData after a purchase is made, and before the product isshipped. The licenses are bound to either a USB security device, or a Virtual CmStick, according to yourpurchase.SubscriptionsAccessData provides a one-year licensing subscription with all new product purchases. The subscription allowsyou to access technical support, and to download and install the latest releases for your licensed products duringthe active license period.Following the initial licensing period, a subscription renewal is required annually for continued support and forupdating your products. You can renew your subscriptions through your AccessData Sales Representative.Use LicenseManager to view your current registration information, to check for product updates and to downloadthe latest product versions, where they are available for download. You can also visit our web site,www.accessdata.com anytime to find the latest releases of our products.For more information, see Managing Licenses in your product manual or on the AccessData web site.AccessData Contact InformationYour AccessData Sales Representative is your main contact with AccessData Group, LLC. Also, listed below arethe general AccessData telephone number and mailing address, and telephone numbers for contactingindividual departments.AccessData Legal and Contact InformationDocumentation Conventions 3
Mailing Address and General Phone NumbersYou can contact AccessData in the following ways:TABLE 1-1 AD Mailing Address, Hours, and Department Phone NumbersCorporate Headquarters:AccessData Group, LLC.384 South 400 WestSuite 200Lindon, UT 84042 USAVoice: 801.377.5410Fax: 801.377.5426General Corporate Hours:Monday through Friday, 8:00 AM – 5:00 PM (MST)AccessData is closed on US Federal HolidaysState and LocalLaw Enforcement Sales:Voice: 800.574.5199, option 1Fax: 801.765.4370Email: Sales@AccessData.comFederal Sales:Voice: 800.574.5199, option 2Fax: 801.765.4370Email: Sales@AccessData.comCorporate Sales:Voice: 801.377.5410, option 3Fax: 801.765.4370Email: Sales@AccessData.comTraining:Voice: 801.377.5410, option 6Fax: 801.765.4370Email: Training@AccessData.comAccounting:Voice: 801.377.5410, option 4Technical SupportFree technical support is available on all currently licensed AccessData products.You can contact AccessData Customer and Technical Support in the following ways:TABLE 1-2 AD Customer & Technical Support Contact InformationDomestic Support Americas/Asia-PacificStandard Support:Monday through Friday, 5:00 AM – 6:00 PM (MST),except corporate holidays.Voice: 801.377.5410, option 5Voice: 800.658.5199 (Toll-free North America)Email: Support@AccessData.comAfter Hours Phone Support:Monday through Friday 6:00 PM to 1:00 AM (MST),except corporate holidays.Voice: 801.377.5410, option 5After Hours Email-only Support: Monday through Friday 1:00 AM to 5:00 AM (MST),except corporate holidays.Email: afterhours@accessdata.comInternational Support Europe/Middle East/AfricaStandard Support:AccessData Legal and Contact InformationMonday through Friday, 8:00 AM – 5:00 PM (UKLondon), except corporate holidays.Voice: 44 207 160 2017 (United Kingdom)Email: emeasupport@accessdata.comAccessData Contact Information 4
TABLE 1-2 AD Customer & Technical Support Contact Information (Continued)After Hours Support:Monday through Friday, 5:00 PM to 1:00 AM (UK/London), except corporate holidays.Voice: 801.377.5410 Option 5*.After Hours Email-only Support:Monday through Friday, 1:00 AM to 5:00 AM (UK/London), except corporate holidays.Email: afterhours@accessdata.comOtherWeb Site:http://www.AccessData.com/SupportThe Support web site allows access to DiscussionForums, Downloads, Previous Releases, ourKnowledgebase, a way to submit and track your“trouble tickets”, and in-depth contact information.AD SUMMATIONAmericas/Asia-Pacific:800.786.2778 (North America).415.659.0105.Email: support@summation.comStandard Support:Monday through Friday, 6:00 AM– 6:00 PM (PST),except corporate holidays.After Hours Support:Monday through Friday by calling 415.659.0105.After Hours Email-only Support:Between 12am and 4am (PST) Product Support isavailable only by email atafterhours@accessdata.com.AD Summation CaseVault866.278.2858Email: support@casevault.comMonday through Friday, 8:00 AM – 6:00 PM (EST),except corporate holidays.AD Summation Discovery Cracker866.833.5377Email: dcsupport@accessdata.comSupport Hours:Monday through Friday, 7:00 AM – 7:00 PM (EST,except corporate holidays.Note: All support inquiries are typically responded to within one business day. If there is an urgent need forsupport, contact AccessData by phone during normal business hours.DocumentationPlease email AccessData regarding any typos, inaccuracies, or other problems you find with the onal ServicesThe AccessData Professional Services staff comes with a varied and extensive background in digitalinvestigations including law enforcement, counter-intelligence, and corporate security. Their collectiveexperience in working with both government and commercial entities, as well as in providing expert testimony,enables them to provide a full range of computer forensic and eDiscovery services.At this time, Professional Services provides support for sales, installation, training, and utilization of FTK, FTKPro, Enterprise, eDiscovery, and Lab. They can help you resolve any questions or problems you may haveregarding these productsAccessData Legal and Contact InformationProfessional Services 5
Contact Information for Professional ServicesContact AccessData Professional Services in the following ways:TABLE 1-3 AccessData Professional Services Contact InformationContact MethodNumber or AddressPhoneWashington DC: 410.703.9237North America: 801.377.5410North America Toll Free: 800-489-5199, option 7International: 1.801.377.5410EmailAccessData Legal and Contact Informationadservices@accessdata.comProfessional Services 6
Table of ContentsAccessData Legal and Contact Information . . . . . . . . . . .Legal Information . . . . . . . . . . . . . . . . . . . . . . .AccessData Trademarks and Copyright InformationDocumentation Conventions . . . . . . . . . . . . . . . .Registration . . . . . . . . . . . . . . . . . . . . . . . . . . . . . . . . . . . . . . . . . . . . . .2. . . . . . . . . . . . . . . . . . . .2. . . . . . . . . . . . . . . . . . . .2. . . . . . . . . . . . . . . . . . . .3. . . . . . . . . . . . . . . . . . . .3Subscriptions . . . . . . . . . . . . . . . . . . . . . . . . . . . . . . . . . . . . . . . . .3AccessData Contact Information. . . . . . . . . . . . . . . . . . . . . . . . . . . . . . . . .3Mailing Address and General Phone Numbers . . . . . . . . . . . . . . . . . . . . .4Technical Support . . . . . . . . . . . . . . . . . . . . . . . . . . . . . . . . . . . . . .4Documentation . . . . . . . . . . . . . . . . . . . . . . . . . . . . . . . . . . . . . . . .5Professional Services. . . . . . . . . . . . . . . . . . . . . . . . . . . . . . . . . . . . . . . .5Contact Information for Professional Services . . . . . . . . . . . . . . . . . . . . .6Table of Contents. . . . . . . . . . . . . . . . . . . . . . . . . . . . . . . . . . . . . . . . . . . . . . . .7Chapter 1 Overview and Installation ofFTK Imager . . . . . . . . . . . . . . . . .FTK Imager . . . . . . . . . . . . . .Installing FTK Imager . . . . . . . . . . . . . . . . . . . . . . . . . . . . . . . . . . . . . . 10. . . . . . . . . . . . . . . . . . . . . . . . . . . . . . . . 10. . . . . . . . . . . . . . . . . . . . . . . . . . . . . . . . 10Installing Locally . . . . . . . . . . . . . . . . . . . . . . . . . . . . . . . . . . . . . . 11Installing To a Portable Device . . . . . . . . . . . . . . . . . . . . . . . . . . . . . . 12Running FTK Imager . . . . . . . . . . . . . . . . . . . . . . . . . . . . . . . . . . . . . . . 12Command Line Options . . . . . . . . . . . . . . . . . . . . . . . . . . . . . . . . . . 12Chapter 2 The FTK Imager User InterfaceThe FTK Imager UI . . . . . . . . . . . . . . . . . . . . . . . . . . . . . . . . . . . . . . . . 14. . . . . . . . . . . . . . . . . . . . . . . . . . . . . . . 14Menu Bar . . . . . . . . . . . .File Menu . . . . . . .View Menu . . . . . .Mode Menu . . . . .Help Menu . . . . . .Toolbar . . . . . . . . . . . . . .View Panes . . . . . . . . . . .Evidence Tree PaneFile List Pane . . . .Combination Pane .Table of Contents. 14. 14. 15. 16. 16. 16. 18. 18. 18. 18 7
Viewer . . . . . . . . . . . . . . . . . . . . . . . . . . . . . . . . . . . . . . . 20Chapter 3 Working With Evidence .Previewing Evidence . . . . . . . . . . . . . . . . . . . . . . . . . . . . . . . . . . . . . . . 21. . . . . . . . . . . . . . . . . . . . . . . . . . . . . . . . . . . 21Preview Modes . . . . . . .Automatic Mode .Text Mode . . . .Hex Mode . . . .Adding Evidence Items. 21. 21. 21. 22. . . . . . . . . . . . . . . . . . . . . . . . . . . . . . . . . . . . . . 22Adding a Single Evidence Item . . . . . . . . . . . . . . .Adding All Attached Devices . . . . . . . . . . . . . . . . .Image Mounting . . . . . . . . . . . . . . . . . . . . . . . .Benefits of Image Mounting . . . . . . . . . . . .Characteristics of a Logically Mounted Image .Characteristics of a Physically Mounted ImageMounting an Image . . . . . . . . . . . . . . . . .Removing Evidence. 22. 22. 22. 23. 23. 23. 24. . . . . . . . . . . . . . . . . . . . . . . . . . . . . . . . . . . . . . . . 26Removing a Single Evidence Item . . . . . . . . . . . . . . . . . . . . . . . . . . . 26Removing All Evidence Items . . . . . . . . . . . . . . . . . . . . . . . . . . . . . . 27Obtaining Protected Registry Files . . . . . . . . . . . . . . . . . . . . . . . . . . . . . . 27Acquiring Protected Registry Files on a Local Machine . . . . . . . . . . . . . . . 27Accessing Registry files from a Drive Image . . . . . . . . . . . . . . . . . . . . . 28Using Encrypted Images. . . . . . . . . . . . . . . . . . . . . . . . . . . . . . . . . . . . . 28Detecting EFS Encryption . . . . . . . . . . . . . . . . . . . . . . . . . . . . . . . . 28AD Encryption . . . . . . . . . . . . . . . . . . . . . . . . . . . . . . . . . . . . . . . 29AFF Encryption . . . . . . . . . . . . . . . . . . . . . . . . . . . . . . . . . . . . . . . 30Chapter 4 FTK Imager Output FilesCreating Forensic Images. . . . . . . . . . . . . . . . . . . . . . . . . . . . . . . . . . . . 31. . . . . . . . . . . . . . . . . . . . . . . . . . . . . . . . . . . 31Imaging Complete Drives or Partitions . . . . . . . . . . . . . . . . . . . . . . . . . 31Creating Custom Content Images . . . . . . . . . . . . . . . . . . . . . . . . . . . . 38Exporting From FTK Imager. . . . . . . . . . . . . . . . . . . . . . . . . . . . . . . . . . . 42Exporting Forensic Images . . . . . .Exporting Files . . . . . . . . . . . . .Exporting By SID . . . . . . . . . . . .Exporting File Hash Lists . . . . . . .Evidence Item Information .Exporting Directory Listings . . . . .Decrypting AD1 Images . . . . . . . .Verifying Drives and Images . . . . .Importing Sets of Files. . . . . . . . .Table of Contents. 42. 42. 43. 45. 46. 48. 48. 49. 50 8
Appendix A File Systems andDrive Image Formats . . . . . . . .File Systems . . . . . . . . . . .Whole Disk Encrypted . . . . .Hard Disk Image Formats . . .CD and DVD Image Formats. . . . . . . . . . . . . . . . . . . . . . . . . . . . . . . . . . 52. . . . . . . . . . . . . . . . . . . . . . . . . . . . . . . . . . 52. . . . . . . . . . . . . . . . . . . . . . . . . . . . . . . . . . 52. . . . . . . . . . . . . . . . . . . . . . . . . . . . . . . . . . 53. . . . . . . . . . . . . . . . . . . . . . . . . . . . . . . . . . 53Appendix B Using aLogicube Device . . . . . . . . . . . . . . . . .Integrating a Logicube Forensic MD5 . . . . . . . . . . . . . . . . . . . . . . . . . . . . 54. . . . . . . . . . . . . . . . . . . . . . . . . . . . 54Creating an Image File with the Logicube Forensic MD5 . . . . . . . . . . . . .Formatting the Logicube Forensic MD5 Internal Hard Drive . . . . . . . . . . .Using the Logicube Forensic MD5 Internal Drive as a USB Drive . . . . . . . .Accessing the Logicube Forensic MD5 Compact Flash Drive as a USB DriveViewing the Logicube Forensic MD5 Hardware Information . . . . . . . . . . .Appendix C Using aFernico Device . . . . . . . . . . . . . . .Integrating a Fernico FAR System. 54. 55. 55. 55. 55. . . . . . . . . . . . . . . . . . . . . . . . . . . . . . . 56. . . . . . . . . . . . . . . . . . . . . . . . . . . . . . . 56Accessing the Fernico FAR System from Imager . . . . . . . . . . . . . . . . . . . 56Table of Contents 9
Chapter 1 Overview and Installation ofFTK ImagerFTK ImagerFTK Imager is a data preview and imaging tool that lets you quickly assess electronic evidence to determine iffurther analysis with a forensic tool such as AccessData Forensic Toolkit (FTK) is warranted. FTK Imager canalso create perfect copies (forensic images) of computer data without making changes to the original evidence.With FTK Imager, you can: Createforensic images of local hard drives, floppy diskettes, Zip disks, CDs, and DVDs, entire folders, orindividual files from various places within the media. Previewfiles and folders on local hard drives, network drives, floppy diskettes, Zip disks, CDs, and DVDs Previewthe contents of forensic images stored on the local machine or on a network drive Mountan image for a read-only view that leverages Windows Explorer to see the content of the imageexactly as the user saw it on the original drive. Exportfiles and folders from forensic images. Seeand recover files that have been deleted from the Recycle Bin, but have not yet been overwritten onthedrive. Createhashes of files using either of the two hash functions available in FTK Imager: Message Digest 5(MD5) and Secure Hash Algorithm (SHA-1). Generatehash reports for regular files and disk images (including files inside disk images) that you canlater use as a benchmark to prove the integrity of your case evidence. When a full drive is imaged, a hashgenerated by FTK Imager can be used to verify that the image hash and the drive hash match after theimage is created, and that the image has remained unchanged since acquisition.Important: When using FTK Imager to create a forensic image of a hard drive or other electronic device,be sure you are using a hardware-based write-blocker. This ensures that your operatingsystem does not alter the original source drive when you attach it to your computer.To prevent accidental or intentional manipulation of the original evidence, FTK Imager makes a bit-for-bitduplicate image of the media. The forensic image is identical in every way to the original, including file slack andunallocated space or drive free space. This allows you to store the original media away, safe from harm while theinvestigation proceeds using the image.After you create an image of the data, you can then use AccessData Forensic Toolkit (FTK) to perform acomplete and thorough forensic examination and create a report of your findings.Installing FTK ImagerFTK Imager can be installed to the computer where it will be used, or it can be run from a portable device suchas a USB thumb drive connected to a machine in the field, so there is no need to install it on a suspect’scomputer in order to capture its image.Chapter 1 Overview and Installation of FTK ImagerFTK Imager 10
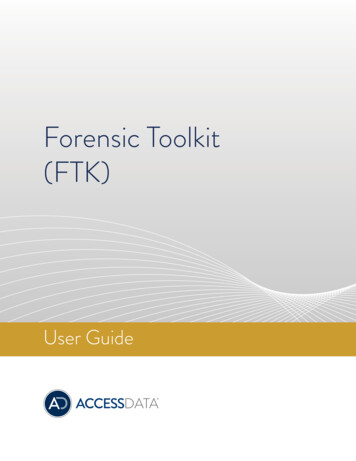
Installing LocallyInstall FTK Imager to a local hard drive when you intend to attach evidence hardware to that computer forpreviewing and imaging evidence.To install FTK Imager1. Browse to the FTK Imager setup file, either from an installation disc, or from the saved file downloadedfrom http://accessdata.com/support/adownloads. The following is an example of what you will find on theweb site, however, the version number and its MD5 hash number will change.FIGURE 3-1 AccessData Web Site: Imager Downloads2. Under Utilities, look for FTK Imager. Click Download to download the latest released version.3. Click Save File.4. Browse to the location where you wish to save the install file, and click Save.5. When the download is complete, browse to the location where it was saved.6. Execute the setup file by double-clicking it.7. On the Welcome screen, click Next.8. Read and accept the License Agreement, then click Next.9. Do one of the following: Accept Browsethe default installation location.to a different destination folder.10. Click Next.11. In the Ready to Install screen, click Next.12. Do one of the following: Markthe Launch AccessData FTK Imager box to force Imager to run immediately after the install iscomplete. Leavethe box unmarked to run the newly installed program at a later time.Note: On MS Windows Server 2008R2 running User Account Control (UAC), marking the Launch boxdoes nothing. You must manually run FTK Imager after installation.13. Click Finish to complete the installation and close the wizard.Chapter 1 Overview and Installation of FTK ImagerInstalling FTK Imager 11
Installing To a Portable DeviceThere are two ways to use Imager on a portable device: Copythe FTK Imager Lite files directly to the device, avoiding installing to a local computer first.Unzip the downloaded files to the portable drive and execute the file from there.The FTK Imager Lite program has fewer files (only the essentials) and does not require a separateinstallation, although you must unzip the downloaded file to extract its contents into a folder before use.the installation on a local computer, then copy the FTK Imager folder from the [Drive]:\ProgramFiles\AccessData\FTK Imager to the thumb drive or other portable device. RunOnce the FTK Imager program files are saved to the portable media, that media can be connected to anycomputer running a Windows OS, and the program file,FTK Imager.exe can be executed from the portable media device.With either method, you will need to make a target drive available for saving the imaged data, and a reliablewrite-blocker must still be used.Running FTK ImagerFTK Imager can be run in a variety of ways: Double-click Executeon the desktop icon.the FTK Imager.exe file from a thumb drive.Start Run Browse. Browse to and select FTK Imager.exe from the location it was installed to,and add a command line switch as discussed below. ClickCommand Line OptionsFTK Imager supports three command line options: /CreateDirListingCreates a directory listing file in the folder where FTK Imager.exe is run from.Sample:"ftk imager.exe" /CreateDirListing e:\precious.E01 /VerifyImageVerifies an image when you specify the image path and filename.Sample:"FTK Imager.exe" /VerifyImage E:\precious.E01 /EnableDebugLogEnables logging to the FTKImageDebug.log file created in the folder you run FTK Imager.exe from.Sample:"FTK Imager.exe" /EnableDebugLogNote: If you fail to specify an image when using the /CreateDirListingor /VerifyImage options, an error message appears indicating no image was found.To run FTK Imager using the Command Line Options1. Close FTK Imager, then from the Windows Start Menu, click Run.2. In the Run text box, browse to the path and folder containing FTK Imager.exe, then click Open.Chapter 1 Overview and Installation of FTK ImagerRunning FTK Imager 12
3. At the end of the resulting text line:3a. Add one space before the option you wish to use3b. Type the option to use.3c. Add another space and any corresponding data.3d. Click OK.Chapter 1 Overview and Installation of FTK ImagerRunning FTK Imager 13
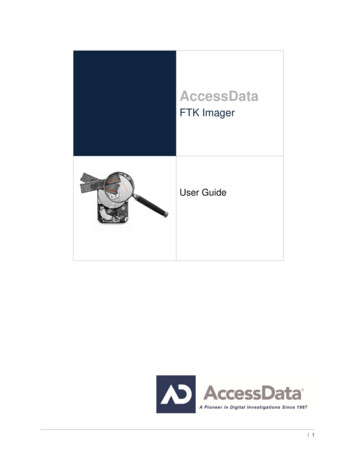
Chapter 2 The FTK Imager UserInterfaceThis chapter discusses the FTK Imager User Interface and options.The FTK Imager UIThe FTK Imager User Interface is divided into several panes; each is dockable. The Evidence Tree, File List,Properties, Hex Value Interpreter, Custom Content Sources panes, Menu, and Toolbar can all be undocked andresized to best fit your needs. Each can be re-docked individually, or you can reset the entire view for the nextinvestigation.To undock a pane or toolbar Select it and click and drag its title bar to the desired location.To re-dock a pane or toolbar Drag the pane inside the FTK Imager window until an outline shape snaps into place in the desiredposition, then release the pane.To return all panes to their original positions Select View Reset Docked Windows.Menu BarUse the Menu Bar to access all the features of FTK Imager. The Menu Bar is always visible and accessible.There are four items on the Menu Bar. They are discussed in detail in this section.File MenuThe File menu provides access to all the features you can use from the Toolbar.Chapter 2 The FTK Imager User InterfaceThe FTK Imager UI 14
FIGURE 4-1 The File MenuSee Toolbar (page 16).View MenuThe View menu allows you to customize the appearance of FTK Imager, including showing or hiding panes andcontrol bars.Chapter 2 The FTK Imager User InterfaceThe FTK Imager UI 15
FIGURE 4-2 The View MenuMode MenuThe Mode menu lets you select the preview mode of the Viewer. Each of the viewing modes isdiscussed in more detail in Chapter 3. See Preview Modes (page 21).FIGURE 4-3 The Mode MenuHelp MenuThe Help menu provides access to the FTK Imager User Guide, and to information about the program versionand so forth.FIGURE 4-4 The Help MenuToolbarThe Toolbar contains all the tools, functions, or features, that can be accessed from the File menu, except Exit.The following table provides basic information on each feature.TABLE 4-1 FTK Imager Toolbar ComponentsButton DescriptionAdd Evidence ItemChapter 2 The FTK Imager User InterfaceThe FTK Imager UI 16
TABLE 4-1 FTK Imager Toolbar Components (Continued)Button DescriptionAdd All Attached DevicesImage Mounting. Opens the Map Image to Drive dialog.Remove Evidence ItemRemove All Evidence ItemsCreate Disk ImageExport Disk ImageExport Logical Image (AD1)Add to Custom Content Image (AD1)Create Custom Content Image (AD1)Verify Drive/ImageCapture MemoryMetaCarve (Deep Scan)Obtain Protected FilesDetect EFS EncryptionExport FilesExport File Hash ListExport Directory ListingChoose IE, text, or hex viewer automaticallyView files in plain textView files in hex formatOpen FTK Imager User GuideShow or Hide Panels. Choose to show or hide the Toolbar, Evidence Tree, FileList, Properties, Hex Value Interpreter, and/or Custom Content SourcesPanes.Chapter 2 The FTK Imager User InterfaceThe FTK Imager UI 17
View PanesThere are several basic view panes in FTK Imager. They are described in this section.Evidence Tree PaneThe Evidence Tree pane (upper-left pane) displays added evidence items in a hierarchical tree. At the root of thetree are the selected evidence sources. Listed below each source are the folders and files it contains.Click the plus signnext to a source or folder to expand the view to display its sub folders.Click the minus signnext to an expanded source or folder to hide its contents.When you select an object in the Evidence Tree, its contents are displayed in the File List. The properties of theselected object, such as object type, location on the storage media, and size, are displayed in the Propertiespane. Any data contained in the selected object is displayed in the Viewer pane.File List PaneThe File List pane shows the files and folders contained in whichever item is currently selected in the EvidenceTree. It changes as your selection changes.Combination PaneFTK Imager’s lower-left pane has three tabs: Properties, Hex Value Interpreter, and Custom Content Sources.Each is described here.PropertiesThe Properties tab displays a variety of information about the object currently selected in either the EvidenceTree or the File List.FIGURE 4-5 The Properties TabProperties include information such as object type, size, location on the storage media, flags, and time stamps.Chapter 2 The FTK Imager User InterfaceThe FTK Imager UI 18
Hex Value InterpreterThe Hex Value Interpreter tab converts hexadecimal values selected in the Viewer into decimal integers andpossible time and date values.FIGURE 4-6 The Hex Value Interpreter TabTo convert hexadecimal values, highlight one to eight adjacent bytes of hexadecimal code in the Viewer. Avariety of possible interpretations of the selected code are automatically displayed in the Hex Value Interpreter.This feature is most useful if you are familiar with the internal code structure of different file types and knowexactly where to look for specific data patterns or time and date information.Custom Content SourcesEach time you add an item to be included in a Custom Content image, it is listed here.FIGURE 4-7 The Custom Content Sources TabYou can add, edit, and remove one or all sources, and create the image from here.Click Edit to open the Wild Card Options dialog box.Chapter 2 The FTK Imager User InterfaceThe FTK Imager UI 19
FIGURE 4-8 Wild Card OptionsFor more information, see Creating Custom Content Images (page 38).ViewerThe Viewer shows the content of the currently selected file, based on the Preview Mode selected: Natural, Text,or Hex. See Preview Modes (page 21) for more information.The content can be scrolled through so you can see the entire file content. In addition, with Hex Mode selected,and the Combo Pane Hex Value Interpreter open, the hex interpretation of text selected in the Viewer pane canbe viewed simultaneously.Chapter 2 The FTK Imager User InterfaceThe FTK Imager UI 20
Chapter 3 Working With EvidenceUse FTK Imager to preview evidence prior to creating the image fi
At this time, Professional Services provides support for sales, installation, training, and utilization of FTK, FTK Pro, Enterprise, eDiscovery, and Lab. They can help you resolve any questions or problems you may have regarding these products After Hours Support: Monday through Friday, 5:00 PM to 1:00 AM (UK/ London), except corporate holidays.