Transcription
V1.02.0002017-10-24
LAUNCHMillennium HD Pro English User’s ManualTrademark InformationLAUNCH is a registered trademark of LAUNCH TECH CO., LTD. (LAUNCH) inChina and other countries. All other LAUNCH trademarks, service marks, domainnames, logos and company names referred to in this manual are eithertrademarks, registered trademarks, service marks, domain names, logos andcompany names of or are otherwise the property of LAUNCH or its affiliates. Incountries where any of the LAUNCH trademarks, service marks, domain names,logos and company names are not registered, LAUNCH claims other rightsassociated with unregistered trademarks, service marks, domain names, logosand company names. Other products or company names referred to in thismanual may be trademarks of their respective owners. You may not use anytrademark, service mark, domain name, logo, or company name of LAUNCH orany third party without permission from the owner of the applicable trademark,service mark, domain name, logo, or company name. You may contact LAUNCHat www.cnlaunch.com, or write to LAUNCH TECH. CO., LTD., Launch IndustrialPark, North of Wuhe Rd., Banxuegang, Longgang, Shenzhen, Guangdong, P.R.China, to request written permission to use Materials on this manual for purposesor for all other questions relating to this manual.Copyright InformationCopyright 2017 by LAUNCH TECH. CO., LTD. All rights reserved. No part ofthis publication may be reproduced, stored in a retrieval system, or transmitted inany form or by any means, electronic, mechanical, photocopying and recording orotherwise, without the prior written permission of LAUNCH. The informationcontained herein is designed only for the use of this unit. LAUNCH is notresponsible for any use of this information as applied to other units.General Notice Other product names used herein are for identification purposes only and maybe trademarks of their respective owners. LAUNCH disclaims any and allrights in those marks. There is a possibility that this unit is inapplicable to some of the vehicle modelsor systems listed in the diagnosis section due to different countries, areas,and/or years. Do not hesitate to contact LAUNCH if you come across suchquestions. We are to help you solve the problem as soon as possible.I
LAUNCHMillennium HD Pro English User’s ManualDisclaimerTo take full advantage of the unit, you should be familiar with the engine. All information, illustrations, and specifications contained in this manual arebased on the latest information available at the time of publication. The right isreserved to make change at any time without notice. Neither LAUNCH nor its affiliates shall be liable to the purchaser of this unit orthird parties for damages, losses, costs or expenses incurred by purchaser orthird parties as a result of: accident, misuse, or abuse of this unit, orunauthorized modifications, repairs, or alterations to this unit, or failure tostrictly comply with LAUNCH operating and maintenance instructions. LAUNCH shall not be liable for any damages or problems arising from the useof any options or any consumable products other than those designated asOriginal LAUNCH Products or LAUNCH Approved Products by LAUNCH.Safety Precautions and WarningsTo prevent personal injury or damage to vehicles and/or the Millennium HD Pro,please read this user’s manual first carefully and observe the following safetyprecautions at a minimum whenever working on a vehicle: Always perform automotive testing in a safe environment. Do not attempt to operate or observe the tool while driving a vehicle. Operatingor observing the tool will cause driver distraction and could cause a fatalaccident. Wear safety eye protection that meets ANSI standards. Keep clothing, hair, hands, tools, test equipment, etc. away from all moving orhot engine parts. Operate the vehicle in a well-ventilated work area: Exhaust gases arepoisonous. Put blocks in front of the drive wheels and never leave the vehicle unattendedwhile running tests. Use extreme caution when working around the ignition coil, distributor cap,ignition wires and spark plugs. These components create hazardous voltageswhen the engine is running. Put the transmission in P (for A/T) or N (for M/T) and make sure the parkingbrake is engaged. Keep a fire extinguisher suitable for gasoline/chemical/electrical fires nearby.II
LAUNCHMillennium HD Pro English User’s Manual Don’t connect or disconnect any test equipment while the ignition is on or theengine is running. Keep the Millennium HD Pro dry, clean, free from oil/water or grease. Use amild detergent on a clean cloth to clean the outside of the Millennium HD Pro,when necessary.III
LAUNCHMillennium HD Pro English User’s ManualTable of Contents1. Introduction .12. General Information .22.1 On-Board Diagnostics (OBD) II .22.2 Diagnostic Trouble Codes (DTCs) .22.3 Location of the Data Link Connector (DLC) .32.4 OBD II Readiness Monitors .42.5 OBD II Monitor Readiness Status .52.6 OBD II Definitions .63. Product Descriptions .83.1 Outline of Millennium HD Pro .83.2 Specifications .93.3 Accessories Included .94. Connection .94.1 Connect Millennium HD Pro .94.2 Settings . 105. Diagnose . 115.1 HD OBD Diagnosing . 115.2 EOBD II Diagnosing . 146. Dpf Reset . 177. Help . 178. FAQ . 20IV
LAUNCHMillennium HD Pro English User’s Manual1. IntroductionThe Millennium HD Pro is specially developed by LAUNCH, which support all 10modes of OBD II test for a complete diagnosis. They all feature the 4.0” colorLCD.For Millennium HD Pro, it is also a multipurpose code reader with large-size colordisplay. It provides full HDOBD/EOBD diagnostic functions. Millennium HD Proprovides one or multiple of the following functions to meet the differentrequirements: DPF reset.It can be connected to PC through the USB cable for upgrade to keep updatedwith the latest software version. But here we strongly recommend that you shoulduse the memory card reader to update your tools.Note: Millennium HD Pro may automatically reset while being disturbed by strong staticelectricity. THIS IS A NORMAL REACTION.1
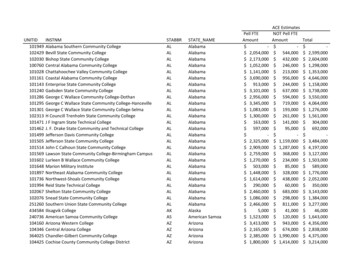
LAUNCHMillennium HD Pro English User’s Manual2. General Information2.1 On-Board Diagnostics (OBD) IIThe first generation of On-Board Diagnostics (OBD I) was developed by theCalifornia Air Resources Board (ARB) and implemented in 1988 to monitor someof the emission control components on vehicles. As technology evolved and thedesire to improve the On-Board Diagnostic system increased, a new generation ofOn-Board Diagnostic system was developed. This second generation ofOn-Board Diagnostic regulations is called “OBD II”.The OBD II system is designed to monitor emission control systems and keyengine components by performing either continuous or periodic tests of specificcomponents and vehicle conditions. When a problem is detected, the OBD IIsystem turns on a warning lamp (MIL) on the vehicle instrument panel to alert thedriver typically by the phrase of “Check Engine” or “Service Engine Soon”. Thesystem will also store important information about the detected malfunction sothat a technician can accurately find and fix the problem. Here below follow threepieces of such valuable information:1) Whether the Malfunction Indicator Light (MIL) is commanded ‘on’ or ‘off’;2) Which, if any, Diagnostic Trouble Codes (DTCs) are stored;3) Readiness Monitor status.2.2 Diagnostic Trouble Codes (DTCs)OBD II Diagnostic Trouble Codes are codes that are stored by the on-boardcomputer diagnostic system in response to a problem found in the vehicle. Thesecodes identify a particular problem area and are intended to provide you with aguide as to where a fault might be occurring within a vehicle. OBD II DiagnosticTrouble Codes consist of a five-digit alphanumeric code. The first character, aletter, identifies which control system sets the code. The second character, anumber, 0-3; other three characters, a hex character, 0-9 or A-F provide additionalinformation on where the DTC originated and the operating conditions that causedit to set. Here below is an example to illustrate the structure of the digits:2
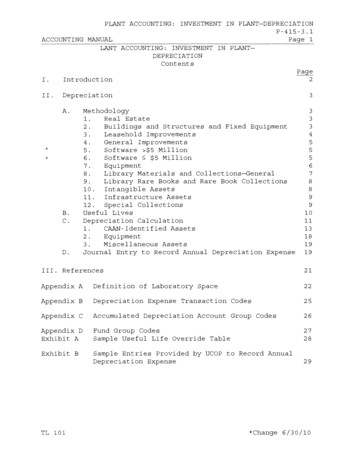
LAUNCHMillennium HD Pro English User’s ManualFigure 2-12.3 Location of the Data Link Connector (DLC)The DLC (Data Link Connector or Diagnostic Link Connector) is typically a 16-pinconnector where diagnostic code readers interface with the vehicle’s on-boardcomputer. The DLC is usually located 12 inches from the center of the instrumentpanel (dash), under or around the driver’s side for most vehicles. If Data LinkConnector is not located under dashboard, a label should be there telling location.For some Asian and European vehicles, the DLC is located behind the ashtrayand the ashtray must be removed to access the connector. If the DLC cannot befound, refer to the vehicle’s service manual for the location.3
Millennium HD Pro English User’s ManualLAUNCHFigure 2-22.4 OBD II Readiness MonitorsAn important part of a vehicle’s OBD II system is the Readiness Monitors, whichare indicators used to find out if all of the emissions components have beenevaluated by the OBD II system. They are running periodic tests on specificsystems and components to ensure that they are performing within allowablelimits.Currently, there are eleven OBD II Readiness Monitors (or I/M Monitors) definedby the U.S. Environmental Protection Agency (EPA). Not all monitors aresupported in every vehicles and the exact number of monitors in any vehicledepends on the motor vehicle manufacturer’s emissions control strategy.Continuous Monitors -- Some of the vehicle components or systems arecontinuously tested by the vehicle’s OBD II system, while others are tested onlyunder specific vehicle operating conditions. The continuously monitoredcomponents listed below are always ready:1. Misfire2. Fuel System3. Comprehensive Components (CCM)Once the vehicle is running, the OBD II system is continuously checking theabove components, monitoring key engine sensors, watching for engine misfire,and monitoring fuel demands.Non-Continuous Monitors -- Unlike the continuous monitors, many emissions and4
LAUNCHMillennium HD Pro English User’s Manualengine system components require the vehicle to be operated under specificconditions before the monitor is ready. These monitors are termednon-continuous monitors and are listed below:1) EGR System2) O2 Sensors3) Catalyst4) Evaporative System5) O2 Sensor Heater6) Secondary air Injection7) Heated Catalyst8) A/C system2.5 OBD II Monitor Readiness StatusOBD II systems must indicate whether or not the vehicle’s PCM’s monitor systemhas completed testing on each component. Components that have been testedwill be reported as “Ready”, or “Complete”, meaning they have been tested by theOBD II system. The purpose of recording readiness status is to allow inspectors todetermine if the vehicle’s OBD II system has tested all the components and/orsystems.The Powertrain Control Module (PCM) sets a monitor to “Ready” or “Complete”after an appropriate drive cycle has been performed. The drive cycle that enablesa monitor and sets readiness codes to “Ready” varies for each individual monitor.Once a monitor is set as “Ready” or “Complete”, it will remain in this state. Anumber of factors, including erasing of Diagnostic Trouble Codes (DTCs) with acode reader or a disconnected battery, can result in Readiness Monitors being setto “Not Ready”. Since the three continuous monitors are constantly evaluating,they will be reported as “Ready” all of the time. If testing of a particular supportednon-continuous monitor has not been completed, the monitor status will bereported as “Not Complete” or “Not Ready.”In order for the OBD monitor system to become ready, the vehicle should bedriven under a variety of normal operating conditions. These operating conditionsmay include a mix of highway driving and stop and go, city type driving, and atleast one overnight-off period. For specific information on getting your vehicle’sOBD monitor system ready, please consult your vehicle owner’s manual.5
LAUNCHMillennium HD Pro English User’s Manual2.6 OBD II DefinitionsPowertrain Control Module (PCM) – It is the OBD II terminology for the on-boardcomputer that controls engine and drive train.Malfunction Indicator Light (MIL) -- Malfunction Indicator Light (Service EngineSoon, Check Engine) is a term used for the light on the instrument panel. It is toalert the driver and/or the repair technician that there is a problem with one ormore of vehicle’s systems and may cause emissions to exceed federal standards.If the MIL illuminates with a steady light, it indicates that a problem has beendetected and the vehicle should be serviced as soon as possible. Under certainconditions, the dashboard light will blink or flash. This indicates a severe problemand flashing is intended to discourage vehicle operation. The vehicle onboarddiagnostic system cannot turn the MIL off until the necessary repairs arecompleted or the condition no longer exists.DTC -- Diagnostic Trouble Codes (DTC) that identifies which section of theemission control system has malfunctioned.Enabling Criteria -- Also termed Enabling Conditions. They are thevehicle-specific events or conditions that must occur within the engine before thevarious monitors will set, or run. Some monitors require the vehicle to follow aprescribed “drive cycle” routine as part of the enabling criteria. Drive cycles varyamong vehicles and for each monitor in any particular vehicle. Please refer to thevehicle’s factory service manual for specific enabling procedures.OBD II Drive Cycle -- A specific mode of vehicle operation that providesconditions required to set all the readiness monitors applicable to the vehicle tothe “ready” condition. The purpose of completing an OBD II drive cycle is to forcethe vehicle to run its onboard diagnostics. Some form of a drive cycle needs to beperformed after DTCs have been erased from the PCM’s memory or after thebattery has been disconnected. Running through a vehicle’s complete drive cyclewill “set” the readiness monitors so that future faults can be detected. Drive cyclesvary depending on the vehicle and the monitor that needs to be reset. For vehiclespecific drive cycle, consult the service manual.Freeze Frame Data -- When an emissions related fault occurs, the OBD II systemnot only sets a code but also records a snapshot of the vehicle operatingparameters to help in identifying the problem. This set of values is referred to asFreeze Frame Data and may include important engine parameters such as engine6
LAUNCHMillennium HD Pro English User’s ManualRPM, vehicle speed, air flow, engine load, fuel pressure, fuel trim value, enginecoolant temperature, ignition timing advance, or closed loop status.Fuel Trim (FT) -- Feedback adjustments to the base fuel schedule. Short-term fueltrim refers to dynamic or instantaneous adjustments. Long-term fuel trim refers tomuch more gradual adjustments to the fuel calibration schedule than short-termtrim adjustments. These long-term adjustments compensate for vehicledifferences and gradual changes that occur over time.7
Millennium HD Pro English User’s ManualLAUNCH3. Product Descriptions3.1 Outline of Millennium HD ProFigure 3-1 Millennium HD Pro Front ViewNo.NameDescriptions1DB-15connectorTo connect vehicle's DLC (Data Link Connector) withMillennium HD Pro via the diagnostic cable.2LCDIndicates test results.3I/M(F3)I/M refers to Inspection and Maintenance that islegislated by the Government to meet federalclean-air standards.4DPF (F4)Press DPF key to enter the engine selection menu5OKConfirms a selection (or action) from a menu list. / Move cursor up and down for selection. / Move cursor left or right for selection; Or turn page upand down when more than one page is displayed.Mini USB portTo connect on PC to upload data or print test results.678
Millennium HD Pro English User’s ManualLAUNCH8Exit the current program or return to the previousscreen.(ESC)9DTC(F1)To read the DTCs.10ER(F2)To erase the DTCs.11Memoryslotcard To insert the memory card to update your tool.3.2 Specifications Screen: 4.0” color LCD Input voltage range: 12 24V Working temperature: -10 to 50 C (14 to 122 F ) Storage temperature: -20 to 70 C (-4 to 158 F ) External Dimension: 195mm(L) x 86mm(W) x 32mm(H) Weight: 460g3.3 Accessories Included1. Millennium HD Pro handset2. Diagnostic cable3. User’s Manual4. Memory card (Built-in)5. Memory card reader6. USB cable4. Connection4.1 Connect Millennium HD Pro1. Turn the ignition off.2. Locate vehicle’s DLC socket: It provides standard 16 pins and is generallylocated on driver’s side, about 12 inches away from the center of dashboard.See Figure 2-2. If DLC is not equipped under dashboard, a label indicating itsposition will be given. In case no DLC is found, please refer to AutomobileRepair Manual.3. Plug one end of the diagnostic cable into the DB15 connector of MillenniumHD Pro, and connect the other end of the diagnostic cable into the vehicle’sDLC.9
LAUNCHMillennium HD Pro English User’s Manual4. Turn the ignition on. Engine can be off or running.5. After finishing, the system will start initializing. After initialization, the systemwill enter the main menu interface.CAUTION: Don’t connect or disconnect any test equipment with ignition on or enginerunning.4.2 SettingsSelect [Settings] in the main menu and press [OK], the system will enter thefollowing screen:Figure 4-11) LanguageThis option enables you to set the user interface language.Note: Due to continuous software upgrade, language interface may differ from differentsoftware versions.2) Unit of MeasureThis option allows you to set measurement unit.3) BeeperIt is used to set On/Off the buzzer.10
LAUNCHMillennium HD Pro English User’s Manual5. DiagnoseSelect [Hdobd/Eobd] in Main Menu and press [OK], the screen will display MonitorStatus interface as following figure 5-1:Figure 5-15.1 HD OBD DiagnosingSelect [HD OBD] in Figure 5-1 and press [OK], the screen will the interface asfollowing figure 5-2:Figure 5-211
LAUNCHMillennium HD Pro English User’s ManualSelect [System automatic search] in Figure 5-2 and press [OK], the screen will theinterface as following figure 5-3:Figure 5-3Select [System manual selection] in Figure 5-2 and press [OK], the screen will theinterface as following figure 5-4:Figure 5-4Select [SAE J1939] in Figure 5-4 and press [OK], the screen will the interface as12
LAUNCHMillennium HD Pro English User’s Manualfollowing figure 5-5:Figure 5-5Select [SAE J1708] in Figure 5-4 and press [OK], the screen will the interface asfollowing figure 5-6:Figure 5-613
LAUNCHMillennium HD Pro English User’s Manual5.2 EOBD II DiagnosingThis option presents a quick way to check for DTCs, isolate the cause of theilluminated Malfunction Indicator Lamp (MIL), check monitor status prior toemissions certification testing, verify repairs, and perform a number of otherservices that are emission-related.In Figure 5-1, select [EOBD II] and then press [OK] to enter the system, thescreen will automatically jump to figure 5-7:Figure 5-7Press [OK], a screen similar to Figure 5-8 will appear:14
LAUNCHMillennium HD Pro English User’s ManualFigure 5-8It mainly includes the following functions:1. Read CodesThis option is used to identify which section of the emission control system hasmalfunctioned.2. Erase CodesAfter reading the retrieved codes from the vehicle and certain repairs have beencarried out, you can use this function to erase the codes from the vehicle. Beforeperforming this function, please be sure the vehicle’s ignition key is in the ONposition with the engine off.Notes: Before performing this function, make sure to retrieve and record the trouble codes. After clearing, you should retrieve trouble codes once more or turn ignition on andretrieve codes again. If there are still some trouble codes in the system, pleasetroubleshoot the code using a factory diagnosis guide, then clear the code andrecheck.3. I/M ReadinessI/M refers to Inspection and Maintenance that is legislated by the Government tomeet federal clean-air standards. I/M Readiness indicates whether or not the15
LAUNCHMillennium HD Pro English User’s Manualvarious emissions-related systems on the vehicle are operating properly and areready for Inspection and Maintenance testing.The purpose of the I/M Readiness Monitor Status is to indicate which of thevehicle’s Monitors have run and completed their diagnosis and testing (asdescribed in Chapter 2.5), and which ones have not yet run and completed testingand diagnosis of their designated sections of the vehicle’s emissions system.I/M Readiness Monitor Status function also can be used (after repair of a fault hasbeen performed) to confirm that the repair has been performed correctly, and/or tocheck for Monitor Run Status.4. Data StreamThis option retrieves and displays live data and parameters from the vehicle’sECU.5. View Freeze FrameWhen an emission-related fault occurs, certain vehicle conditions are recorded bythe on-board computer. This information is referred to as freeze frame data.Freeze Data is a snapshot of the operating conditions at the time of anemission-related fault.Note: If DTCs were erased, Freeze Data may not be stored in vehicle memory dependingon vehicle.6. O2 sensor testThe results of O2 sensor test are not live values but instead the results of theECU’s last O2 sensor test. For live O2 sensor readings, refer to any of the livesensor screens such as Graph Screen.Not all test values are applicable to all vehicles. Therefore, the list generated willvary depending on vehicle. In addition, not all vehicles support the OxygenSensors screen.7. On-board monitor testThis function can be utilized to read the results of on-board diagnostic monitoringtests for specific components/systems.8. EVAP System TestThe EVAP test function lets you initiate a leak test for the vehicle’s EVAP system.The Millennium HD Pro does not perform the leak test, but signals to vehicle’s16
LAUNCHMillennium HD Pro English User’s Manualon-board computer are to initiate the test. Before using the system test function,refer to the vehicle’s service repair manual to determine the proceduresnecessary to stop the test.9. Vehicle InfoThis option displays the vehicle information, such as VIN (Vehicle identificationNumber), CID (Calibration ID) and CVN (Calibration Verification Number).6. Dpf ResetSelect [Dpf] in Main Menu and press [OK], the screen will display the interface forvehicle model list as following figure 6-1:Figure 6-17. HelpThis menu enables you to view tool information and OBD introduction.In main menu, select [Help] and press [OK] to enter Figure 7-1.17
Millennium HD Pro English User’s ManualLAUNCHFigure 7-17.1 DLC Location InformationThis option helps you to find the location of the vehicle’s DLC.7.2 DTC LibraryIn Figure 7-1, select [DTC Library] and press [OK] to enter the following screen.Figure 7-218
LAUNCHMillennium HD Pro English User’s ManualPress [ ]/[ ] button to move the highlight bar to different position. Press [ ]/[ ]button to alter the value, then press [OK] button, the screen will display definitionof the DTC.7.3 AbbreviationThis option allows you to view the full name and detailed explanation of theautomotive glossary abbreviations.7.4 Tool InformationThis option displays the related information of your tool.In Figure 7-1, select [Tool Information] and then press [OK].Figure 7-3Note: You are strongly recommended to note down the Serial Number and Register Codein Figure 7-3 since these 2 pieces of information are required while registering yourMillennium HD Pro.Press [ESC] to return to the previous screen.7.5 About OBDThis option allows you to have a general knowledge of OBD.19
LAUNCHMillennium HD Pro English User’s Manual8. FAQHere we list some frequently asked questions and answers relating to MillenniumHD Pro.Question: System halts when reading data stream. What is the reason?Answer: It may be caused by a slackened connector. Please turn off theMillennium HD Pro, firmly connect the connector, and switch it on again.Question: Screen of main unit flashes at engine ignition start.Answer: Caused by electromagnetic disturbing, and this is normal phenomenon.Question: There is no response when communicating with on-board computer.Answer: Please confirm the proper voltage of power supply and check if thethrottle has been closed, the transmission is in the neutral position, and the wateris in proper temperature.Question: Why are there so many fault codes?Answer: Usually, it’s caused by poor connection or fault circuit grounding.20
LAUNCHMillennium HD Pro English User’s ManualWarrantyTHIS WARRANTY IS EXPRESSLY LIMITED TO PERSONS WHO PURCHASELAUNCH PRODUCTS FOR PURPOSES OF RESALE OR USE IN THEORDINARY COURSE OF THE BUYER’S BUSINESS.LAUNCH electronic product is warranted against defects in materials andworkmanship for one year (12 months) from date of delivery to the user.This warranty does not cover any part that has been abused, altered, used for apurpose other than for which it was intended, or used in a manner inconsistentwith instructions regarding use. The exclusive remedy for any automotive meterfound to be defective is repair or replacement, and LAUNCH shall not be liable forany consequential or incidental damages.Final determination of defects shall be made by LAUNCH in accordance withprocedures established by LAUNCH. No agent, employee, or representative ofLAUNCH has any authority to bind LAUNCH to any affirmation, representation, orwarranty concerning LAUNCH automotive meters, except as stated herein.Order InformationReplaceable and optional parts can be ordered directly from your LAUNCHauthorized tool supplier. Your order should include the following information:QuantityPart numberItem descriptionCustomer ServiceIf you have any questions on the operation of the unit, please contact local dealer,or contact LAUNCH TECH. CO., LTD:Tel: 86-755-84528767E-mail: X431@cnlaunch.com21
LAUNCHMillennium HD Pro English User’s ManualStatement: LAUNCH reserves the rights to make any change to product designsand specifications without notice. The actual object may differ a little from thedescriptions in the manual in physical appearance, color and configuration. W ehave tried our best to make the descriptions and illustrations in the manual asaccurate as possible, and defects are inevitable. If you have any question, pleasecontact local dealer or after-sale service center of LAUNCH. LAUNCH does notbear any responsibility arising from misunderstandings.22
LAUNCH Millennium HD Pro English User's Manual 1 1. Introduction The Millennium HD Pro is specially developed by LAUNCH, which support all 10 modes of OBD II test for a complete diagnosis. They all feature the 4.0" color LCD. For Millennium HD Pro, it is also a multipurpose code reader with large-size color display.