Transcription
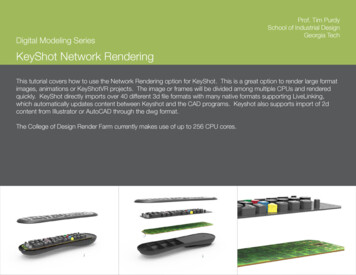
Digital Modeling SeriesProf. Tim PurdySchool of Industrial DesignGeorgia TechKeyShot Network RenderingThis tutorial covers how to use the Network Rendering option for KeyShot. This is a great option to render large formatimages, animations or KeyShotVR projects. The image or frames will be divided among multiple CPUs and renderedquickly. KeyShot directly imports over 40 different 3d file formats with many native formats supporting LiveLinking,which automatically updates content between Keyshot and the CAD programs. Keyshot also supports import of 2dcontent from Illustrator or AutoCAD through the dwg format.The College of Design Render Farm currently makes use of up to 256 CPU cores.
Before starting a network rendering job in KeyShot, you should setup a folder on the network share. The folder gives the networkrender a place to save the file(s) and helps keep the share organized. Open a window on the desktop and highlight the locationbar at the top of the window (A). Replace it with \\keyshotnr.ad.gatech.edu\renderings Note that once you type this in and hitreturn, the address changes to Network keyshotnr.ad.gatech.edu renderings. Create a folder in the window using your lastname plus first name.ASoID@GTStep 1Prof. Purdy - 2017KeyShot Network RenderingPage 1
Open KeyShot and setup your model as normal. If the model was transferred from another computer, then test render to makesure the texture maps are linked properly (diffuse, bump, labels, etc). Next, open the Render panel and choose Output. Thenetwork render cannot save back to your account. Instead, use the path and folder you just created (A). If you are renderingframes, then use the same path and folder but add /frames at the end (B). The network render tool will create this folder if it doesnot existABSoID@GTStep 2Prof. Purdy - 2017KeyShot Network RenderingPage 2
Network Rendering cannot use Maximum Time for the quality. Instead use Maximum Samples. For animations, 32 samples isgood enough. Large format images may required higher sampling rate such as 64. Choose Send to Network button.SoID@GTStep 3Prof. Purdy - 2017KeyShot Network RenderingPage 3
The Network Queue should open up. Select My Jobs in the left panel. Make sure the job starts.SoID@GTStep 4Prof. Purdy - 2017KeyShot Network RenderingPage 4
If the network rendering can not find the server, the Connection dialogue box should open. If not, then choose File ConnectionSettings (A). Select Auto detect master and choose Apply. If this does not work, then type in keyshotnr.ad.gatech.edu for theMaster Hostname and 4807 for the Queue Port (B). KeyShot will stop trying to access the Network Queue after 30 seconds soyou may have to resend the job to the Network Queue.AB4807SoID@GTStep 5Prof. Purdy - 2017KeyShot Network RenderingPage 5
Once the rendering/animation is finished, the files are save back to the \\keyshotnr.ad.gatech.edu\renderings file share (A). Thisfile share is not meant as a permanent storage drive but only a temporary storage for the network render. Copy the files off thedrive and then delete them.ASoID@GTStep 6Prof. Purdy - 2017KeyShot Network RenderingPage 6
KeyShot Network Rendering Digital odeling Series Prof. Tim Purdy School of Industrial Design eorgia Tech This tutorial covers how to use the Network Rendering option for KeyShot. This is a great option to render large format images, animations or KeyShotVR projects. The image or frames will be divided among multiple CPUs and rendered