Transcription
HOW TO CONFIGURE A ‘DMZ’ FORSECURE COLLABORATIONKramer Electronics White Paper – By Lars DuziackKramerAV.comKRAMER ELECTRONICS, Ltd.VIA – HOW TO CONFIGURE A ‘DMZ’ FOR SECURE COLLABORATION1
TABLE OF CONTENTSHOW TO DESIGN A DMZ. 3SETTING UP A DMZ WITHIN A FIREWALL. 4STEP-BY-STEP GUIDE TO INSTALL A FORTINET FIREWALL. 5INTRODUCTIONDMZ is an abbreviation for ‘Demilitarized Zone.’ In a world of ever-increasing and sophisticated security threatsand hacks, a DMZ will be an essential part of your network to help you guard against unauthorized access. It ispositioned specifically between your internal & guest IP networks to allow safe and simultaneous communicationand collaboration between those networks.The DMZ you’ll read about in this paper securely isolates any Kramer VIA product – Collage, Campus, or ConnectPRO - that can be accessed from any and all other devices on your internal and external (guest) networks. Thisadditional layer of security ensures that users of an external network cannot directly address and access an internalnetwork in a “back door” manner through any VIA product.Internal networks always contain more proprietary and/or valuable information than guest or external networks.And the simplest way to differentiate internal and external networks is to determine which network needs protectionfrom the other.A DMZ is usually located on external networks that have an Internet connection to the outside world. It is commonpractice to run a separate web server inside a DMZ. However; in our case, the DMZ described in this manual will beused to isolate a connected VIA product from all other devices located on both internal and guest networks.The concept of a DMZ is familiar to companies that already operate multiple subnets to separate guest computers,internal computers, and other IP-addressable devices. Since different IT applications have specific QoS andbandwidth requirements, it’s common practice to create specific subnets to run these applications.The same principle is at work here. Adding a DMZ to create network separation for VIA products may slow downnetwork speeds to some extent, but if the DMZ is configured correctly, any reduction in speed will be minimized and the increase in internal network security will be significant.2KRAMER ELECTRONICS, Ltd.VIA – HOW TO CONFIGURE A ‘DMZ’ FOR SECURE COLLABORATION
HOW TO DESIGN A DMZLet’s start with the basics.STEP 1: Determine which devices are assigned to internal or guest networksSTEP 2: Secure the entrance port for your networkAt first glance, these steps might seem easy to follow. But you may find more than one entryway to your network,and this will mean more points to monitor for security. For the example in this paper, we’ll focus on a singleentrance port.Minimalism should be your goal when implementing network security.1. Determining which devices are assigned to internal or guest networksAfter verifying which devices you need to protect, you must first locate them on your secure internal network. Also,make sure you know how these devices will communicate with the VIA platform that you’re going to install in theDMZ. Kramer’s IT Deployment Guide will provide you with details about all of the relevant ports that are needed forcommunication with VIA. You will also need to set up your existing network firewall to allow only VIA-specific traffic.Again, cross-check with Kramer’s IT Deployment guide to determine which protocols and ports are used.Guests will bring their own devices to collaborate through VIA and accordingly will require their own subnet withinyour existing network. The access point for this subnet will be separate from your internal network. (Make sure allsuch access points are part of your guest network!) You may also want your firewall to provide DHCP addressingto your guests. (DHCP addresses can be also assigned by a router or server within or outside the guest network.)2. Securing the entrance port for your networkTypically, this will be an ISP router with an integrated modem. Locate the entrance port and ensure your networkfirewall is working correctly. Check for passwords and usernames that may not comply with today’s advancedsecurity terms – passwords should contain at least 16 characters and include a mix of small letters, capital lettersand special characters. Usernames should be changed from factory default settings like “admin” or “root” tosomething more advanced.Example: Common default username and password combinations that must always be changedUser: admin / Password: passwordOrUser: root / Password: toorKRAMER ELECTRONICS, Ltd.VIA – HOW TO CONFIGURE A ‘DMZ’ FOR SECURE COLLABORATION3
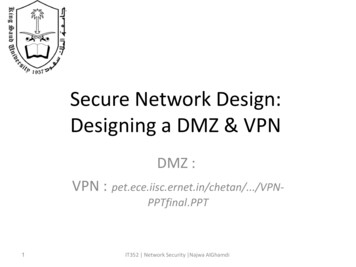
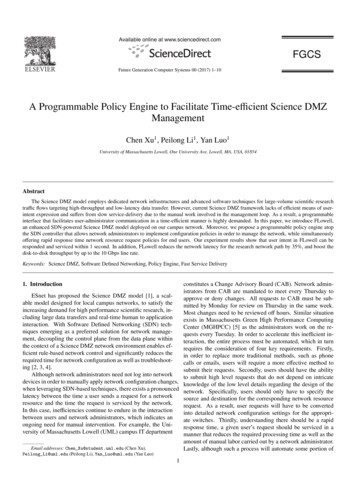
SETTING UP A DMZ WITHIN A FIREWALLYou can use one or more firewalls to set up a proper DMZ. In this paper, we will focus on a single firewall configurationwith a guest network connected to our VIA system within the DMZ.You can add additional firewalls for increased security. In this case, it is common practice to configure one firewallto be in front of the DMZ and the other one behind it.GUESTDMZWITH VIAFIREWALLFIREWALLINTERNALThe “front” firewall should be located between the guest network and your DMZ, while the “rear” firewall sitsbetween the DMZ and your internal network. In this scenario; even if one firewall fails, guest traffic will still beblocked from your internal network. It’s also a good idea to use different vendors for each firewall, as it’s unlikelythat an attacker will know how to get past two different firewall designs.How to configure your firewall interfacesFor a single-firewall dual-network solution, you will need to define three interfaces: Internal, Guest, DMZ.Check to see if these interfaces need to provide DHCP addressing, or if you already have a DHCP server runningelsewhere in the specific subnet where the VIA platform will be connected. It is highly recommended to run DHCPaddressing within your guest network environment to provide flexible and easy IP address assignments to BYOD(Bring Your Own Device) clients.Next, limit administrative access to your interfaces. Make sure you close off all unnecessary access modes toprevent unauthorized access.Select the correct IP addressing mode for your Firewall interfaces (static or DHCP) and advise users of the correctIP address and subnet if static addressing is used. All configuration information will be provided by the firewallthrough DHCP requests from clients. Note that you may need to configure static routes if you’re running anadditional device that provides DHCP.(Never run more than one DHCP server per subnet!)Activate “Multicast” policies in your firewall. This option is usually deactivated to prevent overloading the networkwith data packages from applications like Bonjour. Multicast policies must be activated to permit AirPlay operationthrough a specific subnet. To allow AirPlay on all subnets, define a new policy with a list of all source interfaces andthe outgoing interface to the DMZ. You will also have to add two more firewall policies from the incoming interfaceDMZ to the outgoing interfaces internal and guest. If your Firewall allows adding multiple interfaces into one policy,you can define the policy as “internal, guest“.All Airplay/Bonjour packages sent through the network have a characteristic TTL (Time To Live) that typically hasa value “1“. This can create a problem because the router / firewall starts requesting the package after 85% of itsTTL. At this point, you can see the AirPlay device on your subnet, but you can’t view your display. Most firewalls canset different TTL values or otherwise alter the TTL after a package request. Make sure your firewall / router doesnot change the TTL.We will now define the services from each subnet to the DMZ and from the DMZ to the internal and guest networks.Locate the Service Options menu for your firewall and create and name a new service. Add the specific ports andprotocols for each service. The minimum number of services you will create here is two, with the first defining trafficfrom all clients to VIA and from VIA to your clients. (It is highly recommended to define multiple services for guestand internal devices. Make sure you also add a service for AirPlay.)Ports from/to VIAFor a full description of all VIA ports, see the VIA IT Deployment Guide(available at: www.kramerav.com/product/VIA%20Campus#Tab Resources).4KRAMER ELECTRONICS, Ltd.VIA – HOW TO CONFIGURE A ‘DMZ’ FOR SECURE COLLABORATION
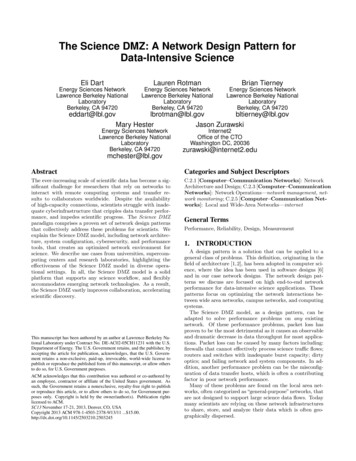
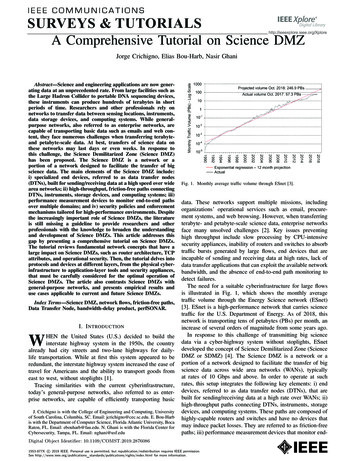
STEP-BY-STEP GUIDE TO INSTALL AFORTINET FIREWALL1.Download and install the software program “FortiExplorer“. This will allow you to connect to the FortiGate 60D.Download Link: http://www.fortinet.com/resource center/product downloads.htmlInternalGuestNetwork 10.10.40.x/24Network 192.168.1.x/24SwitchWindowsServer 2008Kramer IFI APWIFI 92.158.1.1/24SwitchDNZ10.10.30.1/24DMZNetwork 10.10.30.x/24SwitchVia Collage10.10.30.10/24KRAMER ELECTRONICS, Ltd.VIA – HOW TO CONFIGURE A ‘DMZ’ FOR SECURE COLLABORATIONVIA Connect10.10.30.11/245
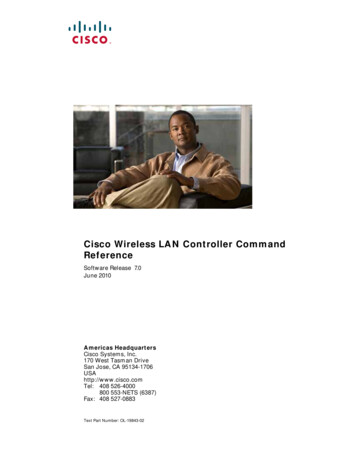
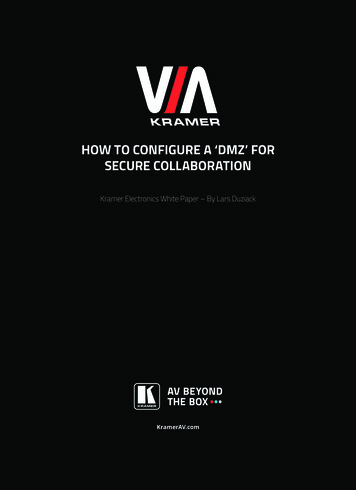
2.After installing the software, you can power up the FortiGate 60D and connect it via a USB cable toyour computer.RESETDC 12VUSBMGMTUSB3.Launch the FortiExplorer program.4.Under the Devices tab, select the FortiGate 60D.6KRAMER ELECTRONICS, Ltd.VIA – HOW TO CONFIGURE A ‘DMZ’ FOR SECURE COLLABORATION
5.Select the Web-based Manager tab on the left side.a.Enter the default username and password (Username: admin / Password: -Blank-)b. Login to start configuring the FortiGate 60D.6.We will now configure the interfaces for these networks:a.DMZ (with VIA Collage / VIA ConnectPro / VIA Campus)b. Internal (with all your internal devices that belong to the company and are trusted)c.7.Guest/Internal (with all untrusted devices that will connect to VIA)Select the top level interface. In this case, it‘s the Internal network interface.a.Right-click this interface and click Edit to enter the settings page.KRAMER ELECTRONICS, Ltd.VIA – HOW TO CONFIGURE A ‘DMZ’ FOR SECURE COLLABORATION7
8.You will need to change the IP/Network Mask settings. In most cases, these initial settings will not work withyour network. (Our Internal network is set to “10.10.40.x/24“ and you may change this value as required.)After changing the IP/Network Mask field to “10.10.40.1/255.255.255.0“ you will need to change the DHCPrange as well. Set DHCP values to start at “10.10.40.50“ and end at ”10.10.40.200“, as shown in our schematicview. If you’re already running a DHCP server on your network, you can disable DHCP on that interface.Once configured, your Interfaces overview will display the Internet interface as follows:9.Now, continue to edit the DMZ and Guest interfaces. Follow the previous steps and edit each interface asrequired. Right-click on DMZ and choose edit.Edit the IP/Network Mask field to:“10.10.30.1/255.255.255.0“Remember: You can enter your preferred IP and network mask.8KRAMER ELECTRONICS, Ltd.VIA – HOW TO CONFIGURE A ‘DMZ’ FOR SECURE COLLABORATION
It is not necessary to have a DHCP server running in the DMZ, so disable it if this option is enabled.10. Now, configure the internal interface settings for your Guest network. Edit the IP/Network mask again asrequired. For our example, we will use “192.168.1.1/255.255.255.0“. Also, we will need the DHCP server to runon our firewall with a range from “192.168.1.51“ to “192.168.1.200“.KRAMER ELECTRONICS, Ltd.VIA – HOW TO CONFIGURE A ‘DMZ’ FOR SECURE COLLABORATION9
After you’ve completed these steps, your Physical Interface view should look like this:11. In the default configuration, our firewall will not allow for multicasting. However, since the VIA product lineuses AirPlay and Bonjour, you should enable multicasting.Go to: SystemConfigFeaturesScroll down to Multicast Policy. (You may need to click “show more” to see this option.)10KRAMER ELECTRONICS, Ltd.VIA – HOW TO CONFIGURE A ‘DMZ’ FOR SECURE COLLABORATION
To save your changes, scroll back to the top of Feature Settings and click on Apply.12. After successfully activating the Multicast feature, a new sub-menu will appear under Policy & Objects.Go to: Policy & ObjectsPolicyMulticastTo allow AirPlay and Bonjour through our networks, we will first need to add four policies to our firewall.Click on Create New.KRAMER ELECTRONICS, Ltd.VIA – HOW TO CONFIGURE A ‘DMZ’ FOR SECURE COLLABORATION11
13. Our first policy will allow AirPlay/Bonjour from the internalA (Guest) interface to the DMZ.For the incoming interface, choose internalAFor source address, choose allFor the outgoing interface, choose DMZThe destination address is BonjourSelect OK to save your changes14. Our second policy will define traffic in the opposite direction from DMZ to internalA.Confirm the settings shown below by selecting OK.12KRAMER ELECTRONICS, Ltd.VIA – HOW TO CONFIGURE A ‘DMZ’ FOR SECURE COLLABORATION
15. Our third policy will allow communication from the internal network to the DMZ network.Confirm the settings as shown below and select OK.16. Finally, the last policy we have to create is to allow communication from DMZ back to internal.Confirm the settings as shown below, and select OK.17. The Multicast tab overview should look like this now.KRAMER ELECTRONICS, Ltd.VIA – HOW TO CONFIGURE A ‘DMZ’ FOR SECURE COLLABORATION13
18. As mentioned earlier, the Time To Live (TTL) value for each package is very important. Our entire AirPlay/Bonjour package should pass through the firewall unaltered. To enable this, we will first have to enter someCLI commands into the firewall.Go to: SystemDashboardStatusScroll down till you find the CLI consoleClick into the black area, and enter the following lines of text.Note: you cannot copy and paste text here!a.config system settingb. set multicast-forward enablec.set multicast-ttl-notchange enabled. end14KRAMER ELECTRONICS, Ltd.VIA – HOW TO CONFIGURE A ‘DMZ’ FOR SECURE COLLABORATION
19. We’re halfway there! Now, we have to define policies for the VIA Ports.Go to: Policy & ObjectsObjectsServicesClick on Create New and choose Service20. Name the new service Traffic from Client to VIA, or choose a name that fits your needs. All the ports that willbe needed for communication are well-documented in our IT Deployment guide. Additional ports can easilybe added by clicking on the green “plus” sign.KRAMER ELECTRONICS, Ltd.VIA – HOW TO CONFIGURE A ‘DMZ’ FOR SECURE COLLABORATION15
21. Two more services must be defined. Create a new service and name it Traffic from VIA to Clients.22. Our last service will contain all iOS ports in use. Name this service Traffic from iOS to VIA.16KRAMER ELECTRONICS, Ltd.VIA – HOW TO CONFIGURE A ‘DMZ’ FOR SECURE COLLABORATION
23. In the Services menu overview, you can filter for specific content within the service names.Search for VIA to see all related services.The menu should look like this:24. Now, we need to create the traffic rules between the networks. This step will show how to allowcommunication for internal to DMZ, InternalA(Guest) to DMZ, and in reverse directions for both.GoTo: Policy & ObjectsPolicyIPv4Create a new policy by clicking on Create New.KRAMER ELECTRONICS, Ltd.VIA – HOW TO CONFIGURE A ‘DMZ’ FOR SECURE COLLABORATION17
25. To create this new policy, we will re-enter all the previous policy information again.Select for the incoming interface: internalASource address: allOutgoing interface will be: DMZDestination address: allSchedule: alwaysService: Traffic from Client to VIA and Traffic from iOS to VIAMake sure you have NAT (under Firewall/Network Options) deactivated.26. The next policy you define will enable communication from DMZ to internalA.Make sure you have NAT deactivated here as well.18KRAMER ELECTRONICS, Ltd.VIA – HOW TO CONFIGURE A ‘DMZ’ FOR SECURE COLLABORATION
27. Create the same policies for the internal interface now.28. Finally, create a policy to allow communication back from DMZ to internal.29. Congratulations – you’re done! The configurations and policies you’ve defined in the previous steps will allowtwo networks to collaborate securely with VIA Collage, Campus, and Connect Pro in a Demilitarized Zone.Disclaimer: Keep in mind that we’ve only defined a basic configuration for the firewall. To make sure that yourfirewall is completely configured, you will need additional information from your IT Department or firewalldistributor. This white paper covers the setup for dual network collaboration only, and no other securityfunctions of this or any other firewall.KRAMER ELECTRONICS, Ltd.VIA – HOW TO CONFIGURE A ‘DMZ’ FOR SECURE COLLABORATION19
www.KramerAV.com 2018 KRAMER ELECTRONICS, Ltd. All rights reserved.Reproduction in whole or in part without written permission is prohibited. Specifications are subject to change without notice.
DMZ is an abbreviation for 'Demilitarized Zone.' In a world of ever-increasing and sophisticated security threats and hacks, a DMZ will be an essential part of your network to help you guard against unauthorized access. It is positioned specifically between your internal & guest IP networks to allow safe and simultaneous communication