Transcription
FluteTheAndrew Scott Flute MethodBook 1An enjoyable and thorough series of exercises, songs and explanations.Provides the beginning student with a firm foundation for study of theflute.Book andAudio Set
TheAndrew ScottFluteMethodbyAndrew ScottVisit us on the web:andrewscottmusic.com
2ContentsLesson 1Parts of the Flute . 3Making a Sound on the Headjoint . 3Exercises with the Headjoint . 4Tonguing . 4Assembling the Flute . 4-5The Note A . 5Playing a Note . 6Carrying the Flute . 6Lesson 2The Staff, Treble Clef . 7The Half Note (or Minim)& Rest . 7Bars & Bar Lines, . 8The Quarter Note (Crotchet) . 8The Time Signature . 9Quarter Rest, Final Bar Line . 97 Exercises with the A note . 8-9Lesson 3How to Tune the Flute . 10Tuning Exercise . 10Lesson 4The Note B . 11Note Stems . 11Repeat Sign, Bar Numbers . 127 Exercises and Songs includingBasic Blues (duet) * . 11-13Lesson 5The Note G . 14The Note C . 1513 Exercises and Songs includingHot Cross Buns, Yankee Doodle,Merrily & ABC Exercise . 14-16Lesson 6Breathing and Blowing . 172 Breathing Exercises . 18Lesson 7The Dotted Half Note (DottedMinim) . 19The Common Time Signature . 207 Exercises and Songs includingSatellite Song .19-20Lesson 9Lesson 16bThe Note B Flat (B ) . 23Flat Signs After a Clef . 247 Exercises and Songs includingLove Me Tender, Jingle Bells, &Ode to Joy . 23-25Lesson 10The Lead In . 263 Exercise and Songs includingThe Banks of the Ohio and Whenthe Saints Go Marchin’ In . 26-27Lesson 11The Natural Sign . 28bThe Right Hand B . 28The Three Four Time Signature . 29The Tie . 301st and 2nd Endings . 319 Exercises and Songs includingBarcarolle and Roses from theSouth . 28-31Lesson 12The Whole Note (Semibreve) . 32The Note E . 3311 Exercises and Songs includingGood Evening Friends &Mary Ann . 32-35Lesson 13The Eighth Note (Quaver) . 3612 Exercises and Songs includingShave and a Haircut . 36-38Beam Me Up . 21-22Lesson 17The Dotted Quarter Note (DottedCrotchet) . 488 Exercises and Songs includingOde to Joy (advanced version) . 48-50Lesson 18The Note E (Middle Register) . 5115 Exercises and Songs includingTakeda, My Bonnie Lies over theOcean & O Susanna . 51-55Lesson 19Staccato . 567 Exercises and Songs includingThe Mexican Hat Dance andShortnin’ Bread . 56-57Lesson 20The Note F Sharp . 5813 Exercises and Songs includingJingle Bells (complete), We WishYou a Merry Christmas, Hark! TheHerald Angels Sing and GoodKing Wenceslas . 58-62Lesson 21Lesson 14The Note D . 398 Exercises and Songs includingBig Ben, The Volga Boatman,Harem Dance &La Spagnola . 39-41Lesson 15The Note D (on the 4th Line) . 42The Three Flute Registers . 43Changing Registers . 4312 Exercises and Songs . 42-44Lesson 8The Note F . 21The Slur . 227 Exercises and Songs includingSongs with D . 456 Songs including For He’s a JollyGood Fellow, When Johnny ComesMarching Home and Twinkle,Twinkle, Little Star . 45-47* Bold type denotes duetThe Note F (Middle Register) . 6314 Exercises and Songs includingPick a Bale o’ Cotton, CamptownRaces, & The First Noel . 63-67Fingering Chart . 68Glossary . 69Preview of Book 2 . 70Other Publications fromAndrew Scott . 71Order Form . 72
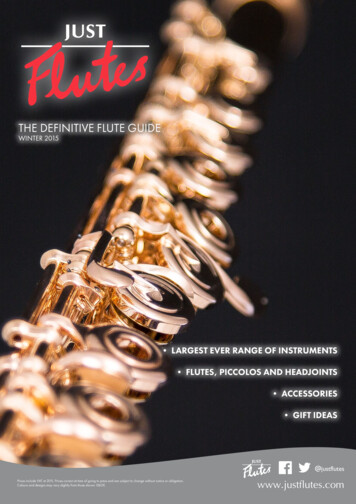
3Lesson 1Parts of the FluteA flute is made up of three pieces - the head joint, the middle joint and the foot joint.HeadjointFoot jointTone holeMiddle jointLip plateBarrelMaking a Sound on the Head JointHold the head joint with both hands as shown on the illustration below. Place the lip plateagainst your lower lip so that it covers about a quarter of the hole.Blow gently across thehole towards the oppositeedge. The head jointshould make a sound.If you can’t make a sound,try moving the head jointa little to the left or theright, or rolling it intowards you or outaway from you.TipBe very, very patientwith this process.Some people takedays before theycan get anywhere.Blow smoothly, andavoid huffing andpuffing.It is not necessary toswellupyourcheeks.
4Jungle SoundsWhen you can make a sound, vary it by covering the open end of the head joint with yourright palm. You can hear this on Track 2 of the CD.Jungle SoundsTrack 2This track contains the sound of the open head joint, then the head joint with the palm placedover the end, then some twittering and fluttering as the hand is moved on and off the barrel.TonguingUse your tongue to start and stop the sounds. As you blow across the mouth hole, whisperthe word too, or doo, several times.Let the tip of your tongue rest at the back of your top teeth as you start to blow, so thatit blocks the air. When you whisper too, the air rushes into your flute and the note starts.When you replace your tongue against your teeth the sound will stop.This technique is called tonguing. Flute players use it all the time to make notes start andstop cleanly.Listen to Track 3 on the CD.Tongued NotesTrack 3First you will hear four notes on the head joint without tonguing. Thenfollow four notes with tonguing. You can hear the difference. Withouttonguing, the attack on the note sounds more like a foo or a hoo thana too or a doo.Putting the Flute TogetherWhen you pick up the middle joint, make sure youhold it by the barrel. Try not to grip the keysbecause too much pressure can bend them.As you insert the head joint into the middlejoint, twist it back and forth to help itslip in more smoothly.Line up the mouth hole with thekey on the middle joint.Line up these twopoints
5Attach the foot joint to the middle joint, then line them up as shown.Middle jointFoot jointLine up the post on the middle joint with the middle of the lever on the foot joint.The alignment of the joints shown above is an average position. You can adjust them laterto make them more comfortable.The Note ARefer to the fingering diagram and the position of the person in the illustrations below andon the next page.Place your fingers on the keys shown for the note A.Left Hand FingersRight Hand Fingers214T121343214TLeft HandRight HandPlaying PositionMake sure the flute extends to your right, not your left. Turn your left hand so that its palmfaces toward you, and your right hand so that its palm faces away.
6Playing a NotePlay the note A. Vary your attack - try it withtonguing and without.It requires much more skill to play your A note onthe flute than it does on the piano or guitar. Toproduce a beautiful tone you need to strengthenand refine the muscles around your mouth. Thisis a long term process.Support the flute in 4 places:1. your right thumb;2. the first finger of your left hand,between the hand and your firstknuckle;3. your lower lip, and4. the fourth finger of your right hand.The right hand fourth finger is not strictly necessary for the sound of some notes, but it doeshelp you to balance and control the flute. Get in the habit of following the fingering diagramsexactly. They will help you achieve maximum effect.Carrying the FluteWhen you carry yourflute,gripitaround the barrelon the middlejoint. Don’t carryit by the headjointalone,because some head joints areloose, and can fall out of themiddle joint.TipsTry to keep the little finger of your righthand curved as it holds open its key.This will help prevent cramps, andallow your right hand to be moreflexible.Perform exercises to stretch andstrengthen your shoulders and arms ifthey become painful from supportingthe flute.If you become dizzy or light-headedfrom blowing, fast forward to the lessonon breathing on page 17.
7Lesson 2The StaffA staff (plural: staves) is a set of five lines and four spaces upon which music can bewritten. The lines and spaces are numbered from the bottom.5th line4th space4th line3rd space3rd line2nd space2nd line1st space1st lineThe Treble ClefThe symbol at the left end of the staff is called a treble clef. Every line of flute musichas these clefs to show you how notes are named. There are other clefs, such as bassand alto clefs, but for flute playing you only need to know this one.The Half NoteThe Half Note A(or Minim)The position of a note inthe staff tells us its name.The symbol below is calleda half note (or minim insome countries). A halfnote has a value of twobeats.2nd spaceCount:112Rests mean that you don’tplay any note.Thefollowing symbol drawn onthe middle line of the staffis a half rest (or minimrest). Play nothing for twobeats, but keep counting.2The note above, written inthe second space of thestaff, is the A note youlearned on page 5.Count:The Half Rest(or Minim Rest)Count:12
8Exercise 1Track 4This exercise contains three A notes, each to be held for two beats. On the CD there areanother two beats on the tamborine after the third A, then the exercise is repeated threetimes. The second and third repeats contain only the tamborine.Play the three notes below, tonguing each one.Think:11212212The Bar LineNotes can be grouped in bars or measures. Bar lines divide groups of notes into equalnumbers of beats.bar linebar line2 beats Exercise 22 beats 42 beats 2 beats 4Track 5Played four times on the CD, as above.Think:12112122All the following exercises on the CD are played twice - once with the flute andtamborine or other instruments (the accompaniment), and once with just theaccompaniment.The Quarter Note (or Crotchet)Whereas the half note symbol is a half-hollowed out egg shapewith a stick on one side, the quarter note symbol is a solidegg shape with a stick. The quarter note has a value of onebeat.Exercise 3Think:1Track 6234123412341234
9The Time SignatureA time signature is a symbol that tells you how many beatsshould be played in each bar, and what kind of beats they are.The pair of fours at left are known as the four four time signature,which means that each bar contains four beats. These beats canbe any combination of quarter and half notes or rests, or othernotes that you will learn later.Exercise 4Track 7Take breaths where and whenever you can. The most important thing at this stage is tokeep in time with the CD.Think:The Quarter Rest (or Crotchet Rest)The quarter rest is a squiggly device meandering between the 1st and4th spaces of the staff. Its value is one beat of silence.Exercise 5Track 8The Final Bar LineThe thick and thin lines at the end of the next exercise are a final bar line. They indicatethe end of a piece of music.Exercise 6Track 9Exercise 7Track 10
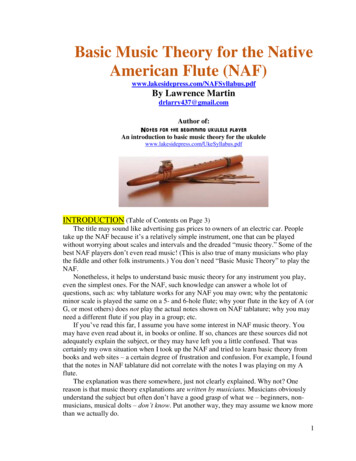
10Lesson 3How to Tune the FluteYou must be able to tune your flute to makeit sound at its best when you play with otherinstruments or recordings.Step 2You can do this by playing your note andthen comparing it to a tuning note.Step 3Start Track 1 again. Play your A’s, then listento the notes on the CD.Step 1Were your A’s at exactly the same pitch, orwere they higher or lower?Listen to Track 1 on the CD, following themusic on the chart below.Step 4TuningTrack 1If your notes sound the same as the CDnotes, your flute is already in tune. Go toStep 7.Step 5If your notes sound lower than the CD, yourflute is said to be flat. Raise its pitch bypushing the headjoint further into the body,then repeat Steps 2 and 3.Pushing theheadjoint inraises thepitch.Step 6If your notes sound higher than the CD, yourflute is said to be sharp. Lower its pitch bypulling the headjoint out from the body, thenrepeat Steps 2 and 3.Pulling theheadjoint outlowers thepitch.Step 7As a final check, play your A’s at the sametime as the notes on the CD. If the two notesare in tune they will sound like oneinstrument. If not, there will be a harsh,irritating beating sound, somewhat like twoblowflies sparring. Begin tuning again.Tuning Tips1. Don’t be too concerned if you can’ttell whether you are sharp or flat. It cantake a long time before you hear thedifference.2. Hot weather makes the flute sharp.Cold weather will make it flat. You will need to adjust your headjoint more on hot or cold days.
11Lesson 4The Note B14TNote StemsNotes on the StaffThe location of a note on the staff tells usits name. The note B is written on themiddle line of the staff.T below the middle line haveNotes writtentheir stems on the right of the note headgoing up. Notes written above the middle lineusually have their stems on the left goingdown. Notes on the middle line can havetheir stems in either direction.MiddleNote heador 3rd lineStemChord SymbolsThe letters and numbers above the staves in the following songs are chord symbols. Aguitarist or keyboard player can use them to accompany you.B Exercise 1Track 11Charlie Byrd StyleB Exercise 2Track 12Perro Style
12The Repeat SignThe two dots before the finalbarline are a repeat sign. Theymean: play the piece againfrom the start.B & A SwingTrack 13Cocktail StyleBar Numbers(or M
Parts of the Flute A flute is made up of three pieces - the head joint, the middle joint and the foot joint. Making a Sound on the Head Joint Hold the head joint with both hands as shown on the illustration below. Place the lip plate against your lower lip so that it covers about a quarter of the hole. Blow gently across the hole towards the opposite edge. The head joint
![Rubank elementary method : [for] flute or piccolo](/img/5/rubankelementary-flute.jpg)