Transcription
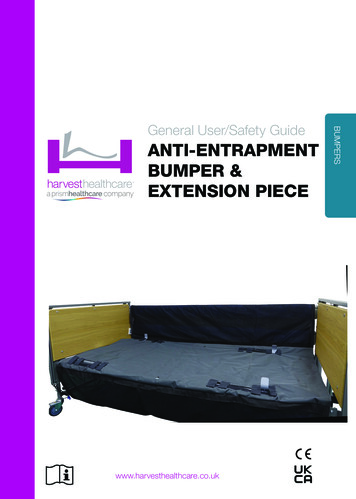
ANTI-ENTRAPMENTBUMPER &EXTENSION PIECEwww.harvesthealthcare.co.ukBUMPERSGeneral User/Safety Guide
2T 44 (0)1709 377172F 44 (0)1709 377173
CONTENTSWARNINGS & CAUTIONS4PRODUCT OVERVIEW5GENERAL INFORMATION6-7INSTALLATION8-910-11BUMPER EXTENSION INSTALLATION12CLEANING AND CAREE .co.uk3
WARNINGS &CAUTIONSREAD THIS INSTRUCTION MANUAL CAREFULLY. PLEASE NOTEIN PARTICULAR THAT THE SAFETY INSTRUCTIONS MUST BEOBSERVED.WARNINGPlease ensure that this booklet is read prior to first use.Please refer to the information in this booklet as a guideline only.Harvest Healthcare Ltd recommend that prior to using this product, a full risk assessment must becompleted by a qualified professional, in order to determine that the correct product is suitable for eachindividual.Do not allow sharp objects to penetrate the side rail meshing or the covering material.Ensure this product is fitted as specified in the fitting instructions.Routinely inspected this item for damage and ensure all fixing straps or Hook and Loop are securely fastened.Remove the item from service if the product is damaged or ripped.Remove the item if the fixing straps or the Hook and Loop show signs of wear and they are not effective.Do not expose this product to open flames. We advise the user not smoke when using this product.Facial contact with the cover may cause suffocation if used incorrectly.SYMBOLS USEDCOVERS AREREMOVABLE ANDMACHINE WASHABLELOW HEATTUMBLE DRYDO NOTDRY CLEANDO NOTBLEACHPHENOLSDO NOT IRONCE MARKUKCA MARKDO NOT USEPHENOLSNOSMOKINGThis symbol indicates general hazards. There is a danger to life and health.4T 44 (0)1709 377172F 44 (0)1709 377173
PRODUCT OVERVIEWPRODUCT DESCRIPTIONAnti-Entrapment BumperThe Anti-Entrapment Bumper is a 2 bar bumper with net/mesh insert and anti-entrapmentsystem with link sheet. Designed for users who move excessively in bed, to prevent limbsfrom becoming trapped. The Anti-Entrapment Bumper fits all standard width Woburn beds,whilst also being suitable for most other manufacturer’s beds with two full length woodenside rails at each side of the bed. We also offer the Anti-Entrapment Bumper for beds with 3bar side rails (Ultimate/Safeguard). All the bumpers come with covers that are removable andmachine washable, for better infection control.Product CodeDescriptionHCSAEBUMP791Anti-Entrapment Bumper with Net/Mesh Inserts for Woburn &Community Bed (L: 2000 mm)HCSAEBUMP140Anti-entrapment Bumper with Net/Mesh Inserts for Beds with 3Bar Side Rails (Ultimate/Safeguard) (L: 2000 mm)HCSAEBUMP791 HCSAEBUMP791.EX20Extended Anti-Entrapment Bumper with Net/Mesh Inserts forWoburn & Community Bed (L: 2200 mm)HCSAEBUMP140 HCSAEBUMP140.EX20Extended Anti-Entrapment Bumper with Net/Mesh Inserts forWoburn Ultimate Bed (L: 2200 mm)E .co.uk5
GENERAL INFORMATIONINSTRUCTIONS FOR USECheck the product for damage, and if it is the correct type of product for the bed, beforecarrying out the installation. If a bumper netting or any other part of the product looks damaged do not fit thebumper. Refer to the product code and pictures to make sure you’re using the right instruction foruse. Before installing this product read the instruction for use thoroughly and seek advice ifyou are unsure how to fit the product.To help prevent injury it is important that patients and equipment are monitored regularly.The Anti Entrapment bumper may be delivered in a plastic cover for protection; these coversmust be removed and dispose of before the equipment can be used.Please dispose of the plastic as specified by your local waste disposal service authority.INTENDED PURPOSEThe 2 bar Anti-Entrapment bumper is designed for users who move excessively in bed, to prevent limbs from becoming trapped.ANTI-ENTRAPMENT BUMPER INSPECTION RECOMMENDATIONSThe Anti-Entrapment bumper should be checked regularly to ensure it remains ‘fit forpurpose’, effective and pose no risk of infection to either the patient or the carer.Harvest Healthcare Ltd recommend that a thorough inspection of both the exterior (cover)zips, straps and Hook and Loop is carried out weekly, and each time a new patient isintroduced to this equipment. Visual checks should be carried out daily to identify anysignificant signs of damage or infection risk.If any signs of contamination are identified, the bumper system should be withdrawn from useimmediately and cleaned.CLEANING AND CAREThe bumper system has a black mesh and protective Vinyl cover. The cover should becleaned regularly in accordance with your organisation’s disinfection protocol. (See page 10)Facial contact with any covering material such as that used on thisproduct can cause suffocation and a Risk Assessment should becarried out prior to the use of this product.6T 44 (0)1709 377172F 44 (0)1709 377173
GENERAL INFORMATIONMOVING, HANDLING AND STORAGEWhere possible, the bumper system should be stored flat to prevent damage to the product.It may require more than one person to aid in fitting the system.The bumper system is to be stored between -5 to 40 degrees, in a dry environment.Do not expose to high humidity or heat.Do not drag or pull the bumper system by the cover.SAFE USEThis product is intended as an aid to prevent accidental injury. With a carer present checkthe material, zips and fastenings to ensure that these parts of the bumper systems have notbeen damaged and do not introduce gaps too or a hazard that could be increased the risk ofentrapment suffocation or injury to the end user or carer.Before and during use of the bumper system, consider the effectiveness of the system,including if the side rails has been fitted correctly, and the side rails can be raised and loweredaccording to the manufacturers instructions. The hazard of entrapment can still occur if theside rail system has not been fitted correctly or the wrong type has been fitted.Seek advice to ensure the correct type is selected before installation as per the manufacturersinstructions.IMPORTANT NOTICEThe bumper must be able to be removed or lowered in case the user requires urgent medicalattention or CPR.Do not leave a bumper in place if the side rails can not be removed or lowered as describedin the manufacturers instructions.Do not sit on the side rails with the bumper on as this will deform the product and couldcause the side rail system to malfunctionWARRANTYBUMPER SYSTEMSAll Harvest Healthcare bumper systems are covered by warranty for a period of 1 year.Damage through incorrect use will invalidate this warranty.GUARANTEEHarvest Healthcare Ltd guarantees to repair or replace all goods issued to its customerswhich are found to be defective whilst still under their applicable warranty period. Allwarranties are subject to our standard terms and conditions of sale which can be found onour website or by request to Harvest Healthcare Ltd.E .co.uk7
2 BAR BUMPERINSTALLATION1. Lay the bumper system on the mattress platform with the Head end this way up label facingupwards and at the head end of the bed.2. Locate the top bumper pad by identifying the pad with the label (on the inside of the bumper padsaying top rail inside)3. Present the top pad (with the above label) against the top side rail, the padding from bothpads will hang on the inside of the side rails.4. Ensure the padding passes over the top of the rail and connect the zip (see picture below)The long piece of black mesh passes over the top ofthe top padPadding passes over the top of the side rail andfinishes hereZip connects along the lower edge of the upper rail8T 44 (0)1709 377172F 44 (0)1709 377173
2 BAR BUMPERINSTALLATION5. Once the top pad is connected the lower pad should fall in place and can be zipped up, onceagain ensure the padding passes over the top of the side rail.6. Carry out the same procedure for the opposite side.7. There are 4 zips in the base sheet to allow the mattress guides to pass through.Open the tips, pass the mattress guides through the base sheet then close both zips around themattress guides.8. Once installed correctly the inside of the bed should look like the below image.9. Tubing can be passed through the gaps created for the mattress guides.10. There are zips on each padded section to allow the foam protection to be removed beforewashing.E .co.uk9
3 BAR BUMPERINSTALLATION1. Lay the system on the bed with the label on the base sheet (saying head end – this way up) atthe head end of the bed facing upwards2. Lay the padded sections across the top of the base sheet and locate the pad with the labelsaying top rail inside3. Present the pad with the label against the top rail.4. Zip the pad around the top rail10T 44 (0)1709 377172F 44 (0)1709 377173
3 BAR BUMPERINSTALLATION5. Bring the rest of the bumper pads from the inside of the bed over the top rail to the outside ofthe bed and pass them between the top and middle rails.6. Zip the pad around the centre rail.7. Finally zip the pad around the bottom rail.8. Feed the mattress guides through the base sheet and close the zips.9. There are 2 holes in the base sheet to allow tubing to pass between the inside and outside of theof the platform.E .co.uk11
BUMPER EXTENSIONINSTALLATION1. Install the full-length bumper as normal on the extended side rails leaving the gap towards thefoot end of the bed.2. Fit the extension to the side rails with the padded section to the outer edge of the rail.3. Ensure the 2 Hook and Loop flaps are towards the full size bumper.200mmextensionStandard bumperHook and LoopflapsFootboard end4. Fold both Hook and Loop flaps together with the mesh from the full-length bumper in between12T 44 (0)1709 377172F 44 (0)1709 377173
BUMPER EXTENSIONINSTALLATION5. The edge of the extension should slightly cover the end on the full-length bumper (there shouldbe no gap between the 2 parts)6. View from inside.E .co.uk13
CLEANING & CAREWARNINGEye protection, gloves, and protective clothing should be worn when carrying out cleaningand disinfection procedures.When disinfecting the system, Harvest Healthcare recommends the following guidelineswhich have been developed to comply with recognised infection control procedures.These procedures are also to be used to prevent cross infection when transferring thesystem between patients.BUMPER COVERDuring general use, the bumper cover can be cleaned by wiping with a mild detergentsolution.Where necessary the cover can be laundered or wiped clean. Where there is staining orbody fluids on the outer cover, wash thoroughly with soap and water, then wipe with asodium hypochlorite solution diluted to 1000ppm before laundering. Bumper covers may belaundered if the foam can be removed.INSTRUCTIONS ON HOW TO LAUNDER THE OUTER COVERLay the bumper cover down on a flat surface and unzip the pocket to gain access to theinternal foam padding. Remove the foam padding. The bumper can now be laundered.1 Pre wash cold 10 minutes2 Main wash 80 C 10 minutes3 Followed by cold rinses and extraction.Do not use abrasive cleaners, phenol disinfectants, solvents, or alcohol-based cleansers,e.g. Dettol, Phenicol, Hibiscrub, Clearsol, Stericol, Hycoline, as these will damage the covermaterials.Tumble dry at low heat.Do not iron.Ensure that the cover is thoroughly dried before inserting the foam and placing the bumperinto storage.HYPERCARBONATE AND PHENOL-BASED SOLUTIONS SHOULD NOTBE USED AS THESE WILL DAMAGE THE PRODUCT COVERDISPOSALIf contaminated, please dispose of as clinical waste.If not contaminated dispose of as household waste at your local approved facility.Note: Remove the foam before decontamination. Harvest Healthcare recommends using a wash bag to protect the system ifdecontaminating in a washing machine. Carry out a risk assessment to ensure the bumper is suitable for the users’ requirements. In the event of the bumper system becoming damaged discontinue use immediately andcontact Harvest Healthcare for advice. If you have any questions, please contact Harvest Healthcare before use.14T 44 (0)1709 377172F 44 (0)1709 377173
NOTESE .co.uk15
Sheaf House, Bradmarsh Business Park,Bradmarsh Way, Rotherham S60 1BWT 44 (0)1709 377172F 44 (0)1709 377173E .co.uk Copyright Harvest Healthcare - Anti Entrapment Bumper - V1- March 2022Harvest Healthcare Limited. Company No: 07210261Our Full Terms & Conditions are available by request or can be found on our Website.Harvest Healthcare reserves the right to alter or amend this document without notice.
1. Lay the bumper system on the mattress platform with the Head end this way up label facing upwards and at the head end of the bed. 2. Locate the top bumper pad by identifying the pad with the label (on the inside of the bumper pad saying top rail inside) 3. Present the top pad (with the above label) against the top side rail, the padding from .