Transcription
AVG Email Server EditionUser ManualDocument revision 2015.11 (23.3.2015)C opyright AVG Technologies C Z, s.r.o. All rights reserved.All other trademarks are the property of their respective owners.
Contents1. Introduction22. AVG Installation Requirements32.1 Operation Systems Supported32.2 Email Servers Supported32.3 Hardware Requirements32.4 Uninstall Previous Versions42.5 MS Exchange Service Packs43. AVG Installation Process53.1 Installation Launch53.2 License Agreement63.3 Activate Your License63.4 Select Installation Type73.5 Custom Install - Custom Options83.6 Installation Completion104. After Installation115. Email Scanners for MS Exchange135.1 Overview135.2 Email Scanner for MS Exchange (routing TA)145.3 Email Scanner for MS Exchange (SMTP TA)165.4 Email Scanner for MS Exchange (VSAPI)175.5 Detection Actions195.6 Mail Filtering206. Anti-Spam Server for MS Exchange226.1 Anti-Spam Principles226.2 Anti-Spam Interface226.3 Anti-Spam Settings237. AVG for Kerio MailServer287.1 Configuration288. FAQ and Technical Support321
1. IntroductionThis user manual provides comprehensive documentation for AVG Email Server Edition.Congratulations on your purchase of AVG Email Server Edition!AVG Email Server Edition is one of a range of award winning AVG products designed to provide you withpeace of mind and total security for your server. As with all AVG products AVG Email Server Edition hasbeen completely re-designed, from the ground up, to deliver AVG’s renowned and accredited securityprotection in a new, more user friendly and efficient way.AVG has been designed and developed to protect your computing and networking activity. Enjoy theexperience of full protection from AVG.Note: This documentation contains description of specific Email Server Edition features. Should you requireinformation about other AVG features, please consult the user guide to Internet Security edition, whichcontains all the necessary details. You can download the guide from the http://www.avg.com.2
2. AVG Installation Requirements2.1. Operation Systems SupportedAVG Email Server Edition is intended to protect mail servers running under the following operating systems:Windows 2012 Server R2 EditionWindows 2012 Server Edition (x86 and x64)Windows 2008 Server R2 EditionWindows 2008 Server Edition (x86 and x64)Windows 2003 Server (x86, x64) SP12.2. Email Servers SupportedThe following mail servers are supported:MS Exchange 2003 Server versionMS Exchange 2007 Server versionMS Exchange 2010 Server versionMS Exchange 2013 Server versionKerio MailServer – version 6.7.2 and higher2.3. Hardware RequirementsMinimum hardware requirements for AVG Email Server Edition are:Intel Pentium CPU 1.5 GHz500 MB of free hard drive space (for installation purposes)512 MB of RAM memoryRecommended hardware requirements for AVG Email Server Edition are:Intel Pentium CPU 1.8 GHz600 MB of free hard drive space (for installation purposes)512 MB of RAM memory3
2.4. Uninstall Previous VersionsIf you have an older version of AVG Email Server installed, you will need to uninstall it manually beforeinstalling AVG Email Server Edition. You must manually perform the uninstallation of the previous version,using the standard windows functionality.From the start menu Start/Settings/Control Panel/Add or Remove Programs select the correctprogram from the list of installed software (or you can do this maybe even easier via menu Start/AllPrograms/AVG/Uninstall AVG).If you have previously used the AVG 8.x or older version, do not forget to uninstall also individual serverplug-ins.Note: It will be necessary to restart the store service during the uninstallation process.Exchange plug-in - run setupes.exe with the /uninstall parameter from the folder where the plug-in wasinstalled.e.g. C:\AVG4ES2K\setupes.exe /uninstallLotus Domino/Notes plug-in - run setupln.exe with the /uninstall parameter from folder where the plugin was installed:e.g. C:\AVG4LN\setupln.exe /uninstall2.5. MS Exchange Service PacksThere is no service pack required for MS Exchange 2003 Server; however, it is recommended to keep yoursystem as up to date with the latest service packs and hotfixes as possible in order to obtain maximalavailable security.Service Pack for MS Exchange 2003 Server /details.aspx?id 9664At the beginning of the setup, all system libraries versions will be examined. If it is necessary to install newerlibraries, the installer will rename the old ones with a .delete extension. They will be deleted after the systemrestart.Service Pack for MS Exchange 2007 Server ils.aspx?FamilyID 44c66ad6-f185-4a1d-a9ab473c1188954c&displaylang enService Pack for MS Exchange 2010 Server /details.aspx?id 281904
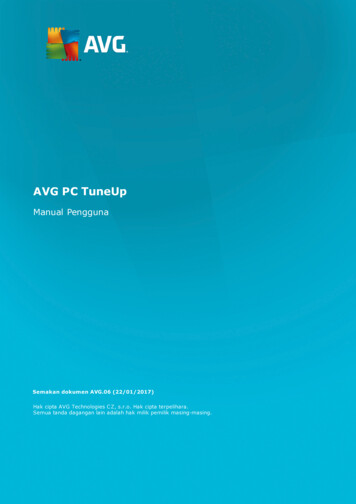
3. AVG Installation ProcessTo install AVG on your computer, you need to get the latest installation file. You can use the installation filefrom the CD that is a part of your box edition but this file might be out-of-date. Therefore we recommendedgetting the latest installation file online. You can download the file from the AVG website (at http://www.avg.com/download?prd msw).There are two installation packages available for your product - for 32bit operating systems (marked as x86)and for 64bit operating systems (marked as x64). Be sure to use the correct installation package for yourspecific operating system.During the installation process you will be asked for your license number. Please make sure you have itavailable before starting the installation. The number can be found in the CD packaging. If you purchased yourcopy of AVG on-line, your license number will have been delivered to you via email.Once you have downloaded and saved the installation file on your hard drive, you can launch the installationprocess. The installation is a sequence of dialog windows with a brief description of what do at each step. Inthe following, we offer an explanation for each dialog window:3.1. Installation LaunchThe installation process always starts with this window. In here you select the language used for theinstallation process and press the Next button.You will be able to choose also additional languages for the application interface later during the installationprocess.5
3.2. License AgreementThis dialog allows you to read the license conditions. Use the Printable version button to open the licensetext in a new window. Press the Accept button to confirm and continue to the next dialog.3.3. Activate Your LicenseIn the Activate your License dialog you have to fill in your license number.Enter your license number into the License Number text field. The license number will be in the confirmationemail that you received after purchasing your AVG on-line. You must type in the number exactly as shown. Ifthe digital form of the license number is available (in the email), it is recommended to use the copy and pastemethod to insert it.6
Press the Next button to continue the installation process.3.4. Select Installation TypeThe Select type of Installation dialog offers the choice of two installation options: Express Install and CustomInstall.7
For most users, it is highly recommended to keep to the Express Install that installs AVG in fully automaticmode with settings predefined by the program vendor. This configuration provides maximum security combinedwith the optimal use of resources. In the future, if the need arises to change the configuration, you will alwayshave the possibility to do so directly in the AVG application.Custom Install should only be used by experienced users who have a valid reason to install AVG with nonstandard settings. E.g. to fit specific system requirements.Upon selecting the Custom Install, the Destination folder section appears in the lower part of the dialog. Itallows you to specify the location where AVG should be installed. By default, AVG will be installed to theprogram files folder located on drive C:. If you want to change this location, use the Browse button to displaythe drive structure, and select the respective folder.3.5. Custom Install - Custom OptionsThe Component selection section displays an overview of all AVG components that can be installed. If thedefault settings do not suit you, you can remove/add specific components.However, you can only select from components that are included in your purchased AVG edition. Onlythose components will be offered to be installed within the Component Selection dialog!Remote Admin - if you intend to connect AVG to an AVG DataCenter (AVG Network Editions), thenyou need to select this option.Additional installed languages - you can define which language(s) AVG should be installed in. Checkthe Additional installed languages item and then select the desired languages from the respectivemenu.8
Basic overview of the individual server components (under the Server branch):Anti-Spam Server for MS ExchangeChecks all incoming email messages and marks unwanted emails as SPAM. It uses several analyzingmethods to process each email message, offering maximum possible protection against unwantedemail messages.Email Scanner for MS Exchange (routing Transport Agent)Checks all incoming, outgoing and internal email messages going through the MS Exchange HUB role.Email Scanner for MS Exchange (SMTP Transport Agent)Checks all email messages coming through the MS Exchange SMTP interface (can be installed for bothEDGE and HUB roles).Email Scanner for MS Exchange (VSAPI)Checks all email messages stored in user mailboxes. If any viruses are detected, they are moved to theVirus Vault, or completely removed.For Exchange 2003 users only Anti-Spam and Email Scanner (VSAPI) components are available.Continue by pressing the Next button.9
3.6. Installation CompletionIf you selected the Remote Administration module during module selection, then the final screen will allowyou to define the connection string for connecting to your AVG DataCenter.This dialog also allows you to decide whether you want to participate in the Product Improvement Program thatcollects anonymous information on detected threats in order to increase the overall Internet security level. Ifyou agree with this statement, please keep the I want to improve my security by participating in AVGProduct Improvement Program in accordance with AVG Privacy Policy option checked (the option isconfirmed, by default).Confirm your choices by clicking the Finish button.AVG is now installed on your computer and fully functional. The program is running in the background in fullyautomatic mode.10
4. After InstallationImmediately after the installation is done, the AVG Email Server Edition main screen appears:This manual only deals with the AVG Email Server Edition specific features; all other components andsettings are being described in the AVG Desktop manual. To access the main server components dialog, clickthe Server button (the one circled in red in the screenshot above). You will see the following screen:11
Please note that all server components will be available (unless you chose not to install some of them duringthe installation process, of course) only if you are using MS Exchange 2007 or higher. MS Exchange 2003only supports Anti-Spam and Email Scanner (VSAPI) components.To individually setup protection for your mail server, follow the appropriate chapter:Email Scanners for MS ExchangeAnti-Spam Server for MS ExchangeAVG for Kerio MailServer12
5. Email Scanners for MS Exchange5.1. OverviewBasic overview of the individual Email Scanner server components:EMS (routing) - Email Scanner for MS Exchange (routing Transport Agent)Checks all incoming, outgoing and internal email messages going through the MS Exchange HUB role.Available for MS Exchange 2007/2010/2013 and can be installed for HUB role only.EMS (SMTP) - Email Scanner for MS Exchange (SMTP Transport Agent)Checks all email messages coming through the MS Exchange SMTP interface.Available for MS Exchange 2007/2010/2013 only and can be installed for both EDGE and HUB roles.EMS (VSAPI) - Email Scanner for MS Exchange (VSAPI)Checks all email messages stored in user mailboxes. If any viruses are detected, they are moved to theVirus Vault, or completely removed.Click a required component icon to open its interface. All the components share the following common controlbuttons and links:ENABLED/DISABLED - clicking this button turns the selected component on/off (if the component is on,the button and the text are green, if it's off, they are red).Scan Results13
Opens a new dialog where you can review scan results:Here you can check messages divided into several tabs according to their severity. See configuration ofindividual components for amending the severity and reporting.By default there are displayed only results for the last two days. You can change the displayed periodby amending the following options:oShow last - insert preferred days and hours.oShow selection - choose a custom time and date interval.oShow all - Displays results for the whole time period.Use Refresh button to reload the results.Refresh statistical values - updates stats displayed above.Clicking the Settings working button opens advanced settings for the selected component (you will find moreinformation on individual settings of all components in the chapters below).5.2. Email Scanner for MS Exchange (routing TA)To open the settings of Email Scanner for MS Exchange (routing transport agent), select the Settingsbutton from the interface of the component.From the Server components list select the Email Scanner for MS Exchange (routing TA) item:14
The Basic Settings section contains the following options:Enable component - uncheck to disable the whole component.Language - select preferred component language.Certify messages - check this if you wish to add a certification note to all scanned messages. You cancustomize the message in the next field.The Scanning properties section:Use Heuristics - check this box to enable heuristic analysis method during scanning.Report Potentially Unwanted Applications and Spyware threats - check this option to report thepresence of potentially unwanted applications and spyware.Report enhanced set of Potentially Unwanted Applications - check to detect extended package ofspyware: applications that are perfectly ok and harmless when acquired from the manufacturer directly,but can be misused for malicious purposes later, or applications that always harmless but might beunwanted (various toolbars etc.). This is an additional measure that increases your computer securityand comfort even more, however it can possibly block legal applications, and is therefore switched off bydefault. Note: This detection feature is additional to the previous option, so if you want protection fromthe basic types of spyware, always keep the previous box checked.Scan inside archives - check this option to let the scanner look also inside archived files (zip, rar, etc.).The Email attachments reporting section allows you to choose which items should be reported duringscanning. If checked, each email with such an item will contain [INFORMATION] tag in the message subject.This is the default configuration which can be easily amended in the Detection actions section, partInformation (see below).15
The following options are available:Report password protected archivesReport password protected documentsReport files containing macroReport hidden extensionsThere are also these sub-items available in the following tree structure:Detection actionsMail filtering5.3. Email Scanner for MS Exchange (SMTP TA)The configuration for the Email Scanner for MS Exchange (SMTP Transport Agent) is exactly the same asin the case of routing transport agent. For more information please see the Email Scanner for MS Exchange(routing TA) chapter above.There are also these sub-items available in the following tree structure:Detection actionsMail filtering16
5.4. Email Scanner for MS Exchange (VSAPI)This item contains settings of the Email Scanner for MS Exchange (VSAPI).The Basic Settings section contains the following options:Enable component - uncheck to disable the whole component.Language - select preferred component language.The Scan settings section:Background Scan - you can enable or disable the background scanning process here. Backgroundscanning is one of the features of the VSAPI 2.0/2.5 application interface. It provides threaded scanningof the Exchange Messaging Databases. Whenever an item that has not been scanned with the latestAVG virus base update is encountered in the users’ mailbox folders, it is submitted to AVG forExchange Server to be scanned. Scanning and searching for the not examined objects runs in parallel.A specific low priority thread is used for each database, which guarantees other tasks (e.g. emailmessages storage in the Microsoft Exchange database) are always carried out preferentially.Proactive Scan (incoming messages)You can enable or disable the proactive scanning function of VSAPI 2.0/2.5 here. This scanning occurswhen an item is delivered to a folder, but a request has not been made by a client.As soon as messages are submitted to the Exchange store, they enter the global scanning queue aslow priority (maximum of 30 items). They are scanned on the first in, first out (FIFO) basis. If an item isaccessed while still in the queue, it is changed to high priority.17
Overflow messages will continue to the store unscanned.Even if you disable both Background Scan and Proactive Scan options, the on access scanner will be stillactive when an user will try to download a message with the MS Outlook client.Scan RTF - you can specify here, whether the RTF file type should be scanned or not.Do not scan outgoing messages (MS Exchange 2007/2010/2013) - with both VSAPI and RoutingTransport Agent (routing TA) server components installed (it doesn’t matter if it’s on one single server, ortwo different ones), it may occur that outgoing mail is scanned twice. The first scan is done by VSAPIOn-access scanner, while the second one by the Routing Transport Agent. This might cause certainserver slowdowns and moderate delays in sending emails. If you’re sure that you have both servercomponents installed and active, you can choose to avoid this double outgoing email scanning bychecking this box and disabling the VSAPI On-access scanner.Number of Scanning Threads - the scanning process is threaded by default to increase the overallscanning performance by a certain level of parallelism. You can change the threads count here.The default number of threads is computed as 2 times the ‘number of processors’ 1.The minimum number of threads is computed as ('number of processors' 1) divided by 2.The maximum number of threads is computed as 'Number of Processors' multiplied by 5 1.If the value is the minimum or lesser value or the maximum or greater, the default value is used.Scan Timeout - the maximum continuous interval (in seconds) for one thread to access the messagethat is being scanned (the default value is 180 seconds).The Scanning properties section:Use Heuristics - check this box to enable heuristic analysis method during scanning.Report Potentially Unwanted Applications and Spyware threats - check this option to report thepresence of potentially unwanted applications and spyware.Report enhanced set of Potentially Unwanted Applications - check to detect extended package ofspyware: applications that are perfectly ok and harmless when acquired from the manufacturer directly,but can be misused for malicious purposes later, or applications that always harmless but might beunwanted (various toolbars etc.). This is an additional measure that increases your computer securityand comfort even more, however it can possibly block legal applications, and is therefore switched off bydefault. Note: This detection feature is additional to the previous option, so if you want protection fromthe basic types of spyware, always keep the previous box checked.Scan inside archives - check this option to let the scanner look also inside archived files (zip, rar, etc.).The Email attachments reporting section allows you to choose which items should be reported duringscanning. The default configuration can be easily amended in the Detection actions section, part Information(see below).The following options are available:18
Report password protected archivesReport password protected documentsReport files containing macroReport hidden extensionsGenerally, some of these features are user extensions of the Microsoft VSAPI 2.0/2.5 application interfaceservices. For the detailed information on the VSAPI 2.0/2.5 please refer to the following links (and also thelinks accessible from the referenced id kb;en-us;328841&Product exch2k - for information onExchange and antivirus software spx?scid kb;en-us;823166 - for information on additional VSAPI2.5 features in Exchange 2003 Server application.There are also these sub-items available in the following tree structure:Detection actionsMail filtering5.5. Detection ActionsIn the Detection actions sub-item you can choose automatic actions that should take place during thescanning process.The actions are available for the following items:19
High severity detections – malicious codes that copy and spread themselves, often unnoticed until thedamage is done.Medium severity detections – such programs, in general, vary from positively serious to only potentialthreats to your privacy.Information severity detections – includes all detected potential threats that cannot be classified asany of the above categories.Use the roll-down menu to choose an action for each item:None - no action will be taken.Move to Vault - the given threat will be moved to Virus Vault.Remove - the given threat will be removed.To select a custom subject text for messages that contain the given item/threat, check the Mark subjectwith. box and fill-in a preferred value.The last mentioned feature is not available for Email Scanner for MS Exchange VSAPI.5.6. Mail FilteringIn the Mail Filtering sub-item you can choose which attachments should be automatically removed, if any.The following options are available:Remove attachments - check this box to enable the feature.20
Remove all executable files - removes all executables.Remove all documents - removes all document files.Remove files with these comma separated extensions - fill the box with file extensions you wish toautomatically remove. Separate the extensions with comma.Move filtered attachments into virus vault - check if you don't want the filtered attachments to beremoved completely. With this box checked, all attachments chosen in this dialog will be automaticallymoved into the Virus Vault quarantine environment. It is a safe place to store potentially malicious files you can view and examine them without endangering your system. The Virus Vault can be accessedfrom the upper menu of your AVG Email Server Edition main interface. Simply left-click the Optionsitem a choose Virus Vault item from the drop-down menu.21
6. Anti-Spam Server for MS Exchange6.1. Anti-Spam PrinciplesSpam refers to unsolicited email, mostly advertising a product or service that is mass mailed to a huge numberof email addresses at a time, filling recipients’ mail boxes. Spam does not refer to legitimate commercial emailfor which consumers have given their consent. Spam is not only annoying, but also can often be a source ofscams, viruses or offensive content.Anti-Spam checks all incoming email messages and marks unwanted emails as SPAM. It uses severalanalyzing methods to process each email message, offering maximum possible protection against unwantedemail messages.6.2. Anti-Spam InterfaceThis dialog contains a brief information about the functionality of the server component, information on itscurrent status (Enabled/Disabled), and some statistics.Available buttons and links:ENABLED/DISABLED - clicking this button turns the selected component on/off (if the component ison, the button and the text are green, if it's off, they are red).Refresh statistical values - updates stats displayed above.Settings - use this button to open advanced Anti-Spam settings.22
6.3. Anti-Spam Settings6.3.1. SettingsIn this dialog you can check the Turn on Anti-Spam protection checkbox to allow/forbid the anti-spamscanning of email communication.In this dialog you can also select more or less aggressive scoring measures. The Anti-Spam filter assignseach message a score (i.e. how similar the message content is to SPAM) based on several dynamic scanningtechniques. You can adjust the Mark message as spam if the score is greater or equal to setting by eithertyping the value (50 to 90) or by moving the slider left or right.Here is a general review of the scoring threshold:Value 90 - Most incoming email messages will be delivered normally (without being marked as spam).The most easily identified spam will be filtered out, but a significant amount of spam may still be allowedthrough.Value 80-89 - Email messages likely to be spam will be filtered out. Some non-spam messages may beincorrectly filtered as well.Value 60-79 - Considered as a quite aggressive configuration. Email messages that are possibly spamwill be filtered out. Non-spam messages are likely to be caught as well.Value 50-59 - Very aggressive configuration. Non-spam email messages are as likely to be caught asreal spam messages. This threshold range is not recommended for normal use.You can further define how the detected spam email messages should be treated:23
Modify subject for messages marked as spam - tick this check box if you would like all messagesdetected as spam to be marked with a specific word or character in the Email subject field; the desiredtext can be typed in the activated text field.Ask before reporting wrong detection - provided that during the installation process you agreed toparticipate in the Product Improvement Programme - this programme helps us to collect up-to-dateinformation on the latest threats from all participants worldwide, and in return we can improve protectionfor everyone - i.e. you allowed reporting of detected threats to AVG. The reporting is taken care ofautomatically. However, you may mark this check box to confirm you want to be asked before anydetected spam gets reported to AVG to make sure the message should really be classified as spam.6.3.2. PerformanceThe Engine performance settings dialog (link ed to via the Performance item of the left navigation) offers theAnti-Spam component performance settings. Move the slider left or right to change the level of scanningperformance ranging between Low memory / High performance modes.Low memory - during the scanning process to identify spam, no rules will be used. Onlytraining data will be used for identification. This mode is not recommended for commonuse, unless the computer hardware is really poor.High performance - this mode will consume large amount of memory. During the scanningprocess to identify spam, the following features will be used: rules and spam databasecache, basic and advanced rules, spammer IP addresses and spammer databases.The Enable on-line checking item is on by default. It results in more precise spam detection viacommunication with the Mailshell servers, i.e. the scanned data will be compared with Mailshell databasesonline.Generally it is recommended to keep the default settings and only change them if you have a valid reason todo so. Any changes to this configuration should only be done by expert users!24
6.3.3. WhitelistThe Whitelist item opens a dialog with a global list of approved sender email addresses and domain nameswhose messages will never be marked as spam.In the editing interface you can compile a list of senders that you are sure will never send you unwantedmessages (spam). You can also compile a list of full domain names (e.g. avg.com), that you know do notgenerate spam messages.Once you have such a list of senders and/or domain names prepared, you can enter them by either of thefollowing methods: by direct entry of each email address or by importing the whole list of addresses at once.The following control buttons are available:Edit - press this button to open a dialog, where you can manually enter a list of addresses (you canalso use copy and paste). Insert one item (sender, domain name) per line.Import - you can import your existing email addresses by selecting this button. The input file can be atext file (in plain text format, and the content must contain only one item - address, domain name - perline), WAB file or the import can be done from Windows Address Book or Microsoft Office Outlook.Export - if you decide to export the records for some purpose, you can do so by pressing this button.All records will be saved to a plain text file.25
6.3.4. BlacklistThe Blacklist item opens a dialog with a global list of blocked sender email addresses and domain nameswhose messages will always be marked as spam.In the editing interface you can compile a list of senders that you expect to send you unwanted messages(spam). You can also compile a list of full domain names (e.g. spammingcompany.com), that you expect orreceive spam messages from. All email from the listed addresses/domains will be identified as spam.Once you have such a list of senders and/or domain names prepared, you can enter them by either of thefollowing methods: by direct entry of each email address or by importing the whole list of addresses at once.The following control buttons are available:Edit - press this button to open a dialog, where you can manually enter a list of addresses (you canalso use copy and paste). Insert one item (sender, domain nam
Anti-Spam Server for MS Exchange 22 6.1 Anti-Spam Principles 22 6.2 Anti-Spam Interface 22 6.3 Anti-Spam Settings 23 7. AVG for Kerio MailServer 28 7.1 Configuration 28 8. FAQ and Technical Support 32. 2 1. Introduction . Anti-Spam Server for MS Exchange AVG for Kerio MailServer. 13 5. Email Scanners for MS Exchange