Transcription
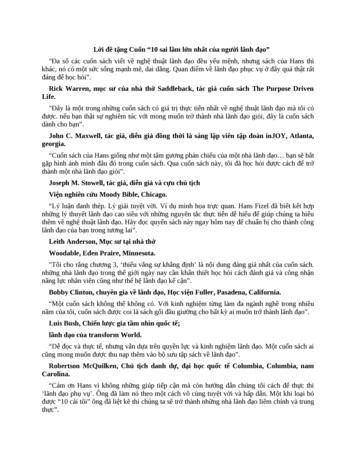
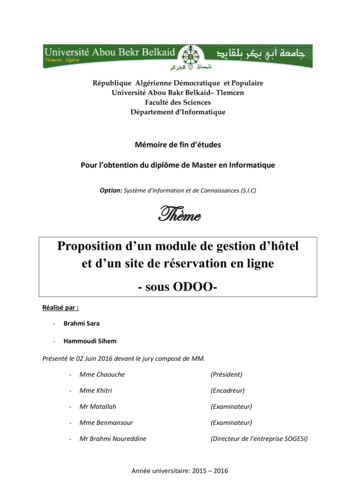
This document describes the new features and improvements introduced in the TYPE EDIT Version V14 software.With this new version, our team has strived to give you more tools to control the design as well as a general optimization of our toolpaths for increased productivity.And of course, new parameters to go even further in machining.TYPE EDIT is now organized under 3 logical and distinct module names: 2D drawing (TYPE CAD), 3D design (TYPE ART) and CAM (TYPE CAM).TYPE CAD1. SVG ICONS, NEW INTERFACEAll TYPE EDIT icons are now in SVG vector format. This format allows you to havesharp icons whatever the size of your screen. The size of the icons to be displayed isset in the “Options”WHAT’S NEW IN TYPE EDIT V14ETT 07-06-20211/48
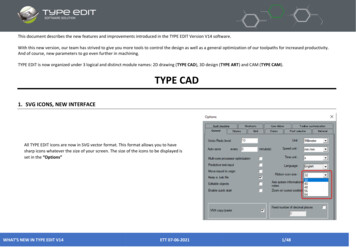
The icons in the different sizes remain clear: the resolution of your screen will be considered.: 100 %: 200 %: 300 %: 400 %WHAT’S NEW IN TYPE EDIT V14ETT 07-06-20212/48
We also took the opportunity to change and modernize the interface by making it simpler, more ergonomic and relaxing with a darker environment while keeping theefficiency you knew.WHAT’S NEW IN TYPE EDIT V14ETT 07-06-20213/48
2. 64 Bit and UnicodeThe introduction of 64 bits will offer the possibility to manage much more data, such as importing a larger vector file, calculating a toolpath with more vectors, orcreating a 3D TYPE ART model with better resolutions.Note: 64-bit does not imply faster calculations but only the management of more data. The master will be also 64 bit.Unicode compatibility will give more flexibility toall our customers using languages such as Russian,Japanese, Korean, Chinese, etc.3. IMPORT /It is no longer necessary to change the WindowsRegional Options and restart your PC. You justneed to change the language in the “OPTIONS”and restart your software.The file names, the imported or written texts andthe interface texts will be totally managed, thedisplay will be correct and in the specifics of yourlanguage of use.WHAT’S NEW IN TYPE EDIT V14ETT 07-06-20214/48
3. EXPORTA. NEW : IMPORTAs for each version, we improve our import speeds, vector formats such as DXF,DWG, PDF are even faster and thanks to our new library, more entities can beimported and recognized by the software.It is now possible to import the *.SVG (Scalable Vector Graphics) format which iswidely used in many web applications to display vectors.B. NEW : EXPORT cloud of pointsTo make our 3D model, TYPE ART, even more compatible with thirdparty software, you can now export them as cloud of points with onlyX, Y, Z coordinates. With this format, we assure you no distortion ofyour model.XYZ38.0387 48.1342 -1.744238.0945 48.1342 -1.715938.1503 48.1342 -1.687638.2061 48.1342 -1.6592WHAT’S NEW IN TYPE EDIT V14ETT 07-06-20215/48
4. NEW : unifie extension formatWe decided to reunite the extensions of our files between TYPE EDIT (*.VND) and LASER TYPE (*.VNL). The new format, from version V14 is *.GVT.The immediate gain for you who have the 2 software solutions is the possibility to open any file whatever your initial creation software. Drag and Drop in the windowalso works and will open the file.Note1 : V14 can open both VND and VNL files and save them in the new GVT format.Note2 : older versions of TYPE EDIT or LASER TYPE continue to open their respective formats but will not be able to open a GVT file.In conclusion : *VND et *.VNL *.GVT5. LanguagesThe available languages are the following from build 1 : French, English, German, Spanish, Italian, Russian, Japanese, Korean, Chinese, Czechs, HungaryWHAT’S NEW IN TYPE EDIT V14ETT 07-06-20216/48
6. NEW : "LINE" functionThis very basic function was missing from our geometrical shape’s catalog. Youcan find it in the "Geometric Shapes" toolbar.».Here it is with its parameters, by clicking on F2 at the same time as the icon.You can enter the length / angle and the start and end points. Freehanddrawing with 2 clicks is also possible.WHAT’S NEW IN TYPE EDIT V14ETT 07-06-20217/48
7. 7. NEW: Function "DELETE ALIGNED POINTS". ”This is a very interesting function that allows, as its name suggests, to delete aligned points. It can be found in the "Special Effects" toolbar.All intermediate aligned points between two ends will beerased according to a tolerance. Very useful after avectorial import whose curves are all segmented. The goalis to minimize the number of points for machining or 3Dconstruction. Note : Our "Knives", "Offset" and "Offset to follow" functions also benefit from this approach.WHAT’S NEW IN TYPE EDIT V14ETT 07-06-20218/48
8. NEW : BRAILLE functionThis Braille wizard has been developed to simplify the process for you. Just type your text and select one of the 53 Braille possibilities according to the country. Thefunction can be found in the "Specific functions" toolbar.Braille is a writing/reading system made up of tactile dots used by people who are visually impaired or blind.Each Braille character or cell is obtained from 2 columns of 3 dots each. By combining relief and flat dots, 64cells are obtained from 6 dot locations.Braille Wizard transcribes a word into Braille equivalent according to the standards in force in the selectedcountry.The Braille Wizard uses the TTF NH-Braille font to display the cells. If the font is not installed on your computer,a message will warn you when you run TYPE EDIT.WHAT’S NEW IN TYPE EDIT V14ETT 07-06-20219/48
9. IMPROVEMENT: EXAMPLE TEXT DISPLAY BiggerThe font selection display is much larger for a better visualization of the shapes. If you need to recognize the font used for your curves then this new display will helpyou.Parameters in TypeEdit.ini allows to display the preview ofthe text in the section:[FONT RAPIDO]WidthDisplay 700Width of the windowFontHeightFamille 18Height of font familiesFontHeight 12Font heightEn fonction de ces paramètres, l’affichage va s’ajuster.: You can enlarge the height of the window manually.FontHeight 12WHAT’S NEW IN TYPE EDIT V14En fonction de ces paramètres, l’affichage va s’ajuster.ETT 07-06-202110/48
TYPE ARTIn this 3D module, TYPE ART, we have worked a lot to make the design more interactive by totally modifying the display but also introduce, progressively, the possibilityto visualize the result during the creation with a "Compute" button.In addition, with 64-bit compatibility, the resolution of our 3D models has been doubled by default.1. NEW : Curve sweepingThis is a new possibility of curve sweeping, which TYPE EDIT offers you, among already 6 other existing methods, in our catalog. This new sweeping makes itpossible to obtain even more astonishing results, even impossible to obtain with other methods or applications, especially in angular corners.Take a look or admire, earlier, in the corners the effect obtained. The junction is perfect and harmonious.The operation is quite simpleto use, you must select thesupport then the sectionbefore starting the function.Sweeping respect the contourdirections (clockwise orcounterclockwise).WHAT’S NEW IN TYPE EDIT V14ETT 07-06-202111/48
2. NEW : 3D VIEWERA new 3D rendering freshly developed by our teams to give you a more concrete reality of your 3D modeling under TYPE EDIT.A new window opens automatically as soon as you are in the 3D TYPE ART module. It is independent or not according to the Options and you can move it and/orresize it as you wish. If, in addition, you have a second screen, your working comfort will be improved because you can on one side select curves and launchfunctions while monitoring the 3D result on the other screen simultaneously.We use dynamic rendering in OpenGLLocking the 3D rendering window ispossible in “Display Options”WHAT’S NEW IN TYPE EDIT V14ETT 07-06-202112/48
The Rendering parameters :A. Modify the color in a palette as well as the associated parameters such asopacity, scattering coefficients, specular, etc.B. Load an image that will be bump mapped on your model.C. Quickly change the basic views: XY, YZ, XZ and 3DD. Changing the position of the lightingA local reference systemlocates you in the 3Dspace.WHAT’S NEW IN TYPE EDIT V14ETT 07-06-202113/48
Example of images proposed during the installation, but you can ofcourse use your own, please take images of good resolutions andsquare images to avoid distortions:WHAT’S NEW IN TYPE EDIT V14ETT 07-06-202114/48
3. NEW : Z position of the 3D modelOn the 2D view on the right, only, move your mouse over your shape to know the Z value. An important information to control the depth of your model at anytime.WHAT’S NEW IN TYPE EDIT V14ETT 07-06-202115/48
4. COMPUTE « button »The main idea is to visualize the result in the 3D Viewer or 2D view beforeleaving the function.Operating principle on the Symmetric Curve function.Select the curves then launch the function. Choose the parameters then click on" Compute ", the result is displayed on the 3D Viewer as well as the 2D view.The result is suitable for you then press on "OK" to validate. If not, you mustundo the actionto cancel your parameters and then modify thecombination mode or choose other values and then " Compute ". You can thenmodify the parameters ad infinitum to really get what you have in mind.We will gradually bring this approach to all functions in the TYPE ART module.WHAT’S NEW IN TYPE EDIT V14ETT 07-06-202116/48
5. “SMOOTH” option during grayscale conversionWhen you convert a grayscale into a 3D model, it is now possible to apply a " smoothing " to reduce the grains.Without smoothingWith smoothingWHAT’S NEW IN TYPE EDIT V14ETT 07-06-202117/48
TYPE CAMAs for the TYPE CAD and TYPE ART modules, the CAM module, TYPE CAM has been completely redesigned and simplified, in terms of interface, while maintainingefficiency.Beyond the interface, our development team has also deeply modified the calculation algorithms to minimize the movements out of materials as well as the distance tobe machined. Therefore, our toolpaths are becoming more and more smart, more optimized, more possibilities, more efficient. Let's take a detailed look at these newfeatures.1. INTERFACE REORGANIZATIONWith the SVG icons, we also took the opportunity to completely reorganize the toolpath interfaces. They are cleaner, more efficient.WHAT’S NEW IN TYPE EDIT V14ETT 07-06-202118/48
Example of a Prismatic Letter and Cutting toolpath interface.WHAT’S NEW IN TYPE EDIT V14ETT 07-06-202119/48
On the cutting toolpath, several interface and operation modifications have been made: Lead in / out :o There are only 2 options left: None and Manual. The Automatic option has been remove In the " OPTIONS " tab- All the parameters of the Lead in / out, which are used in the "Automatic" mode, present in previous versions, have been removed for a better use ofthese parameters.- All parameters are now in the tab: Tangential Entry / Exit when the user decides to have them.Versions prior to V14WHAT’S NEW IN TYPE EDIT V14From Version V14 onwardsETT 07-06-202120/48
2. NEWS : OPTIMIZATION of the SWEEPING ToolpathThe goal of this optimization is to minimize the movements out of material, especially during the paths with several slices as well as the sweeping and anglebreaking. It is a question of managing the connectivity between trajectories. With these new strategies, you will save a lot of time in your sweeping toolpaths.2 new parameters are now present in the interface that will allow to :1. “ Connect within the slice: connect sweeping and angle breaking.2. “ Connect all slices” connect all slices when they exist.Example with ONE slice with and without the connectivity option2 starting pointsOnly 1 starting pointsNote: if the connectivity option is checked then there will be " Sweeping "and "Corner Break", even if in the "Advanced" tab, the "Angle breaking"is not checked.WHAT’S NEW IN TYPE EDIT V14ETT 07-06-202121/48
With connection between slicesWithout connection between slicesSmall square represent starting pointWHAT’S NEW IN TYPE EDIT V14ETT 07-06-202122/48
3. OPTIMIZATION of the ENGRAVING ToolpathThe engraving toolpath is probably the most used of all our toolpaths to remove material efficiently and obtain raised or recessed letters/logos. As for the sweepingtoolpath, the goal of the optimization is to avoid unnecessary lifting and therefore plunging of the tool, which could damage or even break the tool.2 new parameters are now present in the interface that will allow to manage theconnectivity:1.Connection between the 2D and 3D2.Connection in multi sliceA single dive on a complex pocket with corner ascentsWHAT’S NEW IN TYPE EDIT V14ETT 07-06-202123/48
A. Operation with « Connect within a slice »With connectionOn a 25-pointed star : 1 single plungeTotal connection between 2D and 3DDistance out of material: 0 mmNo connection between 2D and 3DOn a 25-pointed star : 26 plunges.No connection between 2D and 3DDistance out of material: 129 mmThe small squares represent a starting point.WHAT’S NEW IN TYPE EDIT V14ETT 07-06-202124/48
B. Operation with the "Connect all slices" parameter. Example with 4 slicesConnection between 2D and 3D in one sliceAnd 1 plunge per slice so 4 plunges in total.And connection all slices : 1 plunge in total for the 4slices. The tool does not stand up for the whole run.WHAT’S NEW IN TYPE EDIT V14ETT 07-06-202125/48
4. OPTIMIZATION of the SEQUENCE toolpathThe Sequence toolpath is central to our desire to offer our engraver customers the best solution on the market to optimize the removal of material efficiently andto obtain raised or recessed letters/logos with several tools. The challenge of this development is threefold: to offer more functionalities for each tool, to minimize themovement out of material and finally to machine only the right amount of material for each tool. A great challenge for our development team.A. New interfaceWHAT’S NEW IN TYPE EDIT V14ETT 07-06-202126/48
B. New Feature: Sweeping Available for ALL Tools in 2D and 3DIn previous versions, the sweeping option was only available for the first tool. The following tools had to be in Engraving. With the new V14 version, the Sweepingoption can be selected for any tool in the list.In our example, the first toolpath is in Engraving and the last 2 tools are in Sweeping mode at 90 and 0 .Zoom on an area with the 3 tools and associated strategies in 2D.WHAT’S NEW IN TYPE EDIT V14ETT 07-06-202127/48
C. Connectivity to minimize out of material movementAs in sweeping and engraving, each tool in the range manages connectivity. Our algorithm therefore introduces 2 new parameters : Connectivity within a sliceAnd the connectivity between all the sliceConnect within a slice will connect, in each pocket, when possible, all 2D parts with its 3D finish. The goal is to avoid lifting the tools and therefore making plunges thatrisk damaging the tools, especially in hard materials like metal.Connect all the slices will connect, in each pocket, when possible, all the slices together. The goal is to avoid lifting the tools between slices and thus preserve the lifeof the tool.Example of connectivity in a pass andthe gain in number of plunges withour courses under V14WHAT’S NEW IN TYPE EDIT V14ETT 07-06-202128/48
WHAT’S NEW IN TYPE EDIT V14ETT 07-06-202129/48
Example of connectivity in a Sequence of 3 tools and 2 slices, Z 2mm and the gain in number of plunges with our toolpaths under V14. The Connectivityoptions are ticked. Note also that the secund and third tool is in 3D.WHAT’S NEW IN TYPE EDIT V14ETT 07-06-202130/48
For the first tool, same number of plunges as for one singleslice. So, we save 100 % of plunges for this tool fromprevious version.The connection between slice in detail.The connection between slice in detail.For the secund tool, only 12 plunges for 2 D and 3D with 2slices.WHAT’S NEW IN TYPE EDIT V14ETT 07-06-202131/48
For the last tool, only 5 plunges for 2 D and 3D with 2 slices.The connection between slice in detail.WHAT’S NEW IN TYPE EDIT V14ETT 07-06-202132/48
D. Tool-optimized zone machiningIn this version, particular attention has been paid to ensure that the paths of each tool are truly optimized. To make it simple, each tool, according to itsparameters, will remove the material to the maximum of its possibilities. The paths will not, for example, unnecessarily machine in the air.To activate the optimization of zone machining, the"Specific parameters" must be displayed in the"Options".In the Sequence path, the "OptimizedTp"parameter must be set to "True".Let us take a simple case to visualize how it works, in 2D.Zoom in the corner, the trajectories are displayed ascenter of the tool. : Bigger tool N 1 : medium tool N 2 : finishing tool N 3WHAT’S NEW IN TYPE EDIT V14ETT 07-06-202133/48
Details of the tool positions in the corners. We clearly see a perfect overlapbetween the previous and the next tool.The diameter ( ) of the first tool fit the toolpath of the secund one.The step over is optimum.The diameter ( ) of the secund tool fit the toolpath of the finishingone. The step over is optimum. : is the center of the first tool. : is the center of the secund tool.WHAT’S NEW IN TYPE EDIT V14ETT 07-06-202134/48
Details with the 3D option in the cornersWHAT’S NEW IN TYPE EDIT V14ETT 07-06-202135/48
5. NEW: COLOR FOR CAMThe Approach to Color for CAM is totally and completely renewed. It will allow greater ease of use and access to all the possibilities of CAM. As soon as thefunction is launched, the Environment changes and a resizable "Parameters" window opens :The "Settings" windowThe list of presets is always visibleand available. Simply organizeyour presets. You can add / deleteand save them.Add a preset, a strategy, a color withthis icon.The color list has been simplifiedbut you can still add your owncolor codes and save them.Changing the name or position isof course possible.You can also organize themachining order by movingeach strategy wherever youwant.Send toolpaths to Machining or tothe CAM module or simply deletecolors / strategies or presets bydragging and dropping them intothe "Delete" icon.Finally, the software automaticallydetects the colors contained inyour selection.WHAT’S NEW IN TYPE EDIT V14For each color in theselection, you can associatea machining strategy. Anddecide for each strategywhether the calculation willbe used.ETT 07-06-202136/48
The complete environmentBy clicking on the arrow, ALLthe toolpaths available in yourconfiguration are displayed.WHAT’S NEW IN TYPE EDIT V14ETT 07-06-202137/48
Here is the description of this environment which will allow you to prepare your machining process.1.2.3.4.List of toolpathsPre-treatmentSimulationPost-treatment1. 1. List of toolpathsOnce you have started the calculation in the CAM module, the list of toolpaths is displayed in theplanes where the curves are located.You can manage the toolpath list (by renaming, deleting, etc.) as in the CAM module.The color to the right of each toolpath indicates the color of the contour.WHAT’S NEW IN TYPE EDIT V14ETT 07-06-202138/48
2. Pre-treatment3 actions are possible:oSee the areas where the selected tool cannot pass,oSimulate with a given tool with a depth,oSelection and sorting of contours to optimize your toolpathsWHAT’S NEW IN TYPE EDIT V14ETT 07-06-202139/48
3. Simulation 2D and 3DSelect your toolpaths to simulate then simply choose a 2D or 3-D simulation.Simulation 2DWHAT’S NEW IN TYPE EDIT V14ETT 07-06-202140/48
Precise 3D simulation, you will getdetails you will have with the realtools on your machine. You canzoom out / in in any area.WHAT’S NEW IN TYPE EDIT V14ETT 07-06-202141/48
Dynamic 3D simulation, with thepossibility to load materials such aswood or metal. Thanks to thecommands, go step by step to makesure that the machining is correct orgo back, speed up or pause.Anything is possibleWHAT’S NEW IN TYPE EDIT V14ETT 07-06-202142/48
4. Post-treatment8 actions are possible :oRecalculate a toolpath with the same contours, for example by modifying the tool or the depth,oModify a toolpath with different contours,oInsert bridges manually on a Plot or Cutting path,oSave machining strategies in XML format for use in a script,oEdit the toolpath in the form of curves,oMulti copy of a toolpath,ooUse projection and/or wrapping tools,Finally, start machiningWHAT’S NEW IN TYPE EDIT V14ETT 07-06-202143/48
A. Bridge Insertion ManuallyWith a "Plotting" or "Cutting" toolpath, it is possible to manually insert bridges to prevent workpieces from falling out during machining.In the interface, the user will be able to :o Manually insert the position of the bridges as well as the dimensions of the bridge (height and width),o Define a total number of bridges per contour or a minimum and maximum number,o Define curved bridges,o Clear all bridgesWHAT’S NEW IN TYPE EDIT V14ETT 07-06-202144/48
B. Saving paths in XMLSelect a tool path and then click on the Save as XML icon. Fill in the name. The created XML file can be used later in the scripts.WHAT’S NEW IN TYPE EDIT V14ETT 07-06-202145/48
C. Editing the toolpath in vector geometryWith TYPE CAM, you can edit the toolpath as vectors and then make checks in point mode, circular duplication, or other interesting actions in TYPE CAD. WHAT’S NEW IN TYPE EDIT V14ETT 07-06-202146/48
D. Multi copy of a toolpathThis very interesting function allows you to duplicate atoolpath in matrix form. You can specify the number ofcopies in row / column as well as the spacing between theparts. Keep or not the original and change the referencepoint for the duplication.E. Use projection and/or wrapping toolsDepending on your configuration, you will also be able to use the projection and/or wrapping tools.:Note : Please have a look at the help to see how these functions work, which allow you to place any toolpath on any surface.WHAT’S NEW IN TYPE EDIT V14ETT 07-06-202147/48
F. Start millingThis is the last step which consists of creating the code and sending it to the machine. You can manage the safety distance between 2 objects, make shifts accordingto the origin of your machine, make mirrors, or activate specific commands for your machine.WHAT’S NEW IN TYPE EDIT V14ETT 07-06-202148/48
TYPE EDIT is now organized under 3 logical and distinct module names: 2D drawing (TYPE CAD), 3D design (TYPE ART) and CAM (TYPE CAM). TYPE CAD 1. SVG ICONS, NEW INTERFACE All TYPE EDIT icons are now in SVG vector format. This format allows you to have sharp icons whatever the size of your screen. The size of the icons to be displayed is