Transcription
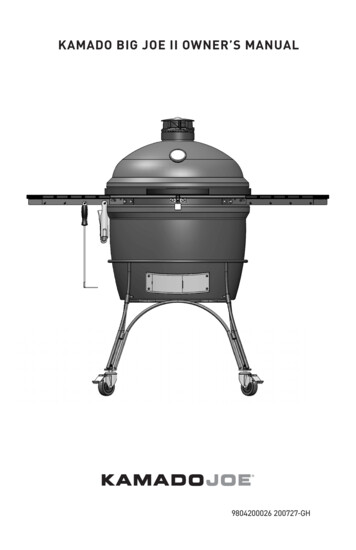
KAMADO BIG JOE II OWNER’S MANUAL9804200026 200727-GH
Table of ContentsWarnings3Parts List & Tools Required7Grill Set-Up Instructions8Assembly Instructions9Safety Information14Cleaning & Care15Hinge Adjustments16Quick Start Guide18Quick Temperature Guide19Grill does not come with charcoal.2
WARNING This manual contains important information necessary for the properassembly and safe use of the appliance. Read and follow all warnings and instructions before assembling and usingthe appliance. Keep this manual for future reference.Failure to follow these instructions could result in fire, explosion or burnhazard which could cause property damage, personal injury or death.CARBON MONOXIDE HAZARD Burning charcoal or wood chips gives off carbon monoxide, which has noodor and can cause death. Use only outdoors where it is well ventilated.3
WARNINGS AND IMPORTANTSAFEGUARDSREAD ALL INSTRUCTIONS WARNING! This barbecue will become very hot. Do not move itduring operation. WARNING! Do not use indoors! WARNING! Do not use alcohol, gasoline or other similar liquids to light orrelight the barbecue. WARNING! Keep children and pets away from grill at all times. Do NOTallow children to use grill. Close supervision is necessary when children orpets are in the area where grill is being used. Do not use the barbecue in a confined and/or habitable space e.g.houses, tents, caravans, motor homes, boats. Danger of carbon monoxidepoisoning fatality. Always use grill in accordance with all applicable local, state and federalfire codes. Before each use check all nuts, screws and bolts to make sure they aretight and secure. Never operate grill under overhead construction such as roof coverings,carports, awnings or overhangs. Grill is for OUTDOOR USE ONLY. Maintain a minimum distance of 10 ft. (3m) from overhead construction,walls, rails or other structures. Keep a minimum 10 ft. (3m) clearance of all combustible materials such aswood, wood decks, dry plants, grass, brush, paper or canvas.4
WARNINGS AND IMPORTANTSAFEGUARDS Never use grill for anything other than its intended use. This grill is NOTfor commercial use. Accessory attachments not supplied by Kamado Joe are NOTrecommended and may cause injury. Use of alcohol, prescription or non-prescription drugs may impair user’sability to assemble or safely operate grill. Keep a fire extinguisher accessible at all times while operating grill. When cooking with oil or grease, have a type BC or ABC fire extinguisherreadily available. In the event of an oil or grease fire do not attempt to extinguish with water.Immediately call the fire department. A type BC or ABC fire extinguishermay, in some circumstances, contain the fire. Use grill on a level, non-combustible, stable surface such as dirt, concrete,brick or rock. An asphalt surface (blacktop) may not be acceptable forthis purpose. Grill MUST be on the ground. Do not place grill on tables or counters. DoNOT move grill across uneven surfaces. Do not use grill on wooden or flammable surfaces. Keep grill clear and free from combustible materials such as gasoline andother flammable vapors and liquids. Do not leave grill unattended. Do NOT allow anyone to conduct activities around grill during or followingits use until it has cooled. Never use glass, plastic or ceramic cookware in grill. Never place emptycookware in grill while in use. Never move grill while in use. Allow grill to cool completely (below 115 F(45 C)) before moving or storing. Do not store grill with hot ashes or charcoal inside grill. Store only whenfire is completely out and all surfaces are cold. Never use grill as a heater. READ CARBON MONOXIDE HAZARD. The grill is HOT while in use and will remain HOT for a period of timeafterwards and during cooling process. Use CAUTION. Wear protectivegloves/mitts. DO NOT bump or impact the grill to prevent personal harm, damage to grillor spillage/splashing of hot cooking liquid.5
WARNINGS AND IMPORTANTSAFEGUARDS Be careful when removing food from grill. All surfaces are HOT and maycause burns. Use protective gloves/mitts or long, sturdy cooking tools forprotection from hot surfaces or splatter from cooking liquids. Do not touch HOT surfaces. Grill is HOT during use. To avoid burns, keep face and body away fromvents and when opening lid. Steam and hot air are expelled during use. When cooking above 350 F (175 C), carefully open the grill (or burp thegrill) each time you lift the grill dome to prevent flashback – a surge ofwhite-hot heat caused by a rush of oxygen. Partially opening the lid 2-3inches (5-8cm) and allowing heat to escape for about 5 seconds shouldprevent this. Air dampers are HOT while the grill is in use and during cooling. Wearprotective gloves when adjusting. Grill has an open flame. Keep hands, hair and face away from flame. DoNOT lean over grill when lighting. Loose hair and clothing may catch fire. DO NOT obstruct flow of combustion and ventilation. Do not cover cooking racks with metal foil. This will trap heat and maycause damage to the grill. Never leave HOT coals or ashes unattended. Fuel should be kept red hot for at least 30 minutes prior to use. Do not cook before the fuel has a coating of ash. Do not remove ash drawer while ashes and charcoal are HOT. Use protective gloves when handling this grill or working with fire. Useprotective gloves or long, sturdy tools when adding wood or charcoal. Never use charcoal lighting fluid, gasoline, alcohol or other highlyvolatile fluids to ignite charcoal. These fluids can explode and cause injuryor death. The maximum amount of charcoal for the Classic III is 6 lbs. (2.7 kg). Neveroverfill charcoal grate. This can cause serious injury as well as damage tothe grill. Dispose of cold ashes by placing them in aluminum foil, soaking with waterand discarding in a non-combustible container. SloRoller should not be used for temperatures over 500 F (260 C)SAVE THESE INSTRUCTIONS6
121.TOP VENT (1)2.GRILL DOME (1)3.HALF MOON COOKING GRATES (2)4.ACCESSORY RACK (1)5.CERAMIC HEAT DEFLECTORS (2)6.DIVIDE & CONQUER FLEXIBLECOOKING RACK (1)3457.STAINLESS STEEL FIREBOX RING (1)8.CAST IRON GRATE (1)9.FIREBOX WALLS (6)10. FIREBOX BASE (1)611. SLIDE-OUT ASH DRAWER (1)12. LEFT SIDE SHELF (1)713. RIGHT SIDE SHELF (1)14. GRATE TOOL (1)815. GRATE GRIPPER (1)916.GRILL BASE (1)17. STEEL WIRE CART (1)18.10NON-LOCKING SWIVEL CASTERS (2)19. HINGE DISENGAGEMENT TOOL KIT (1)1112LOCKING SWIVEL CASTERS (2)20.19CERAMIC FEET (4)131614201517181818187
Grill Set-UpUNBOXING YOUR GRILL1 Cut the plastic bands and remove the top and side panels ofthe shipping container.2 Set the grill cart box aside.3 Open the dome of the grill and remove the components from the inside ofthe grill. Handle the internal ceramic parts with care.KAMADO JOE GRILL WITH CART1 Once the internal components of the grill have been removed, lift the grillout of the container and set it aside. Due to the weight of this grill, we highlyrecommend two people perform this task. Do NOT lift the grill by the side shelftabs. Use the rear hinge and the front lower vent opening as lifting points.2 Assemble the grill cart.3 With the same lifting technique used previously, lift the grill into the cart.Adjust the grill in the cart so the lower grill vent is facing the front of the cart.The front side of the cart is the side with the two locking casters.8
11717181818189
2216173101110
487955611
63417113121415STAND ALONE VERSION12
813
Latch AdjustmentsThe latch on your Classic III is already preset for an ultra-tight seal.Use these instructions if any adjustments should be needed.CLASSIC III LATCHTo tighten and loosen the latch setting, use a small Allen wrench. Adjust theset screw to lower the latch plate and add the spacer. Once the spacer is added,reinstall the latch plate by tightening the set screw.Safety InformationCAUTIONHinge and band is under high tension, failure to follow instruction steps in ordermay result in severe injury.HINGEDo not attempt to disassemble the hinge or loosen bands from your grill withoutthe hinge disengagement tool kit.NOTE: Hinge disengagement tool kit (spacer, washer, and hex nut areincluded). Store these parts in case the hinge needs to be removed later.The hinge cannot be removed safely without these parts.Use the bottom face and the front lower vent opening as lifting points (Donot lift the grill by the hinge, bands brackets or handle as this could causethe dome to become dislodged from the band).Only minor adjustments to the weight of the dome should be made per theinstructions on page 16.GASKETSelf-cleaning through natural heat cycle recommended.Do not use chemical based cleaners on the gasket.If absolutely necessary, gently wipe off any spills or moisture. Do not scrub orabrade the gasket if cleaning. Excessive rubbing can cause wear.14
Cleaning & CareYour Kamado Joe grill is made of quality materials, so generalcare and maintenance is minimal. The best way to protect yourKamado Joe from the elements is with a grill cover.Light cracked porcelain called crazing is part of the naturalcharacteristic.SELF-CLEANING1 Add charcoal and light it.2 Install the Divide & Conquer flexible cooking rack in the topposition and both heat deflectors on the accessory rack.3 Open the top and bottom air vents fully and let thetemperature inside the grill rise to 600 F (315 C) with thedome closed.4 Hold the temperature at around 600 F (315 C) for 15-20 minutes.5 Close the bottom vent fully and wait another 15-20 minutes toclose the top vent.This process will burn off any unwanted residue from the insideof your grill. Before cooking again, brush the cooking grate witha standard grill brush. Use a soft bristle brush on the ceramicsto remove any residue. Your heat deflector plates should alsobe free of burned on residue after this process. Brush themdown with a soft bristle brush after cleaning. When your heatdeflectors get dirty during normal use, flip them over with thedirty side down for the next cook and the heat from the fire willself-clean that side of the deflector plate.Once or twice a year, you should do a more thorough cleaningof the inside of the grill. Remove the internal components andremove any residual ash or debris that has collected betweenthe grill body and the internal components. Use a plasticbristle brush to clean the inside ceramic surface and scoop orvacuum debris from the bottom of the grill before replacing theinternal components.15
Big Joe Air Lift Hinge AdjustmentsThe Air Lift Hinge on your Kamado Joe Big Joe is alreadypre-adjusted for ideal balance and stability. Follow theseinstructions for any additional adjustment to suit yourpersonal preferences.Caution: Air Lift Hinge under high tension.1 Open the dome of your Kamado Joe Big Joe grill.2 With the dome open, place the 10mm wrench on the flats onthe screw (see Inset 1).3 Place the 19mm wrench on the nut on top of the springretainer (see Inset 1).4 To make the dome easier to raise, hold the 10mm wrenchstationary and rotate the 19mm wrench clockwise as shown.Remove the wrenches and check the dome action for every fullrotation of the nut. If you want the dome to feel heavier, rotatethe nut counter-clockwise. Remove the wrenches and check thedome action for every full rotation of the nut. Do not adjust thenut so that it contacts the connector (see Inset 1).ALTERNATE HINGE16
ALTERNATE HINGE10mm19mmALTERNATE HINGEInset 1Nut under connectorFlats on screwAdjustment nut onspring retainerTOOLS REQUIRED: 10 MM OPEN END WRENCH AND 19 MM OPEN END WRENCH.17
Quick Start GuideSTARTING IT UP1 Add charcoal to firebox and light using one or two fire starters.2 Leave dome open for 10 minutes with the bottom vent fully open.3 Close the dome.4 Begin closing the top vent and bottom vent when the dometemperature is within 50 F (10 C) of your target.MAINTAINING TEMPERATURETo lower the temperature, decrease the airflow through thegrill by closing the vents. Conversely, raise the temperature byopening the vents. Adjustments to the vents are not immediate—allow 10–15 minutes for a vent change to take effect. Becauseyour ceramic Kamado Joe retains heat so well, it can take sometime to fully heat. Give your grill 20–40 minutes to stabilize thetemp before you start cooking.COOLING IT DOWN1 When finished cooking, close the bottom vent completely.2 Once the temperature falls below 400 F (205 C), close the topvent almost completely, but leave a small crack.3 Do not cover the grill until the dome is cool to the touch.TO LOWER THE TEMPERATURE, CLOSE THE VENTS.TO RAISE THE TEMPERATURE, OPEN THE VENTS.18
QUICK TEMPERATURE GUIDEApproximate temperatures for cooking techniques.GRILLING400–600 F (205–315 C)SEARING500–750 F (260–400 C)BAKING300–750 F (150–400 C)ROASTING300–450 F (150–230 C)SMOKING225–275 F (105–135 C)CAUTIONBURPWhen cooking above 350 F (175 C), carefully open the grill (or burp thegrill) each time you lift the grill dome to prevent flashback.LIQUIDSDo not spill liquids inside or on the grill while it is hot.SPARKSBe aware of sparks and embers when using the grill on a wooden deck.DURING OPERATIONDo not leave your grill unattended with the grill dome open.19
RRANTYKAMADOJOE.COM/COLLECTIONS/PARTSKAMADO JOE 5032 MILGEN CT. COLUMBUS, GA 31907
KAMADO JOE GRILL WITH CART 1. Once the internal components of the grill have been removed, lift the grill out of the container and set it aside. Due to the weight of this grill, we highly recommend two people perform this task. Do NOT lift the grill by the side shelf tabs. Use the rear hinge and the front lower vent opening as lifting points.