Transcription
For more informationwww.energystar.govor call 1.888.STAR.YES(1.888.782.7937).United StatesEnvironmentalProtection AgencyOffice of Air and Radiation(6202J) EPA 430-F-04-024August 2007Recycled/Recyclable – Printed with Vegetable Oil Based Inks on Recycled Paper (Minimum 50% Post-consumer Content)A DO-IT-YOURSELF GUIDE TO SEALINGAND INSULATING WITH ENERGY STAR SEALING AIR LEAKS AND ADDING ATTIC INSULATION
CONTENTSSealing and Insulating your home isone of the most cost-effective waysto make a home more comfortableand energy efficient—and you cando it yourself.Use This Guide To:1. Learn how to find and seal hiddenattic and basement air leaks2. Determine if your attic insulationis adequate, and learn how toadd more3. Make sure your improvementsare done safely4. Reduce energy bills and helpprotect the environmentLocating Air Leaks1.2Getting Started1.4Sealing Attic Air Leaks1.6Additional Sources of Air Leaks2.1Sealing Basement Air Leaks3.1Adding Attic Insulation4.1When you see products or services withthe ENERGY STAR label, you know theymeet strict energy efficiency guidelinesset by the U.S. Environmental ProtectionAgency (EPA) and the U.S. Departmentof Energy (DOE). Since using less energyreduces greenhouse gas emissions andimproves air quality, choosing ENERGYSTAR is one way you can do your part toprotect our planet for future generations.For more information visit:www.energystar.govor call 1.888.STAR.YES(1.888.782.7937).The U.S. EPA wishes to thank The FamilyHandyman Magazine for their contributionof photographs and content for this guide.Photos appear courtesy of The FamilyHandyman Magazine 2001 exceptwhere otherwise noted.1.1 CONTENTS
LOCATING AIR LEAKSMore than any other time of year, you notice your home’s air leaks in the winter. Mostpeople call these air leaks “drafts.” You may feel these drafts around windows anddoors and think these leaks are your major source of wasted energy. In most homes,however, the most significant air leaks are hidden in the attic and basement. These arethe leaks that significantly raise your energy bill and make your house uncomfortable. Incold weather, warm air rises in your house, just like it does in a chimney. This air, whichyou have paid to heat, is just wasted as it rises up into your attic and sucks cold air in allaround your home—around windows, doors, and through holes into the basement. The illustrations on Page 1.3 and 3.1 show warm air leaving (red arrows) the house through theattic and cold air being pulled into the house (blue arrows). Locating these leaks can bedifficult because they are often hidden under your insulation. This guide will help you findthese leaks and seal them with appropriate materials.Even if you have enoughinsulation in your attic, sealingCommon HouseholdAir LeaksABehind Kneewallsperformance of your insulationBAttic HatchCWiring HolesDPlumbing VentEOpen Soffit (the box that hidesrecessed lights)FRecessed LightGFurnace Flue or Duct Chaseways(the hollow box or wall feature thathides ducts)HBasement Rim Joists (where thefoundation meets the wood framing)IWindows and Doorscomfortable home.If you are not familiar withsome of the terms in this guide,check our glossary inside theback cover.1.2 LOCATING AIR LEAKSCold outside air drawn into the houseHeated inside air drawn into the atticADBattic air leaks will enhance theand make for a much moreEffects of Air LeaksCGEFIH1.3 LOCATING AIR LEAKS
GETTING STARTEDYou May Need a Contractorto Correct These Problems: Wet or damp insulation indicating aleaky roofMoldy or rotted attic rafters or floorjoists indicating moisture problemsKitchen, bathroom, and clothesdryer vents that exhaust moist airdirectly into the attic space insteadof outdoorsA history of ice dams in the winter(an indication of serious air leaks)Little or no attic ventilation (see Page4.2 – A Note About Attic Ventilation)Knob and tube wiring (pre-1930),which can be a fire hazard when incontact with insulationIf you have many unsealed anduninsulated recessed “can” lights,special care must be taken wheninsulating around these fixtures(See Page 2.2)1.4 GETTING STARTEDTips For Working in the AtticAttic air sealing and adding insulationare do-it-yourself projects if your attic isaccessible and not too difficult to movearound in. The projects recommended inthis guide can usually be completed in aday or two and will provide benefits foryears to come. However, if upon inspectionof your attic you find any of the conditionslisted to the left, we recommend youconsider hiring a contractor to correctthese problems before proceeding. Have a Plan in Place Take precautions to avoid a dangerousimprovement project is adequateworking environment in the attic. Duringplanning. Gather all your tools andhot weather start working early, as atticssupplies before you begin to minimize tripsheat up as the day moves on. Drink plentyin and out of the attic. Be sure that theof water and use an OSHA-approvedwork area is well-lit by using a drop light,particulate respirator or double-strapand keep a flashlight handy.dust mask to prevent inhalation ofhazardous substances. Also rememberPrepare to Get Dirtyto watch your step. Walk on joists orThe entire process of sealing your attictruss chords, not exposed ceiling drywallwill be made easier if you take the timeor insulation. In addition, watch out forand effort to wear the right gear. WearFor tips on hiring the right contractor, visitwww.energystar.gov/homeimprovement.Above All – Be SafeThe key to any successful homesharp nails sticking through theknee pads to help prevent pain associatedroof deck!with crawling on attic joists. Additionally,a lightweight disposable coverall, gloves,Get Your Bearingsfrom BelowA good way to start home sealing is tomake a quick sketch of your home’s floorplan. This sketch will serve as a referencepoint once you get into the attic and willhelp you locate areas of leakage. In yoursketch, make note of dropped soffits overkitchen cabinets or bath vanities, slantedceilings over stairways, where walls(interior and exterior) meet the ceiling, andany other dropped-ceiling areas. Theseareas may have open stud cavities leadingdirectly into the attic and can be hugesources of air leaks (see photos 1-3 onPages 1.6 and 1.7).and hat can keep itchy and irritatinginsulation off your skin.Materials Checklist for Sealing Attic Air Leaks Batt or roll of unfaced fiberglass insulationand large garbage bags (for stuffing openstud cavities behind kneewalls and indropped soffits)Roll of reflective foil insulation or other blockingmaterial such as drywall or pieces of rigid foaminsulation to cover soffits, open walls, andlarger holes Silicone or acrylic latex caulk & caulk gun forsealing small holes (1/4 inch or less) Several cans of expanding spray foam insulationfor filling larger gaps (1/4 inch to 3 inches) Special high-temperature (heat-resistant) caulkto seal around flues and chimneys Roll of 14-inch wide aluminum flashing to keepinsulation away from the flue pipe Retractable utility knife and sheet metal scissors Tape measure and staple gun (or hammer andnails) to hold covering materials in place Safety glasses, gloves, and dust mask(for insulation work as well) Flashlight or portable safety light Boards to walk on, if needed Large bucket to haul materials1.5 GETTING STARTED
SEALING ATTIC AIR LEAKSPlug the Big Holes First4. SEAL BEHIND KNEEWALLS3. COVER DROPPED SOFFITSDon’t worry about finding and sealing all the little holes in your attic; your biggest savingswill come from plugging the large ones. Once in the attic, refer to your sketch to locatethe areas where leakage is likely to be greatest: where walls (inner and outer) meet theattic floor, dropped soffits (dropped-ceiling areas), and behind or under attic kneewalls.Look for dirty insulation—this indicates that air is moving through it. Dropped soffits maybe filled or covered with insulation and hard to see. Push back the insulation and scoop itout of the soffits. You will place this insulation back over the soffit once the stud cavitieshave been plugged and the soffits covered (photos 1-3) (If you have recessed “can” lightsin your open soffits, please read about them on Page 2.2 before proceeding).REFLECTIVE FOILINSULATION24” BATTROLLED INSIDEGARBAGE BAGKNEEWALLOPEN JOISTCAVITYDROPPEDSOFFITCAULK OR ADHESIVE1. CREATE STUFFED BAGS2. PLUG OPEN STUD CAVITIESOPENSTUD CAVITYAfter removing insulation from a dropped soffit, cuta length of reflective foil or other blocking material(rigid foam board works well) a few inches longerthan the opening to be covered. Apply a bead ofcaulk or adhesive around the opening. Seal the foilto the frame with the caulk/adhesive and staple ornail it in place, if needed.Cut a 24 inch long piece from a batt of fiberglassinsulation and place it at the bottom of a 13-gallonplastic garbage bag. Fold the bag over and stuff itinto the open joist spaces under the wall (a piece ofrigid foam board sealed with spray foam also workswell for covering open joist cavities). Again, coverwith insulation when you’re done.If You Have a Finished Attic, Seal Behind the KneewallsPLUGGEDSTUD CATIVITY16” PIECE OFFIBERGLASSBATTRECESSEDCAN LIGHTDROPPEDSOFFITRECESSEDCAN LIGHTCut a 16 inch long piece from a batt of unfacedfiberglass insulation and fold it into the bottomof a 13-gallon plastic garbage bag.1.6 SEALING ATTIC AIR LEAKSFold the bag and stuff it into the open stud cavity.Add more insulation to the bag if it doesn’t fittightly. Plug all open stud spaces, then cover thesoffit (photo 3, Page 1.7 ).Finished rooms built into attics often have open cavities in the floor framing under theside-walls or kneewalls. Even though insulation may be piled against or stuffed into thesespaces, they can still leak air. Again, look for signs of dirty insulation to indicate air ismoving through. You need to plug these cavities in order to stop air from traveling underthe floor of the finished space (photo 4).Caution: Some attics have vermiculite insulation, which may contain asbestos, a healthhazard. Vermiculite is a lightweight, pea-size, flaky gray mineral. Don’t disturb vermiculiteinsulation unless you’ve had it tested by an approved lab to be sure it doesn’t containasbestos. Contact your local health department for the name of an approved lab.1.7 SEALING ATTIC AIR LEAKS
SEALING ATTIC AIR LEAKSFurnace Flues Require Special Sealing Techniques6. SEAL WITH SILICONE CAULK7. FORM AN INSULATION DAMThe opening around a furnace or water heater flue or chimney can be a major source ofwarm air moving in the attic. Because the pipe gets hot, building codes usually require1 inch of clearance from metal flues (2 inches from masonry chimneys) to any combustiblematerial, including insulation. Photos 5 and 6 show how to seal this gap with lightweightaluminum flashing and special high-temperature (heat-resistant) caulk. Before you pushthe insulation back into place, build a metal dam (photo 7) to keep it away from the pipe.Use the same technique for masonry chimneys.1” TABSRENT ININSULATION DAMSTAPLEDOWN5. CUT ALUMINUM FLASHINGCaution: Furnace flues (thepipe that removes your furnaceexhaust) can be very hot.Seal the gap between the flue and metal flashingwith special high-temperature caulk. Don’t usespray foam.CLASS BFURNACE FLUEHIGH-TEMPCAULKForm an insulation dam to prevent insulation fromcontacting the flue pipe. Cut enough aluminum fromthe coil to wrap around the flue plus 6 inches. Cutslots 1 inch deep and a few inches apart along thetop and bend the tabs in. Cut slots about 2 inchesdeep along the bottom and bend out the tabs. Wrapthe dam around the flue and secure the bottom bystapling through the tabs. Now put insulation backright up against the dam.Identifying Attic PipesOPEN JOISTCAVITY14” ALUMINUMFLASHINGCut aluminum flashing to fit around the flue. Forround flues, cut half circles out of two pieces sothey overlap about 3 inches in the middle. Pressthe flashing metal into a bead of high-temperaturecaulk and staple or nail it into place. If there’s nowood, staple or nail it directly to the drywall, butbe sure not to staple or nail through the drywall.1.8 SEALING ATTIC AIR LEAKS2” TABSBENT OUTHIGH-TEMPCAULKFLUES/VENTS/PIPES:MADE OUT OF:SEAL AROUND WITH:Furnace/Water HeaterGalanized MetalAluminum flashing and hightemperature silicone caulkChimneyMasonry/MetalAluminum flashing and hightemperature silicone caulkPlumbingCast Iron or PVCExpanding foam or caulk,depending on size of gap1.9 SEALING ATTIC AIR LEAKS
SEALING ATTIC AIR LEAKSFoam or Caulk Small Gaps in Your AtticSeal Small GapsEven though most of the gaps spilling warm air into your attic are buried under insulation,you might be able to find evidence of these gaps. Look for areas where the insulationis darkened (see photo 8). This is the result of filtering dusty air from the house. In coldweather, you may also see frosty areas in the insulation caused by warm, moist aircondensing and then freezing as it hits the cold attic air. In warmer weather, you’ll findwater staining in these same areas. Although the insulation is dirty, it is still okay to use.There’s no need to remove and replace. After sealing the areas, just push the insulationback into place. If you have blown insulation, a small rake can be helpful to level itback into place.Use expanding foam or caulk to seal the openings around plumbing vent pipes andelectrical wires (see photos 9 and 10). Be sure to wear gloves and be careful not to getexpanding foam on your clothes, as the foam is very sticky and nearly impossible toremove once it sets. When the foam or caulk is dry, cover the area again with insulation.8. FIND ATTIC BYPASSES9. FILL HOLES WITH CAULK10. STUFF GAPS WITH INSULATIONPLUMBINGVENTSPRAY FOAMIN HOLESCAULKOPENINGSDIRTY INSULATIONEXPANDING FOAMDUST FROMLEAKING AIRGAP AROUNDPLUMBING VENTELECTRICAL BOXCheck for gaps in your attic that facilitate airmovement by checking for dirty insulation. Seal thegaps with caulk or expanding foam. When completeand dry, push the insulation back into place.1.10 SEALING ATTIC AIR LEAKSFill wiring and plumbing holes with expanding foam.Caulk around electrical junction boxes, and fillholes in box with caulk.If the space around your plumbing pipe is widerthan 3 inches, you may need to stuff somefiberglass insulation into the space to serve as abacker for the expanding foam. Once the fiberglassinsulation is in place, follow the directions on thecan to foam the space around the pipe.1.11 SEALING ATTIC AIR LEAKS
SEALING ATTIC AIR LEAKSADDITIONAL SOURCES OF AIR LEAKSComplete the Job by Sealing the Attic Hatch or DoorFinish up by sealing the access hatch with self-sticking weather stripping (photos 11 and12). If your hatch rests directly on the moldings, add 2-1/2 inch wide stops around theopening. The stops provide a wider surface for attaching the weatherstrip and a spaceto mount hook-and-eye fasteners. Position the screw eyes so the weatherstrip is slightlycompressed when the hooks are latched. Cut a piece of fiberglass or rigid foam boardinsulation the same size as the attic hatch and nail or glue it to the back of the hatch.If you have pull-down attic stairs or an attic door, these should be sealed in a similarmanner: weatherstrip the edges and put a piece of rigid foam board insulation on the backof the door. Treat the attic door like a door to the outside. Pre-made insulated attic staircovers are also available from local home improvement centers or on the Web.11. WEATHERSTRIP THE DOORIf Your Heating and Cooling Ducts Are in Your Attic,Seal Them While in the AtticLeaky and poorly-insulated ducts (especially in attics) severely compromise theperformance of your heating and cooling equipment. Sealing and insulating your ductscan increase the efficiency of your heating and cooling system by 20% and greatlyincrease air flow. 12. ATTACH FASTENERSCheck the duct connections for leaksby turning on your heating and coolingsystem fan and feeling for leaks—seal thejoints with mastic or foil tape (householdduct tape should not be used).Pay special attention to all the ductpenetrations going through the attic floor.Seal these with foam.should also be insulated—if yourducts are uninsulated or poorly insulated(i.e., you see gaps or torn insulation), sealthem first, then add insulation to keep the airin your ducts at your desired temperatureas it moves through the system. Use ductinsulation material rated at least R-6.Materials Checklistfor Attic Duct Sealing Duct sealant (mastic) or metal-backed (foil) tape Duct insulation material rated atleast R-6 Zip ties to hold duct insulationin place Gloves, safety glasses, mask,flashlight DuctsCompressedWeatherstripSELF-ADHESIVE FOAMWEATHERSTRIPNEW WOOD STOPSEXISTING MOLDINGWeatherstrip the attic access hatch or door. Cut1x3 boards to fit the perimeter of the opening andnail them on with 6d finish nails. Apply self-adhesivefoam weatherstrip tape to the top edge of the stop.1.12 SEALING ATTIC AIR LEAKSHOOK-AND-EYELATCHNOTE: Duct sealant, also known as duct mastic,is a paste which is more durable than foil ducttape. It is available at home improvement centers.Traditional grey duct tape fails quickly andshould not be used.HATCHDOORAttach hook-and-eye fasteners to the attic door andstops. Position the eyes so that the weatherstrip iscompressed when you latch the hooks.Caution: Check for Carbon Monoxide to keep your house safe. After making energyimprovements that result in a tighter house, there can be an increased opportunity for COto build up if your gas-burning appliances are not venting properly. Have your heating andcooling technician check your combustion appliances (gas- or oil-fired furnace, water heater,and dryer) for proper venting. For additional information on Indoor Air Quality (IAQ) issuesrelated to homes such as combustion safety, indoor air contaminants, and proper ventilation,visit www.epa.gov/iaq/homes/hip-front.html.2.1 ADDITIONAL SOURCES OF AIR LEAKS
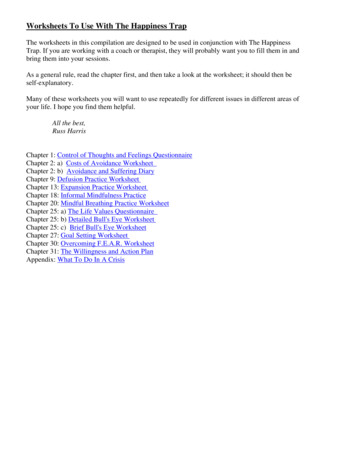
ADDITIONAL SOURCES OF AIR LEAKSRecessed “Can” Lights: Big Source of Air Leaks,But No Easy SolutionRecessed “can” lights (also called high-hats or recessed downlights) look great, butwhen they protrude into your attic space, they can make your home less energy-efficient.These recessed lights in a one-story house or in the ceiling of a second-story createopen holes into your attic that allow unwanted heat flow between conditioned andunconditioned spaces. In the summer, hot attic air can make the rooms warmer, and inthe winter can lights draw warm air up into your attic. Both the warm air leakage and theheat from the lights can cause problems. In cold climates, the heat melts snow on theroof and forms ice dams (water re-freezes at the roof edge). This is more likely to happenif the “can” light is close to the roof deck. Recessed “can” lights in bathrooms also causeproblems when warm, moist air leaks into the attic and causes moisture damage. Hereare some suggestions for improving the recessed can lights in your attic: Call a Professional to Properly Seal Switchto More Efficient BulbsRecessed lights can be sealed, but it is difficultWhen keeping existing recessed lights, youand can create a hazard if not done properly withcan still reduce lighting energy use as muchnon-combustible materials. Since any old-styleas 75% by installing ENERGY STAR qualifiedlights need adequate air space around them tocompact fluorescent light (CFL) bulbs. Thisvent the heat they create, it’s best to consult withincludes CFL bulbs specifically designeda professional before sealing them. Also, seefor recessed lights with built-in reflectors“Caution” below. Alternatively, recessed lightsmatching the appearance of traditionalcan be replaced with ICAT (Insulated Ceiling Air-incandescent reflector bulbs. As with newTight) rated lights, which insulation can touch andfixtures, it is important to make sure anyare sealed to reduce air leaks.CFL bulb selected meets your light outputWhen Replacing or Adding, BuyENERGY STAR with ICATLook for ENERGY STAR qualified recessed fixturesthat reduce energy use as much as 75%. However,expectations. Also, check the packaging ofthe CFL to ensure that it may be used in anenclosed fixture. However, switching to CFLbulbs will not solve the air leakage problem.it’s important to check that any fixture selectedmeets your light output expectations since fixturescome with widely varying wattage bulbs andoptics. Also, make sure fixtures have an ICATrating to minimize heat loss.2.2 ADDITIONAL SOURCES OF AIR LEAKSCaution: Keep all insulation 3 inchesfrom “can” lights, except those ratedIC (insulation contact). You can usea piece of circular metal flashing orwire mesh around the light as a damto keep the insulation away from thelight (see photo 2, Page 4.3).SEALING BASEMENT AIR LEAKSStopping the Chimney EffectOutside air drawn in through basement leaksis exacerbated by the chimney effect createdby leaks in the attic. As hot air generatedby the furnace rises up through the house➊ and into the attic through leaks ➋, cold2outside air gets drawn in through basementleaks to replace the displaced air➌. This1makes a home feel drafty and contributesto higher energy bills. After sealing attic airleaks, complete the job by sealing basementleaks, to stop the chimney effect.3Locating Basement Air LeaksA common area of air leakage in the basement is along the top of the basement wallwhere cement or block comes in contact with the wood frame. These leaks can easily befixed in portions of the basement that are unfinished. Since the top of the wall is aboveground, outside air can be drawn in through cracks and gaps where the house framingsits on top of the foundation. This perimeter framing is called the rim (or band) joist. In thebasement, the above floor joists end at the rim joist creating multiple cavities along thelength of the wall, and many opportunities for leakage (see illustration on Page 3.2).3.1 SEALING BASEMENT AIR LEAKS
SEALING BASEMENT AIR LEAKSSeal All Gaps and Cracks around Rim JoistsWhat About Insulating the Rim Joist?Though you may not be able to see cracks in the rim joist cavities, it is best to seal upthe top and bottom of the inside of the cavity. Also, rim joist air sealing is especiallyimportant at bump out areas such as bay windows that hang off the foundation. Theseareas provide greater opportunities for air leakage and heat loss. Caulk is best for sealinggaps or cracks that are 1/4 inch or less. Use spray foam to fill gaps from 1/4 inch to about3 inches. We also recommend you seal penetrations that go through the basement ceilingto the floor above. Generally, these are holes for wires, water supply pipes, water drainpipes, the plumbing vent stack (for venting sewer gases), and the furnace flue (for ventingfurnace exhaust).After air sealing the rim joist area it is relatively easy to insulate each cavity with rigidfoam insulation or fiberglass batts. If using batts, just cut the insulation to fit and placeagainst the rim joist without compression, gaps, or voids. If using rigid, foam into place.This could also be done in conjunction with finishing the basement, when you wouldinsulate the basement walls floor-to-ceiling. Attic and basement air sealing will goa long way to improve your comfort because your house will no longer act like anopen chimney.Materials Checklist forBasement Sealing Silicone or acrylic latex caulk and caulk gun Expanding spray foamAreas to Foam or CaulkLONG RIM JOISTRIM JOISTCCaution: When sealing the furnaceflue (which will be encased in ametal sleeve) use high-temperaturecaulk. Run a bead of hightemperature caulk around the pipesleeve and around the metal frame.AAlong the gap between the sillplate and the foundationBAt the bottom and top of the rimjoist on each end of the houseCAll electrical, water, or gaspenetrations and any ventingducts that pass to the outsideSUB FLOORBFLOORJOISTASILL PLATEFOUNDATIONILLUSTRATION BY DALE HOFFMEYER3.2 SEALING BASEMENT AIR LEAKSADDING ATTIC INSULATIONNow that you’ve air-sealed your attic and basement, check your attic insulation levelsand add more if necessary. The attic is the easiest place to add insulation to improve yourcomfort and the energy efficiency of your home.Do I Have Enough?No matter what kind of insulation you currently have in your attic, one quick way todetermine if you need more is to look across the span of your attic. If your insulation isjust level with or below your floor joists (i.e., you can easily see your joists), you shouldadd more. If you cannot see any of the floor joists because the insulation is well abovethem, you probably have enough and adding more may not be cost-effective. It isimportant that the insulation be evenly distributed with no low spots; sometimes thereis enough insulation in the middle of the attic and very little along the eaves. To see howto add insulation out to the eaves, see Installing Rafter Vents (on Page 4.4). If your atticinsulation covers your joists and is distributed evenly, you probably have enough.How Much Should I Add?Insulation levels are specified by R-Value. R-Value is a measure of insulation’s abilityto resist heat flow. The higher the R-Value, the better the thermal performance of theinsulation. The recommended level for most attics is to insulate to R-38 or about10 to 14 inches, depending on insulation type.4.1 ADDING ATTIC INSULATION
ADDING ATTIC INSULATIONA Note about NaturalAttic VentilationDoing the JobLaying fiberglass rolls is easiest for a DIY job. If you have any type of insulation betweenthe rafters, install the second layer over and perpendicular to the first (again, the secondlayer of roll insulation should be unfaced– with no vapor retarder). This will help coverthe tops of the joists and reduce heat loss or gain through the frame. Also, when layingdown additional insulation, work from the perimeter toward the attic opening. Never layinsulation over recessed light fixtures or soffit vents. Keep all insulation at least 3 inchesaway from “can” lights, unless they are rated IC (Insulated Ceiling). If you are using loosefill insulation, use sheet metal to create barriers around the openings. If using fiberglass,wire mesh can be used to create a barrier.At first it may seem odd to add insulation for warmthand then purposely allow cold air to enter the atticthrough vents, but this combination is the key to adurable and energy-efficient home. Here’s why: in thewinter, allowing a natural flow of outdoor air to ventilatethe attic helps keep it cold, which reduces the potentialfor ice damming (snow that melts off a roof from anattic that is too warm and then re-freezes at the gutters,causing an ice dam that can damage the roof). Properinsulation and air sealing also keeps attics cold inwinter by blocking the entry of heat and moist air frombelow. In the summer, natural air flow in a well-ventedattic moves super-heated air out of the attic, protectingUse a blowing machine to blow in loosefill insulation.Photo courtesy of Green Fiberroof shingles and removing moisture. The insulation willresist heat transfer into the house. The most commonmistake homeowners make when installing insulationis to block the flow of air at the eaves. NEVER COVERATTIC SOFFIT VENTS WITH INSULATION—use raftervents and soffit vents to maintain airflow (See Pages 4.4and 4.5).A Note about Attic FansAttic fans are intended to cool hot attics by drawingin cooler outside air from attic vents (soffit and gable)and pushing hot air to the outside. However, if your attichas blocked soffit vents and is not well-sealed from therest of the house, attic fans will suck cool conditionedair up out of the house and into the attic. This willuse more energy and make your air conditioner workharder, which will increase your summer utility bill.You don’t want your unfinished attic cooled by your airconditioner. To prevent this, follow the air sealing and1. LAY FIBERGLASS ROLLS2. CREATE A BARRIERLayer fiberglass roll insulation perpendicularto the joists.Photo courtesy North American InsulationManufacturers AssociationUse sheet metal or wire mesh to help create abarrier around fixtures or vents.Add the Right Kindof InsulationWhen adding additional insulation, you donot have to use the same type of insulationthat currently exists in your attic. Youcan add loose fill on top of fiberglassbatts or blankets, and vice-versa. If youuse fiberglass over loose fill, make surethe fiberglass batt has no paper or foilbacking; it needs to be “unfaced.” If youchoose to add loose fill, it may be wiseto hire a professional, as the applicationrequires the use of a blowing machine,although some home improvement storesoffer rentals of this machine.insulation strategies in this guide and make sure theattic is well-ventilated using passive vents and naturalair flow.4.2 ADDING ATTIC INSULATION4.3 ADDING ATTIC INSULATION
ADDING ATTIC INSULATIONInstalling Rafter VentsAttic Air FlowTo completely cover your attic floor with insulation out to the eaves you need to installrafter vents (also called insulation baffles). Complete coverage of the attic floor alongwith sealing air leaks will ensure you get the best performance from your insulation.Rafter vents ensure the soffit vents are clear and there is a channel for outside air tomove into the attic at the soffits and out through the gable or ridge vent (see Attic AirFlow graphic on Page 4.5).The outside air flows through the soffit,along the rafter vent and out throughthe gable or ridge vent.To install the rafter vents, staple them directly to the roof decking. Rafter vents comein 4-foot lengths and 14-1/2 and 22-1/2 inch widths for different rafter spacings.Rafter vents should be placed in your attic ceiling in between the rafters at the pointwhere your attic ceiling meets your attic floor. Once they are in place, you can thenplace the batts or blankets, or blow insulation, right out to the very edge of the atticfloor. Note: Blown insulation may require an additional block to p
Sealing Attic Air Leaks. Additional Sources of Air Leaks Sealing Basement Air Leaks. Adding Attic Insulation 1.2 1.4. 1.6 2.1. 3.1 4.1. Sealing and Insulating your home is one of the most cost-effective ways . to make a home more comfortable and energy efficient—and you can do it yourself. Use This Guide To: 1. Learn how to find and seal hidden