Transcription
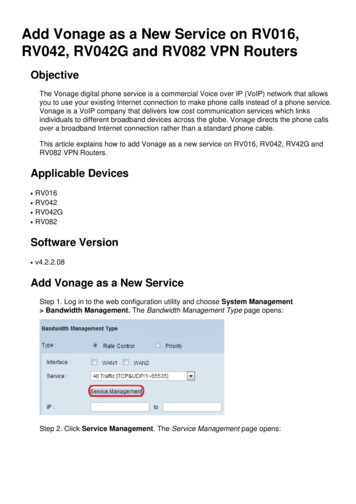
Step-by-step Guide/How-toHow to add an old WBOX IP camera to a new NVR V4.2?This article outlines the steps in adding the old WBOX cameras to the new WBOX NVR. This can also be used as aguide in adding other brands of IP cameras to the new WBOX NVR.There are two methods that can use to add the camera to the NVR:1. The camera is connected to the POE port of the NVR.2. The camera is connected to a POE switch or a router.Product Models:NVR0E-4CHNVR1TB / 0E-4CHNVR2TB0E-8CHNVR2TB0E-16CHNVR2T / 0E-16CHNVR4TFirmware Version: V4.2.XXXX.0000.157.X.XX.X.XThe camera is connected to the POE ports of the NVRProcedures:1. Connect the camera and laptop/PC to the POE ports at the back panel of the NVR (not the LAN/Internetport). See image below.Technical Support Hotline: 1-833-574-9124 (Option 1) Email Address: tech@wboxsupport.comWebsite: www.wboxtech.com
Step-by-step Guide/How-to2. Check the POE IP address on the NVR. If you are adding several cameras that were previously added on another NVR, you need to changethe POE IP address of the new NVR to the existing IP address range of the cameras. If the camera was never added to an NVR or just recently reset to factory setting, you may need toset the IP address of the camera to the same range as the POE IP address of the NVR.The default POE IP address of the NVR is 169.254.10.121. You can find the POE IP address in Setting Network POE3. To change the IP address of the camera, you need to install the WBOX Device Tool on your PC. You candownload the tool here: http://bit.ly/2I1xRqa.[1][2][3][4]On the WBOX Device Search Tool, click the camera that you would like to modify the IP address.On the right pane, input an IP address which is on the same range as the NVR’s POE IP address.Follow the Subnet Mask and Default Gateway on the NVR’s POE setting.Input the camera’s password and hit Save.Technical Support Hotline: 1-833-574-9124 (Option 1) Email Address: tech@wboxsupport.comWebsite: www.wboxtech.com
Step-by-step Guide/How-to4. Once the camera’s IP address and the NVR’s POE IP address are on the same range, the NVR willautomatically detect the camera. However, the status will be OFFLINE5. Click the.icon. You will be prompted with screen below.6. Input the password of the camera in the Password field and hit OK.7. Once the camera is successfully added to the NVR, you will see annumber.icon beside the camera’s channelTechnical Support Hotline: 1-833-574-9124 (Option 1) Email Address: tech@wboxsupport.comWebsite: www.wboxtech.com
Step-by-step Guide/How-toThe cameras are connected to a POE Switch or RouterProcedures:1. Make sure that the camera and the laptop are connected to the same network. See sample image below.2. Check the IP address of the NVR. Go to Setting Network Network IP on the NVR’s monitor.Technical Support Hotline: 1-833-574-9124 (Option 1) Email Address: tech@wboxsupport.comWebsite: www.wboxtech.com
Step-by-step Guide/How-to3. Change the IP address of the camera using the WBOX Device Tool on your PC. You can download the toolhere: http://bit.ly/2I1xRqa.[1] On the WBOX Device Search Tool, click the camera that you would like to modify the IP address.[2] On the right pane, input an IP address which is on the same range as the NVR’s IP address and therouter’s default gateway.[3] Follow the Subnet Mask and Default Gateway on the NVR’s and the router’s network setting.[4] Input the camera’s password and hit Save.4. On the NVR’s monitor go to Setting Channel Camera. Click Refresh. The camera which is on the samenetwork as the NVR and the computer will show up under Online Device.Technical Support Hotline: 1-833-574-9124 (Option 1) Email Address: tech@wboxsupport.comWebsite: www.wboxtech.com
Step-by-step Guide/How-to5. To add the camera, follow the steps below:[1] Tick the checkbox beside the camera’s IP address.[2] Input the camera’s password in the Password field.[3] Click Add.6. Once the camera is successfully added to the NVR, you will see annumber.icon beside the camera’s channelTechnical Support Hotline: 1-833-574-9124 (Option 1) Email Address: tech@wboxsupport.comWebsite: www.wboxtech.com
Step-by-step Guide/How-toAdditional Information: For OLD WBOX and HIKVISION IP CamerasThere is feature on the camera that will protect itself from wrong password attempts. If a wrong password was usedto add the camera to the NVR for several times, the camera will not be added and will be locked for any other loginattempt. To resolve this, follow the steps below:1.2.3.4.Log in to the camera’s web UI.Go to Configuration System Security Security Service.Uncheck Enable Illegal Login Lock option.Hit Save.For Hikvision cameras with firmware version V5.5.0, the ONVIF protocol is disabled.You need to log in to the camera’s web UI to manually enable the ONVIF protocol and create an ONVIF account.Please see this link for the instructions. nical Support Hotline: 1-833-574-9124 (Option 1) Email Address: tech@wboxsupport.comWebsite: www.wboxtech.com
How to add an old WBOX IP camera to a new NVR V4.2? This article outlines the steps in adding the old WBOX cameras to the new WBOX NVR. This can also be used as a guide in adding other brands of IP cameras to the new WBOX NVR. There are two methods that can use to add the camera to the NVR: 1. The camera is connected to the POE port of the NVR. 2.