Transcription
Oracle Communications Acme Packet 1100Session Boarder Controller with BoadworksR21Technical Application Note
DisclaimerThe following is intended to outline our general product direction. It is intended for informationpurposes only, and may not be incorporated into any contract. It is not a commitment to deliver anymaterial, code, or functionality, and should not be relied upon in making purchasing decisions. Thedevelopment, release, and timing of any features or functionality described for Oracle’s productsremains at the sole discretion of Oracle.2
Table of ContentsINTENDED AUDIENCE.4DOCUMENT OVERVIEW .4INTRODUCTION .5LAB CONFIGURATION . 6CONFIGURING THE ORACLE E-SBC .7IN SCOPE . 7OUT OF SCOPE . 7WHAT YOU WILL NEED . 7SBC GETTING STARTED . 71. Establish the serial connection to the Net-Net SBC. 82. Login to the Net-Net SD and enter the configuration mode . 83. Initial Configuration – Assign the management Interface an IP address . 9SBC CONFIGURATION KEY ELEMENTS . 11SBC CONFIGURATION. 12CONFIGURING THE BROADWORKS SERVER . 172.1.1 BROADWORKS LAB REQUIREMENTS . 172.1.2 BROADWORKS CONFIGURATION . 172.1.3 BROADWORKS CONFIGURATION FOR PREMISE-BASED SBCS. 172.1.4 BROADWORKS CONFIGURATION FOR HOSTED SBCS . 172.1.4.1 Enable Line/Port Synchronization. 172.1.4.2 Configure Origination Redirect Policy . 18CONFIGURING THE ORACLE ENTERPRISE OPERATIONS MONITOR . 19IN SCOPE . 19OUT OF SCOPE . 19WHAT WILL YOU NEED . 19EOM – GETTING STARTED. 19CONFIGURING EOM TO DISPLAY ALL LEGS OF A CALL IN A SINGLE REPORT . 20TEST SUMMARY . 24SOFTWARE VERSIONS USED . 28TROUBLESHOOTING TOOLS . 29WIRESHARK . 29ON THE ORACLE E-SBC . 29EXAMINING THE LOG FILES . 29THROUGH THE WEB GUI. 30TELNET . 30APPENDIX A . 30ACCESSING THE ACLI . 30ACLI BASICS . 30CONFIGURATION ELEMENTS . 32CREATING AN ELEMENT. 32EDITING AN ELEMENT . 33DELETING AN ELEMENT. 33CONFIGURATION VERSIONS. 34SAVING THE CONFIGURATION . 34ACTIVATING THE CONFIGURATION . 343 Page
Intended AudienceThis is a technical document intended for use by Oracle Systems Engineers, third party SystemsIntegrators, Oracle Enterprise customers and partners and end users of Oracle Enterprise Session BorderController (E-SBC) as well as service provider based session border controller. It assumes that the readeris familiar with basic operations of Oracle Session Border Controller AP1100, 3800/4000 and 6000 seriesplatforms.Document OverviewThis Oracle technical application note outlines the recommended configurations for the Oracle SessionBorder Controller AP1100 series for connecting Broadworks R21 customers. The solution containedwithin this document has been certified on Oracle’s Acme Packet OS ECZ 7.3.0m2p4.Broadworks platform delivers a broad range of unified communications services including video, voice,hosted call center, conferencing, messaging and mobility, for businesses and consumers worldwide.This application note has been prepared as a means of ensuring that Broadworks and Oracle AP1100 ESBC are configured in the optimal manner.4 Page
IntroductionAudienceThis is a technical intended for telecommunications engineers with the purpose of configuring the OracleEnterprise Session Border Controller (E-SBC) and Broadworks. There will be steps that requirenavigating Broadworks as well as the Acme Packet Command Line Interface (ACLI). Understanding thebasic concepts of TCP/UDP, IP/Routing and SIP/RTP are also necessary to complete the configurationand for troubleshotting, if necessary.Requirements Fully functioning Broadworks R.21 Oracle Enterprise Session Border Controller AP 1100 or any Oracle ESBC appliance or VM editionrunning Net-Net OS ECZ730m2p4.64.bz. Note: the configuration running on the SBC isbackward/forward compatible with any release in the 7.3.0 stream.5 Page
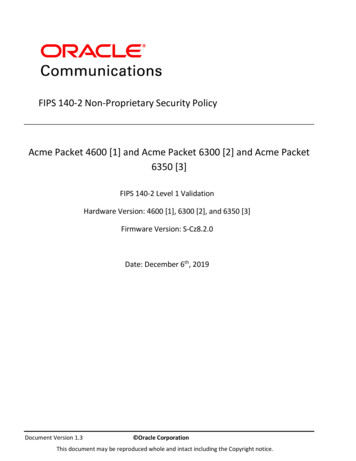
Lab ConfigurationThe following diagram illustrates the lab environment created to facilitate certification testing (IPaddressing/Port below is only a reference, they can change per your network specifications).AOracle 1100BCPhone A, B and C register to Broadworksthrough the E-SBCBroadworksBroadworks UC OneCommunicator6 Page
Configuring the Oracle E-SBCIn this section we describe the steps for configuring a Net-Net E-SBC for use with Broadworks.In ScopeThe following Step-by-Step guide configuring the Net-Net E-SBC assumes that this is a newly deployeddevice dedicated to a single customer.Note that Oracle Communications offers several products and solutions that can interface withBroadworks. This document covers the setup for the Net-Net E-SBC platforms software ECZ 7.3.0m2p4or later. A Net-Net 1100-series (AP1100) platform was used as the platform for developing this guide.If instructions are needed for other Oracle Communications products, please contact your OracleCommunications representative.Out of Scope Configuration of Network management including SNMP and RADIUSWhat you will need Serial Console cross over cable with RJ-45 connectorTerminal emulation application such as PuTTYor HyperTermPasswords for the User and Superuser modes on the Net-Net E-SBCSignaling IP address and port of BroadworksSignaling and media IP addresses and ports to be used on the Net-Net E-SBC facing Endpoints andBroadworksIP address of the enterprise DNS serverSBC getting startedOnce the Net-Net E-SBC is racked and the power cable connected, you are ready to set up physicalnetwork connectivity.7 Page
Plug the INT (slot 0 port 0) interface into your endpoints facing network and the EXT (slot 1 port 0)interface into your Broadworks (server-facing) network as shown in the diagram above. Once connected,you are ready to power on and perform the following steps.All commands are in bold, such as configure terminal; parameters in bold red such as1100-BSFT-1 are parameters which are specific to an individual deployment.Note: The ACLI is case sensitive.1. Establish the serial connection to the Net-Net SBC.Confirm the Net-Net SD is powered off and connect the serial console cable to the Net-Net SD to aworkstation running a terminal emulator application such as PuTTy. Start the terminal emulationapplication using the following settings: Baud Rate 115200 Data Bits 8 Parity None Stop Bits 1 Flow Control NoneStart the Net-Net SD and confirm that you see the following output from the bootup sequence.2. Login to the Net-Net SD and enter the configuration modeEnter the following commands to login to the Net-Net SD and move to the configuration mode.Note that the default Net-Net SBC password is “acme” and the default super user password is“packet”.8 Page
Password: acme1100-BSFT-1 enablePassword: packet1100-BSFT-1# configure terminal1100-BSFT-1 (configure)#You are now in the Global Configuration mode.3. Initial Configuration – Assign the management Interface an IP addressTo assign an IP address, one has to configure the bootparams on the Net-Net SD, by going to1100-BSFT-1#configure terminal --- bootparams Once you type “bootparam” you have to use “carriage return” key to navigate down A reboot is required if changes are made to the existing bootparams1100-BSFT-1#(configure)bootparam'.' clear field;boot deviceprocessor numberhost name'-' :::go to previous field;eth00acmesystemq quit9 Page
file name: /boot/nnECZ730m2p4.64.bz--- location wherethe software is loaded on the SBCinet on ethernet (e): 172.18.255.134:ffff0000 --- This is theip address of the management interface of the SBC, type the IPaddress and mask in hexinet on backplane (b):host inet (h):gateway inet (g): 172.18.0.1 --- gateway address hereuser (u): vxftpftp password (pw) (blank use rsh): vxftpflags (f):target name (tn): 1100-BSFT-1startup script (s):other (o):10 P a g e
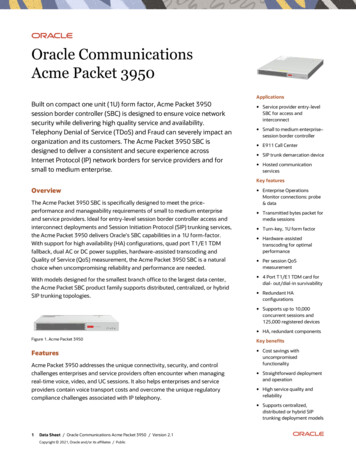
SBC configuration key elementsThe following section walks you through specific elements which require change for the OracleEnterprise SBC to work with Broadworks:static-flow: When a Broadworks client registers to the Broadworks server through the E-SBC, itdownloads the config file from the server. Hence, static-flow is enabled on the E-SBC to allow the HTTPand HTTPS requests and responses from the client to pass through to the server.media-manager options: dont-terminate-assoc-legs: When hairpinned calls are ended because ofsignaling failures on one call leg, the Oracle E-SBC deletes both legs’ media flows simultaneously bydefault. In addition, when the first hairpinned call leg is torn down, the second call leg is gracefullyreleased immediately. When dont-terminate-assoc-legs is configured, the orphaned call leg in the hairpinscenario will be torn down after the initial guard timer expires.survivability: The survivability feature is enabled on the E-SBC by configuring this element. This featureis the Oracle E-SBC’s ability of a Remote Office/Branch Office to detect the loss of communication overSIP-based telephony to Broadworks. When loss of communication is detected over the SIP service, theOracle E-SBC dynamically switches into Survivable Mode, locally handling call processing and providinglimited additional server functionality.service-health: When Survivability Mode is enabled on the E-SBC, the system is able to detect any loss ofconnection (and subsequent re-connection) to the Broadworks server based on a health score. For thepurpose of health monitoring, a sip-interface and one or more attached session agents are logicallygrouped together by configuring a“service-tag” parameter to indicate the name of the session agentgroup. The service health score of the group is based upon the health status of the session agents withinthe group ; in this case the SA for Broadworks AS1 is included.session-agent auth-attribute: This element is configured for digest authentication. The attributes listedin the auth-attribute are used by the E-SBC to send the authentication information when challenged byBroadworks.surrogate-agent: A surrogate agent is needed to register the E-SBC to the Broadworks server on behalf ofthe phone. Surrogate registration requires registration-caching to be set to enabled on the sip-interfaceof Broadworks realm.SIP manipulations:- Add100rel: This is configured to add the Require:100rel header as Broadworks supports earlymedia.- AllowEvents: This is added as an out-manipulation on the sip-interface facing the Broadworksserver.- Broadworks: This header-rule adds the Allow-events: BroadWorksSubscriberData header to allthe REGISTER requests going out of the E-SBC- AddOTG: Broadworks requires the use of otg header param in the From header , and this HMRadds it to the From header.- add iptel: This sip-manipulation adds the tgrp and trunkContext to the Contact header whichBroadworks mandates.11 P a g e
SBC 25:06:c1:2es0p1Media12 P a g e
evas.iop1.broadworks.net172.19.193.110sip-trunkFor failover netsip-config13 P a g e
-udp-length 0register-grace-timer rksAllow-Eventsaddbooleanrequest14 P a g e
SubscriberDataaddOTGaddOTG ramaddoracletrunkgroupadd vability.1.0.spltowards-epfor HTTPS conneection to 193.16:44315 P a g e
web-server-configTCPNAPT40004100towards-epfor HTTP connection towards 255.71212.214.155.116 P a g e
Configuring the Broadworks ServerThis section identifies BroadWorks lab requirements and configuration required as a prerequisite forexecuting this test plan.2.1.1 BroadWorks Lab RequirementsThis test plan requires a standard redundant BroadWorks lab installation. Components required for astandard redundant lab installation include: Application Server (primary) Application Server (secondary) Media Server Network Server (1) Network Server (2) POP3/IMAP4/SMTP Server2.1.2 BroadWorks ConfigurationThis section identifies configuration requirements to enable BroadWorks for SIP requests from the SBC.2.1.3 BroadWorks Configuration for Premise-based SBCsCustomer premise-based SBCs, including ALGs, Edge Gateways, and similar devices are deployed at thecustomer site. Typically, servicing a limited number of users in the same enterprise and are hosted by asingle pair of BroadWorks Application Servers. There is no BroadWorks configuration required for thismodel.However, if the premise-based SBC typically fronts multiple enterprises and/or is also frequentlydeployed as a hosted/carrier-based SBC, then complete the configuration for Hosted SBCs.2.1.4 BroadWorks Configuration for Hosted SBCsHosted (or carrier-based) SBCs sit in the service provider network. They may service many enterprisesacross diverse locations and may front multiple Application Server clusters. Hosted SBCs must direct SIPrequests to the BroadWorks Network Server to determine the hosting Application Server for the user.Access redirect eliminates the need for the SBC to configure static mapping of access devices toApplication Server clusters. The SBC sends all out-of-dialog requests to the BroadWorks Network Server,which responds with a 302 Redirect containing an ordered list of the Application Servers to be contacted.The BroadWorks Network Server must be configured with an Origination Redirect policy to enable it torespond correctly to SIP requests from the SBC. This eliminates the need to configure the SBC with staticmapping of access equipment to Application Server clusters. The SBC sends all out-of-dialog requests tothe BroadWorks Network Server, which responds with a 302 Redirect containing an ordered list of theApplication Servers to be contacted.2.1.4.1 Enable Line/Port SynchronizationFor the Network Server to associate a request from the SBC to a specific Application Server cluster,line/port synchronization must be enabled.Enable synchronization via the Application Server CLI.AS CLI/Interface/NetServSync set syncLinePorts trueAS CLI/Interface/NetServSync set syncTrunkGroups true17 P a g e
AS CLI/Interface/NetServSync getsyncFlag truesyncLinePorts truesyncDeviceManagementInfo truesyncTrunkGroups trueRestart the Application Server after enabling synchronization.If there are BroadWorks users already configured on the system, then existing line/ports must bedumped to file on the Application Server and uploaded to the Network Server as described in theNetwork Server and Application Server Synchronization section of the BroadWorks Maintenance Guide [8].2.1.4.2 Configure Origination Redirect PolicyComplete the following steps to enable the Network Server to perform Origination Redirect for requestsfrom the SBC.1) Create a new OrigRedirect policy instance. Note that this step does not need to be repeated foradditional SBCs or SBC addresses.NS CLI/Policy/OrigRedirect add policy instance name true CallTypes ALL redirectOnLinePortInsteadOfDN true2) Create a new routing profile in the Network Server. . Note that this step does not need to be repeatedfor additional SBCs or SBC addresses.NS CLI/Policy/Profile add routing profile name, e.g. sbcprof OrigRedirect policy instance name 3) Create a new Routing NE for the SBC.NS CLI/System/Device/RoutingNE add Routing NE name, e.g. sbc1 “” 1 50 routing profile name, e.g. sbcprof falseOnLine InboundOnly accessRoutingNE4) Associate address with SBC Routing NE. The address provisioned here must match the address in thefirst (VIA entry in a message from the SBC).NS CLI/System/Device/RoutingNE/Address add Routing NE name address 1 5018 P a g e
Configuring the Oracle Enterprise Operations MonitorIn this section we describe the steps for configuring Oracle Enterprise Operations Monitor (EOM) for usewith the Oracle Enterprise SBCs to monitor SIP signaling traffic on the network.In ScopeThe following guide for configuring the Oracle EOM assumes that this is a newly deployed devicededicated to a single customer. Please see the Oracle Communications Session Monitor Installation Guideon http://docs.oracle.com/cd/E60864 01/index.htm for a better understanding of the basic installation.Out of Scope Basic installation as this is covered in Chapters 2 and 3 of the Oracle Communications SessionMonitor Installation Guide. High availability.What will you need Console access to the EOM server or virtual machine (VM). Browser-based HTTPS access to the EOM server after the initial configuration is complete. Administrator password for the EOM to be used. IP address to be assigned to EOM.EOM – Getting StartedEnsure that the server or VM specifications meet those outlined in Chapter 1 of the OracleCommunications Session Monitor Installation Guide. Install the EOM software and configure thenetwork parameters as outlined in Chapter 2 of the same guide. Chapter 3 details the subsequentbrowser-based installation. When prompted to select the “Machine Type”, select the“Communications Operations Monitor” checkbox.19 P a g e
Configuring EOM to Display All Legs of a Call in a Single ReportThis allows all call legs on both sides of the E-SBC to be displayed in a single report, making analysis andtroubleshooting easier.1. Click on the user (admin in this example) in the top right corner, then click on Settings.20 P a g e
2. Under System Management select System Settings and search for “merge”. Double click on“Merge globally by Call-ID”.3. Click on the Enabled check box and click Update.4. Under Platform select Platform Devices. Click Add (or Edit if you’ve already added a device).21 P a g e
5. Select the SBC/B2BUA radio button regardless of the type of device you’re adding, then click Next.22 P a g e
6. Click on the “Use generic Palladion algorithm (recommended)” radio button, then click Next.7. Enter the device’s IP address in both fields, then click Next.8. Enter a name for the device and click Finish.23 P a g e
9. Repeat for all other devices in the call flow. Enter each side of the SBC (inside and outside)separately. You don’t necessarily need to define the access client’s information.10. On the Dashboard, under Recent Calls, make sure the Auto Refresh is set to something other thanOff.11. Make a call. After the call is finished, the call will show up under Recent Calls with 2 or moresegments if the call only traverses the SBC once, or with 4 or more segments if the call traversesthe SBC twice. Double click on the call.12. The call will show up with all segments. Click on the PDF button to generate a report.13. Click on the Create button.14. Choose to either save the file or open it.15. View the Call Report in Acrobat Reader or another program. The report will show all segments ofthe call.Test Summary24 P a g e
A comprehensive test plan was executed per Broadsoft and call flows. For a copy of full test report, pleasecontact your Oracle Sales account team.BroadWorks Session Border Controller Interoperability Test Plan Support TableTest Plan PackageBasicBroadWorks ServicesAccess DeviceServices – Call ControlServicesAccess DeviceServices – Registrationand AuthenticationTest Plan Package ItemsSupportedCall OriginationYesCall TerminationYesSession AuditYesSession TimerYesRingbackYesForke
Oracle Communications Acme Packet 1100 Session Boarder Controller with Boadworks R21 Technical Application Note . 2 Disclaimer . Once you type "bootparam" you have to use "carriage return" key to navigate down A reboot is required if changes are made to the existing bootparams 1100-BSFT-1#(configure)bootparam
![FIPS 140-2 Non-Proprietary Security Policy Acme Packet 1100 [1] and .](/img/49/140sp3490-5601486.jpg)