Transcription
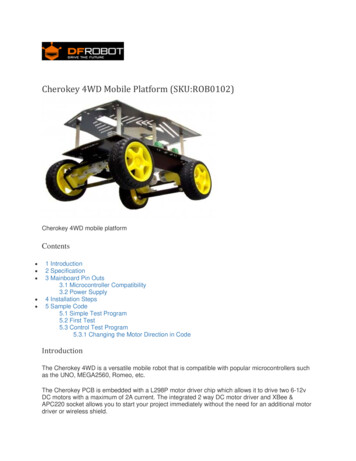
Cherokey 4WD Mobile Platform (SKU:ROB0102)Cherokey 4WD mobile platformContents 1 Introduction2 Specification3 Mainboard Pin Outs3.1 Microcontroller Compatibility3.2 Power Supply4 Installation Steps5 Sample Code5.1 Simple Test Program5.2 First Test5.3 Control Test Program5.3.1 Changing the Motor Direction in CodeIntroductionThe Cherokey 4WD is a versatile mobile robot that is compatible with popular microcontrollers suchas the UNO, MEGA2560, Romeo, etc.The Cherokey PCB is embedded with a L298P motor driver chip which allows it to drive two 6-12vDC motors with a maximum of 2A current. The integrated 2 way DC motor driver and XBee &APC220 socket allows you to start your project immediately without the need for an additional motordriver or wireless shield.
The expansion plate significantly increases the surface area of the Cherokey allowing you to easilyconnect a 9g micro servo or a standard sized servo in two different locations so that you can install arobotic arm or ultrasonic/IR sensors. The prototyping area makes it convenient to install sensors onthe robot. Double sided solder pads in the middle of the top place can be populated with DIP or SMDcomponents to extend the robot's functions.The high strength aluminium alloy chassis provides flexibilitiy in rapid movement particularly inoutdoor enviornments, such as grass, gravel, sand or sloped surfaces.The Cherokey 4WD mobile platform is also suitable for robot competitions and research-relatedprojects.Specification 2 channel DC motor driverSolder prototyping areasServo sized holesMounting holes compatible with Arduino UNO, MEGA, Romeo, etc.Incorporates a dual H-bridge for bi-directional motor controlEasy to connect external modules such as XBee, DFRobot Bluetooth and APC220 wireless modules7 white LEDS surrounding the board's edge for cool lighting effectsGearboxed motors for extra torqueMotor Specification:Gear Ratio 1:120No-load speed(3V):100RPMNo-load speed(6V):200RPMNo-load current(3V):60mANo-load current(6V):71mAStall current(3V):260mAStall current(6V):470mATorque (3V): 1.2KgcmTorque (6V): 1.92KgcmSize: 55mm x 48.3mm x 23mmWeight: 45g
Mainboard Pin OutsIn the above diagram the 4 digital I/O pins in the lower-right corner can connect to any digitalpin of an Arduino or similar microcontroller. In order for it to work you must make sure thecorrect pins are assigned in your code.Note: D5 and D6 are PWM pinsMore Details: PROG SWITCH:PROG:Set the switch in this position when uploading code if you plug in an XBee or Bluetoothmodule on to the Cherokey PCBRUN: Set the switch in this position to run the code after it has been uploadedMOTOR SELECT1: Short the pins with a jumpers to control Motor 2 and Motor 4 simultaneouslyMOTOR SELECT2: Short the pins with a jumper to control Motor 1 and Motor 3 simultaneouslyNote: If you want to control the motors independently, remove the jumpers from these pins
Correct and incorrect method of shorting the pinsMicrocontroller CompatibilityThe Cherokey is compatible with most microcontrollers,such as Arduino UNO, Diecimila, Leonardo,Mega 1280,2560, ADK, Romeo etc.If you use the RoMeo, you have complete control of 4 motors simultaneously.Cherokey 4WD DFRduino UNO
Cherokey 4WD RomeoCherokey 4WD Mega
NOTE:1 If you use Romeo or a Leonardo board where "RX0"&"TX0" are not exposed, youneed to change "Serial" to "Serial1".2 Turn the "PROG/RUN" switch to the "PROG" position when you are going to upload the sketch.3 Turn the switch to "RUN" position when you are going to use Xbee,APC220 orother modules.Power SupplyInstall Battery on the back of the board.You can install 5xAA battery holder or lipo battery on theback of the board.
Installation StepsRefer to the Instruction manual for detailed assembly stepsSample CodeSimple Test ProgramUse Arduino IDE to upload the following sketch to the microcontroller via the USB port. In ArduinoIDE's board settings, you can use "Arduino UNO".Under COM settings, select the microcontrollers COM port (the COM port will vary on yourcomputer).(Make sure your COM port is correctly assigned to your microcontroller in the IDE or the program willnot upload!)int speedPin M1 5;//M1 Speed Controlint speedPin M2 6;//M2 Speed Controlint directionPin M1 4;//M1 Direction Controlint directionPin M2 7;//M1 Direction Control
void setup(){}void ;carTurnRight(250,250);delay(1000);}void carStop(){//Motor StopdigitalWrite(speedPin M2,0);digitalWrite(directionPin M1,LOW);digitalWrite(speedPin M1,0);digitalWrite(directionPin M2,LOW);}void carBack(int leftSpeed,int rightSpeed){analogWrite (speedPin M2,leftSpeed);//Move backward//PWM Speed ControldigitalWrite(directionPin M1,HIGH);analogWrite (speedPin M1,rightSpeed);digitalWrite(directionPin M2,HIGH);}void carAdvance(int leftSpeed,int rightSpeed){analogWrite (speedPin M2,leftSpeed);digitalWrite(directionPin M1,LOW);analogWrite (speedPin M1,rightSpeed);digitalWrite(directionPin M2,LOW);//Move forward
}void carTurnLeft(int leftSpeed,int rightSpeed){//Turn LeftanalogWrite (speedPin M2,leftSpeed);digitalWrite(directionPin M1,LOW);analogWrite (speedPin M1,rightSpeed);digitalWrite(directionPin M2,HIGH);}void carTurnRight(int leftSpeed,int rightSpeed){//Turn RightanalogWrite (speedPin M2,leftSpeed);digitalWrite(directionPin M1,HIGH);analogWrite (speedPin M1,rightSpeed);digitalWrite(directionPin M2,LOW);}First TestAfter code has been uploaded to the microcontroller, unplug the USB cable from the board.Place the Cherokey on a flat surface and at ground level for safety.Turn the Cherokey on using the switch at the rear.It should go backwards, forwards, turn 90 degrees to the left and turn 90 degrees to the right.TROUBLESHOOTING TIPS:Batteries must be connected to make the motors move! If the Cherokey is only plugged in withUSB power through the microcontroller, the motors will be under powered and will not work!If batteries are installed but the motors are not moving, make sure the switch at the rear of theCherokey PCB is turned onThe Cherokey's direction may vary depending on the wiring of the motors. If you think thedirections are wrong, try switching the positive and negative wiresIf a problem persists, try editing the code to change the motor direction - covered in theChanging the Motor Direction in Code section belowControl Test ProgramNow we can try another program that will give us keyboard control over the Cherokey.The advantage of this program is that we will be given feedback to predefined directions. Byobserving the robot's motion, you can debug the motor directions so that each motor is spinning thecorrect way.Upload the following code as before:
/*# Edited by:Matt# Date:2015.09.06# Version:1.1# Product:Cherokey 4WD Mobile Platform# SKU:ROB0102/ROB0117# Description:# Drive 2 motors with this Cherokey 4WD Mobile Platform# Connect D4,D5,D6,D7,GND to UNO digital 4,5,6,7,GND*///Motor Definitionsint E1 5;//M1 Speed Controlint E2 6;//M2 Speed Controlint M1 4;//M1 Direction Controlint M2 7;//M2 Direction Control//DIRECTIONS//STOPvoid stop(void){digitalWrite(E1, 0);digitalWrite(M1, LOW);digitalWrite(E2, 0);digitalWrite(M2, LOW);}//ADVANCEvoid advance(char a, char b){analogWrite (E1, a);digitalWrite(M1, HIGH);
analogWrite (E2, b);digitalWrite(M2, HIGH);}//MOVE BACKWARDS void back off (char a, char b){analogWrite (E1, a);digitalWrite(M1, LOW);analogWrite (E2, b);digitalWrite(M2, LOW);}//TURN LEFTvoid turn L (char a, char b){analogWrite (E1, a);digitalWrite(M1, LOW);analogWrite (E2, b);digitalWrite(M2, HIGH);}//TURN RIGHTvoid turn R (char a, char b){analogWrite (E1, a);digitalWrite(M1, HIGH);analogWrite (E2, b);digitalWrite(M2, LOW);}void setup(void) {int i;for (i 4; i 7; i )
pinMode(i, OUTPUT);Serial.begin(9600);//Set Baud RateSerial.println("hello. w forward, d turn right, a turn left, s backward, x stop, z hello world"); //Display instructions in the serial monitordigitalWrite(E1, LOW);digitalWrite(E2, LOW);}void loop(void) {if (Serial.available()) {char val Serial.read();if (val ! -1){switch (val){case 'w'://Move ForwardSerial.println("going forward");advance (255, 255);//move forward at max speeddelay (1000);stop();break;case 's'://Move BackwardSerial.println("going backward");back off (255, 255);//move backwards at max speeddelay (1000);stop();break;case 'a'://Turn LeftSerial.println("turning left");turn L (255, 255);delay (1000);stop();break;
case 'd'://Turn RightSerial.println("turning right");turn R (255, 255);delay (1000);stop();break;case 'z':Serial.println("hello world!");break;case 'x':Serial.println("stopping");stop();break;}}else stop();}}Once the code has uploaded, keep the USB cable plugged in. Make sure the Cherokey's switch isON and that a power supply is connected - e.g.: a lipo battery.Open the Arduno IDE serial monitor. Set the bottom panels to "No line ending" and the baud rate to9600. This is important as the microcontroller needs to communicate with your computer for thisprogram to work properly.If it is working correctly, the following line should appear when the serial monitor is opened:hello. w forward, d turn right, a turn left, s backward, x stop, z hello worldThese are basic instructions for this program. Using the W, D, A, S, and Z keys on your keyboard,try moving the Cherokey.When you press "W", the Cherokey should move forward for 1 second, and then stopWhen you press "D", the Cherokey should turn to the right 90 degrees and then stopWhen you press "A", the Cherokey should turn to the left 90 degrees and then stop
When you press "S", the Cherokey should move backwards for 1 second, and then stopWhen you press "Z", the Arduino IDE serial monitor should print: "hello world!"If motors are spinning incorrectly, there are two methods to change this: Changing the polarity of the motors by changing the positive and negative wiring. (which works, butisn't an elegant solution)Changing lines in the code, covered in the section belowChanging the Motor Direction in CodeLet's examine some of the global variables in the program:int M1 4;//M1 Direction Controlint M2 7;//M2 Direction ControlDigital pins 4 and 7 have been assigned as the motor direction control pins. By setting each eitherHIGH or LOW (i.e. on or off), we can control which way the motor will turn.Let's examine another section of code://TURN LEFTvoid turn L (char a, char b){analogWrite (E1, a);digitalWrite(M1, LOW);analogWrite (E2, b);digitalWrite(M2, HIGH);}This is a function that tells the Cherokey to turn left. M1 and M2 are set as LOW and HIGHrespectively. This means that the left-side wheels will turn backwards and the right-side wheels turnforwards.Conversely, turning right has the motor pins set like so:
//TURN RIGHTvoid turn R (char a, char b){analogWrite (E1, a);digitalWrite(M1, HIGH);analogWrite (E2, b);digitalWrite(M2, LOW);}Therefore, if you find that your Cherokey's wheels are going in a direction you don't intend them to,try changing the motor pins signal. If they are going the wrong way and the direction pin is set toHIGH, try changing it to LOW, and vice versa. You can use the keyboard control program to debugand verify these settings.Powered By DFRobot 2008-2017
Cherokey 4WD Mobile Platform (SKU:ROB0102) Cherokey 4WD mobile platform Contents 1 Introduction 2 Specification 3 Mainboard Pin Outs . 5.1 Simple Test Program 5.2 First Test 5.3 Control Test Program 5.3.1 Changing the Motor Direction in Code Introduction The Cherokey 4WD is a versatile mobile robot that is compatible with popular .