Transcription
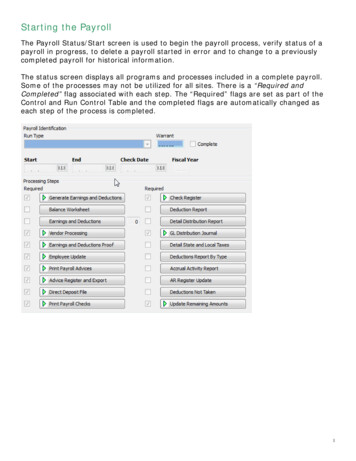
Starting the PayrollThe Payroll Status/Start screen is used to begin the payroll process, verify status of apayroll in progress, to delete a payroll started in error and to change to a previouslycompleted payroll for historical information.The status screen displays all programs and processes included in a complete payroll.Some of the processes may not be utilized for all sites. There is a “Required andCompleted” flag associated with each step. The “Required” flags are set as part of theControl and Run Control Table and the completed flags are automatically changed aseach step of the process is completed.1
Human Resources/Payroll – Payroll – Payroll Processing – Payroll Start and Status Click “Start” from the Side Bar Click “Start” from the Side BarRun Type . Run number created in the auxiliary file – usually a “1”Warrant . The identification tag for a payroll process. You might want to usethe check datePayroll Check Date . Date of the checksFiscal Year . Will default in to the correct fiscal year based on the check date, butcan be changedFrom Location . Blank or specific locationTo Location . ZZZZ or specific ending locationFrom Group/BU. Blank or specific Group/BUTo Group/BU . ZZZZ or specific ending Group/BUEmployee Group . The employee group range to include. You must have an employeegroup established in Employee Group Master FM.Payroll Begin Date . Payroll Period Begin DatePayroll End Date . Payroll Period End DateClickor Hit ENTERClick File and Exit in the upper left hand corner2
TIME & ATTENDANCE –Moving batches into PayrollBefore moving data into a payroll, ALL Batches MUST be approved ClickClickClickClickDepartmental FunctionsTime EntryYes if this is the correct PayrollMove from the Side BarThis will take you to the Generate Screen3
Time & Attendance – moving batches into payrollClick “Define” from the Side Bar and define the screen like a regular payrollClick “Execute” from the Side BarIf you have already generated your payroll, you will receive the following screen Select “Continue”4
TIME & ATTENDANCE –Moving Batches into PayrollYou will be taken to the following screen:Click SAVEHit ENTER or OKClick YES5
HOW TO GENERATE EARNINGS AND DEDUCTIONSThis program creates a worktable for the Current Payroll that includes employeeearnings and deductions. This is accomplished by selecting Employee Records, copyingthe Employee Recurring Pay and or Job/Salary records into the Current Payroll WorkTable, applying the Employee Deduction records against employee earnings andcalculating net pay.From this screen, click GenerateEarnings/Deductions6
Click YES if this is the correct payroll. Click DEFINE from the Side BarIf you need to bypass paytypes or deductions, Clickon Exclude Earnings orExclude Deduction TABClick on Payroll PeriodsTAB to enter theDeduction Cycles.Deduction cycles controlwhat pay types anddeductions are createdin the payroll.IE: 2 usually means thesecond NORMAL payrollof the month.Select “Execute” from the Side Bar. When Done, Click on the FILE and EXIT in the upper left hand corner to exitthe screen. You will be taken back to the Payroll processing Screen.7
Maintaining the period pay by Name/Employee # Click Earnings and Deductions Click Yes if this is the correct payroll Clickor CTRL-F and Hit ENTERIf you have more than 100 records, you will receive the following message: Click Yes tocontinueThis will bring all employees into the payroll.To select one employee: Click “Jump” from the Side Bar or HIT J on your key boardYou will receive this screen:Either key an employee number or anemployees’ last name and hit ENTER8
Adding hours/days Click the PAY tab To CHANGE data on the screen, Clickhit ENTERTo ADD Pay Types, Clickor CTRL-U and make the changes andor CTRL-NEnter the appropriateinformation and click9
Issuing 2nd checkClick on the SUMMARY TABClick onClickor CTRL-F and search for the employee you want to add a 2nd check toor ENTERClickor CTRL-NKey in the Employee Number and TAB to the CHECK field and key in a 1 or 2If you are doing a deduction refund, click the GENERATEDEDUCTION REFUND Box. If the box is checked, youhave to enter a refund pay type.Generate Default Pay and deductions automatically arechecked. If you don’t want them to automaticallypopulate, uncheck the appropriate boxIn the DEDUCTION CYCLE Key whether this is the first,second or third REGULAR pay for the monthAdvance Payroll check indicates if this check is for apayroll advanceIf you select advance payroll check, you then will berequired to fill in the Stop future payrolls untilClick10
Click the PAY TABTo change the existing records, clickTo add a record, clickKey in the data that is neededClickor ENTERClick FILE and EXIT11
Click on WITHHOLDING TABYou may want to delete out deductions not needed for the extra checkDouble click on the first deduction you want to deleteClick; Click YES. Do this to all deductions you want removed.12
Maintaining withholdings Click “Withholding” TAB To CHANGE data on the screen, Double click on the deductionClickor CTRL-U to change data.Clickor CTRL-N to add another deductionClickor CTRL-D to delete a deduction13
Checking for errorsFrom the SUMMARY TAB of Earnings and Deductions:Click GLOBAL from the Side Menu14
ClickReport employees omitted fromspecified deduction ranges.You will want to run numerous times. Oncefor each of the major deductions.Fica/Med/Fed/State and any otherdeduction(s) that is linked to every employeeClick DEFINE and key in 1000 to 1000. Theprogram doesn’t work if you do a range for alldeductions.ClickIf you want to display the output, click onor ENTERor to print, click File and then output. ClickBelow is what it SHOULD look like when all employees HAVE the deduction:This is the message you want to see. If employees show up, go to WITHHOLDINGS andadd the missing deductions. You will want to make a note to figure out WHY they didn’tcome in to begin with for future payrolls.Exit 2 times until you are back to the Main Earnings and Deductions screen15
ClickIf you don’t have errors, you will receive the above message and you can hit Click on the RED “X” toexit the screen.If you HAVE errors you will receive the following screen16
Click on ALL ERROR, click OK and go to the next pageFixing errorsBelow is what the report will look like:(ALL ERRORS)WARRANT:LOC---9999PAY PERIOD:ORGEMP #-------- -----807121106PrimaryLocationPrimaryOrgTOCHECK DATE:NAMECODE ERROR MESSAGE------------------------- ---- ------------------------AEBLI, MARYW-INSUFFICIENT NET PAY8730 W-INSUFFICIENT NET PAYThis will either be a deductionnumber or a pay type numberYou MUST fix all the “S”erious errors as you will not be able to finish the payroll“W”arnings can be left alone if you wish17
Vendor Processing – skip if you don’t do trust checksBEFORE DOING YOUR FINAL PROOF, YOU WILL NEED TO DO THE FOLLOWING:This program is used to assemble vendor check amounts across one or more payrolls as a preview ofpayments to vendors. Access to detail data is available for view and file maintenance processing.The first screen is used to view vendors who are to be included in the current payroll process at asummary level. The program displays each vendor’s totals, including both the current payroll and anyaccumulations from prior payrolls.NOTE: This program cannot be accessed if the payroll run is void manual payroll run. Click “Vendor Processing” Click YES if this is the correct payroll Click FILE and OUTPUT. Print to a landscape printer nameCheck the report for accuracy. You don’t do anything else until the Final Proof is done.VENDOR NAMETYP DED DESCRUN WARRANT EMPLOYEE AMT EMPLOYER AMT------ ---------------- --- ---- ------ --- ------- ------------- ------------1305 NYS CHILD SUPPOR I 6040 BROOME 1 100306439.000.00------------- ------------VENDOR TOTAL:439.00439.000.001306 BROOME COUNTY SHI6030 SHERIF1100306234.960.00------------- ------------18
VENDOR TOTAL:2340 NYS CHILD SUPPORI6070 DELAWA234.961VENDOR TOTAL:2919 ENDICOTT TEACHER2919 ENDICOTT TEACHERII8390 TRFUL8410 TRPARTVENDOR 118.000.00------------- ------- ------------2,416.000.00This report explains how the employee amount is calculated. The warrant column tells you whatwarrant the employee/employer amount came from. The Run column will tell you what type of runnumbers were used to calculate the employee/employer amount.Exit out to the Payroll Processing Menu and continue with balancing your payroll.Removing amounts to the next payrollYou may not want to cut Trust & Agency checks after each payroll for all vendors. Below is theprocess to remove the amounts and carry them forward to the next payroll.Select REMOVE fromthe Side BarIf you want the moneyto accumulate to thepayroll, select Option 1and click OKOption 2 will removethe vendor number fromthe Deduction Master19
You will receiveconfirmation as towhether you really wantto do this.20
Printing proofs for balancing Click Earnings and Deductions Proof Click YES if this is the correct payroll Click “Define” from the Side BarYou can run tworeports at thesame time.Simply Click onSecondary ReportTAB and fill in thescreenStep 2. ClickClick FILE and EXIT21
1234567891.2.3.4.5.6.7.8.9.Based on the Teacher check box on the Job Class MasterBased on the ‘Gender’ field found on the demographics tab of the employee masterTotal of the Male/Female totalsNet PayrollDeductions flagged as Telephone TransfersDirect DepositIncludes emp/empr amounts from non-invoice deductions but excludes Direct Deposit checksTotal Amount of Trust CheckTotal Amount of Trust Checks deferred to a future PayrollEmployee Amount is the total employee amount from the PayrollEmployer Amount is the total employer amount from the PayrollTotal Amount is adding the Employee amount and Employer Amount togetherTotaling up the Deduction Gross from the Payroll and dividing it by 12.40%Revised 10/10/201322
Final proofOnce the payroll is balanced, you need to run a Final Proof Click “Earnings and Deductions Proof”Click “YES”Click “Define” from the Side barChange ProofOption to AStep 2. ClickYou will receive this message. Just click Okay.Click File and ExitRevised 10/10/201323
Call for the MUNIS Help Desk for a payroll backup at607-766-3639This is very important to do.Do Not continue until you have received a call or an email fromthe help desk stating the backup is done.Revised 10/10/201324
Employee File Click Employee Update Click Yes if correct Payroll Click Update from the Side BarYou will see numbers changing inthis area while the update is beingdone.When the update is done, you will receive the following screen:Simply click okayClick FILE and EXITRevised 10/10/201325
PRINTING ADVICES Click “Print Payroll Advices” Click YES if this is the correct payroll If starting Advice number is correct and you don’t want to put a comment, clickPrint Checks/AdvClick CHANGE if you need to changethe starting number or put a message out.Hit ENTERClick SAVE. You may want to tab over tothe FILE NAME and change it to reflectthese are advices and the check dateClick OKRevised 10/10/201326
ADVICE REGISTER Click “Advice Register and Export” Click YES if this is the correct payroll Click DEFINE from the Side BarKey In: ClickCompany Name – District NameCompany’s bank CodeCompany’s Entry Description – REG SALARYTax ID – Districts ID NumberOrigin/Sending Number District Routing numberBatch Number - 0or ENTERClick BANK REPORT from the Side BAR and print the reportRevised 10/10/201327
DIRECT DEPOSIT FILE Click “Direct Deposit File” Click YES if this is the correct payroll Click “Define” from the Side BarKey In: Company Name – District NameTax ID – Districts ID NumberCompany Bank Code – Clearing House Bank Code ID ; Ctrl-W for optionsOrigin/Sending # - District Name shortenedCustomer Checking Account No – Checking Account NumberPage Break on Bank Code – “Y”Once this screen is set up, you will only have to change the EMPLOYEE ACH FILE NAME everypayroll under the OUTPUT OPTIONS TABRevised 10/10/201328
DIRECT DEPOSIT FILE Click on Output Options” TABThis must end in .ddUsually it is a 2 letter id for your sitefollowed by the check date (no spaceor dashes or slashes) followed by .ddIE: mm030612.ddClickor Hit ENTERClick FILE TAPE from the Side BarWhen the file is done being created, you will see a file name at the bottom of the screenYou will need to record the file name you entered in the EMPLOYEE FILE field. This is the name youwill be transmitting to the bankClick FILE and EXITRevised 10/10/201329
DIRECT DEPOSIT – File transferClick Broome MenuClick Broome Transfer Files to PCClick “DEFINE” from the Side BarEnter the file name fromprevious page and TabHit Enter and clickTRANSFER FILE TO PCKey in C:/Revised 10/10/201330
GENERATING PAYROLL CHECKSPUT CHECKS INTO THE PRINTER BEFORE STARTING THIS PAGE Click “Print Payroll Checks” Click YES if this is the correct payrollVerify the starting check number. If it is NOT correct, click “Change” from the Side Bar,Change it and hit ENTERClick on check boxes that are appropriate for your site.You can have a message print on all checks.Revised 10/10/201331
GENERATING PAYROLL CHECKSIf the information is correct: Select “Print Checks/Adv” from the Side BarYou will receive the following box:Change the File NameClick OKRevised 10/10/201332
Check Register Select “Check Register” Click YES if this is the correct payroll Select “Define” from the Side BarDecide if you want theseoptions and hit ENTERClickRevised 10/10/201333
G/L DISTRIBUTION REPORT Select “G/L Distribution Journal”Click YES if this is the correct payrollSelect “Define” from the Ring MenuKey In:Reference – Payroll Warrant NumberG/L Effective Date – Payroll CheckDateYear – Fiscal Year the journals shouldbe posted toPeriod – The period the journalsshould be posted to IE: July 1,August 2, Sept 3 Hit ENTERThis is where your file name will be if you process Trust & Agency checks via Payroll.Depending on your district, the file name will be slightly different. See chart below.After spooldir/ you will see a file name that starts with prinvcmg.xxxx (xxxx will be anumber. This number will change every time this process is done)D:\musys\spool\MV\D:\musys\spool\WF\Click OUTPUT-POST from the Side BarClick SAVEHit TAB to be able to change the file name.Click OK or hit ENTERRevised 10/10/201334
You will be taken to the following screenClick YES when you receive this messageYou may receive a file name at the bottom of thescreen if you are generating Trust & Agency checksfrom MUNIS. You MUST record this EXACTLY as itappears on the screen.Then Click on the RED ”X” to exitRevised 10/10/201335
Deduction Report Click Deductions Report by Type Click YES if this is the correct payroll Click Define from the Side BarKey In: Location Range From – Defaults in as all locations, can change if necessary Org Range From – Defaults in as all orgs, can change if necessary Deduction Range – Defaults in as all deductions, If you run the direct deposit report, changethe ending deduction to be 9199 Report Sequence – Ctrl-W for options Page Breaks after deductions – Do you want a new page when the deduction code changes Include Gross Pay – Do you want to include the Gross wages on the report Suppress SSN – place a check mark if you do NOT want SSN to print on reportHit ENTERClickRevised 10/10/201336
Update Remaining SalariesThis MUST be done BEFORE encumbering the Payroll andSPOOL the report Select “Update Remaining Amounts” Click YES if this is the correct payroll Select “Define” from the Ring MenuHit ENTER Select “PROCESS” from the Side BarWhen the process is done, you will receive the below message: ClickRevised 10/10/201337
Civil Service Click Earnings and Deductions Proof Click YES if this is the correct payroll Click Define from the Side BarKey In: Proof Option – “I” Civil Service Report Report Sequence – Click Drop Down for options Report Title – Will default in a Civil Service Report, this can be changed if you preferHit ENTERClickThis will take you to another screenRevised 10/10/201338
Civil Service Report Select “Define” from the Side Bar Retirement Code – District Identification number (same as ERS number)County Code – Click Help for optionsReport Title – Will default in, but can be changedInclude Signature Text – If you want text to print, click check boxExclude Earnings – If you have Pay Types that should NOT be on the report, youwould list them hereHit ENTERClickRevised 10/10/201339
Detail Proof with check numbersWhile on the Earnings/Deduction Proof Screen: Select “Define” from the Side Bar Proof Option – “B” Detail Proof Report Sequence – Click Drop Down for options Print Text on Proof – Click drop down to indicate when you want the text to print. To add the text, click Report Title – You can let the default title print or you can change it to something else Hit ENTERClickRevised 10/10/201340
Encumbering PayrollHuman Resources/Payroll – Payroll – End of Period – Payroll Encumbering Click Encumbrance Proof/PostRun Period . Period journal should hit. IE: 1 July; 2Run Year . Fiscal Year the journal should hitJournal Ref 1 . reference comment attached to the journalJournal Ref 2 . reference comment attached to the journalJournal Ref 3 . reference comment attached to the journalComment . comment attached to the journalEffective date . Effective date of the journalLocation Range . Blank to ZZZZ or specific LocationOrg Range . Blank to ZZZZZZZZ or specific orgPay Options. The check box SHOULD be checked. DoNOT put any pay types in the ranges.ClickRevised 10/10/2013or hit ENTER41
Select “Output-Post” from the Side BarClick SAVEHit TabChange file nameClick OKYou will receive the following message:Click YesClick FILE and EXIT twiceRevised 10/10/201342
the screen. 7You will be taken back to the Payroll processing Screen. Click YES if this is the correct payroll. Click on Payroll Periods TAB to enter the Deduction Cycles. Deduction cycles control what pay types and deductions are created in the payroll. IE: 2 usually means the second NORMAL payroll of the month.