Transcription
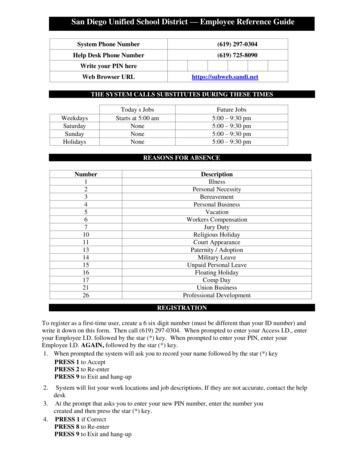
San Diego Unified School District — Substitute Reference GuideSystem Phone Number(619) 297-0304Help Desk Phone Number(619) 725-8090Write your PIN hereWeb Browser URLhttps://subweb.sandi.netTHE SYSTEM CALLS SUBSTITUTES DURING THESE TIMESWeekdaysSaturdaySundayHolidaysToday‟s JobsStarts at 5:00 amNoneNoneNoneFuture Jobs5:00 – 9:30 pm5:00 – 9:30 pm5:00 – 9:30 pm5:00 – 9:30 pmDECLINE / CANCELLATION REASONSNumber12346789DescriptionNot Qualified for AssignmentPersonal IllnessFamily Illness / No Child CareTransportation IssuesPersonal BusinessWorking ElsewhereWorking in Another DistrictOtherREGISTRATION1. To register as a first-time user, create a 6 six digit number (must be different than your ID number) and write it downon this form. Then call (619) 297-0304. When prompted to enter your Access I.D., enter your Employee I.D.followed by the star (*) key. When prompted to enter your PIN, enter your Employee I.D. AGAIN, followed by thestar (*) key.2. When prompted the system will ask you to record your name followed by the star (*) keyPRESS 1 to AcceptPRESS 2 to Re-enterPRESS 9 to Exit to next step3. It will ask you to verify your callback telephone numberPRESS 1 to Modify your callback number or PRESS 9 if your number is correctNote: If your area code is 619, Do NOT include the area code. Enter the 7-digit phone number only. If your areacode is other than 619, enter 1 area code the 7-digit number. Please do NOT enter an invalid number. Notcomplying with the instructions may result in deletion of your information from SAMS.If you are correcting your number, enter your phone number and the star(*)key, it will voice your number again.PRESS 1 if it is CorrectPRESS 2 to Re-enterPRESS 9 to Exit to next stepAt the prompt it will asks you to enter your new PIN number, enter the pin you created and then press the star(*) key.PRESS 1 if CorrectPRESS 8 to Re-enterPRESS 9 to Exit and hang-up
TELEPHONE ACCESS INSTRUCTIONS1. Enter your Access ID (your six digit Employee ID), followed by the star (*) key2. Enter your PIN (Personal Identification Number), followed by the star (*) key (When the system calls you,pressing the star (*) key will make the system wait for 2 minutes for you to enter your Access ID and PIN.3. If the system voices „Invalid‟, enter the number again slower with a pause between each number.4. If you are using a cell phone and you are have a problem with receiving calls, make sure that the DTMS setting isturned on your phone or have your service check to make sure it is on.Note: If you forget your PIN, refer to PIN Reminder under Web Browser Access Instruction Sign In on page 5.THE SYSTEM CALLS — HEAR THE JOB OFFER1. PRESS 1 to Hear the job offerPRESS 2 to Set temporary Do Not CallPRESS 9 to Exit and hang-up2. If you pressed 1 to Hear the job offerPRESS 1 to Hear the job descriptionPRESS 2 to Decline the job (without hearing the description). Enter the decline reason from page 1 followed by thestar (*) key or wait for a list of reasons3. If you pressed 1 to Hear the job descriptionPRESS 1 to Accept this jobRecord the Job Number. You are successfully assigned to the job.PRESS 1 to Hear the job number againPRESS 2 to Repeat the job descriptionPRESS 3 to Decline the jobEnter the decline reason from page 1 followed by the star (*) key or wait for a list of reasonsPRESS 1 to AcceptPRESS 2 to Re-enterPRESS 9 to Exit and repeat this step4. If you pressed 2 to Set temporary Do Not Call, hear a time offeredPRESS 1 to Accept the time offeredPRESS 2 to Enter an earlier time in HH:MM format.Enter two digits for the hour and two digits for the minutes. Enter 1 for am or 2 for pmPRESS 9 to Exit and hear the job offer.2.**If the system is offering you a job in the morning it includes the current day and you must call the school if it is closeto the start time or the job as already startedTHE SYSTEM CALLS --- HEAR THE CANCELLATION1. Hear “This assignment has been cancelled” and the job information2. PRESS 1 to Repeat the job informationPRESS 9 to Exit and hang-up4/12Substitute Reference Guide2
CALLING THE SYSTEM — MENU OPTIONS1 – Review or Cancel Assignments2 – Hear Available Jobs3 – Change your Callback Number4 – Review or Modify Temporary Do Not Call Time5 – Review or Modify Unavailability Dates6 – Review or Modify Daily Availability7 – Change PIN or Re-record Name9 – Exit and hang-up1 — REVIEW OR CANCEL ASSIGNMENTS**Hear assignments in chronological orderPRESS 1 to Hear assigned job information againPRESS 2 to Cancel this assigned jobPRESS 8 to Hear another assigned jobPRESS 9 to Exit to menu optionsIf you pressed 2 to Cancel assignmentPRESS 1 to Confirm cancellationEnter cancellation reason from page 1 followed by the star (*) key or wait for a list of reasonsPRESS 1 to AcceptPRESS 2 to Re-enterPRESS 9 to Exit and hear next assignmentPRESS 9 to Exit and hear next assignment (assignment will not be cancelled)** If you are cancelling out of a job for the current day, please call the school and let them know.2 — HEAR AVAILABLE JOBS**Hear assignment informationPRESS 1 to Repeat assignmentPRESS 2 to Accept assignmentPRESS 3 to Decline assignmentPRESS 8 to Hear next assignmentPRESS 9 to Exit to menu optionsIf you pressed 2 to Accept assignment, hear the job assignmentPRESS 1 to Repeat assignmentPRESS 2 to Hear next assignmentPRESS 9 to Exit to menu optionsIf you pressed 3 to Decline, Enter decline reason from page 1 followed by the star (*) key or wait for a list of reasonsPRESS 1 to AcceptPRESS 2 to Re-enterPRESS 9 to Exit and hear next assignment**If you are calling in the morning, the jobs start the current day.3 — CHANGE YOUR CALLBACK NUMBERHear the Callback telephone numberPRESS 1 to Modify callback telephone numberPRESS 9 to Exit to menu options (number will not be changed)Enter new telephone number followed by the star (*) key. (No area code 619) Hear the new telephone numberPRESS 1 if CorrectPRESS 2 to Re-enter the numberPRESS 9 to Exit to menu options4/12Substitute Reference Guide3
4 — REVIEW OR MODIFY TEMPORARY DO NOT CALL TIMESHear the temporary Do Not Call timePRESS 1 to Enter a timePRESS 2 to Delete this timePRESS 9 to Exit to menu optionsIf you pressed 1 to Enter a time, hear a time offeredPRESS 1 to Accept the time offeredPRESS 8 to Enter an earlier time in HH:MM format. Enter two digits for the hour and two digits for the minutes.Enter 1 for am or 2 for pmPRESS 9 to Exit to menu options5 — REVIEW OR MODIFY UNAVAILABILITY DATESPRESS 1 to Review or delete unavailability periodPRESS 2 to Add a new unavailability periodPRESS 9 to Exit to menu optionsIf you pressed 1 to Review or delete, hear the unavailable period informationPRESS 1 to Delete this unavailability periodPRESS 2 to Hear the next unavailability periodPRESS 9 to Exit to menu optionsIf you pressed 2 to Add datesEnter Start Date; two digits for the month, two digits for the day, two digits for the year (MMDDYY)Enter End Date; two digits for the month, two digits for the day, two digits for the year (MMDDYY)Indicate unavailable all day?PRESS 1 for YesPRESS 2 to Enter timeEnter Start Time in HH:MM format. Enter two digits for the hour and two digits for the minutes. Enter 1 foram and 2 for am.Repeat procedure for end timeReceive calls for future assignments during unavailable period?PRESS 1 to Receive calls for future jobs during this unavailability periodPRESS 2 if you do not want to receive calls for future jobs during this unavailability periodPRESS 9 to Exit and review or modify unavailability dates (without saving unavailability period)6 — REVIEW OR MODIFY DAILY AVAILABILITYPRESS 1 to Review or delete, hear a time period you are available to workPRESS 2 to Enter a new time period you are available to workPRESS 3 to Review or delete, hear a time period you should not be calledPRESS 4 to Enter a new time period you should not be calledPRESS 9 to Exit to menu optionsIf you pressed 1 to Review or delete a time period you are available to work, or pressed 3 to review or delete a timeperiod you should not be called, hear the day and time period in chronological orderPRESS 1 to Delete this time periodPRESS 8 to Hear the next time periodPRESS 9 to Exit to review or modify daily availabilityIf you pressed 2 to Enter a new time period you are available to work, or pressed 4 to a new time period you should notbe called, select the day of the weekPRESS 1 for Monday thru FridayPRESS 2 – 8 for Sunday thru Saturday (2 Sunday, 3 Monday, 4 Tuesday, 5 Wednesday, 6 Thursday,7 Friday, 8 Saturday)If you pressed 1 thru 8, enter a timePRESS 1 for All dayPRESS 2 to Enter start and end timeEnter the time in HH:MM format. Enter two digits for the hour and two digits for the minutes. Enter 1 for am or 2 for pmPRESS 9 to Exit to review or modify daily availability (without saving changes)4/12Substitute Reference Guide4
7— TO CHANGE PIN OR RE-RECORD NAMEPRESS 1 to Change your PINPRESS 2 to Change the recording of your namePRESS 9 to Exit to menu optionsIf you pressed 1 to Change your PINEnter a new PIN at least six (6) digits in length followed by the star (*) keyPRESS 1 if CorrectPRESS 8 to Re-enterPRESS 9 to Exit to menu optionsIf you pressed 2 to Change the recording of your name Record your name; press the star key (*)when finished PRESS 1 to AcceptPRESS 2 to Re-record namePRESS 9 to Exit to menu optionsWEB BROWSER ACCESS INSTRUCTIONSSIGN INOpen your web browser and access the SmartFindExpress Sign In page. Review the messages above the Sign In. Enteryour Access ID and PIN. Review additional announcements on your home page, if any.PIN REMINDERIf you forget your PIN, click on the ―Forgot your PIN‖ link at the login screen. Follow the instructions. Your PIN willbe immediately sent to the email account registered in SmartFindExpress.Note: The user must be registered with the system to use this option.PROFILEChoose the Profile link to view and update your informationProfile Tab Change your Callback NumberEnter the telephone number where you can be contacted by the system. Include the „1‟ (long distance indicator)and area code. If your area code is 619, Do NOT include the area code. Enter the 7-digit phone number only. Add Temporary Do Not Call settingEnter a time in HH:MM am or pm format for the system to resume calling (The maximum is 24 hoursfrom the current time)Schedule Tab Create a new Availability Scheduleo Select New buttono Select days of the week for the schedule by leaving boxes checked by that dayo Select either the times you are available to work or the times you should not be called, but not both Check box for all day or Enter a start and end time range in HH:MM am or pm formato Select Save buttono To Exit without saving changes, select the Return to List button 4/12Modify an Availability Scheduleo Choose day or days of the week you want to delete by checking the boxes by that dayo Select the Delete buttono Select the New button to add a new day of week or time. Follow the steps for “Create a New AvailabilitySubstitute Reference Guide5
Schedule” as outlined aboveClassifications and Locations Tab Review classifications and locations you have chosen for possible assignment, contact the helpdesk to add orremove classifications and locationsUnavailability Dates Tab Create Unavailability Scheduleo Select the New buttono Enter Start and End Date Range (MM/DD/YYYY) or use the calendar icono Select the All Day check box or enter the time range in HH:MM am or pm formato Select the Call for Future Assignments checkbox, if during the unavailabletime period entered you would still like to receive calls for future assignments.Leave box unchecked if you do not want any calls during this timeo Select Save button Delete Unavailability Scheduleo Place a checkmark in the desired date range boxo Select the Delete buttonEmail Tab Check email addressEnter new email addressRe-enter to confirmHit the Save huttonAVAILABLE JOBSChoose the Available Jobs link to view and accept assignmentsTo view and accept jobs You must be available to work all days and times of the job You have specified that you will work at the location You are specified for the jobFollow these steps Select the date range for your search entering in the dates with forward slashes (MM/DD/YYYY) or using thecalendar icon. Leaving dates blank will return all data Press the Search button to display the list of jobs Press the Details link to view the job details. Review the specifics and choose one of the followingo Select the Accept Job button. A job number will be assigned to you if the jobhas been successfully assigned to you. Please record this Job Number.o Select the Decline Job button. Select a reason for decline from the drop-downlist, then select the Decline Job buttono Select the Return to List button to return to the job listingREVIEW ASSIGNMENTSChoose the Review Assignments link to review past, present and future assignments or to cancel an assignmentFollow these steps Select format for Assignment display. List or Calendar view4/12Substitute Reference Guide6
Search for assignmentso Enter the date range with forward slashes (MM/DD/YYYY) for your search or use the calendar icon. Leavingdates blank will return all datao Enter a specific job number (date range will not be used) Press the Search button to display the list of assigned jobs Choose the Job Number link to view job detailso Select the Return to List button to review other jobs assigned to youo Select the Cancel Assignment button to cancel your assignment. Enter a reason for canceling from the pulldown list.o Wait for the “Job was cancelled successfully” notification. You cannot cancel an assignment that has alreadystartedSIGN OUT AND WEB BROWSER INFORMATIONAt any time during the session, the Sign Out link can be pressed to end the session and disconnect fromSmartFindExpress. Pressing the browser's back button or going to another site on the Internet does not disconnect thesession from SmartFindExpress.To ensure security and privacy of information, use the Sign Out link to disconnect from SmartFindExpress andclose the browser when you finish with your session.Important Note: Do NOT use the browser's BACK button to navigate to screens.Navigation buttons are on the bottom of SmartFindExpress screens, such as the Return to Listand Continue buttons.San Diego Unified School DistrictSubstitute Management Unit4100 Normal StreetSan Diego, CA 921034/12Substitute Reference Guide7SAMS / SmartFindExpress (619) 297-0304Help Desk (619) 725-8046Fax (619) 686-6650Email: subhelp@sandi.net
4/12 Substitute Reference Guide 3 CALLING THE SYSTEM — MENU OPTIONS 1 - Review or Cancel Assignments 2 - Hear Available Jobs 3 - Change your Callback Number 4 - Review or Modify Temporary Do Not Call Time 5 - Review or Modify Unavailability Dates 6 - Review or Modify Daily Availability 7 - Change PIN or Re-record Name 9 - Exit and hang-up