Transcription
CARS Dealer Portal Quick Reference Guide
IntroductionWelcome to CARS Protection Plus Dealer Portal! The Dealer Portal is a look inside our Policy Administration system andgives more visibility into business done with CARS Vehicle Service Contracts and GAP Coverage. The Dealer Portal ismeant to help the Dealer manage their business in an easy and more effective way.You can find the CARS Protection Plus Dealer Portal at https://cars.pcrsauto.com. We hope you enjoy this tool!See the following pages for Information on using the Dealer Portal.Add Contract (Pages 3 – 11): Electronically rate contracts, view both retail and remit rates, electronicallysubmit contractsQuick Rater (Pages 12 – 16): Electronically rate contracts (view the Dealer Cost of all coverages and terms fora vehicle)Save a Quote (Pages 17 – 18): Save a quote to bring up later and finish a deal.Search Contract (Pages 19 – 20): Search for and view contracts and their statusesSearch Dealer (Page 21): View your Dealer informationSales Summary Report (Pages 22 – 23): View Month-to-Date and Year-to-Date Sales DataClaim Management Listing Report (Pages 24 – 25): View Claims status and informationClaim Details Report (Pages 26 – 27): View Claims payout and summaryGAP Coverage (Pages 28 – 37): Electronically submit contracts and include GAP Coverage2
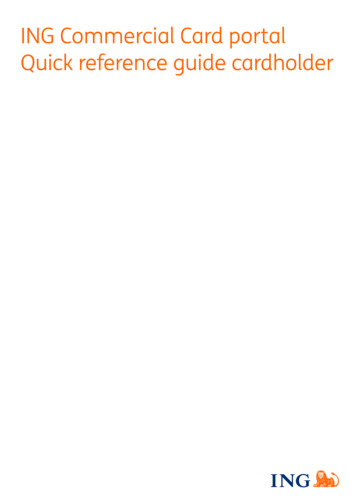
Add ContractThe Add Contract function of the CARS Dealer Portal allows you to electronically rate and submit a contract. All eligibleproducts for the vehicle will display with prices for each term.Steps to Use:1. Open Add Contract: The Add Contract tool can be found in the menu bar on the left of the screenunder “Contract”; clicking on the Add Contract link will open a new tab in your browser. If no new tabopens, watch for a flash in the top right corner of your screen when you click Add Contract. An iconshould appear which you will click and select “Always allow pop ups from this site.” Let us know if thisdoesn’t resolve the issue.2. Enter the Vehicle Information: The left side of the screen requires vehicle information to be entered;required fields have a red asterisk next to them. The Year, Make, and Model are all required, but can bedecoded when the VIN is entered, and the fields will automatically populate the information. Sale Date is thedate you enter the contract, this is not the Vehicle Sale Date, you will have the opportunity to add a vehiclepurchase date later. Please note, the Sale Date cannot be backdated.3
Add Contract cont.3. Enter Financial Information: The right side of the screen requires “Vehicle Purchase Price” to be entered andhas a red asterisk. We also request you complete the Lender Search if the vehicle is financed.4. Lender Search: Click the magnifying glass and you can type in the name of your lender to see if it alreadyexists in our system.4
Add Contract cont.5. Add Lender: If your Lender is not yet in our database, click the Add Lender icon and then enter therequired information.6. Continue to Product Selection: After you have entered all the Vehicle and Financial information,use the blue arrow in the top right corner to advance to the next page.5
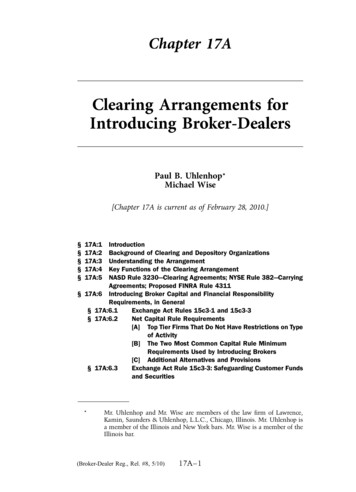
Add Contract cont.7. Select Products: The next page will return the entire list of products for which the vehicle isqualified. Each box is a different coverage and once you select a program's checkbox you will beable to pick the term you want from the drop down. If there are no product results this may meanthe vehicle is ineligible. You can reference the ineligibility list on your Dealer Rate Card or contactour Dealer Services department with any questions.8. View Product Pricing: The price of the program will be displayed on the right. You can switchbetween the Dealer Cost and the Retail price by clicking the indicated icon and choosing "ShowDealer Cost" or "Show Retail"6
Add Contract cont.9. If you choose “Show Retail”, the box underneath the Cost header of the Selected Products section will be white,and you will be able to edit the amount your customer is being charged for the contract.10. Continuing to Customer Information: You can use the Printer icon to print a quote or the right arrow to proceed.7
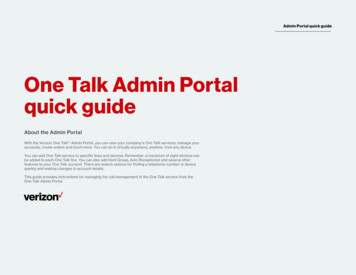
Add Contract cont.11. Customer Information: Enter all the required customer information. At this point you willhave one last opportunity to edit the Retail Price if you did not choose to earlier.12. You can use the Printer icon to preview a sample version of the contract or the right arrow to SUBMIT thecontract. Once submitted, you cannot change the contract. If you've made a mistake and need a correction, callour sales department at 888-335-6838 or email sales@carspp.com .13. Once you submit the contract, a message box will pop up informing your customer of their option to sign thecontract using the eSignature function. If they choose to use this function, check the agreement box and thenclick the “Accept” button.8
Add Contract cont.14. After clicking the “Accept” button, you will be redirected to a screen with a signature field displayed at the top andthe contract shown below. The customer can now use the mouse to sign within the box.15. Once the customer has signed, the “Done” button will turn blue and can be clicked.16. After you have clicked the “Done” button, a second button saying “View and Close” will appear. After clicking thisbutton, an additional tab will be opened, showing a completed contract, with a signature, for you to print out foryourself and the customer.9
Add Contract cont.17. To print out the PDF, click the Print button in the top right corner of the screen when it appears.18. If your customer chose to decline the eSignature, you will be taken directly to a new tab with a PDF of theunsigned contract for you to print out copies for the:**Customer Copy**Dealer Copy**Remittance Copy for CARSUse the Print button in the top right corner of the screen to print out the PDF. Once printed, have your customersign these copies.10
Add Contract cont.19. Once you have printed out the copies you need, exit out of the pdf tab. If you have another contractto enter, use the New Contract icon. Otherwise, click Close to end the process.11
Quick RaterThe Quick Rater function of the CARS Dealer Portal allows you to electronically rate a contract using only the vehicleVIN number, Odometer, and Sale Price. All eligible products for the vehicle will display with prices for each term.Steps to Use:1. Open the Quick Rater: The Quick Rater tool can be found in the menu bar on the left of the screen under“Contract”; clicking on the Quick Rater link will open up a new tab in your browser.2. Enter the Vehicle Information: The first screen displayed requires vehicle information to be entered;required fields have a red asterisk next to them. The Year, Make, and Model are all required, but can bedecoded when the VIN is entered and the fields will automatically populate the information.12
Quick Rater cont.1. Enter Financial Information: Once you have entered the Vehicle Information, click on the “Financial” buttonto navigate to the Financial Information screen. The only field required in this screen is the Vehicle PurchasePrice2. View Rates: When both Vehicle Information and Financial Information have been entered, click on the “ShowRates” button to display pricing for the eligible coverages.13
Quick Rater cont.5. Depending on the size of your screen, the cart may be in the way of the drop-down arrows, press thecollapse button at the top right of the cart in order to minimize the window.6. Expand Rates: Rates can be expanded to be viewed by using the drop-down arrows on the right. Ratingfor an individual product can be expanded, or all can be expanded using the upper most arrow. The printbutton located next to the drop-down arrow can be used to print out a summary of coverage for aquote.7. When hovering over a coverage option, a “ ” button will appear in the row. Click on the button in order tobring up a preview pop up of the coverage.14
Quick Rater cont.1. In this pop up you will see the type of coverage you have selected, the term, and the cost of the coverage.If everything is correct, and the customer would like this coverage, click the “Add to Selected” button toadd that coverage to your cart.2. Once you’ve added the coverage to your cart, click the cart button in the bottom right of the screen to bring upyour currently selected coverage.15
Quick Rater cont.1. With your cart pulled up, click the “Continue” button to go to the “Customer Information” screen.2. From this screen you will be able to finish the rest of the contract entry process like normal.16
Saving a QuoteIf your customer isn’t completely ready to purchase the vehicle, you have an option of saving the quote within the systemand bringing it back up whenever you are ready to move forward with the deal.Steps to Use:1. Enter the vehicle information and fill out the vehicle information, financial information, and select a product to getthe rate pulled up2. Once you click the “Add to Selected” button, the rate will be able to be saved. In order to save the quote, click thethree-bar menu at the top of the screen.17
Saving a Quote cont.3. When you click the menu, a dropdown will appear with the options Show Retail, Save Quote, and Close. Click theSave Quote option.4.Once you choose to save the quote, a pop-up window will appear asking you to fill out the Deal #, First Name, andLast Name of the customer. Only the last name is required, but you will need a Deal # in order to search for the savedquote later. Once you’ve filled out all the information, click the “Save” button.18
Search ContractThe CARS Dealer portal gives visibility into any of your contracts received by CARS, in any state. Contracts can besearched for and viewed, regardless of if the contract is in-force or not.Steps to Use:1. Open Search Contract Screen: The Search Contract screen can be found in the menu bar on the left ofthe screen under “Contract”; clicking on the Search Contract link will open a new tab in the Dealer Portalmain screen.2. Search for a Contract: Once you click the “Search Contract” button, a tab will be opened showing multiplesearch criteria and all your entered contracts with the most recent entry at the top. Any of the criteria canbe used to search for contracts.When you’ve entered the criteria you want to use to search, click the “Refresh” button at the top left of thescreen. Please note, more fields are likely available to search by, using the scroll bar at the bottom of the window.19
Search Contract cont.3. View Contract: To view the contract, click on the Contract Number. The Contract will open a new tab inthe Dealer Portal main screen. The Contract information displays in the Main tab, including customer,vehicle, and loan/lease information. If you wish to print out a copy of the contract, click the printer buttonin the top bar menu.4. View Coverage: Coverage information can be viewed under the Coverage tab. You will see the coverage,term, mileage, dealer cost, and retail cost of the contract.20
Search DealerSearch Dealer screen displays basic information about the Dealer. If this information is incorrect, please contactyour sales representative.Steps to Use:1. Open Search Dealer Screen: The Search Dealer screen can be found in the menu bar on the left of the screenunder “Dealer”; clicking on the Search Dealer link will open a new tab in the Dealer Portal main screen.2. View Dealer Information: To view Dealer information, click on the Dealer Number. Dealer information willopen a new tab in the Dealer Portal main screen.21
Sales Summary ReportThe Sales Summary Report shows Month-to-Date and Year-to-Date sales data for a Dealer’s CARS VSC business. Thereport displays the Dealer Cost, Dealer Mark-up, Dealer Profit, and monthly Contract Detail for a specified time period.Steps to Use:1. Open the Sales Summary report: The Sales Summary Report can be found in the menu bar on the left of thescreen under “Sales”; clicking on the RPT603-Sales Summary link will open a new tab in the browser.2. Enter Report Parameters: To view the report, you must first specify the parameters you wish thereport to display. All the following fields need to be populated in order for the report to run.a. Date From: Start date of the date range you wish the report to reflect; the report periods arespecified by month, so the date range of the report will start with the first day of the monthselectedb. Date To: End date of the date range you wish the report to reflect; the report periods are specifiedby month, so the date range of the report will end with the last day of the month selectedc. F&I Manager: CARS does not track which F&I manager sells a given contract, thus production isonly tracked at the dealership level – please select “All”d. Details: If ‘No’ is selected, the report will show only summary level data; if ‘Yes’ is selected, thereport will show contract level detail supporting the summary; details can only be pulled if a singlemonth is chosen as the date rangee. Contracts By: ‘Bill Date’ is the date CARS received funds for a contract; ‘Entry Date’ is the dateCARS entered the contract into the policy administration system; ‘Sale Date’ is the effective dateof the contract. If you choose to search by entry or sale date, the report will bring back allcontracts, including ones that are rejected, pending, and voided. For the best results, search by‘Bill Date’3. Run the Report: When all parameters are specified, you may run the report by clicking the View Report button22
Sales Summary Report cont.4. Review Report Summary: The report has two separate Summary Sectionsa. Account Balance / Period Summary: Shows a summary of sales data for the range specified in theDate From and Date To fieldsb. Fiscal Year-to-Date – Total: Shows a summary of sales data, year-to-date for the fiscal year,through period specified in the Date To fieldc. Report Data: The following data populates based on the report parameters specified.i. Gross Contract Count: Number of contracts, not accounting for cancellationsii. Dealer Net Rate: Total Dealer cost to CARSiii. Retail: Total retail price paid by the end customer for the contractiv. Up Front Profit: Contract Retail price less Dealer Net Rate5. Review Report Detail: If the report is run with Details (Details can only be pulled if a single month isselected in the Date From and Date To fields), contract detail is populated to support the summary data.a. Tran Type: NB is ‘New Business’ which is any net new contract accepted by CARS; A is‘Adjustment’ which is any rerate that has been applied to a contract (an upgrade of coverageshows a positive number, a downgrade of coverage shows a negative number)b. Contract Number: Identification number of the customer’s contractc. VIN: Vehicle VIN Number covered by the contractd. New / Used: Indicates if the covered vehicle is new (N) or used (U)e. Contract Sale Date: The contract’s effective datef. Customer Last Name: Last name(s) of the individual(s) covered on the contractg. Coverage: Name and CARS form number of the customer’s coverageh. Term/Deduct: Term (months) and the claim deductible for the contracti. Dealer Net Rate: The dealer cost of the contractj. Retail: The retail price the customer paid for the contract23
Claim Management Listing ReportThe Claim Management Listing Report is a tool that you can use in order to look at your overall claim information throughCARS. Information such as the status of a claim, what agent is assigned to a specific claim, the coverage on the vehicle,and how much the claim will pay out.Steps to Use:1. Open the Claim Management Listing Report: The Claim Management Listing Report can be found in the menubar on the left of the screen under “Claims”; clicking on the RPT554-Claim Management Listing link will open anew tab in the browser.2. Enter Report Parameters: To view the report, you must first specify the parameters you wish thereport to display. All the following fields need to be populated in order for the report to run.a. Product Type: The products offered by CARS that you are looking to search by. “VSC” or “GAP” are theonly options you will be able to filter by to bring back your full list of claims.b. Servicer: The name of the shop where the repairs were completed to the vehicle.c. Dealer: Dealership which sold the original service contract.d. Coverage: What type of contract was sold to the customer, “ALL” will automatically fill in to include alltypes of coverage with your search.e. Claim Status: The point where your customer’s claim is within the claims process. You can sort byapproved claims, denied claims, pending claims, etc. Sorting by “ALL” Claim Status is recommended.f. Report Date By: The event date you wish to sort your claims by. You can sort by Claim Entry Date, ClaimPaid Date, or Claim Service Date. Sorting by Claim Paid Date is recommended.g. Date From: Start date of the date range you wish the report to reflect, can be any specific datethroughout the year.h. Date To: End date of the date range you wish the report to reflect, can be any specific date throughoutthe year.24
Claim Management Listing Report cont.3. Run the Report: When all parameters are specified, you may run the report by clicking the View Report button4. Exporting the Report: Once the report is pulled, you can export the report into different file types, includingMicrosoft Word, Microsoft Excel, or a PDF file.25
Claim Details ReportThe Claim Details Report is used in order to see the total dollar amount that is being paid out by CARS for a claim. Thedealer, servicer, and vehicle information are all included in the report as well as service type and parts included within theclaim.Steps to Use:1. Open the Claim Details Report: The Claim Details Report can be found in the menu bar on the left of the screenunder “Claims”; clicking on the RPT560-Claim Details link will open a new tab in the browser.2. Enter Report Parameters: To view the report, you must first specify the parameters you wish thereport to display. All the following fields need to be populated in order for the report to run.a. Dealer Group Type: Type of dealer filter based on zone or territory. Leaving to “ALL” isrecommended when pulling reports.b. Report Group: The product type that you want to search by. (CARS Direct Protect, Flex Protect,Global Protect, etc.)c. Dealer/Servicer: Choose if you want to search by the Dealer the contract was purchased from,the Servicer where the vehicle was repaired, or the Payee that CARS will provide the funds to.Searching by Dealer is recommended.d. Name or Number: The Name or ID Number of the Dealer/Servicer/Payee that you want tosearch by.e. Entity Selection: The complete name of the Dealer/Servicer/Payee that you are choosing. (Ifyou sort by a Dealer Number, you MUST select the dealer name in this section.)f. Report Date By: The event date you wish to sort your claims by. You can sort by Claim Entry Date,Claim Paid Date, or Claim Service Date. Sorting by Claim Paid Date is recommended.g. Date From: Start date of the date range you wish the report to reflect, can be any specific datethroughout the year. Cannot be greater than 32 days from the end date.h. Date To: End date of the date range you wish the report to reflect, can be any specific date throughoutthe year. Cannot be greater than 32 days from the start date.26
Claim Details Report cont.3. Run the Report: When all parameters are specified, you may run the report by clicking the View Report button.4. Exporting the Report: Once the report is pulled, you can export the report into different file types, includingMicrosoft Word, Microsoft Excel, or a PDF file.27
GAP CoverageThrough CARS you can offer GAP coverage to your customers. In the event of the covered vehicle being totaled, GAP willcover the difference between what your customer owes on their vehicle and the amount their insurance company is willingto pay towards the vehicle.Steps to Use:1. Open Add Contract: The Add Contract tool can be found in the menu bar on the left of the screenunder “Contract”; clicking on the Add Contract link will open a new tab in your browser. If no newtab opens, watch for a flash in the top right corner of your screen when you click Add Contract. Anicon should appear which you will click and select “Always allow pop ups from this site.” Let usknow if this doesn’t resolve the issue.2. Enter the Vehicle Information: The left side of the screen requires vehicle information to be entered;required fields have a red asterisk next to them. The Year, Make, and Model are all required, but can bedecoded when the VIN is entered, and the fields will automatically populate the information. Sale Date isthe date you enter the contract, this is not the Vehicle Sale Date, you will have the opportunity to add avehicle purchase date later. Please note, the Sale Date cannot be backdated.28
GAP Coverage cont.3. Enter the Financial Information: To be able to select GAP coverage, the “Finance Type” field needs to be filledin with either “Loan” or “Lease”. Once you have selected one of these types of financing, the “AmountFinanced”, “Finance/Lease Terms”, “Lender Search” and “Lender Name” fields become required. Even thoughthey aren’t required, it is recommended to fill out the “APR” and “Payment” (monthly payment for the vehicle)fields as well.4. Lender Search: Click the magnifying glass and you can type in the name of your lender to see if it alreadyexists in our system.29
GAP Coverage cont.5. Add Lender: If your Lender is not yet in our database, click the Add Lender icon and then enter therequired information.6. After you have entered all the Vehicle and Financial information, use the blue arrow in the topright corner to advance to the next page.30
GAP Coverage cont.7. Select Products: The next page will return the entire list of VSC and GAP products for which thevehicle is qualified. Each box is a different coverage and once you select a program's checkboxyou will be able to pick the term you want from the drop down. The GAP options will be listedto the right of the VSC coverage options and will only have a term available that matches thefinancing term for the vehicle.31
GAP Coverage cont.8. View Product Pricing: The price of the program will be displayed on the right. You can switchbetween the Dealer Cost and the Retail price by clicking the indicated icon and choosing "ShowDealer Cost" or "Show Retail"9. If you choose “Show Retail”, the boxes underneath the Cost header of the Selected Products section will bewhite, and you will be able to edit the amount your customer is being charged for each contract. The total sumof the two programs will be shown at the very bottom of the column.32
GAP Coverage cont.10. Continuing to Customer Information: You can use the Printer icon to print a quote or the right arrow toproceed.11. Customer Information: Enter all the required customer information. At this point you willhave one last opportunity to edit the Retail Price if you did not choose to earlier.12. You can use the Printer icon to preview a sample version of the contract or the right arrow to SUBMIT thecontract. Once submitted, you cannot change the contract. If you've made a mistake and need a correction,call our sales department at 888-335-6838 or email sales@carspp.com .33
GAP Coverage cont.13. Once you submit the contract, a message box will pop up informing your customer of their option to sign thecontract using the eSignature function. If they choose to use this function, check the agreement box and thenclick the “Accept” button.14. After clicking the “Accept” button, you will be redirected to a screen with a signature field displayed at the topand a copy of the VSC contract shown below. The customer can now use the mouse to sign within the box.15. Once the customer has signed, the “Done” button will turn blue and can be clicked.34
GAP Coverage cont.16. After you have clicked the “Done” button, the page will be reloaded, and the signature should appear at thebottom of the contract on the signature line. A second button saying “Next Document” will appear. Click this tobe taken to the next section requiring a signature.17. This new screen will display the GAP contract below a signature box requesting the “Customer Signature”. Oncethe customer signs, the “Next” button will turn blue and can be clicked.18. The next box to appear is for the “Dealer Signature” be sure to sign this yourself before continuing. Aftersigning, the “Done” button will turn blue and can be clicked.35
GAP Coverage cont.19. After you have clicked the “Done” button, the page will be reloaded, and both signatures should appear at thebottom of the contract on the signature lines. A second button saying “View and Close” will appear. Click this tobe taken to a PDF file of both contracts20. To print out the PDF for your personal records., click the Print button in the top right corner of the screen whenit appears.21. If your customer chose to decline the eSignature, you will be taken directly to a new tab with a PDF of theunsigned contracts for you to print out copies for the:**Customer**Dealer**Remittance Copy for CARSUse the Print button in the top right corner of the screen to print out the PDF. Once printed, have yourcustomer sign these copies and sign the GAP copies yourself as well on the signature lines shown below.36
GAP Coverage cont.22. Once you have printed out the copies you need, exit out of the pdf tab. If you have anothercontract to enter, use the New Contract icon. Otherwise, click Close to end the process.37
Welcome to CARS Protection Plus Dealer Portal! The Dealer Portal is a look inside our Policy Administration system and gives more visibility into business done with CARS Vehicle Service Contracts and GAP Coverage. The Dealer Portal is meant to help the Dealer manage their business in an easy and more effective way.