Transcription
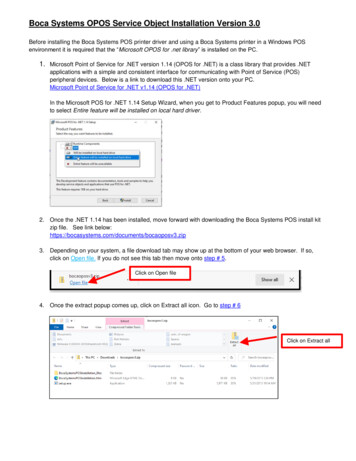
Boca Systems OPOS Service Object Installation Version 3.0Before installing the Boca Systems POS printer driver and using a Boca Systems printer in a Windows POSenvironment it is required that the “Microsoft OPOS for .net library” is installed on the PC.1. Microsoft Point of Service for .NET version 1.14 (OPOS for .NET) is a class library that provides .NETapplications with a simple and consistent interface for communicating with Point of Service (POS)peripheral devices. Below is a link to download this .NET version onto your PC.Microsoft Point of Service for .NET v1.14 (OPOS for .NET)In the Microsoft POS for .NET 1.14 Setup Wizard, when you get to Product Features popup, you will needto select Entire feature will be installed on local hard driver.2. Once the .NET 1.14 has been installed, move forward with downloading the Boca Systems POS install kitzip file. See link .zip3. Depending on your system, a file download tab may show up at the bottom of your web browser. If so,click on Open file. If you do not see this tab then move onto step # 5.Click on Open file4. Once the extract popup comes up, click on Extract all icon. Go to step # 6Click on Extract all
5. If you did not see the file download tab on the bottom of your web browser then click on the file iconon the bottom of your taskbar. You will need to navigate to the Download folder. Click on thebocaoposv3.zip file to highlight it and then left click. Click on Extract all in the short cut menu.Click on Extract all6. The next pop up will give you the option to extract the zip file to the directory where it resides or chooseanother directory. Click on the Extract button.your directory path will look different that the above image7. Once extracted the pop up should look like below with a wizard iconnext to the setup.exe file. Thisdocument, you are currently reading, takes the place of the BocaSystemsPOSInstalation.htm shown in thedirectory (this document is for Windows 7).8. Click on the setup.exe file to highlight it and then left click. Click on Run as Administrator in the short cutmenu.
9. When the below user control popup comes us, click on yes button.10. The below popup box will show up to guide you through the install process. Please note depending onyour system speed this may take 3-5 minutes to show up.The OPOS Service object once installed is referred to by the name BocaSystemsSO. This driver version 3.0 is aPOS pass through printer driver that operates at multiple baud rates on serial ports and USB ports with theprinter USB Device Type set to HID. It is important that the printer USB Device Type is set to HID BEFORE it isplugged into the PC. As with any USB device, Windows attempts to install the drivers needed automatically, onceplugged in and turned on. The USB type on the printer can be set to PRINTER or HID. Windows, of course, usesdifferent drivers for these two settings. If the printer has been previously installed with USB device type set asprinter, it will be necessary to go to the Windows “Devices and Printers” window and “Remove Device”. Then go tothe Factory Menu (Buttons and LCD) and change the USB Device type to HID. The printer will reinitialize and thenthe Windows PC will install it with the proper HID drivers.Plug the BOCA printer’s serial port or USB/HID port FGL printer into the Windows 10 host PC. Power the printeron and load stock into the printer. Confirm the printer is able to print a self-test ticket when the printer’s centerTEST button is pressed.To run the Boca OPOS setup program, click on Start Button, under the Boca Systems folder, right click onBoca Systems OPOS Setup, click on More and then click on Run as administrator as shown below,When the below user control popup comes us, click on yes button.
Once started, you will see the following. You will see the example logical names already assigned toexample devices with logical names like BocaPrinterS0 on COM1 at 9600 baud. If you left click the Service Object Name, click on File, Properties a popup box will appear with the serviceobject description as shown below. Click on OK button to close the popup. It is possible to add, modify and delete devices as needed. To add another device, click on Edit, AddNew Printer Device as shown and a popup box will appear. Select physical port (USB or Serial), baud rate (if printer currently selected is serial) and then enter thelogical name. In the Port dropdown menu Com1 through Com16 is listed, below that will be any BOCAUSB HID printers you have connected to the host computer. For example, Boca printer s/n 123456 willshow up as USB123456. If the new device entered is to be the current default device, indicate that byclicking on True. Click OK to save the information. The below example shows BOCA USB-HID serialnumber 123456 being added and being set as the default printer.
The new device will show up once installed as shown below On confirm the PC and printer are communicating print a FGL test ticket. Click on File, Print FGL TestTicket. In this case the printer with the logical name USB HID is currently selected as the default, so anFGL Test ticket will print on that printer, assuming the printer is ready (plugged in, turned on and has stockloaded).The printout will look similar to the ticket shown below. Should there be multiple printers or device definitions, whichever device is currently selected as the defaultlogical name, will be used by the POS application and service object. In this example USB HID 2 (the newprinter added) for USB HID printer serial number 654321 but is not the default printer. The application gives you the ability to modify the device setting. Under the Device POSPrinter list selectthe printer you want to modify the settings for. Click on Edit tab and select Modify Device Settings.
In the above example USB HID 2 was select. When the Modify Existing Device popup comes, the printerwas changed to be the default printer. You can also change the Logical Name also.Once done the setting changes are reflected so USB HID 2 is now the default printer To delete a device from the POS environment, start by selecting the printer under the POSPrinter list. Inthis case USB HID 2. Next click on Edit, Remove Printer Device. Click Yes on the verification popupbox and the device will be removed.Click Yes on the verification popup box.The device will be removed and you will be advised which printer is now the default printer.Once done the setting changes are reflected so USB HID 2 is no longer there.
You can check the status of a printer listed under the POSPrinter by, selecting the printer, click Tools,Check Health Interactive and the check health utility will respond with OK when the printer is ready.The check health utility will respond with OK when the printer is ready.Once all setup information has been entered and an FGL Test Ticket has been successfully printed, setup hasbeen completed. To exit the setup program, click on File, Exit. Next use whatever POS, OPOS or UPOSapplication to write FGL commands through the Boca Systems pass through service object version 3.0 to a BocaSystems FGL printer.03.26.21
Microsoft Point of Service for .NET v1.14 (OPOS for .NET) In the Microsoft POS for .NET 1.14 Setup Wizard, when you get to Product Features popup, you will need to select Entire feature will be installed on local hard driver. 2. Once the .NET 1.14 has been installed, move forward with downloading the Boca Systems POS install kit zip file.