Transcription
SKYCAM 5” VDU COMPONENT MAINTENANCE MANUALBAW250-TP03ISSUE ACABIN AVIONICS LTD,BOURNEMOUTH, DORSET. BH1 2EFSKYCAMLETTER OF TRANSMITTALInsert this list in front of the normal log of pages.This Component Maintenance Manual is a standalone document.1)New IssueDATE: 25th September 2015Approval:DATE: 25-9-2014ISSUE AForm BAW33 issue 1LETTER OF TRANSMITTALPAGE 1 of 2
SKYCAM 5” VDU COMPONENT MAINTENANCE MANUALBAW250-TP03ISSUE ACABIN AVIONICS LTD,BOURNEMOUTH, DORSET. BH1 2EF(INTENTIONALLY LEFT BLANK)DATE: 25-9-2014ISSUE AForm BAW33 issue 1LETTER OF TRANSMITTALPAGE 2 of 2
SKYCAM 5” VDU COMPONENT MAINTENANCE MANUALBAW250-TP03ISSUE ACABIN AVIONICS LTD,BOURNEMOUTH, DORSET. BH1 2EFLOG OF CHANGESInsert in front of Component Maintenance ManualChanges:ISSUEInitial cturesRMDThe technical content of this document is approved under the authority of Cabin Avionics LimitedSigned:Date: 25/9/2015Quality ManagerDATE: 25-9-2015ISSUE AForm BAW33 issue 1LOG OF CHANGESPAGE 1 of 2
SKYCAM 5” VDU COMPONENT MAINTENANCE MANUALBAW250-TP03ISSUE ACABIN AVIONICS LTD,BOURNEMOUTH, DORSET. BH1 2EF(INTENTIONALLY LEFT BLANK)DATE: 25-9-2015ISSUE AForm BAW33 issue 1LOG OF CHANGESPAGE 2 of 2
SKYCAM 5” VDU COMPONENT MAINTENANCE MANUALBAW250-TP03ISSUE ACABIN AVIONICS LTD,BOURNEMOUTH, DORSET. BH1 2EFCOMPONENTMAINTENANCEMANUALSKYCAM 5” VDUPart number:DATE: 25-9-2015ISSUE AForm BAW33 issue 1/4COMPONENT MAINTENANCE MANUALPAGE 1 of 12
SKYCAM 5” VDU COMPONENT MAINTENANCE MANUALBAW250-TP03ISSUE ACABIN AVIONICS LTD,BOURNEMOUTH, DORSET. BH1 2EFTABLE OF TION . 3DESCRIPTION OF EQUIPMENT PART NUMBERS . 4MODES OF OPERATION . 4TECHNICAL SPECIFICATIONS . 5Overall Dimensions: . 5Weight: . 5Electrical supply requirements: . 5Temperature: . 5CONNECTOR DETAILS:. 10MAINTENANCE REQUIREMENTS . 12SKYCAM VIDEO DISPLAY UNIT – BAC1134-501/* . 12DATE: 25-9-2015ISSUE AForm BAW33 issue 1COMPONENT MAINTENANCE MANUALPAGE 2 of 12
SKYCAM 5” VDU COMPONENT MAINTENANCE MANUALBAW250-TP03ISSUE ACABIN AVIONICS LTD,BOURNEMOUTH, DORSET. BH1 2EF1. INTRODUCTIONThe Skycam system comprises of a Dzus rail mounted 5” Colour TFT Video Display Unit with 4selectable camera inputs1. Each camera input is auto-focussing, auto contrast and auto low lightoperation. The integral power supply feeds all four cameras.The 5” VDU is the latest Video Display Unit used for all new Skycam installations and is also areplacement/upgrade for the existing 4” VDU (BAC1134-101/*).The Skycam system (mounted in the cockpit area) can be used to monitor the flight deck door areaoutside the cockpit, with one camera mounted in the ceiling panel looking aft, & two wall mountedcameras looking port & starboard across the galley. A fourth camera can be fitted further aft in thecabin ceiling looking forward towards the cockpit door; or an expansion pack (using the Selection Box)can be added to this position to allow four more cameras (expandable).There are FIVE camera types used with the 5” VDU:1)2)3)4)5)Wall mounted camera – 4 preset positionsShort universal camera – variable camera positions (48 to 90 degrees)Roof mounted camera – preset camera position (35 degrees)Universal Camera – variable camera position (30 to 90 degrees)IR Wall Camera – set position (0.0 Lux capability – Cargo hold applications)The wall mounted camera (1) is suitable for sidewall or ceiling applications.The short universal camera (2) is suitable for sidewall or ceiling applications, but offers a greaterchoice of viewing angle.The ceiling/roof mounted camera (3) has a low profile and is suitable for confined roof spaces.The universal camera (4) is particularly suitable for viewing floor to ceiling due to its wide viewingangle.The infra-red wall mounted camera (5) is ideal for viewing other dark areas such as Freight Holds.All camera types are electrically interchangeable, with the same wiring harness connector. Smallmounting changes are required if cameras are to be swapped.The system is powered by a single 28VDC supply and consumes approximately 0.7Amps (20 Watts)when connected to 4 cameras.The selection box is used as a camera expansion unit. It consists of an internal power supply, videoselector switch and a status indicator. The selection box is powered by a single 28VDC supply andconsumes approximately 0.6Amps when up to 4 additional cameras are installed and powered fromthe unit. The Selector box can also be used to power the Slave VDU (BAC1134-201) for remote VDUoperation.For information on the other Skycam System components, refer to the following associated document:SKYCAM COMPONENT MAINTENANCE MANUAL J134TP061 ISSUE F (or later revision).1Camera expansion packs are available. Please contact Cabin Avionics Ltd. 44 (0)1202 557670DATE: 25-9-2015ISSUE AForm BAW33 issue 1COMPONENT MAINTENANCE MANUALPAGE 3 of 12
SKYCAM 5” VDU COMPONENT MAINTENANCE MANUALBAW250-TP03ISSUE ACABIN AVIONICS LTD,BOURNEMOUTH, DORSET. BH1 2EF2. DESCRIPTION OF EQUIPMENT PART NUMBERSBAW1134-501/1Skycam VDU – Light Grey FaceplateBAW1134-501/2Skycam VDU – Light Brown FaceplateBAW1134-501/3Skycam VDU – Black FaceplateBAW1134-501/4Skycam VDU – Dark Grey Faceplate3. MODES OF OPERATIONThe Skycam Display Unit operates as follows: POWERThe power switch isolates the 28VDC supply from the unit. To switchthe unit on, select the power switch ‘on’. The unit takes approx 2seconds to power up, therefore the unit may be left in the ‘off’ state whennot required. VIDEO SELECTThe video select switch will select up to 4 video cameras. A standardsystem only uses 3 cameras; however, camera 4 can be used to lookforwards towards the cockpit door from a ceiling position or be used inconjunction with a camera expansion pack. With the Video Select switchturned to the left (1), the port side of the cockpit door/galley area isvisible on the screen. With the Video Select switch turned to the centre(2), the area directly aft of the cockpit door is visible. With the VideoSelect switch turned to the right (3), the starboard side of the cockpitdoor/galley area is visible. With the Video Select switch turned to the farright (4), the front of the cockpit door/galley area is visible (if camera 4 isconnected). DAY/NIGHTThe Day/Night switch is used to vary the intensity of the screen. Holdthen release in the ‘Day’ position, the screen intensity will brighten fornormal daytime use. Hold then release in the ‘Night’ position, the screenintensity is reduced to enable ‘softer’ viewing during night operation.DATE: 25-9-2015ISSUE AForm BAW33 issue 1COMPONENT MAINTENANCE MANUALPAGE 4 of 12
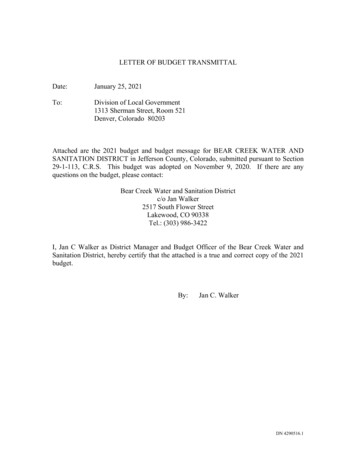
SKYCAM 5” VDU COMPONENT MAINTENANCE MANUALBAW250-TP03ISSUE ACABIN AVIONICS LTD,BOURNEMOUTH, DORSET. BH1 2EF4. TECHNICAL SPECIFICATIONS4.1. Overall Dimensions:Video Display UnitHeight:Width:Depth:Note:4.50” (114.3 mm)5.75” (146.05 mm)2.30” (58.42 mm) (Depth behind panel excl. connectors is 1.70”)Connectors protrudes 0.49” (12 mm) maximum from rear of unit.4.2. Weight:Video Display Unit1.43 lb (0.65 kg)4.3. Electrical supply requirements:Video Display Unit (VDU)9 to 36VDC @ 0.24 Amps(With one camera powered)Notes:1)Add total current by 0.152A for each additional camera fitted,(e.g. 3 camera system 0.54A)2)Each camera assembly (Maximum of 4) is powered from the Video Display Unit.3)Additional cameras (Max 4) are powered from the Selector box.4)Internal Power Supply operates at 81% efficiency.5)Aircraft 28VDC supply to VDU requires a 1 amp Circuit Breaker.6)Aircraft 28VDC supply to Selector Box requires a 1 amp Circuit Breaker.7)VDU has internal Over Voltage, Over Temperature and Short Circuit protection4.4. Temperature:Operating Temperature:Video Display Unit:Internal PSU:-20 C to 40 C-40 C to 85 CStorage Temperature:Video Display Unit:Internal PSU:-30 C to 60 C-55 C to 105 C240 Hour Test:Video Display Unit:DATE: 25-9-2015ISSUE AForm BAW33 issue 1 60 C at 90% RHCOMPONENT MAINTENANCE MANUALPAGE 5 of 12
SKYCAM 5” VDU COMPONENT MAINTENANCE MANUALBAW250-TP03ISSUE ACABIN AVIONICS LTD,BOURNEMOUTH, DORSET. BH1 2EFFRONT ELEVATION OF VDUSIDE ELEVATION OF VDUREAR ELEVATION OF VDU (BAW1134-501 series)Figure 1DATE: 25-9-2015ISSUE AForm BAW33 issue 1COMPONENT MAINTENANCE MANUALPAGE 6 of 12
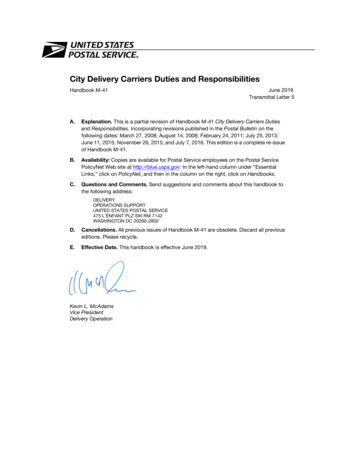
SKYCAM 5” VDU COMPONENT MAINTENANCE MANUALBAW250-TP03ISSUE ACABIN AVIONICS LTD,BOURNEMOUTH, DORSET. BH1 2EFSKYCAM WIRING HARNESSThe Skycam system is to be installed in the aircraft using wiring harness BAC1134-31, oralternative wiring harness as called up in the associated installation modification.A typical harness used with the 5” VDU is made up for a standard 3 camera system usingthe 19 way connector (as shown) in fig 9:TYPICAL 3 CAMERA WIRING HARNESS ASSEMBLY - 19 WAY (BAC1134-31/1)Figure 2STANDARD 3 CAMERA HARNESS WIRING DIAGRAMFigure 3DATE: 25-9-2015ISSUE AForm BAW33 issue 1COMPONENT MAINTENANCE MANUALPAGE 7 of 12
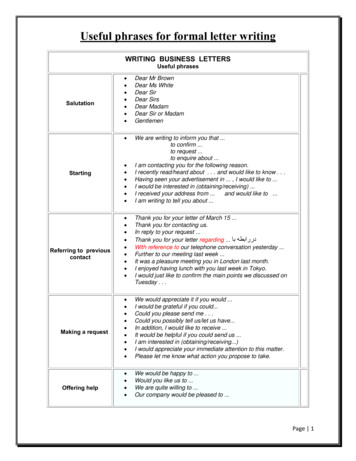
SKYCAM 5” VDU COMPONENT MAINTENANCE MANUALBAW250-TP03ISSUE ACABIN AVIONICS LTD,BOURNEMOUTH, DORSET. BH1 2EFTYPICAL 4 CAMERA SYSTEM AIRCRAFT WIRING DIAGRAMFigure 4DATE: 25-9-2015ISSUE AForm BAW33 issue 1COMPONENT MAINTENANCE MANUALPAGE 8 of 12
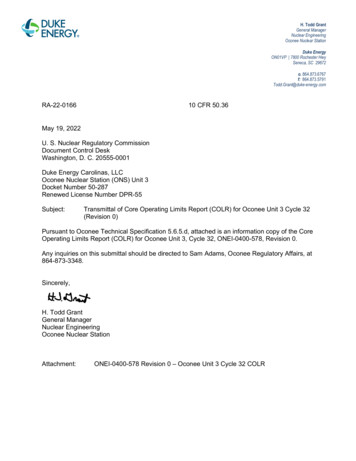
SKYCAM 5” VDU COMPONENT MAINTENANCE MANUALBAW250-TP03ISSUE ACABIN AVIONICS LTD,BOURNEMOUTH, DORSET. BH1 2EFTYPICAL WALL OR ROOF CAMERA WIRINGFigure 5DATE: 25-9-2015ISSUE AForm BAW33 issue 1COMPONENT MAINTENANCE MANUALPAGE 9 of 12
SKYCAM 5” VDU COMPONENT MAINTENANCE MANUALBAW250-TP03ISSUE ACABIN AVIONICS LTD,BOURNEMOUTH, DORSET. BH1 2EF4.5. CONNECTOR DETAILS:VDU Connector D9001 (VDU Type BAW1134-501/*)Part No. MS3122E14-19P(Mates with 19 way Free Connector MS3476L14-19S plus M85049/52-1-14N Back shell)ABCDEFGHJK 28VDCDC GroundGround Out (Camera 1)DC Out (Camera 1)N/CN/CGround Out (Camera 2)DC Out (Camera 3)Video GroundVideo I/P (Green)LMNPRSTUVVideo I/P (Red)Video I/P (Blue)Chassis GndGround Out (Camera 1)DC Out (Camera 1)Ground Out (Camera 2)DC Out (Camera 2)Record Switch (Com)Record (N/C)VDU Connector D9002 to D9006 (VDU Type BAW1134-501/*)RS 405-039 BNC Bulkhead Socket(Mates with BNC Free Connector UPL220-009)Pin 1Pin 2Video SignalGround/ShieldWiring Harness Camera Connector PL1 (camera end). Reference Only.With the typical wiring harness fitted (aircraft installation), the following connector is used foreach camera:MS3475L10-6S 6 Way Free Connector and M85049/52-1-10N Backshell(Mates with fixed camera connector MS34750L10-6P)Pin APin BPin CPin DPin EPin FDATE: 25-9-2015ISSUE AForm BAW33 issue 1Ground (Camera 1) 12VDC Out (Camera 1)Video Signal (Camera 1)ScreenN/CN/CCOMPONENT MAINTENANCE MANUALPAGE 10 of 12
SKYCAM 5” VDU COMPONENT MAINTENANCE MANUALBAW250-TP03ISSUE ACABIN AVIONICS LTD,BOURNEMOUTH, DORSET. BH1 2EFSYSTEM INSTALLATION TEST2TEST No.1 – Power On:1)2)3)4)5)Select Power Switch on (up position)Select Video Select to camera 1 (Knob fully anticlockwise)Select Day/Night to ‘Day’ (to increase brightness if no image is visible)Verify that the Video Display Unit is showing the image captured on the Starboard Camera(looking Port).Verify that the display colour, contrast, brightness and resolution is to an acceptable level.PassFailTEST No.2 – Day/NightWith the Video Display set up as per (1) above, monitor the Video Display Unit (VDU) displaywhilst selecting the Day/Night switch on the VDU.1)2)Select and hold ‘Day’ Mode and verify screen display brightness increases i.a.w thebrightness bar position displayed on the screen. Release ‘Day’ mode switch and selectedbrightness should remain at selected value.Select and hold ‘Night’ Mode and verify screen display brightness reduces i.a.w thebrightness bar position displayed on the screen. Release ‘Night’ mode switch and selectedbrightness should remain at selected value.PassFailTEST No.3 – Video SelectWith the Video Display set up as per (1) above, monitor the Video Display Unit (VDU) displaywhilst selecting camera 1,2,3 & 4 on the VDU.1)2)3)4)5)6)7)8)Select Video Select to ‘Camera 1’ (Knob fully anticlockwise).Verify that the Video Display Unit is show the image captured on the starboard camera(looking Port).Select Video Select to ‘Camera 2’ (Knob moved one position to the right).Verify that the Video Display Unit is show the image captured on the centre camera (lookingaft).Select Video Select to ‘Camera 3’ (Knob moved one more position to the right).Verify that the Video Display Unit is show the image captured on the Port camera (lookingStarboard).Select Video Select to ‘Camera 4’ (Knob fully clockwise).Verify that the Video Display Unit is showing a blank screen (IF CAMERA POSITION 4 ISNOT USED).PassFailTHIS CONCLUDES THE SKYCAM INSTALLATION TESTS2For alternative test please see specific Aircraft Modification.DATE: 25-9-2015ISSUE AForm BAW33 issue 1COMPONENT MAINTENANCE MANUALPAGE 11 of 12
SKYCAM 5” VDU COMPONENT MAINTENANCE MANUALBAW250-TP03ISSUE ACABIN AVIONICS LTD,BOURNEMOUTH, DORSET. BH1 2EF5. MAINTENANCE REQUIREMENTSService and repairSkycam components requiring service or repair should be sent to:Oakenhurst Aircraft Services LtdClaydons LaneRayleighEssex, SS6 7UPUnited KingdomTel: 44 (0)1268 741622Fax: 44 (0)1268 741650Website: www.oakenhurst.com5.1. SKYCAM VIDEO DISPLAY UNIT – BAC1134-501/*5.1.a. Video Display Unit Ground TestsThe VDU is to be tested as part of the Skycam installation as above.5.1.b.Removal and replacement:Video Display Unit Removal:5.1.b.i.Loosen the four ¼-turn Dzuz fasteners (located on front panel) that secure theVDU to the aircraft panel.5.1.b.ii.Gently pull VDU forward to expose rear connectors.5.1.b.iii.Disconnect VDU connectors, making careful note of connections.Video Display Unit Reinstallation:5.1.b.iv.Reconnect connectors to rear of control panel.5.1.b.v.Carefully slide VDU into position and tighten the four ¼-turn Dzus fasteners tohold panel firmly in place.5.1.c. Maintenance ProceduresIn-Aircraft Adjustments:There are no in-aircraft adjustments for the VDU. All alignment and adjustment mustbe done during workshop maintenance.System Protection:The VDU panel is externally protected by a one Ampere circuit breaker (Maximum fiveAmp permitted).Lubrication:There are no moving parts in the VDU panel, so lubrication is not required.Cleaning:After shop maintenance or storage, equipment exterior surfaces should be cleanedprior to installation. Use a lint-free cloth dampened with an approved cleaning agentsuch as denatured alcohol. The front facia plate may be removed for cleaning bothfaces by loosening and removing the 4 off hex socket CSK screws, near each Dzusfastener. Re-assemble using the CSK screws applied with loctite or equivalent.DATE: 25-9-2015ISSUE AForm BAW33 issue 1COMPONENT MAINTENANCE MANUALPAGE 12 of 12
SKYCAM 5" VDU COMPONENT MAINTENANCE MANUAL BAW250-TP03 ISSUE A CABIN AVIONICS LTD, BOURNEMOUTH, DORSET. BH1 2EF DATE: 25-9-2014 LETTER OF TRANSMITTAL PAGE 1 of 2 ISSUE A Form BAW33 issue 1 SKYCAM LETTER OF TRANSMITTAL Insert this list in front of the normal log of pages. This Component Maintenance Manual is a standalone document. 1) New Issue