Transcription
FiberChekPRO Automated fiber inspection and analysis softwareUSER MANUALZP-SW-00071REV 100
NOTICEEvery effort was made to ensure that the information in this manual was accurate at the time of printing. However, informationis subject to change without notice, and VIAVI reserves the right to provide an addendum to this manual with information notavailable at the time that this manual was created.COPYRIGHT Copyright 2019 VIAVI Solutions Inc. All rights reserved. All other trademarks and registered trademarks are the property of theirrespective owners. No part of this guide may be reproduced or transmitted electronically or otherwise without written permissionof the publisher.TRADEMARKSVIAVI and FiberChekPRO are trademarks or registered trademarks of VIAVI in the United States and/or other countries. All othertrademarks and registered trademarks are the property of their respective owners. No part of this guide may be reproduced ortransmitted, electronically or otherwise, without written permission of the publisher.Hirose is a trademark of Hirose Electric Group.MTP is a registered trademark of US Conec, Ltd.Windows is a registered trademark of Microsoft Corporation.Vista is a registered trademark of Microsoft Corporation.Excel is a registered trademark of Microsoft Corporation.Specifications, terms, and conditions are subject to change without notice. All trademarks and registered trademarks are theproperty of their respective companies.PATENTSRibbonDrive Tips: US Patent No. 6,751,017 / 6,879,439CleanBlast: US Patent No. 7,232.262TESTED EQUIPMENTFCC INFORMATIONElectronic test equipment is exempt from Part 15 compliance (FCC) in the United States.EUROPEAN UNIONElectronic test equipment is subject to the EMC Directive in the European Union. The EN61326 standard prescribes both emissionand immunity requirements for laboratory, measurement, and control equipment. This unit has been tested and found to complywith the limits for a Class A digital device.INDEPENDENTLABORATORY TESTINGIIAll pre-qualification tests were performed internally at VIAVI, while all final tests were performed externally at an independent,accredited laboratory. This external testing guarantees the unerring objectivity and authoritative compliance of all test results.VIAVI Commerce and Government Entities (CAGE) code under the North Atlantic Treaty Organization (NATO) is 0L8C3.This unit has undergone extensive testing according to the European Union Directive and Standards.USER MANUAL
Table of ContentsChapter 1FIBERCHEKPRO INSTALLATION. 1-1Minimum System Requirements.1-1Software and Driver Install.1-1Chapter 2FIBERCHEKPRO SOFTWARE CONTROLS AND MENUS. 2-1Test Mode.2-2Quick Test Controls: LIVE View.2-2Quick Test Controls: TEST View.2-4Job Controls: START View.2-5Job Controls: TEST View.2-7File Menu.2-8Help Menu.2-9Setup Menu. 2-10Archiving Options. 2-17Optical Power Meter. 2-19Company Info. 2-20Job Info. 2-20Job Definitions. 2-21Connector Definitions. 2-22Bluetooth. 2-24StrataSync. 2-25Wi-Fi. 2-25Firmware. 2-26Device Setup. 2-27Device Settings. 2-27Optical Settings. 2-28Analysis Profiles (device). 2-33USB Settings. 2-33NTSC Settings. 2-34FiberChekPRO Automated Fiber Inspection and Analysis Software1
Table of ContentsChapter 3USING FIBERCHEKPRO. 3-1Starting FiberChekPRO.3-1Operation Modes.3-1Using FiberChekPRO with an Inspection Microscope.3-1Using FiberChekPRO and P5000i with Other Device Platforms.3-4Using FiberChekPRO with USB Optical Power Meters.3-5OPM View.3-5Using FiberChekPRO to Import Stored Data from Another Device.3-6Chapter 4INTRODUCTION TO FIBER INSPECTION. 4-1Introduction.4-1Key Terms and Concepts.4-1Fiber Connector.4-1Fiber Connection.4-2End Face Views of Simplex and Ribbon Fiber Connectors.4-2Defects.4-3Chapter 5FIBERCHEKPRO HARDWARE. 5-1Overview.5-1Probe Microscopes.5-1Inspection Tips.5-2Installing FBPT Tips on FBP Series Probes.5-3Benchtop Microscopes.5-4VIAVI USB Optical Power Meters (OPM).5-5Chapter 6GENERAL INFORMATION. 6-1Warranty ation.6-2Contacting Technical and Customer Support.6-2Contact Info.6-22USER MANUAL
FiberChekPRO InstallationCHAPTER 1FiberChekPRO Installation1Minimum System Requirements PC/laptop with 1.0 GHz CPU or higherWindows 7 or Windows 10 Operating System400 MB of hard drive space for application softwareOne open USB 2.0 port2 GB RAM.NET Framework 4.0NOTE: If the .NET Framework software is not already installed on the PC/laptop, FiberChekPRO willinstall it. Please allow time for the software to be installed.Software and Driver Install IMPORTANT!Install the FiberChekPRO software before attaching themicroscope to the PC.1.Download FiberChekPRO Software and Driver Go to http://fcpro.updatemyunit.net/ and download thelatest version of the FiberChekPRO installer.2.Install FiberChekPRO Software and Drivers Navigate to the folder where the FiberChekPROinstaller file is located, and then double-click the fileto start the FiberChekPRO Setup Wizard. Click Next.FiberChekPRO Automated Fiber Inspection and Analysis Software1-1
CHAPTER 1FiberChekPRO Installation At the License Agreement step, select I accept the agreement, and then click Next. At the Select Destination Location step, accept the default location (strongly recommended) for the application files, or clickBrowse to select a location, and then click Next. At the Select Components step, select each component you want to install, and then click Next.NOTE: Select Adobe Reader if the application is not already installed on the PC and you want to access reports saved to PDF.1-2 At the Select Additional Tasks step, select any required options, and then click Next. At the Ready to Install step, confirm the installation settings, and then click Install. After the software is installed, click Next to start the VIAVI Driver Installer and install the drivers for each device you specified atthe Select Components step. At the Completing the FiberChekPRO Setup Wizard step, click Finish to exit the setup Wizard.USER MANUAL
FiberChekPRO Installation3.CHAPTER 1Install Hardware Plug the probe microscope into the computer. Wait for the automatic Found New Hardware Wizard to complete.FiberChekPRO Automated Fiber Inspection and Analysis Software1-3
FiberChekPRO Software Controls and MenusCHAPTER 2FiberChekPRO Software Controls and Menus2FiberChekPRO is a software application used to determine the acceptability of optical fiberend faces through automated inspection and analysis. Used in conjunction with VIAVI digitalanalysis microscopes, FiberChekPRO will identify and characterize defects and contamination,and then provide a PASS or FAIL result according to a pre-configured failure criteria setting.In addition, the application allows you to import saved data from VIAVI devices, archive data,generate reports, and obtain an optical power measurement with either the MP-series or FIseries test tools.FiberChekPRO provides the following test-mode options to facilitate collecting analysis results: FiberChekPRO Performs theFollowing Automated Procedures1.Acquires the fiber image.2.Analyzes the image.3.Finds defects and their locationQuick Test mode (default): Discrete testing. Results are saved individually.Job mode: Combines tests utilizing pre-configured job definitions and saves results to agroup.NOTE: Job mode is not supported on the FiberChek Sidewinder MPO Inspection Probe and theFVAm Series Benchtop MPO Autofocus Microscope.relative to fiber core.4.Measures and evaluates the defectswithin each specified Zone.5.Determines whether defects withinthe Zones are acceptable accordingto the pre-configured failure criteriafor each Zone.6.Displays the results as PASS or FAIL.FiberChekPRO Automated Fiber Inspection and Analysis Software2-1
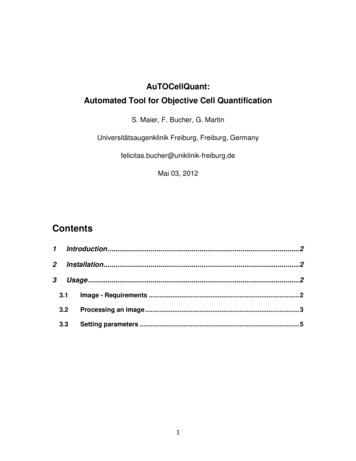
FiberChekPRO Software Controls and MenusCHAPTER 2Test ModeClick to set the test mode: Test ModeQuick TestJobNOTE: The Test Mode icon reflects the active test mode.Quick Test Controls: LIVE ViewMICROSCOPETESTOPTICAL SETTINGPROFILEIMAGE CONTROLSSAVESHOW/HIDEFOCUS QUALITY METERMicroscopeOptical SettingProfileImage ControlsFocus Quality MeterWhen multiple microscopes are connected to FiberChekPRO, you can select a microscope fromthe drop-down list.Select the best optical settings for the type of inspection tip that is attached to the device. Formore information, see “Optical Settings” on page 2-28.Select the profile that specifies the analysis parameters by which PASS/FAIL criteria aredetermined. For more information, see “Analysis Profiles (FiberChekPRO)” on page 2-12 and“Analysis Profiles (device)” on page 2-33.Provides controls for fine-tuning the image. Select between viewing at LOW or HIGHmagnification. Enabling Auto-Center helps ensure that the fiber is in the center of the Field ofView.Color-coded visual gauge that aids in obtaining the optimal focus point. The vertical line on themeter indicates the highest focus quality. As the focus is adjusted, the color of the horizontalbar changes to reflect the focus quality: 2-2Green: Optimized focusYellow: Acceptable focusRed: Unacceptable focus (testing disabled)USER MANUAL
FiberChekPRO Software Controls and MenusShow/HideCHAPTER 2Optimizes the size of the application window for small screens. Select to show or high dropdown lists.SHOW/HIDENOTE: When drop-down lists are hidden, a Show/Hide control appears in the side bar, enabling youto show or hide the side bar controls.TESTSaveInitiates the automated PASS/FAIL test process.Captures and saves the image as it appears on the screen (without analysis).FiberChekPRO Automated Fiber Inspection and Analysis Software2-3
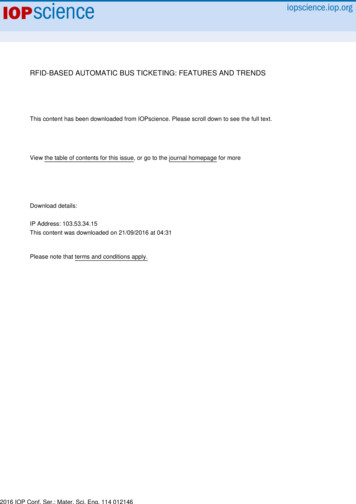
FiberChekPRO Software Controls and MenusCHAPTER 2Quick Test Controls: TEST ViewLIVEIMAGE CONTROLSSAVE REPORTDETAILSImage ControlsProvides specific controls for fine-tuning the image: Select between viewing at LOW or HIGH magnification.Turn overlay details ON or OFF.Turn the ScratchView feature ON or OFF,NOTE: By default, FiberChekPRO ships with the ScratchView feature disabled. This feature canbe enabled in the Setup Archiving Options (see “Archiving Options” on page 2-17).LIVESave ReportDetails2-4Returns to a live image of the fiber connector.Generates a summary report of the tested fiber.Provides specific information on the analysis results for the tested fiber.USER MANUAL
FiberChekPRO Software Controls and MenusCHAPTER 2Job Controls: START ViewSTARTSTARTNew jobProvides options for starting a fiberinspection job: New job: Starts a new job. Resume: Resumes the selectedsaved job (see “Job” on page 2-7). Import: Starts a job using importedjob information that was previouslyexported.New job from Job Definition: Startsa job using a pre-configured jobdefinition.Click START, and then select New job to access the Start Job dialog box. Specify job details asrequired. Job/Group Name: Name of the jobor group that the results of the PASS/FAIL tests are saved to. Fiber Name Base: Base name for thefiber being inspected. Starting Fiber Number: First fibernumber being inspected. Starting Fiber Label (PrependJob/Group Name option): Labelautomatically applied to the startingfiber.FiberChekPRO Automated Fiber Inspection and Analysis Software2-5
FiberChekPRO Software Controls and MenusCHAPTER 2New job from Job DefinitionResume jobImport job2-6Click START, and then select New job from Job Definition to access the Start Job dialog box.Specify job details as required. Job/Group Name: Name of the jobor group that the results of the PASS/Fail tests are saved to. Job Definition: List of available jobdefinitions (see “Job Definitions” onpage 2-21).Click START, and then select Resume job to access the Resume Job dialog box. Select thesaved job you want to resume, or click Import from file to import a job file.Click START, and then select Import job to navigate to and select the job you want to import.USER MANUAL
FiberChekPRO Software Controls and MenusCHAPTER 2Job Controls: TEST ViewTESTNext FiberReportJobTESTNext FiberStarts a test of the fiber connector.Advances FiberChekPRO to the next fiber connector in the job.NOTE: If the active job is based on a job definition, a tool window appears, enabling you to selectthe next fiber end face to test.ReportJobGenerates a summary report for the job, including test results, and saves it to the archivelocation for the device. You can choose whether to finish the current job and start a new job.Provides the following options: Save and close job: Saves the current job after at least one fiber is tested. Export job: Exports the current job details, including test results, to a file (*.zip)saved to a local folder. Cancel job: Discards the current job, including all test results.IMPORTANT: To ensure that required information is retained for your records, VIAVI recommendsthat before canceling a job, you either export the job or generate a report.FiberChekPRO Automated Fiber Inspection and Analysis Software2-7
FiberChekPRO Software Controls and MenusCHAPTER 2File MenuSync all devices with StrataSyncWhen you are already logged in to StrataSync via FiberChekPRO,initiates synchronization of all saved device data to StrataSync.If you are not already logged in via FiberChekPRO, accesses theLogin to StrataSync dialog box.New WindowOpens a new FiberChekPRO window, enabling you to eithercontrol separate microscopes independently or open previouslysaved images.OpenOpens reports, files and images saved in FiberChekPRO.Save ImageSaves the image displayed in the FiberChekPRO window.Recent FileLists the most recently saved files for quick re-opening.Extract ArchiveAccesses the Extract Archive dialog box, where you can selectan archive folder. FiberChekPRO then scans all .xml files in thefolder and creates a .xlsx workbook report file that summarizes allfibers, zones, scratches, and particles. The file is then opened withthe application associated with the .xlsx extension (i.e., MicrosoftExcel ).NOTE: The .xlsx file is named according to the current date and timeand is placed in the archive folder you selected.Exit2-8USER MANUALCloses all FiberChekPRO windows and exits the application.
FiberChekPRO Software Controls and MenusCHAPTER 2Help MenuAboutUser ManualSoftware UpdatesFiberChekPRO DiagnosticsDisplays the FiberChekPRO version information.Provides access to FiberChekPRO user documentation.Lets you select whether FiberChekPRO automatically checks forsoftware updates at startup.Lets you run FiberChekPRO Diagnostics to collect data you can useto help resolves issues.FiberChekPRO Automated Fiber Inspection and Analysis Software2-9
FiberChekPRO Software Controls and MenusCHAPTER 2Setup MenuThe Setup menu is the single location where the user can access and setup details forFiberChekPRO or any of the connected devices. It is accessed by clicking SETUP in the menubar.FiberChekPRO SetupGeneral setup options for FiberChekPRO are available by selecting an option from the list ofcategories in the panel on the left side of the window as follows: LanguageUser InterfaceMicroscope*Analysis Profiles*Archiving Options*Optical Power Meter**Company InfoJob InfoJob DefinitionsConnector * Appears after the first time a Probe Microscope is connected.** Appears after the first time a USB Optical Power Meter is connected.*** Appears only when a Bluetooth dongle/adapter is connected.**** Appears after the first time a Wi-Fi enabled device (e.g., Sidewinder) isconnected to a PC with Wi-Fi capability (i.e., built-in or connected via USB).Language2-10Shows the current language setting. If required, select another language from the list.USER MANUAL
FiberChekPRO Software Controls and MenusUser InterfaceMicroscopeCHAPTER 2Allows you to fine-tune the scale of the user interface for optimized use with device resolution.Provides the following options for the connected microscope: Auto-test On in Focus allows you to choose whether to run a test when the fiber comesinto focus and specify the following settings:-Disabled: Select to enable or disable Auto-test On in Focus.-Enabled with Test Button or Fiber Insertion: Select to enable or disable Auto-testin Focus when the Test button is clicked or a fiber is inserted.Enabled with Test Button: Select to enable or disable Auto-test in Focus when theTest button is clicked.NOTE: Auto-test On in Focus works best when used with devices without auto-focus capability orwhile manually focusing a device. Advance Settings-Enable test limit editing: Select to enable modifications to the recommended andminimum focus for an acceptable inspection.-Show number on focus meter: Select to enable or disable the appearance of a focusquality number with the focus meter. The number continuously updates as the focusquality indicated by the meter changes.FiberChekPRO Automated Fiber Inspection and Analysis Software2-11
CHAPTER 2Analysis Profiles (FiberChekPRO)FiberChekPRO Software Controls and MenusThe Setup Analysis Profiles menu contains the PASS/FAIL analysis parameters. Within eachprofile you can define the fiber type, analysis sensitivity, the “zones” of interest within a fiber,and the criteria for failure within those zones. As such, you will need a unique profile for eachfiber type you are working with, and possibly different profiles depending on the loss budgetassociated with a given product. The Available Profiles list contains all the profiles available inFiberChekPRO that you can use with devices that support them.In addition to providing factory-installed profiles, FiberChekPRO provides tools for managingprofiles, allowing you to create customized profiles, import profiles, and export profiles to files.Factory-installed ProfilesFiberChekPRO is installed with the followingpre-configured Analysis Profiles, whichmatch the PASS/FAIL criteria in the IEC visualinspection standard, IEC-61300-3-35 or IEC61300-3-44. E2000 (metal ferrule)MM (IEC-61300-3-35 Ed. 1.0)MM (IEC-61300-3-35 Ed. 2.0)Ribbon, MM (IEC-61300-3-35 Ed. 1.0)Ribbon, MM (IEC-61300-3-35 Ed. 2.0)Ribbon, SM APC (IEC-61300-3-35 Ed. 1.0)Ribbon, SM APC (IEC-61300-3-35 Ed. 2.0)NOTE: You can also manage analysis profiles via the Setup Analysis Profiles menu for a device. Forinformation, see “Analysis Profiles (device)” on page 2-33.SFP Ball LensSFP Fiber Stub (IEC-61300-3-44 Ed. 1.0)SFP Special/Flat LenSM APC (IEC-61300-3-35 Ed. 1.0)SM APC (IEC-61300-3-35 Ed. 2.0)SM PC & Fiber StubSM PC (IEC-61300-3-35 Ed. 1.0)SM UPC (IEC-61300-3-35 Ed. 1.0)SM UPC (IEC-61300-3-35 Ed. 2.0)2-12USER MANUAL
FiberChekPRO Software Controls and MenusCreating a New ProfileCHAPTER 2Click New to access the profile details window, which contains all the information needed formanaging the acceptance criteria.The Setup tab specifies general details about the profile: Profile Name d
FiberChekPRO Automated Fiber Inspection and Analysis Software. 2-7. FiberChekPRO Software Controls and enus CPR 2. Job Controls: TEST View. TEST Next Fiber Report Job. TEST. Starts a test of the fiber connector. Next Fiber Report. Advances FiberChekPRO to the next fiber connector in the job. NOTE. Job