Transcription
50K305 Agilium ForteInstructions for use .7
12Medial3Lateral2
4530 67893
101180 121330 141530 4
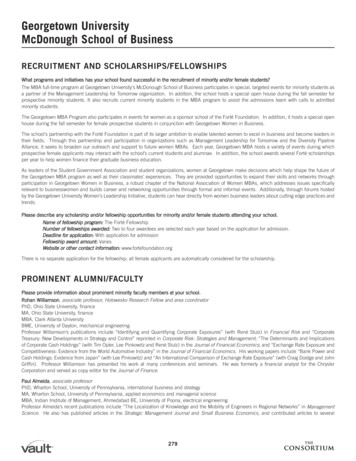
1618Extension 0Flexion 0Flexion 60Extension 10Flexion 10Flexion 75Extension 20Flexion 20Flexion 90Extension 30Flexion 30Extension 45Flexion 451719Agilium Forte20posterior215
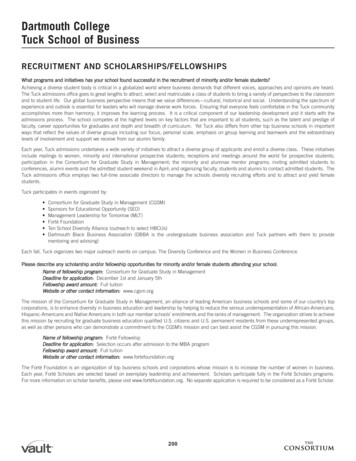
22SXSLMXXXL XXLXXXL XXLXLSizeB5 cm B5 cmBACombinedSizesXLXSSMLXLXXLXXXLALower leg ��1818–2020–2222–24MedialCompartment osteoarthritisLeftRightBThigh t terial6* L-XS-S-MO* L-M-L-MO* L-XL-3XL-MO* R-XS-S-MO* R-M-L-MO* R-XL-3XL-MO* L-XS-S-LO* L-M-L-LO* L-XL-3XL-LOAluminium, Steel, ABS, Nylon, PU foam, Spandex* R-XS-S-LO* R-M-L-LO* R-XL-3XL-LO
English1 ForewordINFORMATIONDate of last update: 2020-10-26 Please read this document carefully before using the product and observe the safetynotices. Instruct the user in the safe use of the product. Please contact the manufacturer if you have questions about the product or in case of prob lems. Report each serious incident related to the product to the manufacturer and to the relevantauthority in your country. This is particularly important when there is a decline in the healthstate. Please keep this document for your records.These instructions for use provide important information on the fitting and application of the50K305 Agilium Forte.2 Product description50K305 Agilium Forte (see fig. 1)Item Designation1Thigh pad2Flap 13Y-hook-and-loop4Clip5Positioning aid6Patella cutout7Calf pad8910Flap 2Flap 3Strap padsItem111213141516171819–DesignationRelease strapY-hook-and-loopD-ring release strapD-ring anti-rotation strapAnti-rotation strapHeight adjustment, joint barsAnti-rotation strap, bottom attach mentBrace jointMarking strip for strap tighteningExtension and flexion stops(see fig. 16)3 Intended use3.1 Indications for useThe brace is intended exclusively for orthotic fittings of the lower limbs and exclusively for con tact with intact skin.The brace must be used in accordance with the indications.3.2 Indications Unicompartmental knee osteoarthritisConditions/injuries requiring unicompartmental relief (e.g. post-operative treatment followingmeniscus reconstruction or ligament injuries which require unilateral relief) Rheumatoid arthritisThe indication must be determined by the physician.3.3 Contraindications3.3.1 Absolute ContraindicationsNone known.7
3.3.2 Relative ContraindicationsThe following indications require consultation with a physician: skin diseases/injuries; inflamma tion; prominent, swollen scars; reddening and hyperthermia of the treated limb; pronounced vari cose veins, especially with impaired return flow; lymphatic flow disorders, including unclear softtissue swelling distal to the body area where the device will be applied; sensory and circulatorydisorders in the legs, e. g. associated with diabetic neuropathy. Bicompartmental osteoarthritis of the knee3.4 Mechanism of ActionThe brace provides relief for the affected compartment by means of the 3-point principle and sta bilizes the knee joint.4 Safety4.1 Explanation of warning symbolsCAUTIONNOTICEWarning regarding possible risks of accident or injury.Warning regarding possible technical damage.4.2 General safety instructionsCAUTIONReuse on other persons and improper cleaningSkin irritation, formation of eczema or infections due to contamination with germs The product may be used by one person only. Clean the product regularly.CAUTIONUse with heat-sensitive skinSkin irritation due to overheating Do not use the product in case of a known heat allergy. Do not continue to use the product if skin irritation occurs.CAUTIONContact with heat, embers or fireRisk of injury (such as burns) and risk of product damage Keep the product away from open flames, embers and other sources of heat.NOTICEContact with oils, salves, lotions or other products that contain oils or acidsInsufficient stabilization due to loss of material functionality Do not expose the product to oils, salves, lotions or other products that contain oils or acids.5 UseINFORMATION The daily duration of use and period of application are generally determined by the physi cian. The initial fitting and application of the product must be carried out by qualified personnelaccording to the instructions of the treating physician.8
Consult a physician if any exceptional changes are noted (such as worsening of the com plaint).5.1 Size selection1) Measure the circumference of the lower leg 15 cm below the center of the patella (circumfer ence A).2) Measure the circumference of the thigh 15 cm above the center of the patella (circumfer ence B).3) Determine the size of the brace (see size chart).5.2 Adapting the sizeShorten the product to use it in sizes XS, M, XL and XXL (see fig. 22). Use scissors to cut the thigh and calf pads to the desired size at the marks. Shorten size S to XS. Shorten size L to M. Shorten size XXXL to XXL or XL.5.3 Adapting the heightThe product is set to the standard height on delivery. Optional: The height position of the upperand lower leg shells can be adapted to the needs of the patient.1) Use a pen to push inwards the plastic button inserted into the hole on the joint bar of theupper or lower leg shell (see fig. 20).2) Move the joint bar to the desired position.3) Push the plastic button from inside to outside using your finger so it fully engages in the holeon the joint bar (see fig. 21).5.4 AdaptationCAUTIONIncorrect or excessively tight applicationRisk of local pressure and constriction of blood vessels and nerves due to improper or exces sively tight application Ensure that the product is applied properly and fits correctly.NOTICEUse of a worn or damaged productLimited effectiveness Before each use, check the product for functional reliability and for possible wear or dam age. Do not continue using a product that is no longer functional, or that is worn or damaged.Prerequisite: The patient should be seated on the edge of a chair.Prerequisite: The knee joint should be relieved of pressure and slightly bent.Open all hook-and-loop closures.Center the patella cutout over the patella (see fig. 4).Bend the leg to a flexion position of 30 with the foot flat on the floor (see fig. 5).Place the brace joint medially or laterally on the side being treated, positioning the center ofthe brace joint at the height of the middle of the patella.5) Use one hand to hold the brace on the leg.6) Use the other hand to tighten flap 1 and attach it to mark 1 on the thigh pad with the hookand-loop closure. The hook-and-loop sections will overlap (see fig. 6).7) Then tighten flap 2 and attach it to mark 2 on the calf pad with the hook-and-loop closure (seefig. 7). 1)2)3)4)9
8) Tighten flap 3 and attach it to mark 3 on the calf pad with the hook-and-loop closure (seefig. 8).9) Check the fit of the brace and optionally adjust the flap positions.10) Optional: Use scissors to change the size or fit of the thigh and calf pads.11) Optional: Use bending irons to change the fit of the brace joint bars. NOTICE! The jointbars are permanently integrated in the brace and cannot be removed from the brace.The brace joint must not be bent, as this results in loss of function of the brace joint.Adjusting the straps1) Use one hand to tighten the release strap and the other hand to slide the clip on the strap(see fig. 9).2) Position the clip so it is centered on the side of the thigh.3) Guide the strap through the D-ring of mark 4 and move the leg to a flexion position of 80 withthe foot flat on the floor (see fig. 10).4) Hold the thigh pad in place with one hand and fasten the strap with the other hand.5) Adjust the length of the release strap (see fig. 11).6) Remove the positioning aid from the clip; this fixes the clip to the strap (see fig. 12).7) Align the hook-and-loop marking strip for strap tightening on the release strap (see fig. 13).8) Move the leg back to a flexion position of 30 (see fig. 14).9) Thread the anti-rotation strap through the D-ring.10) Tighten the strap and fasten the strap to itself. INFORMATION: Tighten both the releasestrap and anti-rotation strap until maximum pain relief is achieved, using the markingstrip on the release strap for orientation.11) Ensure an optimal fit by removing the Y-hook-and-loop from the strap and using scissors toshorten the end of the strap to the required length.12) Attach the Y-hook-and-loop to the strap end (see fig. 15).Optional: limiting the knee flexion and extensionThe extension limitation at delivery is 0 . The flexion is not limited.Available extension stops (square grip):Available flexion stops (round grip):0 , 10 , 20 , 30 , 45 0 , 10 , 20 , 30 , 45 , 60 , 75 , 90 Change the extension and flexion limits only if advised to do so by the attending physician.Remove the cover from the brace joint (see fig. 17).Remove the placeholder from the brace if present.Insert the required extension stop, alternatively the flexion stop (see fig. 16, see fig. 18). The stop will engage with slight resistance.4) Place the cover on the brace joint, ensuring that the arrows are pointing in the correct direc tion on the cover. The arrows should point in the posterior direction (see fig. 19).5) Move the brace joint and check the position of the stops. 1)2)3)5.5 ApplicationPrerequisite: The patient should be seated on the edge of a chair.Prerequisite: The knee joint should be relieved of pressure and slightly bent.Open all hook-and-loop closures.Center the patella cutout over the patella (see fig. 4).Bend the leg to a flexion position of 30 with the foot flat on the floor (see fig. 5).Place the brace joint medially or laterally on the side being treated, positioning the center ofthe brace joint at the height of the middle of the patella.5) Use one hand to hold the brace on the leg.6) Use the other hand to tighten flap 1 and attach it to mark 1 on the thigh pad with the hookand-loop closure. The hook-and-loop sections will overlap (see fig. 6).7) Then tighten flap 2 and attach it to mark 2 on the calf pad with the hook-and-loop closure (seefig. 7). 1)2)3)4)10
8) Tighten flap 3 and attach it to mark 3 on the calf pad with the hook-and-loop closure (seefig. 8).9) Guide the release strap through the D-ring of mark 4 and move the leg to a flexion position of80 with the foot flat on the floor (see fig. 10).10) Hold the thigh pad in place with one hand and fasten the strap with the other hand using themarking strip as guidance.5.6 DeliveryNOTICEIncorrect settingDamage to the brace due to overloading of the material and improper fit of the brace due tobreakage of load-bearing components The brace may only be adjusted by qualified personnel. Do not make any improper changes to the settings.1) Check the product fits properly on the leg when handing the brace over to the patient.2) Ask the patient to sit down, stand up and walk a few steps. The center of the brace joint should be at the height of the middle of the patella. The brace should not be twisted on the leg. The straps should be tight but not impair the patient’s comfort.Inform the patient:Inspect the brace for damage Inspect the brace for damage daily. Contact the qualified personnel promptly if changes arenoted.5.7 Removal1) Open the release strap at the hook-and-loop closure and remove it from the D-ring. INFOR MATION: The anti-rotation strap should not be opened and closed by the patient oncethat strap has been fit by qualified personnel.2) Open flaps 1 to 3 one after the other and remove the brace from the leg.6 CleaningNOTICEUse of improper cleaning agentsDamage to the product due to use of improper cleaning agents Only clean the product with the approved cleaning agents.Clean the product promptly after contact with water containing salt or chlorine, or if it gets dirty.Cleaning the brace joint The brace joint may only be dismantled by qualified personnel.1) Rinse the brace joint with clean, fresh water and remove dirt.2) Dry with a cloth or allow to air dry.Cleaning the brace1) Hand wash the brace in warm water at 30 C (86 F) with standard mild detergent. Do notuse fabric softener. Rinse thoroughly.2) Allow to air dry. Do not expose to direct heat sources (e.g. sunlight, stove, or radiator).3) Do not tumble-dry or bleach.7 DisposalDispose of the product in accordance with national regulations.11
8 Legal InformationAll legal conditions are subject to the respective national law of the country of use and may varyaccordingly.8.1 LiabilityThe manufacturer shall be liable in the event that the product is used in accordance with thedescriptions and instructions in this document. The manufacturer will not assume liability for dam age caused by disregarding the information in this document, particularly due to improper use orunauthorized modification of the product.12
13
14
15
Template-Version: 148x210 - 20200616 - FM480 Ottobock · 647G1651 en US-01-2010Otto Bock HealthCare LP3820 West Great Lakes DriveSalt Lake City, UT 84120 · USAT 1 800 328 4058 · F 1 800 655 4963
Rheumatoid arthritis The indication must be determined by the physician. 3.3 Contraindications 3.3.1 Absolute Contraindications None known. 7. 8 3.3.2 Relative Contraindications The following indications require consultation with a physician: skin diseases/injuries; inflamma .