Transcription
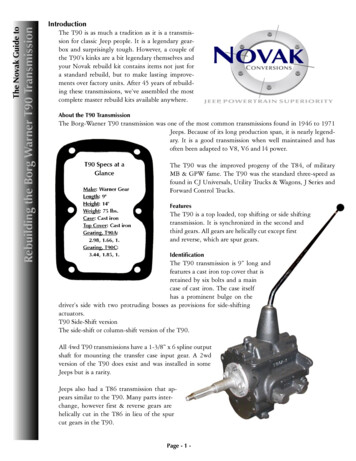
Rebuilding the Borg Warner T90 TransmissionThe Novak Guide toIntroductionThe T90 is as much a tradition as it is a transmission for classic Jeep people. It is a legendary gearbox and surprisingly tough. However, a couple ofthe T90’s kinks are a bit legendary themselves andyour Novak rebuild kit contains items not just fora standard rebuild, but to make lasting improvements over factory units. After 45 years of rebuilding these transmissions, we’ve assembled the mostcomplete master rebuild kits available anywhere.About the T90 TransmissionThe Borg-Warner T90 transmission was one of the most common transmissions found in 1946 to 1971Jeeps. Because of its long production span, it is nearly legendary. It is a good transmission when well maintained and hasoften been adapted to V8, V6 and I4 power.The T90 was the improved progeny of the T84, of militaryMB & GPW fame. The T90 was the standard three-speed asfound in CJ Universals, Utility Trucks & Wagons, J Series andForward Control Trucks.FeaturesThe T90 is a top loaded, top shifting or side shiftingtransmission. It is synchronized in the second andthird gears. All gears are helically cut except firstand reverse, which are spur gears.IdentificationThe T90 transmission is 9” long andfeatures a cast iron top cover that isretained by six bolts and a maincase of cast iron. The case itselfhas a prominent bulge on thedriver’s side with two protruding bosses as provisions for side-shiftingactuators.T90 Side-Shift versionThe side-shift or column-shift version of the T90.All 4wd T90 transmissions have a 1-3/8” x 6 spline outputshaft for mounting the transfer case input gear. A 2wdversion of the T90 does exist and was installed in someJeeps but is a rarity.Jeeps also had a T86 transmission that appears similar to the T90. Many parts interchange, however first & reverse gears arehelically cut in the T86 in lieu of the spurcut gears in the T90.Page - -
More detailed information about the T90 can be found in the Novak Conversions Knowledge Base on the web at novak-adapt.com.Introduction to RebuildingAbout These InstructionsDue to the many questions we get from curious rebuilders, there is somenon-procedural, technical information in this guide, discussing a bit of powertransmission theory and infoabout the NP435 that somepeople find interesting. It’s ourgoal to make this write-up interesting as well as useful.CleaningInstructions DisclaimerWhile every attempt at informational accuracy has been made, the informationin these instructions is for guidance only.Novak also may offer third-party productrecommendations, which are also for guidance only.Because Novak has no control over the Customer’s project procedures, Novak instructions and recommendations do not constitute a warranty of fitness, applicability orcompatibility with the customer’s particularproject and do not constitute warranties.Suitability of parts or information for anyapplication is fully the responsibility of thecustomer and / or rebuilder.Keep bearings and other rebuild parts sealed in their boxes until the moment of installation. Foreign objects in a transmission, ranging from chunks to specks to particles can wreck bearings,journals, faces and bores. Every rebuild should have a dirty phase andclean phase, with a cleaning of your work area and tools demarcatingthe two. A clean transmission and work area make the rebuild a moreenjoyable experience.You should scrape and pressure wash the transmission with hot water and detergent prior to putting it on yourbench for disassembly. If you plan on doing a partial rebuild (upper end / mainshaft changeout) only, getting it asclean as possible prior to disassembly is just as important. If you do this, do not allow the transmission internals tobe in contact with water for any real length of time.If you are doing a full rebuild, a hot-tanking or solvent-bath in addition to theabove methods are great ways to get the most sanitary rebuild and optimal paintadhesion.Reuse of BearingsIt may well be that your bearings look fine. They may even roll fine. Unless you reallyknow your transmission’s rebuild history and the age and care of the bearings, replace them. All of the bearings costless than your time and effort to remove a gearbox, buy the bearings, rebuild it for a second time and reinstall thetransmission in your vehicle.Additionally, mixing old needle rollers with new will also risk shortening your gearbox’s life.Think of a bad apple in a barrel, except this bad apple has 65 Rockwell “C” hardnessflakes that may be eager to escape into the rest of the bearings and journals andwreck chain-reacting havoc.Chips & BreaksRemember throughout your installation/rebuild, that youare dealing with hardened metals in this transmission. Hammering, pressing or shocking any surface with any tool thatis not appropriate for the job can chip or break parts. Alwaysuse brass, aluminum or wood drifts to drive parts. Never usescrewdrivers alone to pry off snap rings.Page - -
Synchro RingsEvery shadetree rebuilder is an expert on synchros, as evidenced by the fact that many call in and tells us that theirrings look great because the beveled clutch teeth look decent and are hardly blunted. This is not the primary measure of a synchro ring’s suitability. It is the grooved and relieved taper on the inside (the part not visible withoutdisassembly) of the blocking ring that is the critical area. These tapers cannot be measured without very specializedtools, and for what little the synchro rings cost, the rebuilder should just replace them.You’ll notice various leveles of blunting of the gear’s clutch teeth if your syncrho rings are worn past efficacity.Using Input Retainers & Tailhousings / Adapters as a PressInput retainers, tailhousings and adapters - whether factory or aftermarket - that can handle hundreds of footpounds of torque, can break when used as a bearing presses. Don’t ever use an adapter or input bearing retainerto press on a bearing or bring the transmission together with its bellhousing or transfer case. Don’t use these endcaps and their bolts to pull them up to the case when they will not seat on their own with anything more than lightcoaxing with a soft mallet. A broken casting will end your project and attempting to force a transmission togetheris merely avoiding the resolution of the real problem.Suggested Rebuilding Tools & SuppliesYou probably already have most of the hand tools required tobuild a transmission, including wrenches, ratches, screwdrivers,scrapers, hammers, etc. Additional tools and supplies that mayinclude:Use safety glasses or goggles. Otherwise, take a poppet ball, snap ring, solvent or case-hardened shaft / gear fragment in your eye and you’ll becomean experienced convert.A set of large, bevel tipped, external snapring pliers is indespensable for removingthe large Eaton type retaining rings you’llencounter. These shown are under the BluePoint brand.The tools that transmission disassembly requires that may not be in your tool chest already are:1) Various external snap ring pliers2) Bearing puller3) Hydraulic shop press and various press arbors and sleeves4) Urethane or other type of soft mallet5) Small pry tool or a three-jaw slide hammer6) Dial indicator with magnetic base7) Feeler gaugesSome of these tools can be rented, borrowed or even purchased for prices that should not be tooshocking.Gasket SealantsThis style of snapring plier is more universal. With dimpledand knurled flats.They are great forsmaller snap rings.After years of rebuilding and testing transmissionsNovak has settled mainly on the use of Permatex Aviation Gasket Sealant on flat, machined surfaces. Moreuneven sealing surfaces such as PTO covers may warrantthe use of The Right Stuff or other RTV sealant.Always use RTV or other sealants sparingly, as any breakaway piece could go rogue in your transmission and plugan oil passage, to your transmission’s demise.Page - -
Assembly LubricantsGrease, including all axle and bearing greases, are absolutely not acceptable assembly lubricants as they will not melt and flow out of bores, bearings, synchros andjournals, clotting transmission oil passages to the demise of those components.Use a few squirts of regular oil into deep-ball roller bearings that are otherwiseinaccesible to assembly lubricants.It is critical to lubricate all mating and adjoining parts upon assembly with aproper assembly lubricant to protect components during initial spin-up of thetransmission. Consider our three product recommendations:1. SmartBlend Transmission Assembly Lubricant #5500: This is marvelously sticky stuff, which makes it ideal for“gluing” loose needle rollers together into their bores, as well as sticking thrust washers and other items togetherwhere the factory may have used assembly tooling such dummy shafts or magnetic assembly methods. This lubricant will melt out of the parts upon the first sign of operating heat and be subsumed into the transmission fluid.We recommend you keep your SmartBlend in the refrigerator to make it as sticky as possible.2. Frozen Petroleum Jelly: Will generally perform like the above, but not quite as sticky and may not offer as goodof spin-up protection prior to the transmission fluid reaching the components.3. Engine assembly lubricant: This is a fairly safe assembly lubricant for transmissions, but is no good at stickingparts together for ease of assembly.FluidsA precursory word is in order about fluids, understanding that it is one of the great hornet’s nest debates in automotive maintenance circles. We’ll go into it to the extent of making these short points:1. Essentially all of the lowest grade transmission oils available today are chemically engineered andrefined to higher standards than when these transmissions were produced. We have disassembled andinspected more of these transmissions than just about any shop inthe nation, and we are constantly impressed at how hard-wearingthe gears are, still showing their original machining marks.2. Synthetic fluids are generally terrific in the fact that they resist heat breakdown better than conventional mineral oils. Actuallubricity, if any better, should only be marginally so. The realquestion for the installer to ask is whether their transmission willbe subject to punishing heat levels as induced by duty level andenvironmental factors such as the climate in which the vehicle isoperating, and then for the installer to decide if this is worth theextra money these fluids may cost.3. Most gear oils are specifically for hypoid axle gears and someolder formulations even have unstabilized sulphur additives thatare not yellow-metal-safe (think corrosion to synchronizer rings).Generally avoid the ultra-mega-extreme-super duty oils. Avoidoils with friction modifiers in them or excessive lubricity, as thetransmission may shift poorly due to inadequate synchronizer acPage - -These are a few gear oil products that have a good reputation in the automotive manual transmission world: Pennzoil Synchromesh ( 30WT) Red Line 75W90NS synthetic Amsoil 75W90 synthetic Sta Lube 85W90 conventional (not pictured) Straight Weight Engine Oils, 40wt or 50wt with API Service Rating of SF through SL
tion. A good example of this is Red Line’s 75W90NS oil which is similar to their regular 75W90 but better forsynchro rings.GL ratings are pressure ratings. GL4 rates higher than GL3, etc. Though it’s an older rating, GL3 is still recommended for transmission gears due to a good balance of protecting both gears and synchros. But, good luck findingGL3 anywhere as it has been superceded by the superior GL4. However for transmissions, GL5 is not better thanGL4. Capische?If you must use GL5, look for the “MT1”, designating it as appropriate for manual transmissions. Oil that’s great forgears is not always good for synchro rings. Many GL5 oils bond well to steel gear teeth but too well to brass synchrorings, causing them to prematurely lose their layers. Again, GL5 is rated at higher pressure than GL4 and very appropriate for hypoid axle gears which can experience around four times the pressure that transmission gears see.4. Because they lack the additives that can damage synchros and yet are made to such high specifications, someengine oils are actually appropriate for use in transmissions with the following considerations: engine oil viscosity /weight designations are on a different scale than gear oils. As such a 40 weight engine oil is similar to 75W90 gearoil in functional viscosity and a 50 weight engine oil is similar to 80W90 gear oil. And, with the terrific rise in thegrade of engine oils over the last several years, these products are actually great alternatives to gear oils. In somecases, 50 weight engine oil was even recommended by manufacturers from the factory. 40 weight oil would be analternative in cooler environments, or where slightly quicker shifts may be desired.If using an engine oil, do not use one with an API service rating newer than “SL”. SN oils have removed an anti-scuffcomponent which may be detrimental for use in a transmission. SF, SG, SH, SJ & SL are all acceptable. Diesel engineoil may also work very well due to their durability. These ratings includeCG4, CH4, CI4.Transmission Oils SummaryOutside of these questions, choose a brand that you like and trust. We do not necessarily endorse any one productover another and the presentment of the listed products is only to aid the reader in more quickly finding their options. Go with a good, honest oil and your transmission will have a long, reliable, service life.Common SymptomsWorn synchronizers will cause gear clash when shifting between gears. Bearing noise, gear whine and fluid leakageare also factors encouraging a full rebuild of the T90.A nearly notorious (but curable) problem with the T90 is its slipping out of second gear on decelleration. This isdue to excessive wear in 2nd gear’s integrated bronze journal bushing, allowing 2nd gear to tilt on the mainshaft- action that forces the disengagement of the gear’s clutch splines from its synchronizer’s sliding sleeve. If this haspersisted over many miles of use, or if the T90 has experienced abusive shifting, the synchronizer sliding sleeve mayalso need replacement, as its internal splines edges may have worn themselves to a shape no longer conducive tokeeping the transmission in gear.Other factors that can contribute to slipping out of 2nd gear are a worn mainshaft bearing spacer ring, loose transfer case input gear retaining nut, worn pilot bushing, worn or bent shift forks, broken or sticking poppet balls andsprings. Once again – these are contributing factors – usually the cause is second gear bushing wear as describedabove.Transfer Case RemovalWarn Overdrive RemovalIf so equipped, the Warn overdrive must be removed from the Dana 18 transfer case before the transfer case can bePage - -
separated from the transmission. This is accomplished as follows: shift overdrive into direct drive.Remove the shift linkage from the overdrive. Remove the five bolts that hold the overdrive to thetransfer case (the four bolts on the back cover ofthe overdrive do not require removal). The overdrive housing can now be pulled straight back forremoval. If necessary, the housing can be tappedback (while pulling on it by hand) with a plasticfaced hammer or block of wood. Be careful! – thehousing is aluminum and is easily damaged byhammering. When we remove a tight overdrive,we use an adapter that we made for our slidehammer that attaches to the overdrive via two ofthe rear cover bolts.With the housing removed, the hub assembly isnow accessible. Use a light to look down in the hole in the center of the hub assembly. You should see a squareshaped flat wire lock ring in a groove. A thin pair of long nose pliers can be used to squeeze the ends of the lockringtogether for removal. With the lockring removed, use a regular 1/2” drivesocket extension to remove the special hub retaining nut. This has a regularright hand (counter-clockwise to loosen) thread. When the hub nut threadsdisengage, the hub can be removed from the T90 output shaft.The transfer case can now be separated from the T90 by removal of the 5retaining bolts. One is on the front side near the front driveshaft yoke.Remove these five bolts, and then the transfer case input gear. Since theinput gear is larger in diameter than the Dana 18 input bore, the gear mustbe removed through the PTO port of the transfer case.Removal of the Model 18 Transfer Case (without the Warn Overdrive)Remove the five bolts on the sheet metal power take off cover on the rearof the Model 18 transfer case and remove the cover. Remove the cotter pinin the nut at the center of the input gear and remove the nut using 1-5/16”socket. Remove the gear from the T90 output shaft taking care not to dropthe hub washer or nut into the transfer case. The transfer case can now beseparated from the T90 by removal of the five retaining bolts. One bolt ison the front side near the front driveshaft yoke.Removal of the Model 20 Transfer CaseThe Model 20 transfer case is used in 1962-65 J-series with the T90. It is removed by taking out the 5 retainingbolts (one on the front side near the front driveshaft yoke) and separating the transfer case from the T90. The nutand gear are removed after the T90 has been separated from the Model 20 transfer case.Transmission DisassemblyAn exploded view the the T90 is available, below.Shift Cover RemovalThe transmission top cover and its shifter should have been removed prior to removal of the T90 from the vehicle,Page - -
but if not, remove it now by taking out the six top coverbolts. If adhered together, break the seal between the topand case by using a soft mallet. It is not recommended topry the top cover away from the case as this may mar themachined sealing surface.Input Bearing Retainer Removal and DisassemblyRemove the three socket screws and seal washers holdingthe front bearing retainer to the transmission. Removethe front retainer and gasket. Remove the snap ring fromthe input gear.Oil Collector Bolts RemovalRemove the two socket screws from the recesses in thefront of the case. These retain the oil collector inside thecase. Note that these are 5/16-24 SAE thread and theyhave seal washers under their heads.Countershaft RemovalUsing a brass or soft steel drift, tap on the front end ofthe cluster shaft to free the lockplate. This is the metal piece in the slots at the rear of the cluster and reverse idlershafts. Remove this lockplate. Using the drift, tap the cluster shaft pin out towards the rear of the case, remove theshaft and drift, allowing the cluster gear to drop to the bottom of the transmission case.Rear Bearing RemovalRemove the rear bearing, rear bearing retainer, and rear bearing spacer from the mainshaft. These usually pull offwithout any difficulty.Mainshaft Assembly RemovalRemove the mainshaft and gears assembly out of the back of the casethrough the rear bearing retainer hole. The pilot roller bearings willfall out as this is done, but these and the cluster rollers are suppliednew in the Novak rebuild kit.Oil Collector RemovalTap the input gear into the case far enough to allow removal of the oilcollector. Remove the oil collector from the bottom of the case.Input Shaft Removal and DisassemblyTap the input gear into the case and remove through the rear hole.Remove snap ring and then press off the front bearing from shaft.T90 oil collectors are no longer available by anymanufacturer. However, no other major transmission uses such a device. The main problem presented to engineers here is that the T90 and Dana18 typically shared transmission fluid, and on asteep incline, fluid could drain from the T90 intothe Dana transfer case. The collector was a lastline of defense in keeping the front bearings of thetransmission oiled in such a scenario.If your T90’s oil collector is damaged or missing,we recommend running a full face gasket or portplug between the T90 and Dana transfer case, andthen filling them with oil independently. This willallow a T90 perform safely without the need for anoil collector.Cluster Gear Removal and DisassemblyRemove the cluster gear and thrust washers from the case. Remove the rollers, spacer rings and spacer sleeve frominside the cluster gear.Reverse Idler Gear RemovalThe reverse idler shaft and gear may be removed by driving the shaft just slightly into the case, using a soft drift.This will break it free. You can then drive the shaft rearward through the case. Note that it is not always necessaryto remove the reverse idler gear during a rebuild. Bushing wear can be usually checked with the gear in place.Page - -
Second Mainshaft Gear DisassemblyComplete the disassembly of the mainshaft by removing the snap ring that holds the synchro hub to the mainshaft.Remove the synchro hub, blocking ring and second gear.General InspectionInspect all parts for discoloration, warpage, brinelling, breakage and wear. We receive frequent questions as towhether gears should be replaced if nicked or otherwise damaged. As a general rule, if the lead-in portion of the geartooth can be reasonably smoothed back to its proper shape with a stone or fine file, it can usually be reused. Gearbreakage, excessive rust pitting and other damage that extends to the pressure faces of the gear teeth themselvesare grounds for replacement. Should you need such components, call us. We keep on hand nearly all T90 parts, newand used.Detent springs should be checked for fatigue or damage.Slip the synchro sleeve on the hub and slide back and forth. Remove burrs with a hand stone until the sleeve slidesfreely.Check the first / reverse sliding gear on the mainshaft to be sure it slides freely.Check the condition of the bearing area on the front of the mainshaft. Quite often this will be worn. The diameterof the bearing area on a new mainshaft is .7625”. Check the condition of the transfer case drive gear splines on theother end of the mainshaft. If the sides of the teeth are worn considerably, it will be impossible to keep the retainingnut (or overdrive hub) tight. Replacement of the mainshaft would be required to solve either the worn bearing areaor worn splines condition.Cleaning & Case FinishingAll internal transmission components not being replaced during this masterrebuild should be fastidiously cleaned to insure that no harmful particles areintroduced into sensitive components. A proper cleaning also makes it easierto read parts that could warrant replacement. It is convenient to use hot-waterand detergent based methods similar to an industrial parts washer. These arelike glorified dishwashers. However, it is recommended that you quickly coatany steel shafts and gears with oil to prevent rust from forming if using thismethod.Otherwise, it is totally acceptable to use solvents and cleaners as you deemsafe and effective. Whatever your method, always follow up with a blast ofcompressed air to each part and any passages it may have to insure readinessfor reassembly.Case Magnet: To Install, or Not?Many transmissions feature a magnet atthe bottom of their cases to catch anydamaging filings as the oil flows aroundit over the course of a transmission’s service. With the ready availability of strong,rare-earth magnets and their ability tostay firmly stuck to the transmissioncase, we think this is a good idea for theT90, though we still recommend usingsmall amount of a durable, heat resistantadhesive such as epoxy or other industrial grade adhesive. Also be careful toinstall it clear of any spinning countershaft gears.This is also the best time to really clean and finish the transmission case. Manyindividuals will use a solvent tank, pressure wash or otherwise. We also recommend media blasting the case if youhave the equipment, as it allows for great adhesion of any paint finishes you may wish to use. As to paint, we recommend industrial grade enamels or epoxies, preceded by their respective recommended priming methods.We do recommend and choose to mask surfaces that will have mating parts, such as top covers, PTO ports, adapters/ tailhousings and input bearing retainers. This gives your gasket sealer a native surface to which it may form thebest seal.Page - -
T90 Exploded ViewFor your reference, all asterixed * items below are included in ourmaster rebuild kit, above. Items indicated with a “‡” are not available singly, but are available in the Small Parts Kit, #A below.A. Kit, small parts *. Includes all items listed below with a “‡”B. Kit, gaskets and front seal1. Ring, retaining, front bearing to case *‡2. Ring, retaining, front input shaft to bearing *‡3. Bearing, front input shaft *4. Slinger, front input bearing *‡5. Shaft, input, main drive gear6. Bearings, needle rollers, input shaft to mainshaft *‡7. Ring, synchronizer, 3rd gear *8. Ring, retaining, 2nd-3rd clutch hub to mainshaft *‡9. Spring, radial, 2nd-3rd clutch hub *‡10. Keys, synchronizer (also called pawls, dogs, struts, etc.) *‡11. Hub, synchronizer, 2nd-3rd gear12. Spring, radial, 2nd-3rd clutch hub *‡13. Clutch, sliding, 2nd-3rd gear14. Ring, synchronizer, 2nd gear *15. Gear, mainshaft 2nd *16. Shaft, main17. Gear, sliding, 1st-Reverse18. Spacer, mainshaft to rear bearing19. Retainer, adapter, rear output bearing20. Bearing, rear output *21. Washer, transfer case input gear retention *‡22. Nut, transfer case input gear retention *23. Washer, thrust, cluster gear front *‡24. Gear, counter/cluster25. Washer, needle bearing spacer *‡26. Tube, slotted, cluster shaft *27. Bearings, needle roller, cluster shaft idling *‡28. Washer, thrust, cluster gear rear *‡29. Washer, thrust, case to cluster gear *‡30. Shaft, cluster idler *31. Plate, retaining, reverse & cluster idler shafts *‡32. Gear, idler, reverse33. Shaft, idler, reverse34. Plug, top cover shift rail port *35. Spring, shift rail poppet *36. Ball, shift rail poppet *‡37. Bolt, top cover *38. Washer, lock, top cover *39. Cover, top, control housing40. Interlock, shifter rails41. Bolt, front input bearing retainer *42. Retainer, front input bearing43. Seal, front input shaft *44. Gasket, front input bearing retainer *45. Spring, shifter cane46. Gasket, top cover *47. Bolt, oil collector *48. Collector, oil49. Plug, drain50. Case, transmission51. Plug, fill52. Gasket, rear, transfer case *53. Fork, shifter, 2nd-3rd gears54. Pin, shifter fork to rail *55. Rail, shift, 2nd-3rd gears56. Rail, shift, 1st-Reverse57. Fork, shifter, 1st-Reverse gears58. Pin, shifter fork to rail *59. Seal, oil, side shift versions only60. Cane, shifterPage - -
Transmission AssemblyReverse Idler InstallationIf the reverse idler gear and shaft have been removed, install these in the case. Use assembly grease in the gear boreand orient the slot in the reverse idler shaft towards the cluster shaft so the lock plate will slide in. Drive the reverseidler shaft in till the slot is about 1/32” to 1/64” from the rear face of the case.Cluster / Counter Gear AssemblyAssemble the new rollers, spacerwashers and spacer sleeve in the cluster gear bore using assembly greaseto hold the rollers in the bore. Usegrease to stick the thrust washers tothe ends of the cluster gear. As discussed earlier, do not use grease suchas the old style wheel bearing grease.That type of thick grease can actuallyprevent gear lube from reaching therollers for some time after start-up andyour transmission will crash and burn. A clusterbearing loading tool can be made from a piece of 3/4”diameter cold rolled steel shafting that has been cut to 7-1/16”long (with the ends “squared”). This will retain the bearings, spacers, andthrust washers in the cluster gear and simplify assembly of the transmission.The sequence of assembly on the cluster gear bearings is:1. In the center is the split spacer sleeve2. On each end of this is a spacer ring3. On each end of this is a row of rollers4. One each end of this is another spacer ring5. Add another row of rollers (there are 88 rollers total in the T90 cluster)6. Add the outer spacer rings7. Lastly are the face thrust washers. The bronze alloyed side faces the gear, not the caseThe cluster gear, when installed in the case, should have .012 to .018 end play. It used to be that there were twochoices of selective thrust washer of .0555” and .0625”. Now, only the latter, thicker washer is available and if theinstaller is faced with the unusual case where this is too thick, the washer can be sanded down on a flat surface(granite table, for example) with fine grit sand paper adhered to it, moving the washer in a figure-8 pattern and evenpressure to prevent sanding off-plane. Follow up with solvent and compressed air to clean the washer.The cluster gear and thrust washers are laid in the bottom of the case. A piece of wire or string is guided under thegear and up over the sides of the case. This will be used to lift the cluster gear for installation of the cluster shaftafter the rest of the transmission is assembled.Mainshaft Geartrain AssemblyAssemble the mainshaft and synchronizer assembly as follows: Put a new pawl spring (this is a circular wire springwith the ends bent outward) in each side of the synchro hub with one of the ends of each spring in opposite endsof the same slot. Put the three synchro pawls in the three slots in the hub with the “hollow” face down. One of theturned out ends of the springs should go into the hollow face of one of the pawls. Hold the pawls in the hub bycircling the parts with the thumb and index finger.Page - 10 -
Slide the clutch sleeve over the hub with long beveled edge towards the long end of the hub. Center the sleeve onthe hub making sure the long end of both match and that the 3 pawls and springs are properly seated. install abronze blocker ring on the short hub side of the synchro, engaging the 3 slots in the blocker ring with the 3 pawlsin the synchro assembly.Lube the second gear bore
The Novak Guide to Rebuilding the Borg Warner T90 Transmission Introduction The T90 is as much a tradition as it is a transmis-sion for classic Jeep people. It is a legendary gear-box and surprisingly tough. However, a couple of the T90's kinks are a bit legendary themselves and your Novak rebuild kit contains items not just for