Transcription
R.2AMay 2003
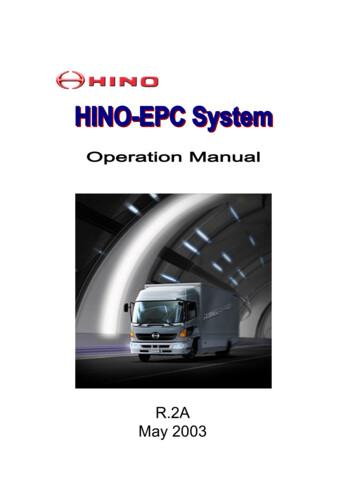
INTRODUCTIONWelcome to Hino EPC world.We are pleased to release Operation Manual R.2A of Hino EPC System.Hino EPC (Electronic Parts Catalog) is a system to inquire or searchpart numbers for vehicles produced and supplied by Hino Motors, Ltd.This manual gives you basic operating instructions of Hino EPC.Please note the following when you use Hino EPC:1. Hino EPC only covers original equipment parts produced and/or suppliedby Hino Motors, Ltd in Japan.Parts equipped locally at distributors, dealers or service workshops are notcontained in Hino EPC.2. Hino EPC sometimes displays alternative part number(s) because of partmodifications. Be sure to confirm which part is equipped in the actual vehicle.3. The content of Hino EPC is subject to change without notice.You are requested to always install the latest information.HINO EPC runs with two kind of CD-ROM.1. "System EPC" :This is program to search catalog data.2. "Data EPC": This is content of catalog and will be updated from time to time."System EPC" can be freely copied or used without time limit, while "Data EPC" hasbuilt-in time limit function in order for promotion to diffuse the latest information."Data EPC" will expire around 12 months after issue date.The following hardware and software specifications must be met to install andrun Hino EPC.1. Windows NT, Windows 98, Windows 2000(Windows 95 is not supported.)2. 40MB free disk space for installation of System EPC.700MB or over free disk space for installation of both "System EPC" and "DataEPC".3. 64MB RAM4. Pentium 166MB processor or over5. CD-ROM device equipped6. Monitor: 1024x800 resolution or overAll the title and copyright in and to the software are owned by Hino Motors Ltd.You may not copy or reproduce the software or any related documentation.You shall acknowledge that you are receiving only a limited license to use the softwareand related documentation.Hino Motors, Ltd. shall not be liable for any consequential, incidental or indirectdamages arising out of the use of the software.The contents of the software and/or any related documentation is subject to changewithout notice.May 2003Hino Motors, Ltd.1
INDEXINTRODUCTION1INDEX2INSTALLATION AND SETUP61. Outline of Installation and Setup1-1. Outline of Installation and Setup1-1-1. Initial Installation and Setup1-1-2. New Release Setup89992. Install "System EPC"2-1. Installation2-1-1. Installation2-1-2. Uninstallation101111133. Start Hino EPC System3-1. Start Hino EPC System14154. Setup System Environment4-1. Setup System Environment4-2. Setup CD-Drive4-2-1. Initial Setup4-2-2. New Release Setup4-3. Copy "Data EPC" into PC's Disk4-3-1. Initial Setup4-3-2. New Release Setup4-4. Check CD-drive1617191923252531342
INDEXSEARCHING OPERATION3361. Outline of Searching Operation1-1. Outline of Searching Operation1-1-1. Search Part Number1-1-2. Search Part Number by Group Code1-1-3. Search Applicable Model for Part Number38393943432. HINO EPC Screen2-1. HINO EPC Screen2-1-1. HINO EPC Screen2-1-2. Language444546463. Vehicle Information3-1. Outline of Vehicle Information3-1-1. When Model is Available3-1-2. When Model is Not Available3-1-3. History Function3-1-4. When VIN is available3-2. Explanation of Screen3-2-1. Explanation of Each Column3-2-2. Explanation of PF Key3-3. Enter Model (6-character) and Chassis No.3-4. Enter Model (6-character) and Select Vehicle Spec.3-5. Enter Model (1 to 5-character) and Select CAT-NO.3-6. Select CAT-NO. Directly3-7. History Function3-8. When VIN is available484950515252535355585961626364
INDEX4. General Search4-1. Outline of General Search4-1-1. Outline of General Search4-1-2. Search KEY-NO. Using Illustration Index4-1-3. Search KEY-NO. by FIG-NO.4-1-4. Enter KEY-NO.4-1-5. Search KEY-NO. by Part Description4-2. Display General Search Screen4-3. Explanation of Screen4-3-1. Explanation of Each Column4-3-2. Explanation of PF Key4-4. Search KEY-NO. Using Illustration Index4-4-1. Illustration Index (Details)4-4-2. Illustration Index (Component)4-5. Search KEY-NO. by FIG-NO.4-6. Input KEY-NO.4-7. Search KEY-NO. by Part Description66676868686868697070717373747677785. Illustration5-1. Explanation of Illustration Screen5-1-1. Explanation of Each Column5-1-2. Explanation of PF-key5-2. Search Part Number5-3. Function of Illustration Screen5-3-1. Model5-3-2. Part Description5-3-3. KEY-NO. List5-4. Display All The Illustrations5-5. KEY-NO. List5-6. Zooming-in5-6-1. Zooming-in5-6-2. Scrolling80818182858686878788899090914
INDEX56. Part Number List6-1. Outline of Part Number List6-1-1. Search Applicable Part Number6-1-2. Various Functions6-2. Explanation of Screen6-2-1. Explanation of Each Column6-2-2. Explanation of PF-key6-3. Search Part Number6-4. Save Data6-4-1. Save Data6-4-2. Call Saved Data6-5. Memo Function6-5-1. Input Memo6-5-2. Delete Memo6-5-3. Memo List6-6. D.M.S Connection6-6-1. D.M.S Connection6-6-2. D.M.S Setting6-7. Reference 71087. KEY-NO. Search7-1. Outline of KEY-NO.7-1-1. Search by KEY-NO.7-1-2. Search by GROUP CODE7-1-3. Search Applicable Model7-2. Display KEY-NO. Search Screen7-3. Explanation of Screen7-3-1. Explanation of Each Column7-3-2. Explanation of PF-key7-4. Search Part Number by GROUP CODE7-4-1. Set GROUP CODE7-4-2. Set GROUP CODE Contents7-4-3. Search Part Number by GROUP CODE7-5. KEY-NO. Search7-6. Search Applicable Model for Part 2
1. Outline of Installation and Setup82. Install "System EPC"103. Start Hino EPC System144. Setup System Environment166
7
Outline of initial installation and setup procedures of HINO EPC isexplained in this chapter.1-1. Outline of Installation and Setup1-1-1. Initial Installation and Setup1-1-2. New Release Setup9998
1-1. Outline of Installation and Setup1-1-1. Initial Installation and SetupBefore using Hino EPC, be sure to install and setup "System EPC" first.InstallationTurn to page10 and after.Start HINO EPCTurn to page14 and after."System EPC"SetupSETUP1. Setup System EnvironmentTurn to page16 and after.2. Setup CD-drive or copy "Data EPC" into PC's disk"Data EPC"Searching Operation1-1-2. New Release SetupWhen you get a newly-released "Data EPC", be sure to setup CD-NO.SetupSetup CD-NO. or copy "Data EPC" into PC's Disk"Data EPC"Searching Operation9Turn to page16 and after.
In this part, the procedure to install "System EPC" is explained.2-1. Install "System EPC"2-1-1. Installation2-1-2. Uninstallation11111310
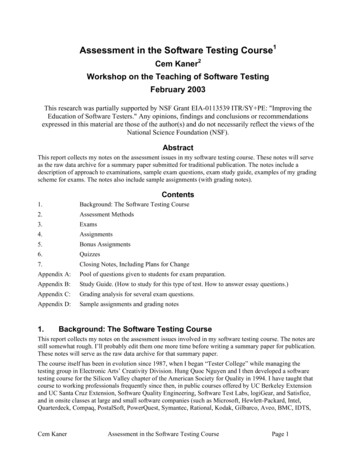
2-1. Install "System EPC"Before using Hino EPC, be sure to install "System EPC" first.2-1-1. InstallationBefore installing "System EPC", be sure to close any other applications as well asvirus-scanning programs.(1) Insert "System EPC" into CD-drive.Almost all PC's detect "System EPC"automatically and you can skip the followingsteps through (2) to (6).Only when PC does not work,follow the steps (2) to (6).(2)START(2) Click on START button.(3) Double-click on RUN.(3)RUN(4) "RUN" box is displayed.(5)DRIVE NO.\Setup.exe(6)OK(5) Enter CD-Drive no. and"Setup.exe" into OPENcolumn. (Eg.:D:\Setup.exe)(6) Click on OK button.Continued11
(7) Wait until indicator barreaches 100%.(8) "HINO EPC SYSTEM" screenis displayed.(9) "License Agreement" box isdisplayed.(10) ReadLicense Agreementcarefully.If you agree, click on Yes button.(10)YESIf you disagree, click onNo button and terminateinstallation.(11) SETUP(12)LANGUAGE(13)Next(12) Select(13) ClickLANG box is displayed.LANGUAGE by clicking on it.on NEXT button.If you wish to terminateinstallation, click on CANCELbutton.(14) Installation(15) Waitstarts.until indicator bar reaches 100%.Continued12
(16) Wheninstallation succeeds,the message saying InstallShield WizardComplete is displayed.(17) Clickon Finish button.(18) Installation(17)Finishhas been completed.2-1-2. UninstallationThis is an explanation of uninstallation of HINO EPC.(1)Click on START button on desktopscreen.(2)Click on PROGRAM.(3)Point cursor to HINO EPCSYSTEM and right-click on it.(4)Click on DELETE.(5)Uninstallation has beencompleted.(1)START(2)PROGRAM(3)HINO EPC SYSTEM(4)DELETE13
The way to start HINO EPC system is explained in this chapter.3-1. Start Hino EPC System1514
3-1.Start Hino EPC SystemWhen installation is completed, Hino EPC icon is created on Desktop screen.Start Hino EPC system double-clicking on the icon.(1) Hino EPC Icon(1) Double-click on the iconof Hino EPC.(2) "Welcome to HINO EPC SYSTEM"screen is displayed.(4)DEALER ID(5)USER ID(6)LOGIN(3) Login box appears.(4) Input any alphanumeric lettersin DEALER column.(5) Input any alphanumeric lettersin USER ID column.(6) Click on LOGIN button.(7) "HINO EPC SYSTEM" screenis displayed.(8) HINO EPC SYSTEM has beenlaunched.15
Setting-up system environment is explained in this chapter.4-1. Setup System Environment4-2. Setup CD-Drive4-2-1. Initial Setup4-2-2. New Release Setup4-3. Copy "Data EPC" into PC's Disk4-3-1. Initial Setup4-3-2. New Release Setup4-4. Check CD-drive171919232525313416
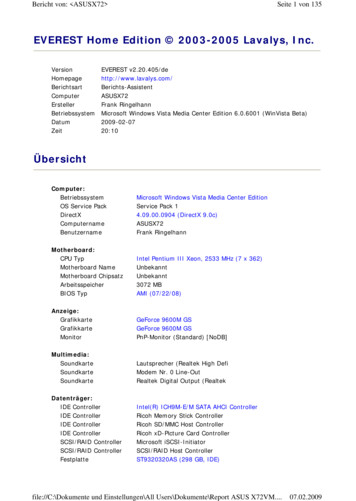
4-1.Setup System EnvironmentSetup system environment of Hino EPC.(1) Click on SETUP MENUof "HINO EPC SYSTEM" screen.(1)SETUP MENU(2) SETUP MENU screen is displayed.(3) Click on 1.SETUP HINO EPC.(2)1.SETUP HINO EPC(4) "SETUP HINO EPC" screenis displayed.Fill-in each column subjectto the following instructions.Continued17
(5) WS-NO (Workstation No.):Confirm if "W00000001"isalready in the column, andmove the cursor to the nextcolumn by pressing downthe arrow key.(5)WS-NO.(6) PRINT FUNCTION:Confirm if "Y" is already in thecolumn, and move cursor tonext column by pressing downthe arrow key.(6)PRINT FUNCTION(7) TEST MODE:Confirm if "0"(zero) is alreadyin the column, and movethe cursor to next columnby pressing down the arrowkey.(7)TEST MODE(8) Y2K:Confirm if "70" is already inthe column, and move thecursor to next columnby pressing downthe arrow key.(8)Y2K(9) STORAGE DAYS OF SAVED DATA:Confirm if "99" is already in the column.(9)STORAGE DAYSOF SAVED DATA(10) Setuphas been completed.(11) PressPF3: SETUP MENUand screen goes back to"HINO EPC SYSTEM" screen.(11)PF3:SETUPMENU18
4-2. Setup CD-DriveThis is an explanation of setting CD-Drive.Refer to 4-2-1 in case of initial setup.Refer to 4-2-2. in case of new release setup.4-2-1.Initial Setup(1) Click on SELECT DRIVEof "HINO EPC SYSTEM"screen.(1)SELECT DRIVE(2) "SELECT DRIVE" screenis displayed.(3)DEVICE(3) Click on DEVICE columnto the left of DRIVE NO. whichyour PC uses for CD-ROM.When the drive no. is not available,follow the instruction of 4-4.CheckCD-Drive.Continued19
(4) A box appears.(5) Click on either CD-DRIVEor AUTO-CHANGER DRIVE.(5)CD-DRIVEorAT-DRIVE(6) Type of drive is indicatedin UNIT column.(7) Click on CD-NO. column.(7)CD-NO.(8) A box appears.(9) Click on the same CD-NO as printed on"Data EPC".(9)CD-NO.When inserting "Data EPC" intoCD-drive and clicking on OPTION,the system automatically detects CD-NO.Continued20
(10) CD-NO.(11) Pressis indicated.PF10: EXECUTE.(12) Press(11)PF10:EXECUTEPF3: BACK, and screen goesback to HINO EPC SYSTEM.(13) Clickon SETUP CD-NO.of "HINO EPC SYSTEM" screen.(14)SETUP CD-NO.(14) "SETUPCD-NO." screen is displayed.(16)CD-NO.(15) Clickon the same CD-NO.as printed on "Data EPC".Continued21
(16) The(16)CD-NO.CD-NO. is highlighted in red.(17) PressPF10:EXECUTE.(17)PF10:EXECUTE(18) Confirmingthe message appeared,insert "Data EPC" into the drive andpress Enter key.(19) [CDSETUP finished.] is displayed.(19)[CD SETUP finished.](20) PressPF3:SETUP MENUand screen goes back to"HINO EPC SYSTEM"screen.PF3:SETUP MENU22
4-2-2. New Release SetupWhen you get a newly-released "Data EPC", be sure to implement the following process.(1) Click on SETUP CD-NO.of "HINO EPC SYSTEM" screen.(2)SETUP CD-NO.(2) "SETUP CD-NO." screen is displayed.(4)CD-NO.(3) Click on the same CD-NO.as printed on newly-released "Data EPC".(4) The CD-NO. is highlighted in red.(5)CD-NO.(5) Press PF10: EXECUTE.(6)PF10:EXECUTEContinued23
(6) Confirming the message appeared,insert "Data EPC" into the drive andpress Enter key.(7) [CD SETUP finished.] is displayed.(7)[CD SETUP finished.](8) Press PF3:SETUP MENUand screen goes back to"HINO EPC SYSTEM" screen.(8)PF3:SETUP MENU24
4-3. Copy "Data EPC" into PC's DiskWhen you copy "Data EPC" into PC's disk, 700MB or over free disk spaceis necessary. 4-3-1explains initial setup, while 4-3-2 explains new release.4-3-1. Initial Setup(1) Click on SELECT DRIVEof "HINO EPC SYSTEM" screen.(1)SELECT DRIVE(2) "SELECT DRIVE" screen is displayed.(3)DEVICE(3) Click on DEVICE columnto the left of DRIVE NO. whichyour PC uses for CD-ROM.When the drive no. is not available,follow the instruction of 4-4.CheckCD-Drive.Continued25
(4) A box appears.(5) Click on either CD-DRIVEor AUTO-CHANGER DRIVE.(5)CD-DRIVEorAT-DRIVE(6) Type of drive is indicatedin DEVICE column.(7) Click on CD-NO. column.(7)CD-NO.(8) A box appears.Click on OPTION.(8)OPTIONContinued26
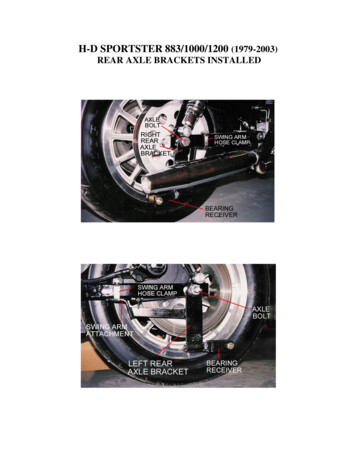
(9) "OPTION" is indicatedin CD-NO. column.(10) The(10)DRIVE for readingCD-ROMdrive for reading CD-ROMhas been set.The next step is setting thedrive to which "Data EPC" is copied.(11) Clickon DEVICE column tothe left of DRIVE-NO.which your PC usesfor local hard disk.(11)DEVICEWhen the drive no. is not available,follow the instruction of 4-4.CheckCD-Drive.(12) Abox appears.(13) ClickHARD DISK DRIVE.(13)HDContinued27
(15)CD-NO.(14) HDis indicatedin DEVICE column.(15) Click(17)CD-NO.(16) Aon CD-NO. column.box appears.(17) Clickon the same CD-NO.as printed on "Data EPC".(17) Clickon OK.(18)OK(18) TheCD-NO. selectedis indicated in CD-NO. column.(19) PressPF9: HD COPY.(20)PF9:HD COPYContinued28
(21)DRIVE(20) Thecolumns are highlightedin blue.(21) Click(22) A(23)DRIVEon DRIVE column.box appears.(23) Clickon DRIVE column.(24) Abox appears.Click on drive-no. fromwhich "Data EPC" is copied.(24)DRIVE(25) ClickOK.(25)OKContinued29
(26) Drive-no.selected is indicatedin DRIVE column.(27) Insert"Data EPC" into driv
Hino EPC (Electronic Parts Catalog) is a system to inquire or search part numbers for vehicles produced and supplied by Hino Motors, Ltd. This manual gives you basic operating instructions of Hino EPC. Please note the following when you use Hino EPC: 1. Hino EPC only covers original equipment parts produced and/or supplied by Hino Motors, Ltd in Japan. Parts equipped locally at distributors .