Transcription
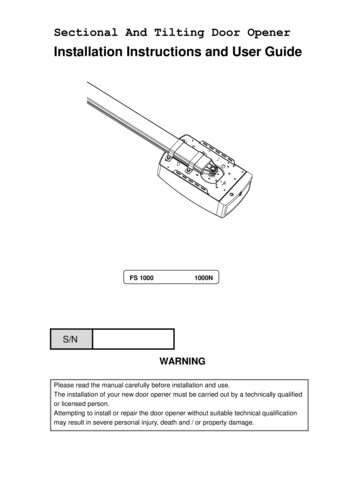
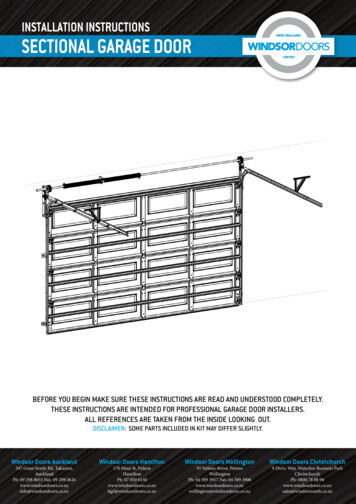
INSTALLATION INSTRUCTIONSSECTIONAL GARAGE DOORBEFORE YOU BEGIN MAKE SURE THESE INSTRUCTIONS ARE READ AND UNDERSTOOD COMPLETELY.THESE INSTRUCTIONS ARE INTENDED FOR PROFESSIONAL GARAGE DOOR INSTALLERS.ALL REFERENCES ARE TAKEN FROM THE INSIDE LOOKING OUT.DISCLAIMER: SOME PARTS INCLUDED IN KIT MAY DIFFER SLIGHTLY.Windsor Doors Auckland347347GreatGreatSouthSouth Rd,Rd, Takanini,Takanini,AucklandAucklandPh: 0909 298298 8655 Fax:Fax:0909298298 ndsor Doors Hamilton170170MauiMaui St,St, PuketePuketeHamiltonHamiltonPh:Ph: 0707 850850 sor Doors Wellington9595NelsonNelson Street, PetonePetoneWellingtonWellingtonPh: 0404 589589 3917 Fax:Fax:0404589589 oors.co.nzWindsor Doors Christchurch9 9DoricDoric Way,Way, chChristchurchPh:Ph: 08000800 78 88 s@windsorsouth.co.nzsales@windsorsouth.co.nz
SECTIONAL GARAGE DOORSAFETY CHECKLIST1There are many potential hazards associated with sectional garage door installation. These hazards can result inserious injury or death and all precautions should be taken by the installer to minimise the risk of such hazards.Windsor Doors is not liable for any damage to the door or persons sustained during the installation of this door. If youare not trained in how to install roller doors then please seek the advice of a trained professional. Please contactWindsor Doors should you wish to discuss best installation practices or seek the advice of a professional.SAFETY DISCLAIMER: it is the installer’s responsibility to identify and minimise potential hazards associated withthe installation of this door. Below is a table of identified potential hazards that may be encountered throughout theinstallation process.PLEASE READ THESE CAREFULLY and take all precautions to minimise the risk these hazards may pose. Note:potential hazards are not limited to this list.HazardControlWorking at HeightsEnsure all ladders are checked and placed correctly on level ground.Use a supervisor when working on ladders.DO NOT work on the top rung.Correct safety headgear with chin strap fastened must be used when operating over2m.Heavy LiftingObserve correct lifting techniques when lifting heavy objects. Use 2 people to liftobjects heavier than 25kg.DO NOT manually lift any object heavier than 35kg.Sharp EdgesWear appropriate PPE (slash proof gloves) throughout the installation process,especially when handling metal.Crush RiskWear appropriate PPE (steel capped boots) throughout the installation process.Use of Power ToolsWear appropriate PPE (gloves, hearing protection, eye protection throughout theinstallation process.Springs Under TensionEnsure two people are working together when springs are under tension.Ensure door is always secured in a stable position whilst adjusting spring tension.www.windsordoors.co.nzInstallation Instructions
SECTIONAL GARAGE DOORPARTS CHECKLIST2Please ensure that the content of your Windsor Doors Sectional Garage Door kit is complete as per the diagrambelow.If you intend to install this door with automation please ensure that you read the automation manufacturer’sinstructions carefully before you begin the door installation process.SAFETY NOTICE: to install this door properly and safely requires two people. DO NOT install this door on your own.Parts ChecklistA - Door panelsB - Horizontal hockey stick tracksC - Horizontal track bracesD - Vertical straight trackE - Torsion tubeF - Top hut anti-sag strutSmall Parts BoxG - Spring(s) - left and rightH - Side bearing brackets - left and rightI - Cable drums - left and rightJ - Spring anchor bracketK - Lifting cablesL - Wheel axlesM - Flag bracketsN - Vertical track bracketsO - Butt hingesP - Finger-safe hinge/wheel assemblyQ - Top panel hingeR - Bottom bracket hingeS - HandleExtrasDoors over 5000mm wide will have a number of double end stile panels. Doors over 3550mm will have associated panelreinforcement included.Note: timber TEK screws are supplied as standard fixing with Windsor Doors Sectional Doors. Should you be fixing to a non-wood frame,please ensure you have the correct fixings appropriate for the material.www.windsordoors.co.nzInstallation Instructions
SECTIONAL GARAGE DOORPRE-INSTALLATION CHECK3Note: all instructions are from the inside looking out.Ensure that the door opening and the supplied door will fit. This can be done by measuring the height of one paneland multiplying it by the number supplied.Ensure that you have at least 120mm of side room on each side and 340mm of head room before you continue.The backspace should be the door height 1.0m to allow for automation and door height 150mm for a manualdoor.WARNING: no guarantee will be given or responsibility accepted by the manufacturer if the door is not installed asinstructed. For satisfactory door operation please follow the instructions carefully.www.windsordoors.co.nzInstallation Instructions
SECTIONAL GARAGE DOORINSTALLING FLAG BRACKETS4Before you begin installing the flag bracketsa. Ensure you have all the components shown in Figure 3.1.b. Ensure the lintel is level.Note: if the lintel is not level, then measurements takenfrom the lintel should be adjusted to account for this.Installing the Flag Bracketsa. On the left hand side of the door opening, measure down 200mm from the bottom of the lintel and mark the doorjamb.b. Measure from the side of the frame across 70mm and mark.c. At the intersection of both marks, fix the right hand flag bracket with 4 x 50mm wood TEK screws or appropriatefixings.d. Repeat steps a)-c) on the right hand side.www.windsordoors.co.nzInstallation Instructions
SECTIONAL GARAGE DOORCUTTING THE VERTICAL TRACKS5a. Measure the length from the bottom of the floor rebate to the centre of the flag bracket’s bottom fixing point.b. Orientate the tracks properly so that the “U” section faces into the door opening and the flat section is againstthe wall.c. Measure from the top of the vertical track and mark the bottom of the track with the measurement from a).d. Cut the track with a hack saw.e. Repeat steps a)-d) for the other track and set both tracks aside.www.windsordoors.co.nzInstallation Instructions
SECTIONAL GARAGE DOORBOTTOM PANEL ASSEMBLY6Before you Begin Assembling the Bottom Door Panela. Ensure you have all the components as shown in Figure 5.1.b. Identify the bottom panel by the rubber weather seal at the bottom of the panel.Assembling the Bottom Panela. On the right side of the panel, fix the bottom bracket hinge to the bottom corner of the panel using 4 x M10x25TEK screws. Note: the bracket should sit 5mm up from the weather seal.b. Repeat on the left hand side.c. Separate the wheel assemblies from the mounted finger-safe hinges to allow for easy drilling of the fixings.d. Fit the mounted finger-safe side hinges to the top of the panel using 4 x M10x25 TEK screws. Note: the top of thehinge pivot should be fixed using the two pre-punched holes on top of the panel.e. Loosely re-attach the wheel assemblies and slide the wheel axles into place. Note: do not fully tighten the wheelassemblies at this point. The assemblies should slide freely up and down the hinge.f. Fix the middle finger-safe hinge to the centre muntin using 2 x M10x25 TEK screws. Note: the hinge pivot shouldsit flush in the valley of the door panel.g. Attach both of the lifting cables by placing the cable loop over the mushroom stud on the bottom bracket hinge.www.windsordoors.co.nzInstallation Instructions
SECTIONAL GARAGE DOORBOTTOM PANEL INSTALLATION7Hanging the Vertical Tracksa. Loosely bolt the vertical tracks to the flag brackets using 2 x M6x16 zinc specialbolts and M6 wiz nuts as shown in Figure 6.1.b. Sit the assembled bottom panel in place evenly across the door opening so thateach side of the panel overlaps the door opening by 25mm as shown in Figure 6.2.c. Ensure the panel is sitting level on the floor. Note: use packing to level the panelshould the floor not be even.Fixing the Vertical Tracksa. With the vertical tracks hanging loosely, fit the vertical tracks over the bottompanel wheel assemblies.b. Bolt the 6’ vertical track brackets to the central pre-punched holes on both verticaltracks using an M6x16 zinc special bolt and M6 wiz nut as shown in Figure 6.3.c. Bolt the 5’ vertical track brackets to the bottom pre-punched holes on bothvertical tracks using an M6x16 zinc special bolt and M6 wiz nut is shown in Figure6.4.d. Fix both central track brackets to the door jamb 70mm from the door openingusing 50mm wood TEK screws or an appropriate fixing.e. Note: make sure the tracks are level and plumb.f. Fix both bottom track brackets to the door jamb 70mm from the door openingusing 50mm wood TEK screws or an appropriate fixing.Installing the Door Panelsa. Separate the wheel assemblies from the finger-safe side hinges and set aside.b. Remove the protective plastic layer from the next door panel and sit it on top ofthe bottom door panel. Note: the door panels should fit neatly together with thetongue and groove configuration.c. Attach the finger-safe side hinges in the same manner as thed. bottom panel using 4 x M10x25 TEK screws as shown in Figure 6.5.e. Re-attach the wheel assemblies, with the wheel axle installed andf. inserted into the vertical track, on to the finger-safe side hinge. Note: do not fullytighten the wheel assemblies at this point. The assemblies should slide freely upand down the hinge.g. Fix the middle finger-safe hinge to the centre muntin using 2 x M10x25 TEKscrews. Note: the hinge pivot should sit flush in the valley of the door panel.h. Repeat steps b)-e) for all the remaining panels except the top panel as shown inFigure 6.6.www.windsordoors.co.nzInstallation Instructions
SECTIONAL GARAGE DOORHORIZONTAL TRACK8Assembling the Horizontal Tracksa. Orientate the horizontal and hockey stick tracks on the ground asshown in Figure 7.1.b. Bolt the horizontal and hockey stick tracks together using 3 xM6x16 zinc special bolts and M6 wiz lock nuts as shown in Figure7.1.Installing the Horizontal Track Assembliesa. Fix the horizontal section of the track assembly to the top of the flag bracket using an M8x20 gutter boltand M8 wiz lock nut.b. Fix the vertical section of the track assembly to the bottom of the flag bracket using 2 x M6x16 bolts andM6 wiz lock nuts. Note: ensure the vertical and horizontal track assemblies are fitted in line with eachother to form one continuous track.c. Repeat steps a)-b) on the other side.d. Tighten all track fixings.Installing the Ceiling HangingBracketa. Measure from the door opening along thehorizontal track to a point approximately 3 4 ofthe door length.b. Identify a solid ceiling fixing point around thispoint and measure down to the horizontal track.c. Cut the ceiling hanging bracket to length suchthat the final installed position will leave thehorizontal track assemblies level.d. Fix the ceiling hanging bracket to the ceilingusing 50mm wood TEK screws or appropriatefixing.e. Bolt the ceiling hanging bracket to thehorizontal track using M6x16 bolts and wizlocking nuts. Note: the final hanging position of the horizontal track assemblies should be level, parallel toeach other, and square to the door opening.www.windsordoors.co.nzInstallation Instructions
SECTIONAL GARAGE DOORAXLE ASSEMBLY9Before you begin assembling the springaxle assembly, layout the spring assemblycomponents as shown in Figure 8.1.Note: right handed components can beidentified by their black markings and lefthanded components by their red markings.a. Cable drum: left and right.b. Spring assemblies: left and right.c. Axle.d. Side bearing brackets.e. Spring anchor bracket.f. Spring bearing.Spring Axle Assemblya. Slide the spring bearing to the middle ofthe axle.b. Slide on the left and right spring in thecorrect orientation until they are upagainst the spring bearing.c. Place the left and right cable drums onto the axle in the correct orientation.d. Position the left and right side bearingbrackets on to the ends of the axle.Note: do not tighten the cable drum orspring worm screws at this point.www.windsordoors.co.nzInstallation Instructions
SECTIONAL GARAGE DOORSPRING AXLE INSTALLATION10a. With two people, carefully lift the spring axle assembly and slide it in to position in line with the flag brackets.b. Bolt both side bearing brackets to the flag brackets using 2 x M8x20 gutter bolts and M8 wiz lock nuts per side.Note: the nuts should be facing the outside of the door.c. Fix the spring anchor bracket approximately to the centre of the lintel using 50mm wood TEK screws ord. appropriate fixings. Note: this diagram shows how the spring should be installed in low headroom situations.e. Bolt springs to spring anchor bracket using M10x40/28 zing bolt with nuts and washers.www.windsordoors.co.nzInstallation Instructions
SECTIONAL GARAGE DOORLIFTING CABLE INSTALLATION11a. Feed the right hand lifting cable behind the door so that the wire is between door frame and wheel axles.b. Fit the end of the wire into the groove of the wheel drum so that the wire sits flush in the door groove.c. Wind the wire on to the drum by rotating the drum clockwise until all the slack in the wire is removed.d. Tighten the cable drum grub screws on to the axle using a 10mm open spanner.e. Whilst keeping the wire tight, attach two pairs of vice grips to the end of the axle to secure it in place. Note: thevice grips should be orientated so that one grip is facing upwards and one is facing downwards. This is to ensurethe axle doesn’t move when tightening the springs, allowing the cables to remain in the correct position.www.windsordoors.co.nzInstallation Instructions
SECTIONAL GARAGE DOORTOP PANEL INSTALLATION12a. Attach the top panel finger-safe side hinges in the same manner as the bottom panel using 4 x M10x25 TEKscrews.b. Re-attach the wheel assemblies, with the wheel axle installed and inserted into the vertical track, on to thefinger-safe side hinge. Note: do not fully tighten the wheel assemblies at this point. The assemblies should slidefreely up and down the hinge.c. Secure all the panels together by screwing the hinges together with M10x25 TEK screws. d) Tighten all wheelassembly nuts and bolts.www.windsordoors.co.nzInstallation Instructions
SECTIONAL GARAGE DOORINSTALLING THE ANTI-SAG TOP HAT13a. Check all hinges are attached and nuts and bolts are tight.b. Measure and cut the anti-sag top hat rail to the door panel width.c. Fix the anti-sag top hat rail hard up against top hinges of the top panel with M10x25 TEK screws. Note: therequired anti-sag top hat is provided in a single length appropriate to the door size. Install on the top panel firstand then on to subsequent panels until the supply is exhausted.www.windsordoors.co.nzInstallation Instructions
SECTIONAL GARAGE DOORTENSIONING THE SPRINGS14WARNING: springs under tension are an extreme hazard. If you are unclear on how to correctly tension the doorspring then seek the advice of a trained professional.a. Insert two winding bars into the spring as shown in Figure 13.1.b. Rotate the bars upwards, ensuring a firm grip is always maintained on at least one of the torsion bars at allc. times. Note: to achieve the correct tension, the spring should be wound a full turn for every foot in door height.E.g. an 8 foot door will be wound 8 full turns.d. Once the correct tension is achieved, tighten the two grub screws with a 10mm open ended spanner.Final CheckRemove the clamps from the axle and test the doors movement. The door should lift up and down with pressure fromone hand and be stationary with no added pressure. Refer to the trouble shooting appendix if the door doesn’t workproperlywww.windsordoors.co.nzInstallation Instructions
SECTIONAL GARAGE DOORTROUBLESHOOTING15Torsion Bar Moving Cable drums not adjusted correctly Springs not adjusted correctly Shaft collar not fitted (single spring) Check end bearing brackets are square and verticalDoor Will Not Hold Up In Open Position Adjust tension on door Incorrect springs Panel reinforcing fitted incorrectlyDoor Not Level Check level marks are correct Lifting cable not equally tautLifting Cables Loose When Door Is Opened Cable drums have slipped Diagonals out of square Check length of lifting cablesDoor Moving To One Side Clearance incorrect Cable drum not hard up against end bearing bracketsDoor Panels Jamming/Rubbing On Tracks Incorrect clearance between wheel and vertical track Door out of Level Cable drum not lined up correctly Vertical tracks not parallel Lifting cables slippingDoor Hard To Lift Incorrect tension on springs Spring may have slipped on set screws Wrong spring Check all panel reinforcing on door panelwww.windsordoors.co.nzInstallation Instructions
SECTIONAL GARAGE DOOR INSTALLATION INSTRUCTIONS Windsor Doors Christchurch 9 Doric Way, Waterloo Business Park Christchurch Ph: 0800 78 88 98 www.windsordoors.co.nz . Installing the Door Panels a. Separate the wheel assemblies from the finger-safe side hinges and set aside. b. Remove the protective plastic layer from the next door panel and .