Transcription
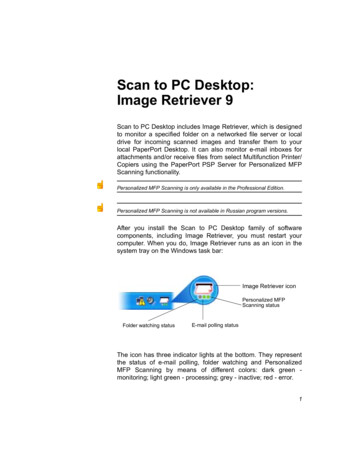
Scan to PC Desktop:Image Retriever 9Scan to PC Desktop includes Image Retriever, which is designedto monitor a specified folder on a networked file server or localdrive for incoming scanned images and transfer them to yourlocal PaperPort Desktop. It can also monitor e-mail inboxes forattachments and/or receive files from select Multifunction Printer/Copiers using the PaperPort PSP Server for Personalized MFPScanning functionality.Personalized MFP Scanning is only available in the Professional Edition.Personalized MFP Scanning is not available in Russian program versions.After you install the Scan to PC Desktop family of softwarecomponents, including Image Retriever, you must restart yourcomputer. When you do, Image Retriever runs as an icon in thesystem tray on the Windows task bar:Image Retriever iconPersonalized MFPScanning statusFolder watching statusE-mail polling statusThe icon has three indicator lights at the bottom. They representthe status of e-mail polling, folder watching and PersonalizedMFP Scanning by means of different colors: dark green monitoring; light green - processing; grey - inactive; red - error.1
Right-click on the Image Retriever icon in the Windows systemtray to display the Image Retriever menu with the followingcommands: 2Get NowUse DefaultsRefresh DefaultsSettingsView LogAboutCloseSCAN TO PC DESKTOP: IMAGE RETRIEVER 9
Settings commandBefore using Image Retriever it has to be configured through the“Image Retriever Settings” dialog.Once you have installed the program it starts up along with yourPC and resides in the system tray.To configure Image Retriever right-click the Image Retriever iconto display its menu. Then click the “Settings” command to displaya dialog box of all the Image Retriever controls:3
E-mail PollingThis feature of Image Retriever lets you monitor your MicrosoftOutlook or Lotus Notes inbox for new messages with attachedPDF, TIFF or XPS files generated by a Xerox device. Disable thefeature if you do not want to monitor your e-mail. Use thefollowing controls to configure e-mail polling of Image Retriever.Watch for scanned files in your e-mail inboxClick this checkbox to enable e-mail polling.Options ButtonClick the Options. button to change your current e-mail pollingconfiguration.If you have both Microsoft Outlook and Lotus Notes installed onyour system, the following dialog box will display enabling you tomake your selection between the two mail clients. Click OK toconfirm your choice, or Cancel to close the dialog.4SCAN TO PC DESKTOP: IMAGE RETRIEVER 9
In case of Microsoft Outlook the “Choose Profile” dialog boxdisplays enabling you to choose the Microsoft Outlook profilewhose inbox you want Image Retriever to monitor. Select yourMicrosoft Outlook profile and click OK.In the “Image Retriever Settings” dialog, you will see yourMicrosoft Outlook profile name displayed in the relevant field.Microsoft Outlook users cannot enable e-mail monitoring or choose a MicrosoftOutlook profile unless Collaboration Data Objects is installed and enabled forMicrosoft Outlook. Image Retriever will display an error message if they attemptto do so.To install Collaboration Data Objects with Microsoft Outlook 2000, 2002 or 2003 choose custom installationthen detailed installation options for each applicationfinally select and enable the installation of the Collaboration Data Objects.Microsoft Outlook 98 users should pick the Full Installation option.Microsoft Outlook 2007 users should download and install Collaboration DataObjects from Microsoft’s Download Center.For more information about Collaboration Data Objects please see yourMicrosoft Outlook documentation.If you set Lotus Notes as the mail client for Image Retriever towatch, you have to specify your password. If you leave thecheckbox “Save password“ empty you will have to give it againevery time Image Retriever starts. If you click the checkbox, yourpassword will be stored in an encrypted format and will not beprompted for again.5
Please note that if Lotus Notes is installed, but is not configuredproperly, or not set for any users, e-mail polling will not work, andImage Retriever will display an error message (during configuringthe program) or the left-hand side light indicator in the programicon will turn red (during monitoring).E-mail Polling Supported Xerox DevicesImage Retriever can poll for e-mail attachments generated by thebelow Xerox devices.Document Centre 490/480/470/460 STDocument Centre 440/432/425/420 STDocument Centre 426/430Document Centre 555/545/535WorkCentre Pro 55/45/35WorkCentre M55/M45/M35WorkCentre Pro 90/75/65WorkCentre Pro 40 Color/32 ColorWorkCentre Pro 165/175WorkCentre M165/M175WorkCentre Pro C2128/C2636/C3545WorkCentre C2128/C2636/C3545WorkCentre Pro 232/238/245/255/265/275WorkCentre 232/238/245/255/265/275WorkCentre 7132WorkCentre 7655/7665/7675WorkCentre 5030/5050WorkCentre 7328/7335/7345WorkCentre 4150WorkCentre 7328/7335/7345/7346WorkCentre 123/128/133WorkCentre 5222/5225/52306SCAN TO PC DESKTOP: IMAGE RETRIEVER 9
WorkCentre 7232/42Phaser 3200 MFPPhaser 8560 MFP/XPhaser 6110 MFPWorkCentre 5632/5638/5645/5655/5665/5675/5687Phaser 3300 MFPPhaser 3635 MFPPhaser 6180 MFPWorkCentre 4260WorkCentre M20iFor list updates, see: http://www.xerox.com/scan2pcNOTE: Scan to Email with JPEG attachments will not be polled by theImage Retriever e-mail feature.Folder PollingEnable this setting to monitor a specified folder on a networkedfile server or local drive for incoming scanned images generatedby a Xerox device.Watch Document Repository FolderClick this checkbox in the “Image Retriever Settings” dialog toenable Image Retriever to monitor the folder of your choice.Browse ButtonClick the Browse. button to locate and select the folder you wantImage Retriever to monitor:7
Browse to thenetwork serverthatcontainsthe folder to bewatched; selectthe folder andclick OK.Image Retriever can periodically monitor this folder to see if anyscanned images are placed there by the Xerox system.Transfer documents toTo specify where Image Retriever is to place the retrieved files,click Browse and choose a PaperPort folder. If the target folderhas folder notes (subject, author, and keywords) then these willbe applied to the files delivered by Image Retriever. ThePaperPort folder selected in the "Transfer Documents to" sectionis not used by the Personalized MFP Scanning function.8SCAN TO PC DESKTOP: IMAGE RETRIEVER 9
Interval for checkingTo set how often the watched folder or monitored inbox will bechecked, select a setting from the “Interval for checking” list box.This interval is also used by the Personalized MFP Scanningfunctionality to process the documents you scanned remotely.The following choices are available from the list box:1, 2, 5, 10, or 30 seconds1, 2, 3, 5, 10, 30, or 60 minutesIn addition to the above values, you could also select “Never“. Inthis case Image Retriever will continue running but watching issuspended.Use Defaults ButtonTo restore default Watch Settings for Image Retriever, click theUse Defaults button. This will restore the default watch interval(30 seconds).NOTE: If you have configured defaults during program setup,Use Defaults will restore the values you used during installation.For details see: Customized Install.Get Now ButtonClick the Get Now button if you wish to scan the folder or inbox ofyour choice immediately. Image Retriever does the monitoring onwhichever component is checked.In either case, the relevant signal of the Image Retriever icon onthe system tray will change to “Processing” state (light green).Image Retriever will place the new items appearing in thewatched folder or inbox on the PaperPort desktop and will launchthe PaperPort application - unless you have specified “Don’t runPaperPort“ in the “Image Retriever Settings” dialog.9
When documents are retrieved SettingNow that you have set the Image Retriever repository folder andthe watch interval, specify the behavior you prefer for documentretrieval. The “When documents are retrieved” setting offers threechoices described in the following table:Select thissetting:To get this result:Run PaperPort ina windowEvery time Image Retriever detects a newdocument in the folder, on the PSP Serverand/or inbox being watched, it places it inPaperPort, which is then opened on yourWindows desktop. It then purges theoriginal scanned document from the folderor PSP Server being watched. If it brings aPDF, TIFF or XPS e-mail attachment to thePaperPort desktop, the original e-mailmessage remains in the e-mail inbox but itsstatus will switch to “Read”.Run PaperPortminimizedSame as above, but PaperPort runsminimized. (Later, when you openPaperPort, all scanned documents will beon the PaperPort desktop.)Don’t runPaperPortDocuments are transferred into the targetfolder, but are not placed on the PaperPortdesktop until you launch PaperPort. IfImage Retriever is watching a folder orpolling e-mail, the target folder is set underTransfer documents to. If the PSP Server iswatched, the target folder is set on thedevice panel.Personalized MFP ScanningPersonalized MFP Scanning is only available in the ProfessionalEdition.10SCAN TO PC DESKTOP: IMAGE RETRIEVER 9
Personalized MFP Scanning is the ability to change the controlpanel on supported Multifunction Printers/Copiers so that itbecomes customized with your own destination folders andscanning preferences. Image Retriever displays PaperPortfolders and scanning profiles as well as the document conversionworkflows of OmniPage stored on your local computer and allowsyou to "push" these settings to the control panel of theMultifunction Printer/Copier through the PaperPort PSP Server.When you identify yourself to the MFP through a log-in screen itwill automatically change the control panel to reflect your personalfolder destinations and scanning preferences. The PaperPortPSP Server requires Image Retriever on your local machine andthe ability to control the MFP through a specially designedsoftware interface. On select Xerox machines this ability isreferred to as the Xerox Extensible Interface Platform (EIP)Advanced Development Software for Xerox Multifunction Printers.The following devices currently support the Xerox ExtensibleInterface Platform (EIP) and PaperPort PSP Personalized MFPScanning:WorkCentre 56xxWorkCentre 76xxWorkCentre Pro 2xxWorkCentre 73xxWorkCentre 52xxWorkCentre 72xxWorkCentre 74xxFor list updates, see: http://www.xerox.com/scan2pcUse the following server for Personalized MFPScanningTurn on this option to enable the Personalized MFP Scanningfunctionality.Server ButtonClick the Server button to change the PaperPort PSP Serverused for the Personalized MFP Scanning functionality.For information on available servers contact your systemadministrator.11
Personalized MFP Scanning Wizard ButtonClick this button to display the Personalized MFP ScanningWizard. This lets you collect and transfer information from yourcomputer to the remote scanning device (MFP). This informationincludes PaperPort Scanning Profiles, PaperPort Folders andOmniPage Workflows.The left side of the Wizard always displays the PaperPort folders,PaperPort Scanning Profiles and OmniPage Workflows on yourcomputer.The right side of the Wizard shows the marked items that will beshown on the device panel. These items change dynamicallyreflecting modifications on the left: marking or unmarking folders,profiles or workflows. Newly marked items are added to thebottom of the table. To change item order, use the buttons Up andDown.The device panel has limited space, so long folder, profile andworkflow names may get truncated when added to the table. Tochange (truncated) names, use the Rename button. Predefineditems ("Current Desktop" or "none") cannot be moved orrenamed.12SCAN TO PC DESKTOP: IMAGE RETRIEVER 9
Use the Device panel dropdown list at the bottom of the dialog tomatch the on-screen display of the table with that of the devicepanel type.When you select table items, the corresponding folder, profile orworkflow gets selected on the left. When you change the selectedfolder, profile or workflow on the left, the corresponding item getsselected in the table (provided that it is marked).If you mark too many items (folders, scanning profiles orworkflows) on the left to fit into the limited space of the devicepanel, a special item appears in the table: "More ". This will alsobe added to the list on the device panel. Push "More " on thedevice panel to access items that are listed in light grey under"More." on your screen.1. Too many markeditems to fit into thedevice panel.2. The More itemappearsonthescreen and on thedevice panel.3. Push More on thedevice panel to accessitems that are light greyon screen. (Examples:Legal, Marketing)13
The last list item in the table is always "Other folders / workflows /profiles (set by Administrator)". These are to remind you that youmay find additional destinations, workflows and / or profiles on thedevice panel - provided that your system administrator has setthem up for you.OmniPage WorkflowsOmniPage Workflows allow you to apply multiple documentconversion options into a single setting that can be pushed to thedevice panel as a button. Document conversion options includefile format settings, conversion methods and additional documentdestination preferences. Scanner setting choices available inOmniPage workflows are not used by PaperPort PSP. To createselectable scanner preferences you will need to create or modifyPaperPort Scanning Profiles. For information on creating andmodifying workflows, consult your OmniPage documentation.Scanning profilesPaperPort Scanner Profiles allow you to combine multiplescanning settings and image enhancements into a single settingthat can be pushed to the device panel as a button. The ScannerProfiles will override the default scanning settings of the deviceincluding resolution, paper size, color depth and other settingswhere applicable to your particular device. Image corrections,know as Scanner Enhancement Technology (SET) in PaperPort,are applied by PaperPort when the image is transferred from thedevice to the PaperPort desktop.To add a new scanning profile to the device interface or to updateone that you have previously changed in PaperPort, click thePersonalized MFP Scanning Wizard button in the “ImageRetriever Settings” dialog box when you have finished themodifications.14SCAN TO PC DESKTOP: IMAGE RETRIEVER 9
Use PaperPort to create new profiles or modify existing ones.Click on the Scan or Get Photo button in the PaperPort maintoolbar to display the Scan or Get Photo pane.This lists your scanning profiles.For more information on scanning profiles, consult yourPaperPort documentation.PaperPort PSP Virtual ScannerPaperPort is designed to handle (create, modify or delete)scanning profiles for local scanners. If you do not have a scannerconnected to your machine, use the PaperPort PSP VirtualScanner tool to work with scanning profiles. It is automaticallyinstalled along with ImageRetriever.The Virtual Scanner is a tool for scanning profile management. Itis not intended for scanning - a STOP sign (along withexplanation text) reminds you of this, when you try the operation.15
OK ButtonClick OK in the “Image Retriever Settings” dialog box to confirmImage Retriever settings.Get Now commandUse this command for the same purpose as the correspondingbutton in the “Image Retriever Settings” dialog. For details see theGet Now button.Use Defaults commandUse this command for the same purpose as the correspondingbutton in the “Image Retriever Settings” dialog. For details see theUse Defaults button.Refresh Defaults commandIf your system administrator has set up default destinations,workflows or profiles for you, they will not appear on the devicepanel until you restart Image Retriever or use this command torefresh these defaults.View Log commandTo get information about program events, right-click the ImageRetriever icon, then choose the “View Log” command. Click OK toclose this panel or the Clear Log button to delete your current listof events.16SCAN TO PC DESKTOP: IMAGE RETRIEVER 9
About commandTo get version and copyright information about Image Retriever,right-click the Image Retriever icon to display its menu. Click the“About” command. You can also select About. from the “ImageRetriever Settings” dialog. Click OK to close the “About” window.Close commandTo close Image Retriever, right-click the Image Retriever icon todisplay its menu. Click the “Close” command. After selecting this,the program displays the following message: “Closing ImageRetriever disables the automatic placement of Network Scannerdocuments into your PaperPort”. “Do you wish to close the ImageRetriever now?” Select Yes to close, or No to cancel.Using Image Retriever via a remote deviceFirst, consult your device manual or system administrator on howto access custom services on the device. Typically, it is done asfollows:1. Navigate to the main screen on the device panel.2. Locate “Custom Services” (for details see your device manual)to access a list of available services. If authentication is turned on,you have to type in your user name and password.3. Press the "Scan to PC Desktop" button. This starts thePaperPort PSP service used by Image Retriever.4. If authentication is turned off (that is, you did not have to type inyour user name and password beforehand (Step 2)), at this pointyou will need to select your name from the list of registered usersand press the Login button.5. The PaperPort PSP service main screen displays showing yourPaperPort folders, OmniPage Workflows and PaperPort ScanningProfiles.6. If your system administrator has set up default destinations,workflows and profiles for you, these items will also appear on thedevice panel, under your personal items.17
To specify your settings, see the section Personalized MFPScanning Wizard Button in this guide.Clicking the Settings. button gives you access to your scanningsettings: navigate to the proper panel to review and/or modify anyof them. (details: see below)When no PaperPort profile is selected, the following defaultvalues will be used: Color: black-and-whiteResolution: 300dpiImage quality: Higher image qualityOriginal type: Photo and TextScanning method: 1-sided (simplex)File format: PDF.Settings (including the above listed default ones) always remainin use until you change them and scan.That is, if - after scanning once - you re-enter the service, modifysome settings, then exit the service (but do not do any scanning),your setting modifications will be ignored.Modifying settingsYou can change your scanning settings from the main screen ofthe device panel that lists your PaperPort Folders, OmniPageWorkflows and PaperPort Scanning Profiles.18SCAN TO PC DESKTOP: IMAGE RETRIEVER 9
Push the Settings. button to access the following screen:Depending on the capabilities of the device you are using, someoptions may be greyed out. (For instance, if your device can onlyscan black-and-white, the Color mode option will not beavailable.)Also, if you are using a specific PaperPort Profile, you will not beable to change some of its presets (e.g. file format and file name)here. You can only do this by modifying the profile itself: launchPaperPort on your machine, update the profile and then publish itto the device again through the Wizard.You can adjust scan settings in the following categories: Color Mode Resolution Original Type19
Scanning MethodImage QualityFile Format andFile Name.Scanning profiles may contain settings that are not supported bythe device in use. In such cases, the following warning messageis displayed on the main screen of the device panel (above theSettings. button): “Ready to Scan your job (with device-specificre-adjustments)”. This can imply two scenarios:You attempted scanning grayscale or color on a black-and-whitedevice. Color Mode will switch to black-and-white and all otherscan settings remain unchanged.You tried scanning at an unsupported resolution. The closestmatching value will be used.20SCAN TO PC DESKTOP: IMAGE RETRIEVER 9
Other Information about Image RetrieverNow that you have specified the Image Retriever watch folder,watch interval, monitored inbox and PaperPort behavior andPersonalized Scanning Server, here is some other informationabout Image Retriever. User-specific watch folder. Only one user and oneapplication is able to watch a specific folder at any time. Themechanism for this is adding a file named “repwatch.xsw” in thewatched folder. Other applications that use this mechanism,Image Retriever or other Image Retriever programs will not beable to watch that folder until the file is removed. If you workwith the Professional Edition of Scan to PC Desktop, makeyour choice between Image Retriever and DesktopDelivery(see below). Retrieving images in Scan to PC Desktop v10 ProfessionalEdition. There are two ways to bring images into the PaperPortdesktop in the Professional Edition of Scan to PC Desktop. Asan alternative to Image Retriever, you can utilizeDesktopDelivery - an integrated folder monitoring and e-mailpolling application in PaperPort Professional 11. For details onits use, please refer to your PaperPort documentation. Supported network operating systems. Image Retrieverworks with a number of industry-standard network operatingsystems—Novell Netware 3.x, 4.x, and 5.x using Bindery;Netware 4.x, 5.x, and 6.x using NDS; Microsoft Windows 2000and Windows 2003 Server. Supported client operating systems. Microsoft Windows2000, XP, and Vista (32 and 64-bit versions). Supported e-mail clients. Microsoft Outlook 98, 2000, 2002,2003, and 2007; Lotus Notes 5.x, Lotus Notes 6.x, and LotusNotes 7.0. Supported image file formats. Image Retriever supports thefollowing file formats:JPEGPDFTIFFXPS21
Please note that Image Retriever copies the above files ontothe PaperPort desktop without any modification or conversion.Notes on Using Image Retriever with a XeroxPhaser 8560 MFP DeviceTo ensure proper functioning between Image Retriever and thisdevice, follow the steps below:First, install your device driver.Launch the Xerox Scan Utility application.Use this to create one or more user templates. Each will contain afolder that you can set as the watched one for Image Retriever.Then install Image Retriever.Finally, set the Image Retriever watch folder to the one specifiedby the user template you wish to use.Image Retriever can watch only one user template-specifiedfolder at a time. To change this, select a folder specified byanother user template.22SCAN TO PC DESKTOP: IMAGE RETRIEVER 9
Customized InstallYou can define Image Retriever program defaults duringinstallation.To install Image Retriever with customized defaults, install onlyOmniPage and PaperPort with the Scan to PC Desktop installer.Then browse to the IR90PRO folder on the CD, and launchsetup.exe from the command line with the desired parameters.Configuration options and the corresponding parameters are asfollows:User interface language: specify the Image Retriever userinterface language with the /L parameter.Value:Behavior1033English (factory 1046Brazilian Portuguese1047RussianDefault watched folder: specify the default watched folderParameter: WATCHFOLDER path to the folder name You can specify any path here, provided that you have writeaccess to the chosen folder. Image Retriever path syntaxsupports mapped drives and UNC standards as well.Folder watching: enable or disable folder watchingParameter: FOLDERWATCH [0.1] .Value:Behavior0disable folder watching(factory default)1enable folder watching23
The value 1 is accepted only if you also specify a valid watchedfolder via the WATCHFOLDER parameter.Default e-mail profile: specify the default Microsoft Outlooke-mail profileParameter: EMAILPROFILE email profile You can specify the e-mail profile to be used for e-mail polling.Note: e-mail polling cannot be configured during install time forLotus Notes.E-mail polling: enable or disable e-mail polling (in ImageRetriever Professional only)Parameter: EMAILWATCH [0.1] .Value:Behavior0disable e-mail polling(factory default)1enable e-mail pollingThe value 1 is accepted only if you also specify a valid e-mail profile towatch via the EMAILPROFILE parameter.Watch interval: define the default watch intervalParameter: POLINT [1.13]24Value:Watch interval11 sec22 secs35 secs410 secs530 secs (factory default)61 min72 mins83 mins95 mins1010 mins1130 minsSCAN TO PC DESKTOP: IMAGE RETRIEVER 9
Value:Watch interval1260 mins13“Never”PaperPort behavior: set default PaperPort behavior: “RunPaperPort in a Window”; “Run PaperPort Minimized” or “Don’t runPaperPort”.Parameter: PPACTION [0.2]Value:PaperPort Behavior0“Run PaperPort in a Window”(factory default)1“Run PaperPort Minimzed”2“Don’t run PaperPort”Personalized MFP Scanning Server: specify the defaultPersonalized MFP Scanning Server.Parameter: PSPSRVDEF server name or IP Address Specify the PSP Server here, provided that it is installed. servername or IP Address must not include the leading \\Personalized MFP Scanning is only available in the ProfessionalEdition.Example 1: Installing Image Retriever to watch the folder’Documents’ on the P drive with German user interface:setup.exe /L1031 /v”WATCHFOLDER P:\DocumentsFOLDERWATCH 1”Example 2: Installing Image Retriever to watch the folder’repository’ on the server ’global’, with English userinterface. Watch interval is 3 minutes, and PaperPort is launchedminimized:setup.exe /L1033 /v”FOLDERWATCH 1 PPACTION 225
WATCHFOLDER \”\\global\repository\” POLINT 8”Example 3: Installing Image Retriever Professional to poll theMicrosoft Outlook inbox with the e-mail profile ’MyProfile’ set:setup.exe /v”EMAILPROFILE MyProfileEMAILWATCH 1”Example 4: Installing Image Retriever Professional to use'PSPTestServer' as the Personalized MFP Scanning serversetup.exe /L1033 /v"PSPSRVDEF PSPTestServer"NOTE: All parameters not specified in the examples above willtake their factory default values.26SCAN TO PC DESKTOP: IMAGE RETRIEVER 9
scanning preferences. Image Retriever displays PaperPort folders and scanning profiles as well as the document conversion workflows of OmniPage stored on your local computer and allows you to "push" these settings to the control panel of the Multifunction Printer/Copier through the PaperPort PSP Server.