Transcription
LENTEK WARRANTYPurchase DateThis Limited Warranty is effective upon purchase.Please complete the attached Registration and return to LentekInternational.1. Lentek International warrants this product to be free of manufacturingdefects. Should any such defect develop or become evident withinONE year from the date of purchase, Lentek International will replace theentire product or, at its option, repair or replace the defective part(s)without charge.2. Securely pack the entire unit. Be sure carton clearly identifies sender byname and address. Attach a letter or card describing the defect. Originalreceipt of purchase must be included in returned package for warrantycoverage.3. This warranty is void if damage or malfunction is due to abuse or failureto operate product in accordance with instructions and on recommendedelectrical current.Mail prepaid via insured parcel post to:FOR YOUR SAFETYLENTEK INTERNATIONAL WARRANTY DEPARTMENT1629 PRIME COURT SUITE 800ORLANDO, FL 32809If you smell gas:1. Shut off gas to the appliance.2. Extinguish any open flame.3. If odor continues, immediatelycall your gas supplier.WARNING: Improper installation, adjustment,alteration, service or maintenance can causeinjury or property damage. Read the installation, operating and maintenance instructionsthoroughly before installing or servicing thisequipment.LENTEK INTERNATIONAL INC.P.O. Box 593812 Orlando, FL 32859-3812Phone: 407 857 8786Fax: 407 857 4045Toll Free: 888 3LENTEKEmail: customerservice@lentek.com 2002 Lentek International. All rights reserved.All specifications are subject to change without notice.Dimensions are approximate.DirectionsFor UseWARNING: For Outdoor Use OnlyINSTMK0102-0302
Dear Customer,Thank you and congratulations on your purchase ofthe Mosquito Trap. This product is the latest in newtechnology from Lentek . Your satisfaction is veryimportant to us. We back our product with a one (1)year limited warranty.Visit our website at www.lentek.com and view the restof our products, such as our Silã Air Purification line,Pet Appliance , Biagianté and PestContro pest controldevices. While you’re there, register your new purchase, sign up to receive our newsletter, and learn moreabout our company.SHUTTING OFF THE MOSQUITO TRAPStep 1:1. Turn the safety knob below theburner door to the off position.Flame will not go out immediately,it takes up to 30 seconds.Step 2:VALVEQuestions can also be asked on our website, by callers1-888-3-LENTEK, or 407-857-8786 or contacting yourlocal Lentek dealer.We look forward to serving you, now and in the future.2. Close the gas valve on the tank.Enjoy!Step 3:JoeJoe DurekCEOLouLou LentinePresident3. Open the burner door on the sideof the burner unit and verify thatthe flame has gone out.13
STARTING THE MOSQUITO TRAP (cont.)5. Hold the safety knob for about 30 seconds before releasing. Do notturn the safety knob.6. Wait at least a minute between lighting attempts to allow unburnt gasto escape. Repeat steps 4 and 5 if burner goes out. There is a safetydevice that must warm up enough to allow gas to the burner afterthe safety knob is released (no longer pushed in).OPERATION1. Plug in the power cord to an approved outdoor use extension cordper the safety instructions.2. Locate the ON/OFF switch under the outer lip of the main body. Thisturns on the heater and the vacuum fan. Turn it ON.3. Leave the Mosquito Trap turned ON and the burner lit. The MosquitoTrap will operate for 3 to 4 weeks continuously capturing mosquitoeson a single tank of propane.MAINTENANCE1. Empty the mosquito capture cup when half full by rinsing the capturecup under running water. Mosquito Fact: About 800 deadmosquitoes equals 1 tablespoon! One ounce equals over 65,000dead mosquitoes!2. Refill the propane tank as necessary when using continuously.3. There is a replaceable fuse next to the ON/OFF switch. Check thisfuse if the Mosquito Trap does not turn on when properly pluggedinto an approved electric outlet.4. Keep the area around the Mosquito Trap clear and free fromcombustible materials, gasoline, and other flammable vapors andliquids.5. Keep the area of the propane cylinder enclosure free and clear fromdebris.6. Clean the Mosquito Trap outside surface with a mild detergent anda damp cloth. Do Not Spray with or immerse in water.7. Replacement parts (Regulator with hose, Catch Cup, Ground Stakes)are available from Lentek International, Inc.12Directions for Assembly and UseRead before unpacking and operating the Lentek Mosquito Trap.The Mosquito Trap is for Outdoor Use Only.FOR YOUR SAFETY:1.2.Do not store or use gasoline or other flammable vapors and liquids in the vicinity ofthis or any other appliance.The installation must conform with local codes or, in the absence of local codes, withthe National Fuel Gas Code, ANSI Z223.1-1998 for US and with the CANI-B149 forCanada.TOOLS NEEDED1. Phillips head screw driver.2. 10 mm wrench or socket, or an adjustable wrench.3. Fire Place lighter.PARTS LIST1.2.3.4.5.6.7.8.9.10.11.12.13.FA(Material packed on both sides of foam)Hardware: 8 (5mm x 7mm) screws29 (6mm x 15 mm) bolts,lock-washers, nuts.3 (6mm x 15mm) bolts only1 (6mm x 15mm) thumb screwTrap Body (A).Burner Unit (B).Upper Body Support (not shown) (C).Base, two piece (I).Legs - bottom (D).Legs - top (E).Ground Stakes (F).Upper Body Shield (G).Support Column (J).Catch cup (H).Regulator with hose (K).20 lb Propane Tank (Not Included)HJGC (Not Shown)EBKD(Parts Identification Pictures - page 2)I1
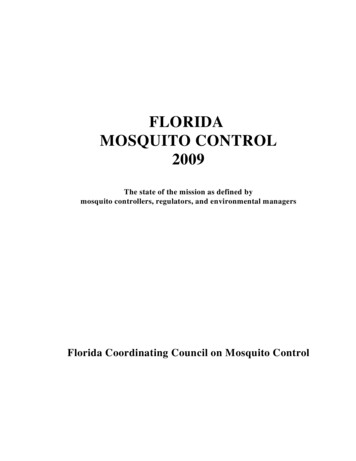
PARTS IDENTIFICATIONSTARTING THE MOSQUITO TRAP8 (5mm x 7mm) screwsStep 1:29 (6mm x 15 mm) bolts, lock-washers, nuts.VALVE6 x 15 mm thumb screw.1. Open the gas valve on the tank,by turning it counterclockwise.Step 2:Upper Body Support (C)Burner Unit (B)Mosquito Trap Body (A)2. Open the door on the side ofthe burner unit.2a. Turn the safety knob below thedoor to the left until it stops andthe word pilot is lined up withthe indicator.Step 3Base Halves (I)Legs bottom (D)Legs top (E)GroundStake (F)4. While pressing in the safety knob,reach into the center of theburner unit with a fireplace lighterand light the burner.Upper Body Shield (G)2Catch Cup (H)SupportColumn (J)(cont. page 12)Regulator (K)11
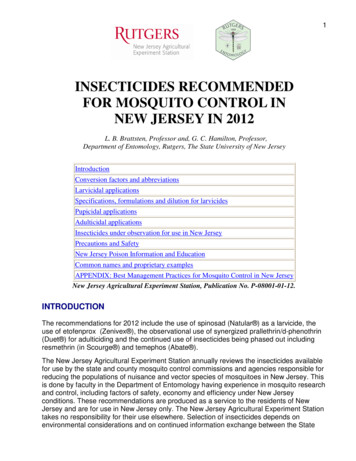
WHERE TO PLACE THE MOSQUITO TRAPMany species of mosquito have an adult life span that lasts about twoweeks. Approximately 3000 species of mosquito have been identifiedworld-wide, with approximately 170 species found in the United States.Both male and female mosquitoes feed on plant nectar, but only thefemale requires a blood meal. The blood meal is needed for each batch ofeggs the female lays, typically feeding once every 3-4 days. A blood mealusually lasts about 90 seconds if the mosquito is not disturbed. Females onlyneed to mate once, typically 2-3 days after emerging as an adult.The female mosquito is attracted to a host by scent (including CO2), temperature, color, movement, and for some species, sound. There are an estimated 400 chemicals emitted from human skin and about 100 volatilecompounds in each human breath that mosquitoes can detect. The combination and amount of chemicals given off is believed to be why somepeople are more readily bitten than other people. The female mosquito ismost active between 50 degrees Fahrenheit and 95 degrees Fahrenheit incalm or light breeze conditions. Mosquitoes tend to travel up-wind whenseeking a blood meal. Most species of female mosquito take about 90 seconds to complete a blood meal that is equal to 1 1/2 times its normal bodyweight.The placement of the Mosquito Trap will greatly affect the success of theunit capturing mosquitoes. The most mosquitoes will be captured by positioning the Mosquito Trap 30 to 40 feet from the location you want to protect, in the normal down-wind direction towards were mosquitoes are living(trees, bushes, water). The mosquitoes will encounter the Mosquito Trap andbe captured, before coming into contact with you and your family.Warning: Minimum clearance 24 inches to walls or ceilings.HOW THE MOSQUITO TRAP WORKSThe Lentek Mosquito Trap utilizes the documented attractiveness of CO2,moisture, body temperature (thermal imaging), color, and airflow in aneffective design that captures and kills mosquitoes. Similar traps have beenin use for years by universities, State monitoring programs and researchersaround the world. The Lentek Mosquito Trap uses this traditional trappingapproach, combined with the latest in research, to turn the female mosquitoes natural hunting techniques toward seeking out the trap and facilitating capture in a product that private home owners can use.10ASSEMBLYStep 1: Assemble the Base4 SCREWSPER SIDE6 x 15 mm bolts,lock washers and nutsEight used in this step1. Attach the two halves (I) of thebase together using eight6 x 15 mm bolts, lock washersand nuts.Step 2: Assemble the LegsNote: The upper legpart is curved. Followthe diagram.6 x 15 mm bolts,lock washers and nutsTwo needed per legSix used in this step2. Attach each top leg piece (E) to a bottomleg piece (D) and connect with two 6 x 15 mmbolts, lock washers and nuts. The screw head ison the side of the leg facing you as shown inthe diagram. Lock washer and nut are on theinside. Note: The legs have a stamped raisedportion running down their length that shouldface outwards matching the lower leg part.3
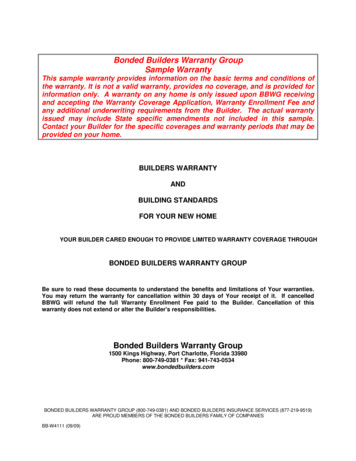
SAFETYStep 3: Attach the legs to the base1.2.6 x 15 mm bolts,lock washers and nutsTwo needed per legSix used in this step3.4.5.3. Fasten each of the three assembledlegs to the outside of the base with6 x 15 mm bolts, lock washers andnuts. Screw heads face outside withlock nuts and bolts on the inside.6.7.8.9.10.11.12.13.14.Step 4: Assemble the burner unit to the upper body support15.16.17.18.6 x 15 mm bolts,lock washersThree used in this step19.20.4. Attach the burner unit to the upperbody support with three 6 x 15 mmbolts. Screw heads face down withlock washers into threaded holes.21.22.23.24.4Use only extension cords having plugs and receptacles that accept the Mosquito Trap’s plug.The Mosquito Trap has a 3-conductor cord and 3-prong grounding type plug to fit a properlygrounded outlet. Replace or repair damaged cords.The electrical rating of the extension cord must be as great as the electrical rating of theMosquito Trap. Use extension cords with 14 gauge or greater wire with a label stating suitablefor use outdoors.Don’t abuse cord. Never yank it to disconnect from receptacle. Keep cords from heat, oil,and sharp edges.Devices for retaining an extension cord connection to the power supply cord are availablewhere ever fine extension cords are sold.The connection between the Mosquito Trap and any extension cord used must be kept dryand off of the ground.Disconnect the Mosquito Trap from the power supply when not in use, before servicing,cleaning, etc.Do not insert foreign objects into this product.The Mosquito Trap is for Outdoor Use Only.The Mosquito Trap should be stored indoors when not in use and kept away from children.To avoid electric shock, DO NOT clean the Mosquito Trap by spraying water or byimmersion in water.All repairs to the Mosquito Trap must be performed only by qualified service personnel.Read and follow all instructions affixed to the propane tank.Young children should be carefully supervised when they are in the area of theMosquito Trap.Clothing or other flammable materials should not be hung from the Mosquito Trap, orplaced on or near the Mosquito Trap.Any guard or other protective device removed for servicing the Mosquito Trap must bereplaced prior to operating.It is imperative that the compartment, burner, and circulating air passageways of theMosquito Trap be kept clean.A maximum of a 20 lb. LP-Gas cylinder shall be used with the Mosquito Trap.The LP-Gas cylinder must be provided with a shutoff valve terminating in an LP-Gas supplycylinder valve outlet specified for Connection No. 510 in the Standard for Compressed GasCylinder Valve Outlet and Inlet Connections, ANSI/CGA-V-1-1977 (Any standard 20 lb.Propane tank manufactured in the USA after 1999).The LP-Gas cylinder supply system must be arranged for vapor withdrawal and the cylindermust include a collar to protect the cylinder valve.The LP-Gas cylinder used shall be constructed and marked in accordance with thespecifications for LP-Gas cylinders of the U.S. Department of Transportation (DOT).This Mosquito Trap shall be used outdoors only in a well ventilated space and shall not beused in a building, garage, or any other enclosed area.The LP-Gas cylinder must be disconnected and removed from the Mosquito Trap, if theappliance is stored indoors.LP-Gas cylinders must be stored outdoors in a well ventilated area out of the reach ofchildren. Disconnected cylinders must have threaded valve plugs tightly installed and mustnot be stored in a building, garage, or any other enclosed area.The pressure regulator and hose assembly supplied with the Mosquito Trap must be used forconnection to the LP-Gas cylinder. Replacement pressure regulators and hose assembliesmust be provided by Lentek International, Inc.9
ATTACHING THE PROPANE TANKStep 5: Attach the upper body support to the legsStep 11: Attach the propane tank to the base.Always use no larger than a 20 lb. propane tank6 x 15 mm thumb screwOne used in this step1. Place a full tank (20 lb) of propane onthe base bracket. Follow safetyinformation on tank.2a. Attach tank anchor thumb screw intothreaded hole.2b. Or use a small padlock in largerunthreaded hole if added security isdesired.Step 12: Attach the gas regulator valveto the propane tankMinimum inlet gas supply pressure: 11 inches wc3. Remove protective cap from thepropane hose fitting.4. Attach hose with regulator to propanetank, turning clockwise to tighten. Thehose fitting must be securely tightenedby hand to prevent any gas leakage.Never use any tools to tighten the fitting!5. Check for gas leak by putting soapywater on connector and looking forbubbles.6. Inspect the hose before each use. Thehose assembly must be replaced if thereis excessive abrasion or wear, or if hose isdamaged. Replacement hose assemblyis specified by manufacturer.86 x 15 mm bolts,lock washers and nutsSix used in this step5. Position the upper body support withthe burner unit attached on top of thelegs. The legs should be on the inside.Secure using two 6 x 15 mm bolts, lockwashers, and nuts per leg. Screw headsare on the outside with lock washersand nuts on the inside. Note: Be sureburner door is not behind leg.Step 6: Attach the gas regulator supply hose6. Attach regulator hose to bottom ofburner. Thread on clockwise until handtight. Use an adjustable wrench to tightenan additional 1/4 turn.Do Not Over Tighten!5
Step 7: Attach the support columnand upper body shieldStep 9: Attach the catch cup(G)5 x 7 mm screwsSix used in this step(J)(C)7a. Slide the support column (J), short end upinto the upper body support (C), securewith two 5 x 7 mm screws by lining up theholes.7b. Place the green upper body shield (G)on top of the upper body support andsecure with four 5 x 7 mm screws.Step 8: Attach the trap bodyPRONGS9. Slide the catch cup into position usingthe alignment marks. Catch cup lid isopened downward by prongs attachedto underside of trap.Step 10: Hammer the pegs into theground to secure the Mosquito Trap.5 x 7 mm screwsTwo used in this step8. Slide the pipe attached to the Trap bodyover the support column. Rotate to lineup the screw holes. Secure using two5 x 7 mm screws.67
P.O.Box 593812 Orlando,FL 32859-3812 Phone: 407 857 8786 . Thank you and congratulations on your purchase of the Mosquito Trap. This product is . of our products, such as our Silã Air Purification line, Pet Appliance , Biagianté and PestContro pest control devices. While you're there, register your new pur-chase .