Transcription
Vauxhall CorsaOwner's Manual
ContentsIntroduction . 2In brief . 6Keys, doors and windows . 20Seats, restraints . 35Storage . 57Instruments and controls . 75Lighting . 112Climate control . 122Driving and operating . 132Vehicle care . 187Service and maintenance . 234Technical data . 237Customer information . 252Index . 258
2IntroductionIntroduction
IntroductionVehicle specific dataPlease enter your vehicle's data onthe previous page to keep it easilyaccessible. This information isavailable in the sections "Service andmaintenance" and "Technical data"as well as on the identification plate.IntroductionYour vehicle is a designedcombination of advanced technology,safety, environmental friendlinessand economy.This Owner's Manual provides youwith all the necessary information toenable you to drive your vehiclesafely and efficiently.Make sure your passengers areaware of the possible risk of accidentand injury which may result fromimproper use of the vehicle.You must always comply with thespecific laws and regulations of thecountry that you are in. These lawsmay differ from the information in thisOwner's Manual.Disregarding the description given inthis manual may affect your warranty.When this Owner's Manual refers to aworkshop visit, we recommend yourVauxhall Authorised Repairer.For gas vehicles, we recommend aVauxhall Authorised Repairerlicensed to service gas vehicles.All Vauxhall Authorised Repairersprovide first-class service atreasonable prices. Experiencedmechanics trained by Vauxhall workaccording to specific Vauxhallinstructions.The customer literature pack shouldalways be kept ready to hand in thevehicle.Using this manual This manual describes all optionsand features available for thismodel. Certain descriptions,including those for display andmenu functions, may not apply toyour vehicle due to modelvariant, country specifications,special equipment oraccessories.The "In brief" section will give youan initial overview. 3The table of contents at thebeginning of this manual andwithin each section shows wherethe information is located.The index will enable you tosearch for specific information.This Owner's Manual depicts lefthand drive vehicles. Operation issimilar for right-hand drivevehicles.The Owner's Manual uses theengine identifier code. Thecorresponding sales designationand engineering code can befound in the section "Technicaldata".Directional data, e.g. left or right,or front or back, always relate tothe direction of travel.Displays may not support yourspecific language.Display messages and interiorlabelling are written in boldletters.
4IntroductionDanger, Warnings andCautions9 DangerText marked 9 Danger providesinformation on risk of fatal injury.Disregarding this information mayendanger life.9 WarningText marked 9 Warning providesinformation on risk of accident orinjury. Disregarding thisinformation may lead to injury.CautionText marked Caution providesinformation on possible damage tothe vehicle. Disregarding thisinformation may lead to vehicledamage.SymbolsPage references are indicated with 3.3 means "see page".Page references and index entriesrefer to the indented headings givenin the section table of content.Thank you for choosing a Vauxhall.We wish you many hours ofpleasurable driving.Your Vauxhall Team
Introduction5
6In briefIn briefVehicle unlockingInitial drive informationPress c to unlock the doors and loadcompartment. Open the doors bypulling the handles.To open the tailgate, push thetouchpad switch below the brandemblem.Radio remote control 3 21, Centrallocking system 3 22, Loadcompartment 3 25.
In briefSeat adjustmentBackrest inclinationSeat heightTurn handwheel. Do not lean onbackrest while adjusting.Seat position 3 36, Seat adjustment3 37, Seat folding 3 38, Sport seat3 38.Lever pumping motionup: seat higherdown : seat lower7Longitudinal adjustmentPull handle, slide seat, releasehandle. Try to move the seat back andforth to ensure that the seat is lockedin place.Seat position 3 36, Seat adjustment3 37.Seat position 3 36, Seat adjustment3 37.
8In briefHead restraint adjustmentSeat beltMirror adjustmentInterior mirrorPress release button, adjust height,engage.Head restraints 3 35.Pull out the seat belt and engage inbelt buckle. The seat belt must not betwisted and must fit close against thebody. The backrest must not be tiltedback too far (maximum approx. 25 ).To release belt, press red button onbelt buckle.Seat position 3 36, Seat belts3 40, Airbag system 3 43.To adjust the mirror, move the mirrorhousing in the desired direction.Manual anti-dazzle interior mirror3 29.Automatic anti-dazzle interior mirror3 30.
In briefExterior mirrorsSteering wheel adjustmentSelect the relevant exterior mirror withthe rocker switch and adjust themirror with the control :.Convex exterior mirrors 3 28,Electric adjustment 3 28, Foldingexterior mirrors 3 29.Heated exterior mirrors 3 29.Unlock the lever, adjust the steeringwheel, then engage the lever andensure it is fully locked.Do not adjust the steering wheelunless the vehicle is stationary andthe steering wheel lock has beenreleased.Airbag system 3 43, Ignitionpositions 3 133.9
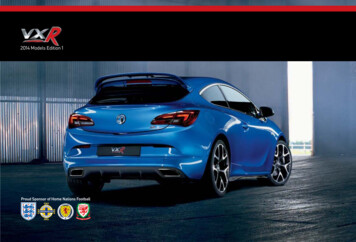
10In briefInstrument panel overview
In brief1Turn and lane-changesignals, headlight flash,low beam and high beam . 117Exit lighting . 120Parking lights . 11823456789Buttons for DriverInformation Centre . 96Instruments . 83Forward collision alertindicator . 156Driver Information Centre . 96Infotainment controls . 76Windscreen wiper,windscreen washersystem, rear windowwiper, rear window washersystem . 77Central locking system . 22City mode . 152Fuel selector . 85Eco button for stop-startsystem . 135Traction Control system . 1501415161718Electronic Stability Control . 15119Parking assist . 159Seat heating . 39Heated steering wheel . 76Anti-theft alarm systemstatus LED . 27Hazard warning flashers . 116Control indicator for airbagdeactivation . 9110111213Control indicator for frontpassenger seat belt . 90Colour-Info-Display . 100Graphic-Info-Display . 101Centre air vents . 130Side air vents, passengerside . 130Airbag deactivation switch(behind glovebox cover) . 48Glovebox . 57Climate control system . 122Power outlet . 82AUX input, USB input . 10Selector lever,transmission . 144Parking brake . 1491120 Ignition switch withsteering wheel lock . 13321 Horn . 77Driver airbag . 4622 Bonnet release lever . 18923 Steering wheel adjustment . . 7624 Light switch . 112Headlight rangeadjustment . 114Rear fog light . 117Fuse box . 207Brightness of instrumentpanel illumination . 11825 Power windows . 3026 Exterior mirrors . 2827 Cruise control . 153Speed limiter . 155Forward collision alert . 156
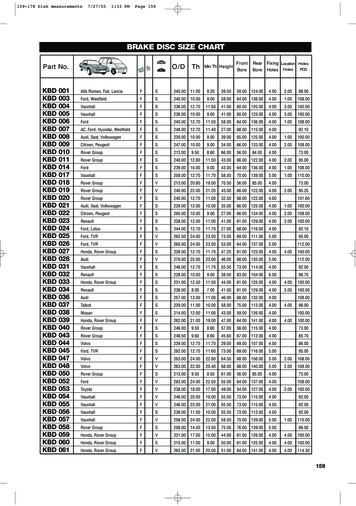
12In briefExterior lightingLight switchTurn light switch:7 : lights off8 : sidelights9 : headlightsFog lightsPress buttons in light switch: : front fog lightsr : rear fog lightLight switch with automatic lightcontrolHeadlight flash, high beam andlow beamAUTO : automatic light control:exterior lighting is switchedon and off automaticallym: activation or deactivation ofthe automatic light control: sidelights8: headlights9headlight flash : pull leverhigh beam: push leverlow beam: push or pull leverAutomatic light control 3 113.High beam 3 114, Headlight flash3 114, High beam assist 3 115.
In briefTurn and lane-change signalsHazard warning flashersHornlever up: right turn signallever down : left turn signalOperated by pressing .Hazard warning flashers 3 116.Press j.Turn and lane-change signals3 117, Parking lights 3 118.13
14In briefWasher and wiper systemsWindscreen washerRear window wiperPull lever.Windscreen washer system 3 77,Washer fluid 3 193, Wiper bladereplacement 3 195.Press the rocker switch to activate therear window wiper:upper switch: continuousoperationlower switch: intermittentoperationmiddle position : offWindscreen wiperHI : fastLO : slowINT : interval wipingorautomatic wiping with rainsensorOFF : offFor single wipe when the wiper is off,press lever down to position 1x.Windscreen wiper 3 77.
In briefRear window washerClimate controlHeated rear windowPush lever.Washer fluid is sprayed on the rearwindow and the wiper wipes a fewtimes.Rear window wiper/washer 3 79.The heating is operated by pressingÜ.Heated rear window 3 32.Heated windscreen 3 32.Heated exterior mirrorsPressing Ü also activates the heatedexterior mirrors.Heated exterior mirrors 3 29.15Demisting and defrosting thewindows Set air distribution control to l.Press V.Set temperature control towarmest level. Set fan speed to highest level. Switch on heated rear window Ü. Open side air vents as requiredand direct them towards the doorwindows.Climate control system 3 122.
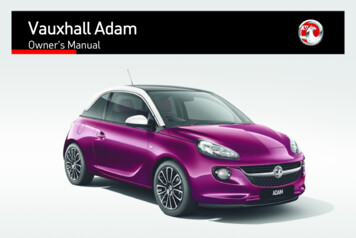
16In briefTransmissionAutomatic transmissionManual transmission automatedPRNDM ]R : reverse, engage only whenvehicle is stationaryN : neutralD : automatic modeM : manual mode : upshift in manual mode] : downshift in manual modeManual transmissionReverse: with the vehicle stationary,depress clutch pedal and press therelease button on the selector leverand engage the gear.If the gear does not engage, set thelever to neutral, release the clutchpedal and depress again; then repeatgear selection.Manual transmission 3 144.:::::::parkreverseneutraldrivemanual modepress to upshift in manual modepress to downshift in manualmodeThe selector lever can only be movedout of P when the ignition is on andthe brake pedal is applied. To engageP or R, press the release button.Automatic transmission 3 140.Manual transmission automated3 144.
In briefStarting offStarting the engineCheck before starting off Tyre pressure and condition3 211, 3 250.Engine oil level and fluid levels3 190.All windows, mirrors, exteriorlighting and number plates arefree from dirt, snow and ice andare operational.Proper position of mirrors, seats,and seat belts 3 28, 3 36,3 41.Brake function at low speed,particularly if the brakes are wet. Turn key to position 1.Move the steering wheel slightlyto release the steering wheellock.Manual transmission: operateclutch and brake pedal.Manual transmission automated:operate brake pedal.Automatic transmission: operatebrake pedal and move selectorlever to P or N.Do not operate accelerator pedal. 17Diesel engines: turn the key toposition 2 for preheating and waituntil control indicator !extinguishes. Turn the key to position 2 forpreheating and wait until controlindicator ! extinguishes. Turn key to position 3 andrelease.Starting the engine 3 134.
18In briefStop-start systemIf the vehicle is at a low speed or at astandstill and certain conditions arefulfilled, activate an Autostop asfollows:Vehicles with manual transmission: Depress the clutch pedal. Set the lever to neutral. Release the clutch pedal.An Autostop is indicated by thecontrol indicator D.To restart the engine, depress theclutch pedal again. The controlindicator D extinguishes.Vehicles with manual transmissionautomated:If the vehicle is at a standstill with thebrake pedal depressed, Autostop isactivated automatically, indicated bycontrol indicator D.Release the brake pedal or moveselector lever out of D to restart theengine. Control indicator Dextinguishes.Stop-start system 3 135.Parking9 Warning Do not park the vehicle on aneasily ignitable surface. Thehigh temperature of theexhaust system could ignite thesurface.Always apply the parkingbrake. Activate the manualparking brake without pressingthe release button. Apply asfirmly as possible on a downhillslope or uphill slope. Depressbrake pedal at the same time toreduce operating force.Switch off the engine.If the vehicle is on a levelsurface or uphill slope, engagefirst gear or set the selectorlever to position P beforeremoving the ignition key. Onan uphill slope, turn the frontwheels away from the kerb.If the vehicle is on a downhillslope, engage reverse gear or
In brief set the selector lever to positionP before removing the ignitionkey. Turn the front wheelstowards the kerb.Close the windows and thesunroof.Remove the ignition key fromthe ignition switch. Turn thesteering wheel until thesteering wheel lock is felt toengage.For vehicles with automatictransmission, the key can onlybe removed when the selectorlever is in position P.For vehicles with manualtransmission automated, thekey can only be removed fromthe ignition switch when theparking brake is applied.Lock the vehicle by pressing e onthe radio remote control.Activate the anti-theft alarmsystem 3 27.The engine cooling fans may runafter the engine has beenswitched off 3 189.CautionAfter running at high enginespeeds or with high engine loads,operate the engine briefly at a lowload or run in neutral forapprox. 30 seconds beforeswitching off, in order to protectthe turbocharger.Keys, locks 3 20, Laying-up thevehicle for a long period of time3 188.19
20Keys, doors and windowsKeys, doors andwindowsKeys, locks . 20Keys . 20Car Pass . 21Radio remote control . 21Memorised settings . 22Central locking system . 22Automatic locking . 24Child locks . 25Doors . 25Load compartment . 25Vehicle security . 26Anti-theft locking system . 26Anti-theft alarm system . 27Immobiliser . 28Exterior mirrors . 28Convex shape . 28Electric adjustment . 28Folding mirrors . 29Heated mirrors . 29Interior mirrors . 29Manual anti-dazzle . 29Automatic anti-dazzle . 30Windows . 30Windscreen . 30Manual windows . 30Power windows . 30Heated rear window . 32Heated windscreen . 32Sun visors . 32Roof . 33Sunroof . 33Keys, locksKeysCautionDo not attach heavy or bulky itemsto the ignition key.Replacement keysThe key number is specified in theCar Pass or on a detachable tag.The key number must be quotedwhen ordering replacement keys, asit is a component of the immobilisersystem.Locks 3 231.The code number of the adapter forthe locking wheel bolts is specified ona card. It must be quoted whenordering a replacement adapter.Wheel changing 3 223.
Keys, doors and windows21Lock cylindersCar PassDesigned to free-wheel if they areforcefully rotated without the correctkey or if the correct key is not fullyinserted. To reset, turn cylinder withthe correct key until its slot is vertical,remove key and then re-insert it. If thecylinder still free-wheels, turn the keythrough 180 and repeat operation.The Car Pass contains securityrelated vehicle data and shouldtherefore be kept in a safe place.When the vehicle is taken to aworkshop, this vehicle data is neededin order to perform certain operations.The radio remote control has a rangeof approx. 20 metres. It can berestricted by external influences. Thehazard warning flashers confirmoperation.Handle with care, protect frommoisture and high temperatures andavoid unnecessary operation.Radio remote controlFaultKey with foldaway key sectionPress button to extend. To fold thekey, first press the button.Used to operate: central locking system anti-theft locking system anti-theft alarm systemIf the central locking system cannotbe operated with the radio remotecontrol, it may be due to the following: The range is exceeded. The battery voltage is too low. Frequent, repeated operation ofthe radio remote control while notin range, which will require resynchronisation. Overload of the central lockingsystem by operating at frequentintervals, the power supply isinterrupted for a short time. Interference from higher-powerradio waves from other sources.Unlocking 3 22.
22Keys, doors and windowsBasic settingsMemorised settingsSome settings can be changed in theInfo-Display.Vehicle personalisation 3 105.Whenever the key is removed fromthe ignition switch, the followingsettings are automatically memorisedby the key: lighting electronic climate control presets for Infotainment system central locking system comfort settingsThe saved settings are automaticallyused the next time the memorised keyis inserted into the ignition switch andturned to position 1 3 133.A precondition is that Personalizationby driver is activated in the personalsettings of the Info-Display. This mustbe set for each key used.Vehicle personalisation 3 105.Radio remote control batteryreplacementReplace the battery as soon as therange reduces.Batteries do not belong in householdwaste. They must be disposed of atan appropriate recycling collectionpoint.Extend the key and open the unitsideways. Replace the battery(battery type CR 2032), payingattention to the installation position.Close the unit and synchronise.Radio remote controlsynchronisationAfter replacing the battery, unlock thedoor with the key in the driver's doorlock. The radio remote control will besynchronised when the ignition isswitched on.Central locking systemUnlocks and locks doors, loadcompartment and fuel filler flap.
Keys, doors and windowsFrom inside the vehicle with the doorslocked, pull an interior door handle tounlock the respective door. Pullingthe handle once more opens the door.NoticeIn the event of an accident in whichairbags or belt pretensioners aredeployed, the vehicle isautomatically unlocked.NoticeThree minutes after unlocking withthe remote control, the doors arerelocked automatically if no door hasbeen opened.UnlockingPress c.23Two settings are selectable in theInfo-Display: To unlock only the driver's door,load compartment and fuel fillerflap; press c once. To unlock alldoors; press c twice. Press c once to unlock doors,load compartment and fuel fillerflap.Vehicle personalisation 3 105.The setting can be saved for the keybeing used.Memorised settings 3 22.Unlocking and opening the tailgate3 25.Press e.If the driver's door is not closedproperly, the central locking systemwill not work.LockingCentral locking buttonsClose doors, load compartment andfuel filler flap.Locks or unlocks doors, the loadcompartment and fuel filler flap frominside the passenger compartment.
24Keys, doors and windowsFault in radio remote controlsystemUnlockingPress e to lock.Press c to unlock.Delayed door lockSwitch off engine and remove keyfrom the lock. Press e with at leastone door opened and three chimeswill sound. When the last door isclosed, the vehicle will automaticallylock all doors after five seconds andfeedback is given.After ten minutes, the vehicle willautomatically lock all doors even if adoor is still open. This function may beactivated or deactivated in the InfoDisplay. Vehicle personalisation3 105.Manually unlock the driver's door byturning the key in the lock. Switch onthe ignition and press the centrallocking button c to unlock the otherdoors, load compartment and fuelfiller flap.By switching on the ignition, the antitheft locking system is deactivated.LockingManually lock the driver's door byturning the key in the lock.Fault in central locking systemUnlockingManually unlock the driver's door byturning the key in the lock. The otherdoors can be opened by pulling theinterior handle twice. The loadcompartment and fuel filler flapcannot be opened.To deactivate the anti-theft lockingsystem, switch on the ignition 3 27.LockingPress inside locking knob of all doorsexcept driver's door. Then close thedriver's door and lock it from theoutside with the key.The fuel filler flap and tailgate cannotbe locked.Automatic lockingThis security feature can beconfigured to automatically lockdoors, load compartment and fuelfiller flap as soon as a certain speedis exceeded.
Keys, doors and windowsAdditionally, it is configurable tounlock the driver's door or all doorsafter the ignition is switched off andthe ignition key is removed (manualtransmission) or the selector lever ismoved to position P (automatictransmission).Settings can be changed in theInfo-Display.Vehicle personalisation 3 105.The settings can be saved for the keybeing used 3 22.Child locks9 WarningUse the child locks wheneverchildren are occupying the rearseats.DoorsLoad compartmentTailgateOpeningUsing a key or suitable screwdriver,turn switch on rear door lock to thehorizontal position. The door cannotbe opened from inside.To open the tailgate, push thetouchpad switch below the brandemblem.25
26Keys, doors and windowsClosinggases, which cannot be seen orsmelled, could enter the vehicle.This can cause unconsciousnessand even death.CautionUse interior handle.Do not press the touchpad switchwhilst closing as this will unlock thetailgate again.Central locking system 3 22.General hints for operatingtailgate9 DangerDo not drive with the tailgate openor ajar, e.g. when transportingbulky objects, since toxic exhaustBefore opening the tailgate, checkoverhead obstructions, e.g. agarage door, to avoid damage tothe tailgate. Always check themoving area above and behind thetailgate.NoticeThe installation of certain heavyaccessories onto the tailgate mayaffect its ability to remain open.Vehicle securityAnti-theft locking system9 WarningDo not use the system if there arepeople in the vehicle! The doorscannot be unlocked from theinside.The system deadlocks all the doors.All doors must be closed otherwisethe system cannot be activated.If the ignition was on, the driver's doormust be opened and closed once sothat the vehicle can be secured.Unlocking the vehicle disables themechanical anti-theft locking system.This is not possible with the centrallocking button.
Keys, doors and windowsActivatingActivation Self-activated 30 seconds afterlocking the vehicle by pressing eonce.Directly by pressing e twicewithin five seconds.Status LED27Status during the first 30 seconds ofanti-theft alarm system activation:LED illuminates : test, arming delayLED flashes: doors, tailgate orquicklybonnet notcompletely closed,or system faultStatus after system is armed:LED flashes: system is armedslowlySeek the assistance of a workshop inthe event of faults.Press e on the radio remote controltwice within five seconds.DeactivationAnti-theft alarm systemThe anti-theft alarm system iscombined with the central lockingsystem.It monitors: doors, tailgate, bonnet ignitionStatus LED is integrated in the sensoron top of the instrument panel.Unlocking the vehicle by pressing cdeactivates anti-theft alarm system.The system is not deactivated byunlocking the driver's door with thekey or with the central locking buttonin the passenger compartment.AlarmWhen triggered, the alarm hornsounds and the hazard warning lightsflash simultaneously. The numberand duration of alarm signals arestipulated by legislation.
28Keys, doors and windowsThe alarm can be silenced bypressing any button on the radioremote control or by switching on theignition.The anti-theft alarm system can onlybe deactivated by pressing c on theradio remote control or by switchingon the ignition.A triggered alarm, which has not beeninterrupted by the driver, will beindicated by the hazard warninglights. They will flash quickly threetimes when the vehicle is unlockedwith the radio remote control.Vehicle messages 3 102.ImmobiliserThe system is part of the ignitionswitch and checks whether thevehicle is allowed to be started withthe key being used.The immobiliser is activatedautomatically after the key has beenremoved from the ignition switch.If the control indicator d flashes whenthe ignition is on, there is a fault in thesystem; the engine cannot be started.Switch off the ignition and repeat thestart attempt.If the control indicator continuesflashing, attempt to start the engineusing the spare key and seek theassistance of a workshop.NoticeThe immobiliser does not lock thedoors. You should always lock thevehicle after leaving it.Switch on the anti-theft alarmsystem 3 22, 3 27.Exterior mirrorsConvex shapeThe convex exterior mirror containsan aspherical area and reduces blindspots. The shape of the mirror makesobjects appear smaller, which willaffect the ability to estimatedistances.Electric adjustmentControl indicator d 3 94.Select the relevant exterior mirror bypressing the rocker switch to the left(L) or right (R). Then swivel thecontrol : to adjust the mirror.
Keys, doors and windowsRocker switch in center position: nomirror is selected to be adjusted.Heated mirrors29Interior mirrorsManual anti-dazzleFolding mirrorsFor pedestrian safety, the exteriormirrors will swing out of their normalmounting position if they are struckwith sufficient force. Reposition themirror by applying slight pressure tothe mirror housing.Operated by pressing Ü.Mirror heating works with the enginerunning.It is switched off automatically aftersix minutes.Pressing Ü once more during thesame ignition cycle allows the heatingto operate for another three minutes.Parking positionThe exterior mirrors can be folded inby pressing gently on the outer edgeof the housing, e.g. when in aconfined parking situation.To reduce dazzle, adjust the lever onthe underside of the mirror housing.
30Keys, doors and windowsAutomatic anti-dazzleWindowsWindscreenWindscreen stickersDo not attach stickers, e.g. toll roadstickers or similar, on the windscreenin the area of the interior mirror.Otherwise the detection zone of thesensor in the mirror housing could berestricted.Windscreen replacementDazzle from following vehicles atnight is automatically reduced.CautionIf the vehicle has a front-lookingcamera sensor for the driverassistance systems, it is veryimportant that any windscreenreplacement is performedaccurately according to Vauxhallspecifications. Otherwise, thesesystems may not work properlyand there is a risk of unexpectedbehaviour and/or messages fromthese systems.Manual windowsThe rear door windows can beopened or closed manually with thewindow cranks.Power windows9 WarningTake care when operating thepower windows. Risk of injury,particularly to children.Be careful when closing thewindows. Ensure that nothingbecomes trapped in them as theymove.Operable with ignition on (position 2)3 133.Retained power off 3 134.
Keys, doors and windowsLonger pull: window closesautomatically upto end position. Tostop movement, operate switch oncemore.Safety functionIf the window glass encountersresistance above the middle of thewindow during automatic closing, it isimmediately stopped and openedagain.Operate the switch in the door trim forthe respective window by pushing toopen or pulling to close.OpenShort push: window opens in stages.Long push: window opensautomatically upto end position. Tostop movement, operate switch oncemore.CloseShort pull: window closes in stages.Override safety functionIn the event of closing difficulties dueto frost or the like, switch on theignition, then pull the switch severaltimes to close the windows in stages.OverloadIf the windows are repeatedlyoperated at short intervals, thewindow operation is disabled forsome time.31FaultIf the windows cannot be opened orclosed automatically, activate thewindow electronics as follows:1. Close the doors.2. Switch on ignition.3. Close the window completely andoperate the button for anadditional five seconds.4. Open the window completely andoperate the button forone second further.5. Repeat this procedure for eachwindow.
32Keys, doors and windowsHeated rear windowHeated windscreenOperated by pressing Ü.Rear window heating works with theengine running.It is switched off automatically aftersix minutes.Pressing Ü once more during thesame ignition cycle allows the heatingto operate for another three minutes.Operated by pressing Ü.Windscreen heating works togetherwith heated rear window and enginerunning.It is switched off automatically aftersix minutes.Pressing Ü once more during thesame ignition cycle allows the heatingto operate for another three minutes.Sun visorsThe sun visors can be folded down orswivelled to the side to preventdazzling.The integral mirrors should be closedwhen driving.A ticket holder is located on thebackside of the sun visor.
Keys, doors and windowsRoof33CloseHold switch d depressed from anyposition until sunroof is closedcompletely. Releasing the switchstops movement in any position.Sunroof9 WarningTake care when operating thesunroof. Risk of injury, particularlyto children.Keep a close watch on themovable parts when operatingthem. Ensure that noth
The "In brief" section will give you an initial overview. The table of contents at the beginning of this manual and within each section shows where the information is located. The index will enable you to search for specific information. This Owner's Manual depicts left-hand drive vehicles. Operation is similar for right-hand drive vehicles.