Transcription
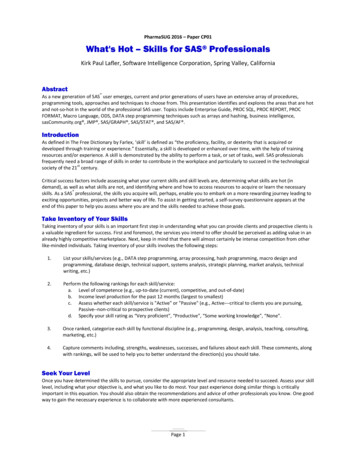
Paper SAS302-2014Introduction to SAS StudioMichael A. Monaco, Marie Dexter, Jennifer TamburroSAS Institute Inc., Cary, NCABSTRACTThis paper is an introduction to SAS Studio and covers how to perform basic programming tasks in SAS Studio. Manypeople program in the SAS language by using SAS Display Manager or SAS Enterprise Guide . SAS Studio isdifferent because it enables you to write and run SAS code by using the most popular web browsers, without requiringa SAS 9.4 installation on your machine. With SAS Studio, you can access your data files, libraries, and existingprograms, and write new programs while using SAS software behind the scenes. SAS Studio connects to a SAS serverin order to process SAS programs. The SAS server can be a hosted server in a cloud environment, a server in yourlocal environment, or a copy of SAS on your local machine.INTRODUCTIONSAS Studio is a pure HTML5 application that requires no browser plug-ins and supports all the major web browsers,such as Microsoft Internet Explorer 9, 10 and 11, Apple Safari 6 , Mozilla Firefox 21 , and Google Chrome 27 . Thebrowser-based interface enables SAS Studio to run on the iPad as well as laptop or desktop computers. In mostdeployments to run SAS Studio, you simply go to a URL and log on. This paper covers the following topics: Elements of the SAS Studio Interface Programming with SAS Studio Working with Data in SAS Studio Introduction to the Common Task Model and Authoring SAS Studio TasksELEMENTS OF THE SAS STUDIO INTERFACEWhen you log on to SAS Studio, the main SAS Studio window appears.The main window of SAS Studio consists of a navigation pane on the left and a work area on the right. The navigationpane provides access to the search feature, your folders and folder shortcuts, your tasks and snippets, the librariesthat you have access to, and your file shortcuts. The Folders section is displayed by default.1
The work area is used to display your data, code, logs, and results. When you first open SAS Studio, the work areadisplays a new program window. When you open data and run tasks, other windows open in the work area with atabbed interface.USING THE NAVIGATION PANEYou can expand the sections of the navigation pane by clicking the section that you want to view.Using the Search PaneThe Search section of the navigation pane enables you to search your directories for filenames, folder names, tablenames and descriptions, column names and labels, and library names. You can open items directly from your searchresults by double-clicking them or using a drag-and-drop operation to move them to the work area.1.2.3.In the navigation pane, click Search to open the Search section.In the search box, enter the text that you want to search for.Click to open the Search Options window and specify the types of items that you want to search. By default,all types of items are searched.4.Click Search.Using the Folders PaneThe Folders section of the navigation pane enables you to access your folders, create folder shortcuts, download andupload files, and create new SAS programs. You can expand and collapse folders, and you can open items in thefolders, such as a SAS program or table, by double-clicking them or by using a drag-and-drop operation to move themto the work area.To create a new folder shortcut, clickand select Folder Shortcut. Enter the shortcut name and full path to thefolder location, and then click Save. The new shortcut is added to the list of folder shortcuts.The Folders section of the navigation pane references files that are stored on the same machine as the SASserver. These files can be downloaded to your workstation. Local files on your workstation must be uploaded to theserver in order to be used with SAS Studio.To download a file, select the file that you want to download and clickdefault application or save it to your local computer. You are prompted to open the file in theTo upload one or more files from your local computer, click. Specify the folder to which you want to upload thefiles, and click Choose Files to browse for the files that you want to upload.Note that all files are stored on the same machine as the SAS server. Local files on your workstation must be uploadedto the server in order to be used with SAS Studio.2
Using the Tasks PaneThe Tasks section of the navigation pane enables you to access tasks in SAS Studio. Tasks are based on SASprocedures and enable you to generate SAS code and formatted results, based on the entry of user-supplied inputsand parameter values. SAS Studio is shipped with several predefined tasks that you can run. You can also edit a copyof a predefined task, and you can create your own new tasks.To create a new task, click. SAS Studio creates a template in the work area that you can modify to develop customtasks for your site. Custom tasks can be accessed from the My Tasks folder. For more information, see the “Introductionto the Common Task Model and Authoring SAS Studio Tasks” section in this paper.To edit a task that you have created, select the task from the My Tasks folder and click. The XML code that is usedto create the task is opened in the work area. If you want to edit a predefined task, you must first right-click the taskand select Add to My Tasks. Note that you can edit only the tasks that are in the My Tasks folder.Using the Snippets PaneThe Snippets section of the navigation pane enables you to access your code snippets, which are samples of commonlyused SAS code that you can insert into your SAS program. SAS Studio is shipped with several predefined code snippetsthat you can use. You can also save copies of these snippets and edit them to create your own custom snippets.Using the Libraries PaneThe Libraries section of the navigation pane enables you to access all of your SAS table libraries and their contents.You can expand a table and view the columns in that table. The icon in front of the column name indicates the datatype of the column. In addition to viewing the column names, you can use a drag-and-drop operation to move thecolumns from the tree directly into your SAS code.3
Using the File Shortcuts PaneFile shortcuts, also known as SAS File References, enable you to quickly access files. You can create a file shortcut toa file on your SAS server or via a URL.To create a new file shortcut, expand the File Shortcuts section of the navigation pane and click. You can definethe shortcut by specifying a complete path and filename or by specifying a URL. If you want this shortcut to be availablethe next time you use SAS Studio, select Re-create this file shortcut at start-up.You can open a file from a file shortcut by double-clicking it or by using a drag-and-drop operation to move it to thework area.Customizing the Navigation PaneBy default, all six sections of the navigation pane are displayed when you open SAS Studio. To customize whichsections are displayed, clickin the upper right corner of the application and select View. Select or clear anysections that you want to add or remove. The navigation pane is updated immediately.USING THE WORK AREAThe work area is the main portion of the SAS Studio application for accessing programs and tasks and for viewing data.The work area is always displayed and cannot be minimized. When you open a program, task, or table, the windowsopen as new tabs in the work area. The code, log, and results that are associated with programs and tasks are groupedtogether under the main tab for the program or task.4
SETTING PREFERENCESThe Preferences window enables you to change several options that affect SAS Studio. To access the generaloptions, clickin the upper right corner of the application and select Preferences.PROGRAMMING WITH SAS STUDIOAbout the Code EditorSAS Studio includes a color-coded, syntax-checking SAS language editor for editing new or existing SAS programs.The editor includes a wide variety of features such as autocomplete, automatic formatting, and pop-up syntax help.With the code editor, you can write, run, and save SAS programs. You can also modify and save the code that isautomatically generated when you run a task.SAS Studio also includes several sample code snippets that you can use to make programming common tasks easier.Opening and Creating ProgramsYou can open SAS programs from the Folders section of the navigation pane. To open a program, expand theappropriate folder and double-click the program that you want to open, or use a drag-and-drop operation to move it tothe work area. The program opens in a new tab in the work area.You can create a new SAS program from the Folders section of the navigation pane. To create a new program, clickand select SAS Program. A program window appears in a new tab in the work area.Note: You can also clickon the toolbar in a program window or press F4.Running a ProgramAfter you have written your program, you can run it by clickingor pressing F3. If there are no errors, the resultsopen automatically. If there are errors, the Log tab opens by default. You can expand the Errors, Warnings, andNotes sections to view the messages. When you click on a message, SAS Studio highlights it for you in the log so thatyou can see exactly where the message occurs in the log.5
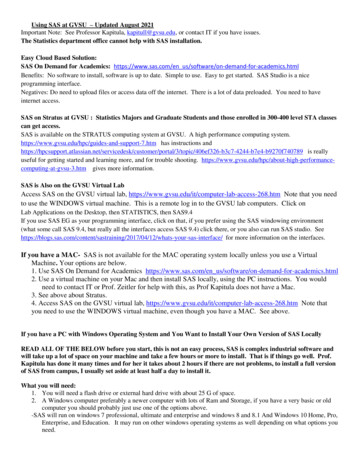
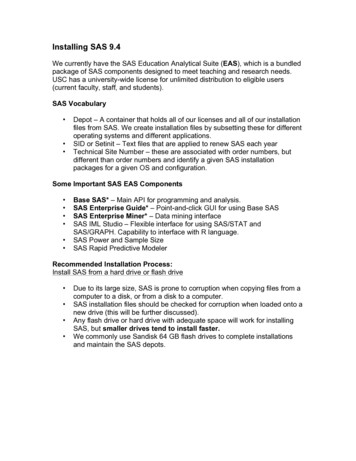
The autocomplete, or code completion, feature in the code editor can predict the next word that you want to enterbefore you actually enter it completely. The autocomplete feature can complete keywords that are associated with SASprocedures, statements, macros, functions, CALL routines, formats, informats, macro variables, SAS colors, styleelements, style attributes, and statistics keywords, and various SAS statement and procedure options.This example shows the keywords and help that appear when you enter proc a in the code editor.In this example, you select APPEND from the list of procedures so that proc append appears in the code editor.When you enter a space, the code editor displays a list of options for the APPEND procedure.6
How you open the autocomplete list depends on the keyword that you want to add.If you want to add a global statement, DATA step statement, CALL routine, procedure, macro statement, or automaticmacro variable, enter the first one or more letters of the keyword that you want to use. A window opens with a list ofsuggested keywords that begin with those letters.If you want to specify colors, formats, informats, macro functions, SAS functions, statistics keywords, style elements,or style attributes, position your mouse pointer in a comment and press Ctrl spacebar. To navigate through the list ofoptions backward, press Ctrl Shift spacebar.Note: The code completion feature can be turned off in the Preferences window. In the Preferences window, clickEditor and deselect Enable autocomplete. Even if you have deselected the Enable autocomplete option, thesekeyboard shortcuts are available.7
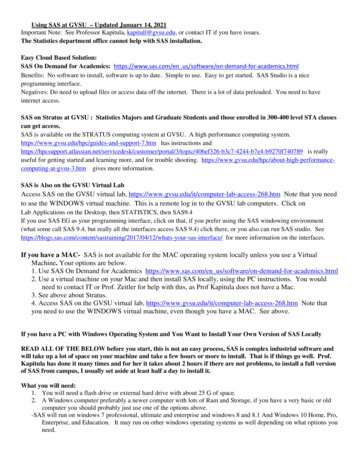
The code editor displays brief SAS syntax documentation as you write and edit your programs. You can display theHelp by right-clicking a keyword in your program and selecting Syntax Help, or simply start entering a valid SASkeyword and then click a suggested keyword in the autocomplete window.The SAS Product Documentation provides more comprehensive usage information about the SAS language, but thesyntax help in the code editor can get you started with a hint about the syntax or a brief description of the keyword.Click the links at the bottom of the window to search for the keyword in the SAS Product Documentation, Samples andSAS Notes, and SAS Technical Papers.You can use the code editor to make your programs easier to read by automatically formatting your code. When youautomatically format your code, line breaks are added, and each line is correctly indented according to its nesting level.To format the code in the code editor, click.For example, the following code is difficult to read because it lacks indention and logical line breaks:8
you use the automatic code-formattingdataAftertopn;length rank 8; label rank "Rank";set topn;&category descending &measure;data bytopn;if first.&category then rank 0; rank 1;lengthrank 8;if rank le &n then output;label rank "Rank";runfeature, the program looks like this:set topn;by &category descending &measure;if first.&category thenrank 0;rank 1;if rank le &n thenoutput;run;SAS Studio also maintains a log with entries for each time you run a program or task. You can use this log, orsubmission history, to access prior versions of your submitted code. To view your submission history, click the Codetab in your program or task window. On the toolbar, clickand select the version that you want to open. The priorversion of the program opens in a new window from which you can copy and paste the code as needed. Thisfunctionality replaces the RECALL functionality in SAS Display Manager.Working with ResultsWhen you run a task or a program in SAS Studio, the results are displayed in the work area. You can save the resultsas an HTML, PDF, or RTF file. You can also download any generated data. The SAS Output Delivery System (ODS)used by SAS Studio gives you greater flexibility in generating, storing, and reproducing SAS procedure and DATA stepoutput along with a wide range of formatting options. ODS provides formatting functionality that is not available whenusing individual procedures or the DATA step without ODS. To see the default output destinations, simply submit somebasic SAS code to produce output.proc print data sashelp.cars;run;proc gtestit;run;SAS Studio uses very specific ODS options and the GOPTIONS statements so that the output displays properly in theweb environment. To view all of the ODS options in your code, clickand select Preferences. In the Preferenceswindow, click General and select the Show generated code in the SAS log option.Note: To ensure that your output displays properly, use great care when explicitly setting ODS options or GOPTIONSstatements in your code.The Preferences window enables you to change several options that affect how your results are displayed. To accessthe editor option, clickin the upper right corner of the application, select Preferences, and then click Results.This option enables you to set the HTML, PDF, and RTF output style. It also enables you to choose whether PDF andRTF output will automatically be generated. Generating PDF and RTF output might increase execution run-timeperformance for complex output.9
WORKING WITH DATA IN SAS STUDIOYou can access tables in SAS Studio in several ways: You can double-click a file in the Folders and Libraries sections. You can use a drag-and-drop operation to move a file from the Folders and Libraries sections to the workarea.You can search for a file in the Search section and open it from the search results. You can open the file bydouble-clicking it or by using a drag-and-drop operation to move it to the work area. When you open a table, all of the columns in the table are displayed. You can use the Columns area to specify whichcolumns you want to include in the table viewer. By default, the column names are displayed, but you can choose todisplay the column labels by selecting Column labels from the View drop-down list.You can view the properties of the table and its columns by clicking10on the toolbar.
Filtering and Sorting DataIn the table viewer, you can right-click a column heading to filter and sort the data by that column.When you customize the table view by filtering, sorting, and selecting columns, SAS Studio is generating SAS code. Toview the generated code, clickon the toolbar. A new program window appears with the code that was used tocreate the view of the table in the table viewer. The program is a copy of the query code and is no longer associatedwith the original query. Editing the code does not affect the data that is displayed in the table viewer, and modifying thetable viewer does not affect the contents of the code.11
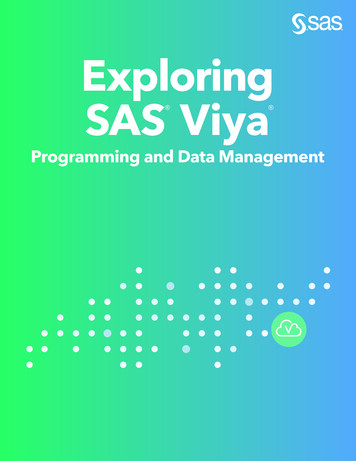
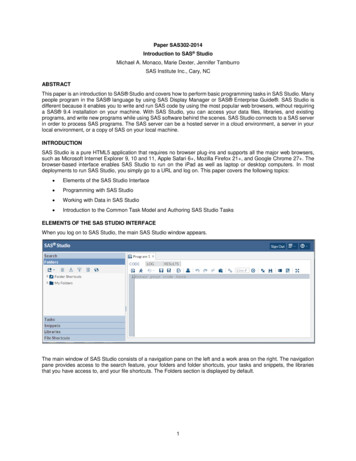
The filter options vary depending on the type of column that you have selected. The Add Filter window for a numericcolumn enables you to specify a single value for each criterion.The Add Filter window for a character column enables you to select one or more values in the column.Exporting DataYou can use SAS Studio to export your data as another file type to a folder that you specify.To export your data:12
Click Libraries in the navigation pane and browse to find the file that you want to export.Right-click the file and select Export. The Export Table window appears.In the Filename box, enter the name of the exported file.From the File format drop-down list, select the format of the exported file. Select the folder in which you want to save the exported file.Click Export to export the file.Note: SAS/ACCESS to PC Files must be licensed for some export formats.INTRODUCTION TO THE COMMON TASK MODEL AND AUTHORING SAS STUDIO TASKSSAS Studio is shipped with several predefined tasks, which are point-and-click user interfaces that guide the userthrough an analytical process. For example, tasks enable users to create a bar chart, run a correlation analysis, or rankdata. When a user selects a task option, SAS code is generated and run on the SAS server. Any output (such asgraphical results or data) is displayed in SAS Studio. Because of the flexibility of the task framework, you can createtasks for your site or modify tasks that have been shipped with SAS Studio. In SAS Studio, all tasks use the samecommon task model and the Velocity Template Language.The Common Task Model (CTM) defines customizable or parameterized SAS execution tasks. A task is defined bydescribing the type of data it needs and the options it presents to the user.13
SAS Studio tasks are defined by an XML specification. The general format is described here.A top-level Task element has these children:RegistrationThe Registration element identifies the type of task. In this element, you define the task name and unique identifier.MetadataThe Metadata element specifies whether an input data source is required to run the task, any role assignments, andthe options in the task. The UI engine reads the Roles element to determine what types of variables are required by the task. Hereis the information that you would specify in this element: the type of variable that the user can assign to this role (for example, numeric or character)the minimum or maximum number of variables that you can assign to a rolethe label or description of the role that appears in the user interfaceThe UI engine reads the Options element to determine how to display the options in the user interface.UIThe UI element describes how to present the user interface to the user. A top-down layout is supported.DependenciesThe Dependencies element describes any dependencies that options might have on one another. For example,selecting a check box could enable a text box.RequirementsThe Requirements element specifies what conditions must be met for code to be generated.Code TemplateThe Code Template element determines the output of the task defined by the Velocity Template Language.For more information about these XML elements, see SAS Studio 3.1 Developer’s Guide.14
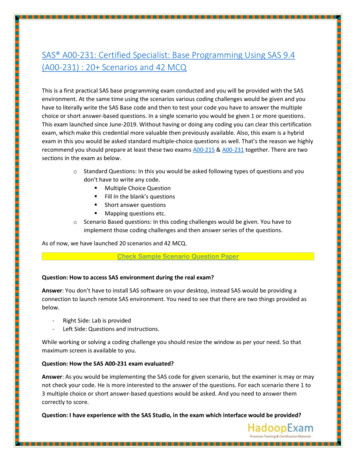
Using the Example Task to Get StartedWhen you create a new task in SAS Studio, the application brings up an example task that demonstrates all the userinterface elements you can use in a task in a full functional example.To create a new task, clickTo test the task, clickin the Tasks section of the navigation pane.or press F3 and the example task will run.15
Understanding the List Data TaskTo view the user interface for a predefined task:1.2.3.In the navigation pane, open the Tasks section.Expand the folder that contains the task.Right-click the task name and select Open. Alternatively, you can double-click the task to open it. The taskopens to the right of the work area.You cannot edit the code for a predefined task. However, you can copy the task code and edit the copy.To view the code for a predefined task:1.2.3.4.In the navigation pane, open the Tasks section.Expand the Descriptive folder.Right-click List Data and select Add to My Tasks. A copy of the task is added to your My Tasks folder.Open the My Tasks folder and select the copied task.5.Click. The XML and Velocity code for the task appears.16
This example shows the task definition for the List Data task and labels each element in the XML code. ?xml version "1.0" encoding "UTF-16"? Task schemaVersion "1.0" 1 Registration Name List Data /Name Description The List Data task displays the contents of a table as areport. /Description GUID 3C74D5C3-B845-4926-A749-E56CBA1283E2 /GUID Procedures PRINT SORT /Procedures Version 1 /Version Links Link href "http://support.sas.com/cdlsearch?nh 25&ct 80000&qt PROC PRINT" PROC PRINT Documentation /Link Link href "http://support.sas.com/cdlsearch?nh 25&ct 80000&qt PROC SORT" PROC SORT Documentation /Link /Links /Registration 2 Metadata DataSources DataSource name "DATASOURCE" Roles Role maxVars "0" minVars "0" name "VAR" order "true"type "A" List variables /Role Role maxVars "0" minVars "0" name "BY" order "true"type "A" Group analysis by /Role Role maxVars "0" minVars "0" name "SUM" order "true"type "N" Total of /Role Role maxVars "0" minVars "0" name "ID" order "true"type "A" Identifying label /Role /Roles /DataSource /DataSources Options Option defaultValue "all" inputType "combobox" name "ROWS2LIST"width "264px" Rows to list: /Option Option inputType "string" name "all" All rows /Option Option inputType "string" name "firstnrows" First n rows /Option !-- Option inputType "string" name "firstnpct" First n percentof rows /Option -- 17
!-- Option inputType "string" name "everynrow" Every nth row /Option -- Option decimalPlaces "0" defaultValue "10" indent "1"inputType "numstepper" maxValue "999999" minValue "1"name "NVALUE" Amount (n): /Option !-- Option decimalPlaces "0" defaultValue "25" indent "1"inputType "numstepper" maxValue "100" minValue "1"name "NPERCENT" Percent (n): /Option -- Option inputType "string" name "DATATAB" DATA /Option Option inputType "string" name "DATAGROUP" DATA /Option Option inputType "string" name "ROLESGROUP" ROLES /Option Option inputType "string" name "OPTIONSTAB" OPTIONS /Option Option inputType "string" name "BASICOPTIONS" BASIC OPTIONS /Option Option defaultValue "1" inputType "checkbox" name "OBS" Display row numbers /Option Option defaultValue "Row number" indent "1" inputType "inputtext"name "OBSHEADING" width "250px" Column label /Option Option defaultValue "1" inputType "checkbox" name "LABEL" Use columnlabels as column headings /Options Option defaultValue "0" inputType "checkbox" name "PRINTNUMROWS" Displaynumber of rows /Option Option defaultValue "0" inputType "checkbox" name "ROUND" Round valuesbefore summing the variable /Option Option defaultValue "default" inputType "combobox" name "HEADING"width "264px" Heading direction: /Option Option inputType "string" name "default" Default /Option Option inputType "string" name "horizontal" Horizontal /Option Option inputType "string" name "vertical" Vertical /Option Option defaultValue "default" inputType "combobox" name "WIDTH"width "264px" Column width /Option Option inputType "string" name "full" Full /Option Option inputType "string" name "minimum" Minimum /Option Option inputType "string" name "uniform" Uniform /Option? Option inputType "string" name "uniformby" Uniform by /Option Option defaultValue "0" inputType "checkbox"name "SPLITLABEL" Split labels /Option Option defaultValue "*" indent "1" inputType "combobox"name "SPLITLABELVALUE"width "80px" Split character /Option /Options /Metadata 3 UI Container option "DATATAB" Group open "true" option "DATAGROUP" DataItem data "DATASOURCE"/ /Group Group open "true" option "ROLESGROUP" RoleItem role "VAR"/ RoleItem role "BY"/ RoleItem role "SUM"/ RoleItem role "ID"/ /Group /Container Container option "OPTIONSTAB" 18
Group open "true" option "BASICOPTIONS" OptionItem OptionItem OptionItem OptionItem OptionItemoption "OBS"/ option "OBSHEADING"/ option "LABEL"/ option "PRINTNUMROWS"/ option "ROUND"/ OptionChoice option "HEADING"/ OptionItem option "default"/ OptionItem option "horizontal"/ OptionItem option "vertical"/ /OptionChoice OptionChoice option "WIDTH"/ OptionItem option "default"/ OptionItem option "full"/ OptionItem option "minimum"/ OptionItem option "uniform"/ OptionItem option "uniformby"/ /OptionChoice OptionItem option "SPLITLABEL"/ OptionChoice option "SPLITLABELVALUE"/ OptionValue * /OptionValue OptionValue ! /OptionValue OptionValue @ /OptionValue OptionValue # /OptionValue OptionValue /OptionValue OptionValue % /OptionValue OptionValue /OptionValue OptionValue amp /OptionValue OptionValue /OptionValue /OptionChoice /Group /Container /UI 4 Dependencies Dependency condition "OBS '1'" Target action "enable" conditionResult "true" option "OBSHEADING"/ Target action "disable" conditionResult "false" option "OBSHEADING"/ /Dependency Dependency condition " SPLITLABEL '1'" Target action "enable" conditionResult "true" option "SPLITLABELVALUE"/ Target action "disable" conditionResult "false" option "SPLITLABELVALUE"/ /Dependency Dependency condition " ROWS2LIST.equalsIgnoreCase('firstnrows')" Target action "enable" conditionResult "true" option "NVALUE"/ Target action "disable" conditionResult "false" option "NVALUE"/ /Dependency /Dependencies 5 CodeTemplate ![CDATA[#set( TABLE DATASOURCE )title;footnote;title1 "List Data for DATASOURCE";#if( BY.size() 0 ) /*Sort DATASOURCE for BY group processing. */19
proc sort data DATASOURCE out WORK.SORTTEMP;by #foreach( item in BY) item#end;run;#set( TABLE "WORK.SORTTEMP" )#end/* Print the table*/proc print data TABLE#if( ROWS2LIST.equalsIgnoreCase("firstnrows"))(obs NVALUE)#end#if ( OBS '1')obs " OBSHEADING"#elsenoobs#end#if ( HEADING && ( HEADING ! "default"))heading HEADING#end#if ( LABEL '1')label#end#if ( PRINTNUMROWS '1')n#end#if ( ROUND '1')round#end#if ( DIVIDE "0")rows page#end#if( WIDTH && ( WIDTH ! 'default'))width WIDTH#end#if ( SPLITLABEL '1')split ' SPLITLABELVALUE'#end;#if( VAR.size() 0 )var #foreach ( item in VAR ) item#end;#end#if( BY.size() 0 )by #foreach ( item in BY ) item#end;#end#if( SUM.size() 0 )sum #foreach ( item in SUM ) item#end;#end#if( ID.size() 0 )id #foreach ( item in ID ) item#end;#endrun;quit;title;footnote;]] /CodeTemplate /Task 20
Use this list to identify each section in the preceding code:1.2.3.4.5.The Registration element defines how the task is displayed in the Task tree.The Metadata element, which specifies whether an input data source is required, defines the roles forcolumns in the input data source, and any options that are required for the task to run.The UI element specifies the layout of the task in the user interface.The Dependencies element specifies the options that rely on one another in order for the task to work.The Code Template element generates the SAS code for the task. The Code Template is defined by theVelocity Template Language.CONCLUSIONMany people program in the SAS language by using SAS Display Manager or SAS Enterprise Guide. SAS Studio isdifferent because it is a tool that you can use to write and run SAS code through all major web browsers without anysoftware installed on the client machine. This paper introduced the essential elements of this new programminginterface to the SAS language and presented the concepts of writing custom tasks that use the Common Task Model.SAS Studio will be available on top of the first maintenance release for SAS 9.4 in March 2014. Subsequent releasesof SAS Studio will combine SAS Enterprise Guide features to provide one unified programming environment foradvanced SAS programmers and new SAS programmers requiring more active assistance.21
REFERENCES The Apache Velocity Project. The Velocity User Guide. Available ity-1.5/user-guide.html. “Apache Velocity.” Wikipedia. Available at http://en.wikipedia.org/wiki/Apache Velocity. The Apache Velocity Project. Available at http://velocity.apache.org/.RECOMMENDED READING Getting Started with Programming in SAS Studio 3.1 SAS Studio 3.1: Administrator’s Guide SAS Studio 3.1: User’s Guide SAS Studio 3.1: Developer’s GuideACKNOWLEDGMENTSThe authors would like to acknowledge Christie Corcoran, Cummins Mebane, Danny Zimmerman, Dave Mackie, FranMiles, J. Jeffreys-Chen, Kris Kiser, Mike Porter, Pat Bostic, Philip Johns, Rick Pappas, Satish Chittineni, StephenSlocum, Swapnil Ghan, Samantha DuPont, Shannon Smith, Richard Fox, Anjali Matange, Raj Patel, Tina Tart, AmyPeters, and Becky Williamson for reviews and assistance on this paper.CONTACT INFORMATIONYour comments and questions are valued and encouraged. Contact the authors:Michael A. Monaco100 SAS Campus DriveCary, NC 27513SAS Institute Inc.Michael.Monaco@sas.comhttp://www.sas.comMarie Dexter100 SAS Campus DriveCary, NC 27513SAS Institute Inc.Marie.Dexter@sas.comhttp://www.sas.comJennifer Tamburro100 SAS Campus DriveCary, NC 27513SAS Institute Inc.Jennifer.Tamburro@sas.comhttp://www.sas.comSAS and all other SAS Institute Inc. product or service names are registered trademarks or trademarks of SAS InstituteInc. in the USA and other countries. indicates USA registration.Other brand and product names are trademarks of their respective companies.22
a file on your SAS server or via a URL. To create a new file shortcut, expand the File Shortcuts section of the navigation pane and click . You can define the shortcut by specifying a complete path and filename or by specifying a URL. If you want this shortcut to be available the next time you use SAS Studio, select