Transcription
Directory Services – Practical ExercisesOverviewThis course comes with a virtual lab environment where you can practice what youlearn. Launch the lab environment from the Welcome Getting Started PracticeLab Environment page. You will only have four hours in the practical environment. The time is cumulative, so you can work a little bit at a time until it addsup the total time allowed. You may not have enough time to complete all the practical exercises.So, choose wisely. You may want to consider all the hand-on exercisesand decide which ones you want to make sure you work on first.In most cases, the userid is Adatum\Administrator and the password isPa55w.rd, but read the instructions carefully.If you are having difficulties with the lab environment check out the Student LabGuide. This document is available from the Course Handouts page and includesbasic troubleshooting and the support desk link.Recommendation: Bookmark the edX Practice Lab Environment pageas you will return to it frequently to perform your hands-on labs!Notice in the lab environment you can copy information to the virtual machines byusing the Actions Paste Content window. Before you paste the content, be sureyour cursor is where you want the copied data.
Module 1 – User AccountsUser Accounts (ADAC)In this exercise you will delete, create, and move a user account by using the ActiveDirectory Administrative Center. You will also view the Windows PowerShell Historywindow.Delete an existing account1. Log on to LON-DC1 as Adatum\Administrator with the password Pa55w.rd.2. In Server Manager, click Tools, and then click the Active DirectoryAdministrative Center.3. Click Adatum (local), and then double-click Managers.4. Right-click Art Odom and notice your choices including: Reset Password, Addto Group, Disable, Delete, Move and Properties.5. Select Properties and take some time to review the categories and attributesthat are associated with the user account.6. Use the Tasks menu to Delete the Art Odom user account.Create a new user account1. Right-click Adatum (local), select New, and then User. First name: Art
Last name: Odom User SamAccountName: Art Password: Pa55w.rd Confirm Password: Pa55w.rd2. Did you notice only Full name and User SamAccountName are required?3. Will your organization have other attributes that should be populated, such asJob title or E-Mail?4. Click OK to create the user.Move a user account1. Double-click Adatum (local). Notice that Art Odom isn't part of any group.2. Right-click Art Odom, and then click Move.3. Move Art Odom to the IT organizational unit.4. Verify Art Odom is now part of the IT OU.View the Windows PowerShell History1. At the bottom of the ADAC window, click WINDOWS POWERSHELL HISTORY.2. Notice the PowerShell commands that were used for each ADAC task.3. The Remove-ADObject cmdlet was used to delete the Art Odom user account.4. The New-ADUser cmdlet was used to create the Art Odom user account.5. The Move-ADObject cmdlet was used to move the Art Odom user account tothe IT organizational unit.6. Note: Expanding the Plus sign next to each command will reformat the commandso that the parameters are easier to read.User Accounts (PowerShell)In this exercise you will use Windows PowerShell to remove a user account, create andenable a new account, and configure user attributes.Remove a user account1. Sign in to LON-DC1 as Adatum\Administrator with the password Pa55w.rd.
2. Open a Windows PowerShell prompt.3. View cmdlets that pertain to AD objects. Notice all these commands are part ofthe ActiveDirectory PowerShell module.Get-Command *ADObject4. Use Remove-ADObject to delete the Art Odom account. If you did the previousexercise, the Identity for this user is the distinguished name: CN ArtOdom,OU IT,DC Adatum,DC com. When prompted, confirm the delete.Remove-ADObject -Identity “CN Art Odom,OU IT,DC Adatum,DC com”5. In the ADAC, Refresh the interface. The Refresh icon is in the upper right handcorner.6. Use Filter to search for Art Odom. Verify that he does not have a user account.Create and enable a new user account1. View cmdlets that pertain to AD users.Get-Command *ADuser2. Use New-ADUser to create a user account for Art Odom. His User UPN logonshould be Art. His password should be Pa55w.rd.New-ADUser -Name "Art Odom"3. In the ADAC, view the Users container, and verify Art Odom has a user account.4. View Art Odom’s account and notice the account is disabled.5. Use Enable-ADAccount to enable Ed’s user account. Notice there are passworderrors, because the account does not have a password.Enable-ADAccount “Art Odom”6. Use Set-ADAccountPassword to provide a password for Ed’s account. Whenprompted provide the current password which is blank (empty). Provide andconfirm the new password Pa55w.rd.Set-ADAccountPassword “Art Odom” {follow the prompts}7. Now you can use Enable-ADAccount.Enable-ADAccount “Art Odom”8. Use Get-ADUser to verify the account is enabled.Get-ADUser “Art Odom”Configure user attributes1. Notice the UserPrincipalName is blank. Use Set-ADUser to set the UPN vale toEd.
Set-ADUser “Art Odom” -UserPrincipalName Art2. User Get-ADUser to verify the UPN value. Notice the Distinguished Name valuefor Ed.Get-ADUser “Art Odom”3. Lastly, use Move-ADObject to move Art Odom to the Managers OU.Move-ADObject -Identity “cn Art Odom,cn users,dc adatum,dc com” TargetPath “ou managers,dc adatum,dc com”4. Use the ADAC or PowerShell to verify Art is now in the Managers OU.User Account TemplatesIn this exercise you will use the ADAC to create a user template. You will then use thetemplate and PowerShell to create another user.Create a user template account1. Sign in to LON-DC1 as Adatum\Administrator with the password Pa55w.rd.2. In Server Manager, click Tools, and then click Active Directory AdministrativeCenter.3. Click Adatum (local), and then double-click Sales.4. In the Action pane, create a New User with these properties. First name: LondonSales Last name: Template User UPN logon: LondonSales Select Protect from accidental deletion Department: Sales Company: A. Datum City: London Description: London Sales user Member of: Add the Sales group Notice the other information that could be added to the template.5. Verify your new template was created in the Sales OU.
Create a user from the template1. Open a Windows PowerShell prompt.2. Create a variable ( LondonSales) to hold the LondonSales template properties.Include only the properties you would like copied. LondonSales Get-ADUser -Identity " LondonSales" -PropertiesDepartment,Company,City3. View the LondonSales variable. LondonSales4. Use New-ADUser to create a new user account. Name: Rosie Reeves SamAccountName: Rosie Path: OU Sales,DC Adatum,DC com Account Password: Pa55w.rd Enabled: True Instance: LondonSales UPN: Rosie@Adatum.comNew-ADUser -Name "Rosie Reeves" -SamAccountName "Rosie" -Path"OU Sales,DC Adatum,DC com" -AccountPassword(ConvertTo-SecureString -AsPlaintext "Pa55w.rd" -Force) -Enabled True -UserPrincipalName "Rosie@Adatum.com" -Instance LondonSales5. Verify the template properties (like Department) were copied to the new user.Notice there are other properties you may want to change like GivenName. Thisis only an example. You could also verify the attributes in the ADAC.Get-ADUser –Identity "Rosie” –Properties *Group Policy Password SettingsIn this exercise you will use Group Policy to configure password settings for all users.1. Logon to LON-DC1 as Adatum\Administrator with the password Pa55w.rd.
2. Before configuring group policy password settings, open a user account andensure you can locate the Account Password Options settings: User must change password at next login. Password does not expire. User cannot change password.3. In Server Manager, click Tools, and then click Group Policy ManagementConsole.4. In the Adatum.com domain right-click the Default Domain Policy, and thenclick Edit.5. Locate Computer Configuration\Policies\Windows Settings\SecuritySettings\Account Policies, and then select Password Policy.6. Double-click each setting and use the Explain tab to learn about the setting.Make the requested changes. Enforce password history: 10 passwords remembered Maximum password age: 60 days Minimum password age: 2 days6. Locate Computer Configuration\Policies\Windows Settings\SecuritySettings\Account Policies, and then select Account Lockout Policy.7. Double-click each setting and use the Explain tab to learn about the setting.Make the requested changes. You must accept the suggested changes when youupdate the first value. Then, you can go back and adjust settings as needed afterthat. Account lockout duration: 60 minutes Account lockout threshold: 5 invalid logon attempts Reset account lockout counter after: 20 minutes8. Take a few minutes to familiarize yourself with the other group policy passwordsettings. These settings will be applied domain wide.Fine-grained Password PoliciesIn this exercise you will configure a fine-grained password policy for the Adatumadministrators.
1. Logon to LON-DC1 as Adatum\Administrator with the password Pa55w.rd.2. In Server Manager, click Tools, and then click Active Directory AdministrativeCenter.3. Browse to the Adatum (local)\System\Password Settings Container.4. In the Tasks window, select New Password Settings. Name: Adatum Administrators Password Settings Precedence: 10 Enforce minimum password length: Selected, 15 character minimumpassword length Enforce password history: Selected, 10 passwords remembered Password must meet complexity requirements: Selected Store password using reversible encryption: Not selected Enforce minimum password age: Selected User cannot change the password within (days): 1 Enforce maximum password age: Selected User must change the password after (days): 60 Enforce account lockout policy: Selected Number of failed logon attempts allowed: 25 Reset failed logon attempts count after (mins): 20 Account will be locked out: Until an administrator manually unlocks theaccount5. In the Directly Applies To section, configure the PSO to apply to the DomainAdmins group.6. Create the PSO.7. In Active Directory Administrative Center, switch to the Overview page, and inthe Global Search box, search for Adam Hobbs.8. Use the View resultant password settings (Tasks) to verify that Adam does nothave resultant fine grained password settings.9. Select Add to group and add Adam to the Domain Admins group.10. Use the View resultant password settings to verify that Adam now has resultantfine grained password settings.
Module 2 – Group AccountsInvestigate GroupsIn this exercise you will explore the default AD DS groups and group scopes.1. Sign in to LON-DC1 as Adatum\Administrator with the password Pa55w.rd.2. In Server Manager, click Tools, and then click Active Directory Users andComputers.3. Expand Adatum.com and select the Users container. Expand the Descriptioncolumn so you can read about each group.4. Click on the Type column heading to sort the items. Notice that all of thesegroups are Security groups. There are different scopes: Domain Local, Global,and Universal. You may need to expand the Type column width.5. Notice the Administrator user is the built-in account for administering thecomputer/domain.6. Double-click the Administrator account and on the Member of tab, notice thedifferent groups this account is part of including Domain Admins, EnterpriseAdmins, and Schema Admins.7. Return to the Users container.8. Notice the Domain Admins group is a Global group. On the Members tab,notice only the Administrator user is part of this group. The Domain Adminsgroup is added to the Administrators group of its domain. It therefore inherits allof the capabilities of the Administrators group. It is also, by default, added to thelocal Administrators group of each domain member computer, thus givingDomain Admins ownership of all domain computers.9. Notice the Enterprise Admins and Schema Admins groups are Universalgroups. Enterprise Admins. This group is a member of the Administrators group inevery domain in the forest, which gives it complete access to theconfiguration of all domain controllers. It also owns the Configuration
partition of the directory and has full control of the domain naming context inall forest domains. Schema Admins. This group owns and has full control of the Active Directoryschema.10. Navigate to Adatum.com\Builtin. Notice all of these Security groups areDomain Local groups.11. Answer the following questions about the Builtin container groups.12. Which group can administer domain and user accounts?Account Operators. Members of this group can create, modify, and deleteaccounts for users, groups, and computers located in any OU in the domain(except the Domain Controllers OU), and in the Users and Computers containers.Account Operator group members cannot modify accounts that are members ofthe Administrators or Domain Admins groups, nor can they modify those groups.Account Operator group members also can sign in locally to domain controllers.By default, this group has no members.13. Which group has complete and unrestricted access to the computer/domain?Administrators. Members of this group have complete control over all domaincontrollers and data in the domain naming context. They can change themembership of all other administrative groups in the domain, and theAdministrators group in the forest root domain can change the membership ofEnterprise Admins, Schema Admins, and Domain Admins. The Administratorsgroup in the forest root domain is generally considered the most powerfulservice administration group in the forest.14. Which group can perform backup and restore operations on domain controllers?Backup Operators. Members of this group can perform backup and restoreoperations on domain controllers, and sign in locally and shut down domaincontrollers. By default, this group has no members.15. Which group can maintain print queues?Print Operators. Members of this group can maintain print queues on domaincontrollers. They also can sign in locally and shut down domain controllers. Bydefault, this group has no members.16. Which group can administer domain servers?Server Operators. Members of this group can perform maintenance tasks ondomain servers. They have the right to sign in locally, start and stop services,
perform backup and restore operations, format disks, create or delete shares, andshut down domain controllers. By default, this group has no members.Group Accounts (ADAC and PowerShell)In this exercise you will create a group and add a member using Active DirectoryAdministrative Center. You will also create a group and add a member usingPowerShell.Create a new group and add a member (ADAC)1. Sign in to LON-DC1 as Adatum\Administrator with the password Pa55w.rd.2. In Server Manager, in the Tools menu, open the Active DirectoryAdministrative Center.3. Right-click Adatum (Local), select New, and then click Group. Group name: IT Managers Group type: Security Group scope: Domain Local4. In the Managed by section Edit the Managed by field an add Holly Spencer. Select the checkbox Manager can update membership list.5. In the Members section Add Mary Skinner Add Pia Vosnik6. Save your changes and refresh the Adatum.com domain.7. Verify your new group was created. If you do not see it, use the global searchfeature in the ADAC Overview to search for it.Create a new group and add a member (PowerShell)1. Sign in to LON-DC1 as Adatum\Administrator with the password Pa55w.rd.2. Open a Window PowerShell prompt.3. View commands that pertain to AD DS groups.
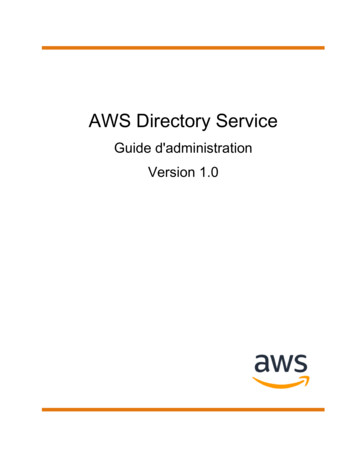
Get-Command *ADGroup*4. Use New-ADGroup to create a new security group called Training. This shouldbe a global scope group in the Adatum domain.New-ADGroup -Name Training -GroupCategory Security –GroupScopeGlobal -Path “dc adatum,dc com”5. Use Get-ADGroup to verify the Training group was created with the correctsettings.Get-ADGroup Training6. Use Add-ADGroupMember to add Neva Bartlett to the Training group. Judy isin the Managers group.Add-ADGroupMember -Identity Training -Members “cn NevaBartlett,ou Managers,dc adatum,dc com”7. Use Get-ADGroup to verify Neva is in the Training group.Get-ADGroup Training –Properties MembersGroup NestingConsider this scenario where you have three domains and in each domain there are five people whoneed access to a file in one of the domains.
Question: How many file permissions do you need to create to assign permissions on this file for eachuser?Answer: Fifteen. You will need to give each individual access to the file, so that is 15 file permissions.Consider that you now group the users in each domain into global groups. So, you now have three globalgroups, one for each domain.Question: How many permissions on the file do you need to assign now?Answer: Three. You must assign one permission for each global group, so that is three permissions toconfigure.
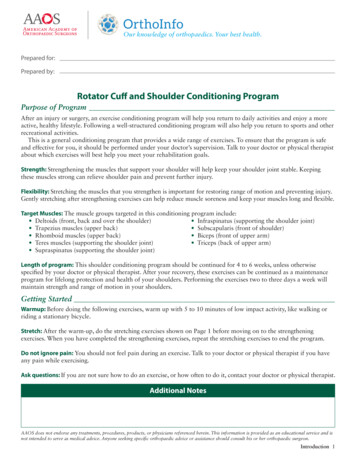
Now, suppose you create a domain local group and add the global groups.Question: How many permissions must you assign to the domain local group?Answer: One. You need only one permission for the domain local group.Group InheritanceIn this exercise you will use the IGDLA acronym and create nested groups.1. Sign in to LON-DC1 as Adatum\Administrator with the password Pa55w.rd.2. Human Resources has some important compliance information that needs to bedisseminated to the HR, Sales, and Marketing groups. They do not wantindividuals to have direct access to the materials. Instead, certain individuals ineach group will be provided access to a centralized folder with the information.This process will be expanded company-wide to different subsidiaries. They wantto simplify the processing of assigning permissions.
3. In Server Manager, click Tools, and then click Active Directory Users andComputers.4. Within the Sales OU, create a new Global Security group named SalesCompliance. Add Kerri West and Lucy Davis to the group.5. Within the Marketing OU, create a new Global Security group namedMarketing Compliance. Add Ana Cantrell and Bill Norman to the group.6. Within the Users container, create a new Domain local Security group namedHR Compliance. Add the Sales Compliance and Marketing Compliancegroups.7. Use File Explorer to create a new folder named HR Compliance.8. Right-click the HR Compliance folder and view the Properties.9. Select the Security tab, click Advanced, click Disable Inheritance, and thenConvert inherited permissions.10. Remove the Users (Adatum\Users) groups (both).11. Apply your changes.12. Add the HR Compliance group. Give the group Read access.13. On the Security tab, click Advanced, and then click the Effective Access tab.14. Click Select a user, add Allan Yoo, and then click View effective access.15. Notice that Allan does not have any access (red) to the folder. Allan is not part ofany of the compliance groups.16. View the Effective Permissions for Kerri West.17. Notice Kerri has several read (green) permissions on the folder. Kerri is part ofthe Sales Compliance group that inherited permissions from the HR Compliancegroup.Module 3 – Computer AccountsComputer Accounts
In this exercise you will create a new computer account, verify that it is added to theComputers container, create a new computers OU, and redirect new computers to theOU.1. Sign in to LON-DC1 as Adatum\Administrator with the password Pa55w.rd.2. In Server Manager, click Tools, and then select Active Directory User andComputers.3. Expand Adatum.com and select the Computers container.4. Notice the container has both server and client computers.5. Right-click the Computers container, select New, and notice there is no choice tocreate an OU. Containers cannot be divided.6. Right-click Adatum.com, select New, and the Organizational Unit. Name theOU MyComputers.7. Click the Computers container and Move LON-CL1 and LON-CL2 to theMyComputers OU.8. Right-click Adatum.com, select New, and then Computer. Name: LON-CL3 User or Group: Domain Admins (This is the group that can join this computerto the domain. Notice you can change the group.)9. Refresh the Adatum.com domain and notice LON-CL3 was added to the root.10. Open a PowerShell prompt.11. Redirect all new computers to the MyComputers OU.Redircmp “OU MyComputers,DC Adatum,DC com”12. Run the Update-Help command at the PowerShell prompt.13. Read about how to use Add-Computer to add a new computer account to adomain.Help New-ADComputer14. Use New-ADComputer to add LON-CL4 to the domain.New-ADComputer -Name “LON-CL4”15. Return to Active Directory Users and Computers, refresh Adatum.com, andverify that LON-CL4 was redirected and added to your MyComputers OU.
Computer DelegationIn this exercise you will create a group of computer admins, delegate control of a OU tothe computer admins group, and test to ensure the permissions are working.Create a group of computer admins1. Sign in to LON-DC1 as Adatum\Administrator with the password Pa55w.rd.2. In Server Manager, click Tools, and then select Active Directory User andComputers.3. Right-click Adatum.com, select New, and then select Group. Create the groupwith these parameters. This group will be delegated control of the computerobjects in the MyComputers OU. Name: Computer Admins Group scope: Global Group type: Security4. Click the Adatum.com domain, right-click the new Computer Admins group,and select Properties.5. On the Members tab, add Beth Burke and Abbi Skinner.Delegate control to the computer admins group1. You will now delegate control of the MyComputers OU. This OU was created inthe previous exercise. If you don’t have the OU then quickly create it.2. Right-click the MyComputers OU, and select Delegate Control. Add the Computer Admins group. On the Tasks to Delegate page, notice the common tasks that can bedelegated. Computer object tasks are not listed. Select the Create a custom task to delegate radio button. Delegate only Computer objects, and give permission to Create and Deleteselected objects in this folder. Give Full Control to the objects. Be sure all the choices have Full Control.
Test the delegate control permissions1. Open a PowerShell prompt.2. Review commands that pertain to AD Computer objects.Get-Command *ADComputer*3. Try creating a new computer, LON-CL5, using Art Odom account. Whenprompted the password is Pa55w.rd. The Path parameter is not needed if youhave redirected computer objects to the folder.New-ADComputer -Name “LON-CL5” -Credential Art -Path“ou MyComputers,dc adatum,dc com”4. This command generates an error. The error states there is a missing attribute,but it means Art does not have permission to create a computer object.5. Try again using Beth. When prompted the password is Pa55w.rd. The Pathparameter is optional, if you have previously set the path using redircmp.New-ADComputer -Name “LON-CL5” -Credential Beth -Path“ou MyComputers,dc adatum,dc com”6. This command does not generate an error.7. Use Active Director Users and Computers to verify LON-CL5 was created. Youmay need to refresh the MyComputers OU.8. Try to remove LON-CL5 using Art Odom account. When prompted the passwordis Pa55w.rd. The Confirm parameter keeps you have having the answer Yes todelete the object. This may not be the best practice.Remove-ADComputer -Identity “LON-CL5” –Credential Art –Confirm: False9. This command generates an error that is more clear: Access denied.10. Try again using Beth. When prompted the password is Pa55w.rd.Remove-ADComputer -Identity “LON-CL5” –Credential Beth –Confirm: False11. This command does not generate an error.12. Use Active Director Users and Computers to verify LON-CL5 was removed. Youmay need to Refresh the console.Domain Join
In this exercise you will reset a computer account, view the sign in error, and rejoin thecomputer to the domain.Reset a computer account1. Note: We are resetting the account to simulate fixing a secure channel problem.2. On LON-DC1, sign in as Adatum\Administrator with the password Pa55w.rd.3. In Server Manager, click Tools, and select Active Directory Users andComputers.4. Navigate the Computers container, right-click LON-CL1, and Reset Account.5. When prompted confirm that you want to reset the account.Observe the behavior when a client logs on1. Meghan Lang has reported that when she tries to sign-in to LON-CL1 there is amessage that the trust relationship has failed.2. Switch to LON-CL1, and attempt to sign in as Adatum\Meghan with thepassword Pa55w.rd.3. A message appears stating that The trust relationship between thisworkstation and the primary domain failed.4. Click OK to acknowledge the message.Rejoin the domain to reconnect the computer account1. Sign in to LON-CL1 as LON-CL1\Admin with the password Pa55w.rd. This is thelocal admin.2. Open Control Panel\System and Security\System.3. Click Change settings and then Change.4. Disjoin the computer from the Adatum.com domain by joining it to a workgroupnamed Workgroup. Provide the Adatum\Administrator credentials. If prompted,acknowledge that you will need to know the password of the local Administratoraccount when the computer is disjoined from the domain.5. Restart to complete the process of disjoining the domain.6. Sign in to LON-CL1 as LON-CL1\Admin with the password Pa55w.rd. Noticethis is a local account since the computer is not joined to the domain.7. Open Control Panel\System and Security\System.8. Click Change settings and then Change. Make selections based on the following. User name: Administrator
Password: Pa55w.rd Domain: Adatum Would you like to use the LON-CL1 computer name: Yes Do you want to enable a domain user account on this computer: No9. Restart the computer.10. Sign in as Adatum\Meghan with the password of Pa55w.rd.11. Notice the error message does not display and the sign in is successful.12. Notice that we did not delete the computer from the domain and create a newcomputer account. Instead, we moved the computer to a workgroup and thenrejoined it to the domain.Offline Domain JoinIn this exercise you will provision an AD DS computer account and create the domainjoin file, transfer the provisioning information to the provisioned computer, and thenrestart the provisioned computer to ensure it automatically joins the domain.Ensure LON-CL1 is not joined to the domain1. Sign in to LON-CL1 as Adatum\Administrator with the password Pa55w.rd.2. View Advanced system settings, select the Computer Name tab, and then clickChange.3. Select Workgroup, and name the workgroup TEMP.4. Confirm the message that you will need the Administrator password to rejoin thedomain.5. Restart the computer.Provision an AD DS computer account and create the domain join file1. Sign in to LON-DC1 as Adatum\Administrator with the password Pa55w.rd.2. Open a PowerShell prompt.3. Read the Help page for the djoin tool.djoin.exe /help
4. Provision LON-CL1 using the existing computer account.djoin.exe /provision /domain adatum.com /machine LON-CL1 /savefile“c:\LON-CL1-join.txt” /reuse5. Ensure the command completes successfully and verify the save file was created.Transfer the provisioning information to the provisioned computer1. Sign in to LON-CL1 as LON-CL1\Admin with the password Pa55w.rd.2. Create a new folder called c:\djoin.3. Copy \\LON-DC1\c \LON-CL1-join.txt to the new folder. You will need to supplyAdatum\Administrator credentials. Also, remember this is a binary file, so copythe file and not the contents. If you could not access the server on the network,you would copy the file to a USB and transfer it that way.4. Open an elevated (Run as Administrator) Command prompt.5. Configure the client with the provisioning information.djoin.exe /requestodj /loadfile “c:\djoin\lon-cl1-join.txt” /windowspath%systemroot% -localos6. Ensure the command completes successfully.7. Restart the computer.Restart LON-CL1 and verify it joins the domain1. Restart LON-CL1.2. Sign in to LON-CL1 as LON-CL1\Admin with the password Pa55w.rd. This willget you on the machine so it can be connected to the domain.3. After the machine reboots, use the Advanced system settings to confirm themachine was joined to the adatum.com domain.Module 4 – Group PolicySimple GPOs
In this exercise you will use the Group Policy Management Console (GPMC) and theGroup Policy Management Editor (GPME) to create a GPO that controls basic userdesktop functionality.Note: If this is your first time in the Group Policy Management tool take some time toexplore the different Computer and User settings that are available.Create a GPO by using the GPMC1. Sign in to LON-DC1 as Adatum\Administrator with the password Pa55w.rd.2. In Server Manager, click Tools, and then click Group Policy Management.3. Expand Forest: Adatum.com\Domains\Adatum.com, right-click the GroupPolicy Objects folder, and then click New.4. In the New GPO dialog box, in the Name field, type ADATUM Standards, andthen click OK.Edit a GPO in the Group Policy Management Editor window1. Click the Group Policy Objects node, right-click the ADATUM Standards GPO,and then click Edit.2. Navigate to User Configuration\Policies\Administrative Templates\System,and then double-click the setting Prevent access to registry editing tools.3. Select Enabled and make sure Disable regedit from running silently is set toYes.4. In the console tree, navigate to User Configuration\AdministrativeTemplates\Control Panel, then click Personalization.5. Click Screen saver timeout, and review the explanatory text. Double-click Screensaver timeout and review the Help section.6. Select Enabled, set the default timeout to 600 seconds, and click OK.7. Enable the Password protect the screen saver policy setting.8. Close the Group Policy Management Editor.9. Return to the GPMC, right-click the Adatum.com domain, and then click Link anExisting GPO.10. Click ADATUM Standards, and then click OK.Test the newly created GPO
1. Switch to LON-CL1 and sign in as Adatum\Administrator with the passwordPa
Fine-grained Password Policies In this exercise you will configure a fine-grained password policy for the Adatum administrators. 1. Logon to LON-DC1 as Adatum\Administrator with the password Pa55w.rd. 2. In Server Manager, click Tools, and then click Active Directory Administrative

![[MS-ADFSOD]: Active Directory Federation Services (AD FS .](/img/1/5bms-adfsod-5d.jpg)