Transcription
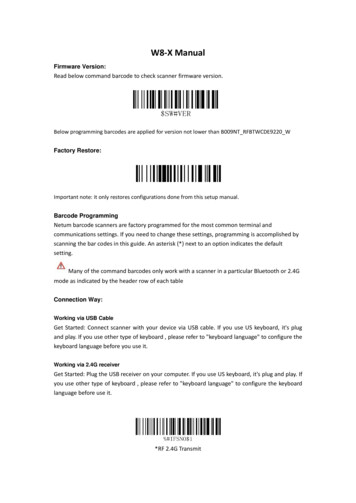
W8-X ManualFirmware Version:Read below command barcode to check scanner firmware version.Below programming barcodes are applied for version not lower than B009NT RFBTWCDE9220 WFactory Restore:Important note: it only restores configurations done from this setup manual.Barcode ProgrammingNetum barcode scanners are factory programmed for the most common terminal andcommunications settings. If you need to change these settings, programming is accomplished byscanning the bar codes in this guide. An asterisk (*) next to an option indicates the defaultsetting.Many of the command barcodes only work with a scanner in a particular Bluetooth or 2.4Gmode as indicated by the header row of each tableConnection Way:Working via USB CableGet Started: Connect scanner with your device via USB cable. If you use US keyboard, it's plugand play. If you use other type of keyboard , please refer to "keyboard language" to configure thekeyboard language before you use it.Working via 2.4G receiverGet Started: Plug the USB receiver on your computer. If you use US keyboard, it's plug and play. Ifyou use other type of keyboard , please refer to "keyboard language" to configure the keyboardlanguage before use it.*RF 2.4G Transmit
Working via BluetoothGet Started: Please refer to the “bluetooth pairing”. Once you’ve paired the bluetooth, locate thecursor on the place where you want to upload the codes than you can start to work.US Keyboardby default if you use other types of keyboard please configure keyboard language before you useit.Working via BluetoothCommand barcodes apply for all working mode.Keyboard LanguageFor example If you use French Keyboard, scan command barcode of “French keyboard ”. If youuse a US keyboard you can ignore this step.America EN keyboardGermany keyboardPortugal keyboardFrench keyboardItaly keyboardSpain keyboard
Turkey Q keyboardTurkey F keyboardUK keyboardCzech keyboardHungary keyboardBelgium FR keyboardBrazil PT keyboardCanadian FR keyboardCroatia keyboardSlovak keyboardDenmark keyboardFinland keyboard
Latin-America ES keyboardNetherland keyboardNorway keyboardPoland keyboardSerbia keyboardSlovenia keyboardSweden keyboardSwiss DE keyboardWorking ModeIf you are heading for a working area which lies outside the Bluetooth signal range, you mayactivate scanner’s store mode, following steps described below. Under this mode, all scanneddata will be stored directly into the buffer memory of the device. Furthermore, the data entrieswill be permanently saved in the buffer memory prior to the manual upload into the workingstation, so that you may upload them when you are near your working device.*Normal ModeStore Mode
Output Stored DataOutput Total EntryClear MemoryGet Battery VolumeScan below command barcode to get battery rough volumeBattery Rough VolumeIdle timeScanner will turn to sleep after idle/inactive for 1minScan "Disable module Idle time" before you doing any other setup from this section.Disable Module idle timePower OffDisable Sleep Mode
30S10Mins3Mins30MinsConvert Case* Disable Convert CaseUp Low Case Swap (A - a)All Upper Case (a- A)All Lower Case (A- a)Bluetooth Connection ModeBasic Mode (HID) (default)Configures the scanner to Human Interface Device (HID) mode. The scanner will be discoverableas a Keyboard to other Bluetooth devices.
BLE for for Apple Devices (a software was required to work under this mode)SPP Mode for for Windows or Android (a software was required to work under this mode)Important Note:If you want to shift from HID to SPP or BLE just scan the Corresponding command barcode.If you want to shift from SPP or BLE to HID mode, please ignore (or delete) "Netum Bluetooth" turn off bluetooth scan command barcode of HID Open the bluetooth repair it.Bluetooth keyboard Upload SpeedHigh SpeedMedium Speed
Low SpeedWired Connection ModeUSB Keyboard and Virtual COM Set*USB Cable as KeyboardUSB Cable as Virtual COMNote: Wire and Wireless connect way selected automatically, the Wire way has high priority.Hide Prefix or suffix digitsThe start/middle/end of barcode chars can be hidden. After scan below hide set barcode, scan adouble-digit hexadecimal number that you want to hide char length(00 FF e.g. hide length 4,scan 0, 4).Hide Barcode Start CharsHide Barcode Middle Char StartHide Barcode Middle Chars
Hide Barcode End CharsOutput FormatTo change the Scan Data Transmission Format, scan one of the eight bar codes corresponding tothe desired format.Enable Hide Barcode Start CharEnable Hide Barcode Middle CharEnable Hide Barcode End CharTo Hide chars of barcode Start/Middle/End:Procedures1. Scan the Hide Barcode Start / Middle Start / Middle length / End Chars symbol.2. Determine the hex value for the length you wish to enter(hide 4 chars, scan 0,4; hide 12chars, scan 0,C).3. Scan the 2 digit hex value from the Numeric Bar Codes4. Scan the output format to enable or cancel hide char function.
Custom prefix and suffixMaximum 20 prefixes and 20 suffixes can be added to scan data for use in data editing. Toset these values, scan a double-digit hexadecimal number (i.e. two bar codes) thatcorresponds to ASCII values. See the Table 1 and Numeric Bar Codes in appendix.To Add a Prefix or Suffix:1. Scan command barcode of " Add Prefix" or" Add Suffix ".2. Check the prefix or suffix hex value from the ASCII Chart.3. Scan the 2 digit hex value from the Numeric Bar Codes4. Repeat Steps 2 and 3 for all the prefix or suffix that you want to add.5. Scan the output format to enable or disable prefix/suffix output.Add PrefixAdd SuffixClear All PrefixClear All SuffixNumeric Bar Codes
Output FormatTo change the Scan Data Transmission Format, scan one of the eight bar codes corresponding tothe desired format.*Default output formatEnable Suffix output
Enable Prefix outputExample on how to add normal prefix or suffixAdd1.on barcode"123456789"" A" and "B" as prefixes and "!" as suffixScan command barcode of " Add Prefix"2. Check the prefix hex value from the ASCII Chart. A- "4","1"; B-"4" "2";3. Scan the 2 digit hex value from the Numeric Bar Codes
4. Scan the output format to enable prefix output.Enable Prefix output5. Scan command barcode of " Add Suffix" to add "!" as suffix.Add Suffix6. Check the suffix hex value from the ASCII Chart. !- "2" "1"7. Scan the 2 digit hex value from the Numeric Bar Codes.8. Scan the output format to enable suffix output.Enable Suffix output9. Scan the barcode then you will get AB123456789!Example on how to add Combination Keysuffixfor barcode"123456789"
Add "Ctrl P" on "123456789" as suffix1.Scan command barcode of " Add Suffix" to add "Ctrl P" as suffix.Add Suffix2. Check the suffix hex value from the ASCII Chart. Ctrl P - "9" "7" "5" "0"3. Scan the 4 digits hex value from the Numeric Bar Codes.4. Scan the output format to enable suffix output.
Enable Suffix output5. Scan the barcode 123456789. (test it on Excel)Table 1. ASCII Character 3H343HC53HS24H 4AHJ5AHZ2BH 3BH;4BHK5BH[2CH,3CH 4CHL5CH\2DH-3DH 4DHM5DH]2EH.3EH 4EHN5EH 2FH/3FH?4FHO5FH60H F392HRightArrow63Hc73Hs83HF493HLeft Arrow64Hd74Ht84HF594HDownArrow65He75Hu85HF695HUp Arrow
Hh78Hx88HF998H*Shirt69Hi79Hy89HF1099H*Left Alt6AHJ7AHz8AHF119AH*Right }8DHHome0AHLF6EHn7EH 8EHPage Up0DHCR6FHo7FHDEL8FHDelete1BHESCContact InformationTel.: 0086 20-6626-0708Whatsapp: 86 188 2626 1132Email:service@gzxlscan.comAddr.:Unit 137, The PacificGuangzhou,China/511340Made in ChinaIndustryPark,XintangTown,ZengchengDistrict,
Read below command barcode to check scanner firmware version. Below programming barcodes are applied for version not lower than B009NT_RFBTWCDE9220_W Factory Restore: Important note: it only restores configurations done from this setup manual. Barcode Programming Netum barcode scanners are factory programmed for the most common terminal and