Transcription
Respondus 4.0User Guide for Desire2Learn Personalityrev. May,2013Getting StartedComputer RequirementsInstallation & SetupActivation PasswordChoose a Learning management system (LMS) PersonalityOn-line HelpStart MenuOverviewOpening a FileCreating a FileTest Bank NetworkExam WizardImporting Questions to RespondusArchive WizardChanging the LMS Personality and Converting FilesEditing a FileOverviewCommon Features Across all Question TypesQuestion List and Expanded View- Multiple Choice- True or False- Long Answer- Matching- Short Answer- Multi-Select- Ordering- Fill in the Blanks- ArithmeticAdding Bold, Italics, Underline, and Super/SubscriptMedia WizardHTML EditorEquation EditorPower Edit- Tables- Fonts, Formatting and ListsSpell CheckKeyword SearchesSettings MenuOverviewPropertiesRestrictions
Attempts / SubmissionsLayoutRandom SectionsHow to Save New Default SettingsPreview & PublishOverviewPreviewPublishPrint OptionsRetrievalOverviewRetrieving a Quiz from Desire2LearnOther Tools & FeaturesOverviewSave As CopySave As StudyMate Class FormatPreferencesUpdate LicenseCleanup HTML ToolQuestion Title ToolCheck for UpdateDisclaimer of WarrantyCopyright, Ownership, and Use of Software2
Getting StartedComputer RequirementsInstallation & SetupActivation PasswordChoose a Learning management system (LMS) PersonalityOn-line HelpRespondus is a powerful tool for creating and managing exams that can be printed to paper orpublished directly to Blackboard, Desire2Learn, eCollege, WebCT, and other eLearning systems.Exams can be created offline using a familiar Windows environment, or moved from oneeLearning system to another. This version of the user guide is specifically intended for peopleusing the Desire2Learn “personality” in Respondus.Computer RequirementsRespondus requires Windows XP or higher, 32 MB of RAM, 10 MB of free hard disk space, anda 800x600 monitor (1024x768 recommended). Respondus is generally used in conjunction with alearning management system such as ANGEL, Blackboard, Desire2Learn, eCollege, WebCT, andcan also be used with IMS QTI-compliant assessment systems.Installation and SetupThe Respondus installation program can be downloaded from www.respondus.com. To begin theinstallation process, locate the installation file that was downloaded to your hard drive (eg.Respondus4.exe), double-click the file, and follow the instructions shown. Once Respondus isinstalled, start the program by double-clicking the Respondus icon that appears on the Windowsdesktop. Or, follow these steps to start the software.Click [Start] from the Windows desktopClick [Programs]Click [Respondus]Click [Respondus X.x]The first time you start Respondus (and each time thereafter until the program is registered), youwill be presented with a screen that provides the “Product ID#”. The Product ID# is used toobtain the Activation Password (see below) which is needed to complete the installation.Activation PasswordOnce the Respondus installation program is finished, you will need to obtain a password fromwww.respondus.com to activate the installation. Be sure to have the “Product ID#” (see previousparagraph) readily available. After you have directed your browser to www.respondus.com, go tothe “Registration” section. You have the choice of purchasing a permanent activation password orobtaining a 30-day trial password. In both cases you will be required to enter a valid e-mailaddress and the Product ID# that displays on the opening screen of Respondus. Once theinformation is submitted, the activation password is immediately sent to the e-mail address youspecified.When the password is received by e-mail, it must be entered into the Respondus program. If youhaven’t done so already, start Respondus and then enter the password when prompted (you maywant to “copy and paste” the password from the e-mail message in order to prevent typing3
mistakes). Click [OK] to continue. The Respondus software is now activated, either permanentlyor for a 30-day trial period.Choose a Learning management system (LMS) PersonalityImmediately after the Respondus software is activated, you are prompted to select a Learningmanagement system (LMS) “personality.” Respondus offers various user environments (called“personalities”) that parallel the features and terminology used by specific learning managementsystems, such as Blackboard, eCollege and Desire2Learn. You can change the “personality” atany time in Respondus from the Start menu.On-line HelpRespondus includes a full-featured help system that includes an index and context-sensitive help.To view the on-line help, choose “Help Topics” from the pull-down Help menu and select a topic.You can also press the F1 key from within Respondus to obtain context-sensitive help.Throughout the program you will additionally see small buttons having a “?” symbol. When thebutton is clicked, information on that particular option or task is provided.If you encounter a question that is not answered in the on-line help or in this manual, you areencouraged to visit the “Support” section of the Respondus web site (www.respondus.com).There you will find a knowledgebase and other resources.The remainder of this user manual is organized according to the five menus used in the“Desire2Learn” personality of Respondus: Start, Edit, Settings, Preview & Publish, andRetrieval.4
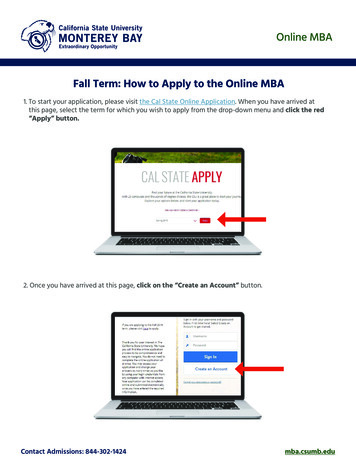
Start MenuOverview of Start MenuOpening a FileCreating a FileTest Bank NetworkExam WizardImporting Questions to RespondusArchive WizardChanging the LMS Personality and Converting FilesOverview of Start MenuThe Start menu provides the ability to Open a Respondus file, Create a new file, accesspublisher test banks from the Respondus Test Bank Network, and Import questions from a MSWord or text file. The Exam Wizard provides an easy way to create an exam from an existing setof questions. The Archive Wizard allows you to archive an exam or survey, including all mediacomponents and equations, with a single click.Opening a FileFrom the Start menu, click the Open button. The following window will appear:Highlight an exam project by clicking it once. To obtain information on the project, select eitherof the two center buttons located to the top right of the file list. Select the “Item List” button(right of center) to view a list of the questions that are available in the highlighted project. Topreview a particular question, click the “Title” of the question.To open a highlighted project, click the [Open] button at the bottom of the window. (Doubleclicking a file name will also open it.)Respondus allows projects to be organized within folders. For example, you can place the examsfor a particular course within a folder rather than having exams for all courses listed together. Tocreate a new folder, click the “Create New Folder” button located second from left. To navigatedown a level within a folder, double-click on the folder itself. To navigate up a level, click the“Up One Level” leftmost button on the row.5
The [Browse ] button, located on the lower left side of the window, allows you to locate aRespondus file (.rsp) located elsewhere on your hard drive and copy the file to the RespondusProjects folder. It does not move the file or open it directly, rather, it creates a new “Projects”folder based on a copy of that file. The [Browse ] button can also be used to locate a Respondus“archive” file (.rsa or .rpa) and to restore it to the Projects directory (see Restoring an ArchiveFile).The [Search] button allows a file to be searched prior to opening it (it can only be used if the“Item List” view is selected). Searching is particularly useful if you are trying to locate aparticular question or set of questions in a file.The [Test Bank Network] button is used to start the Respondus Test Bank Network wizard. TheRespondus Test Bank Network contains the official test banks for thousands of publishertextbooks. Instructors who adopt a participating textbook can access the accompanying test bankdirectly within Respondus (following a registration process). For complete details, see the“Respondus Test Bank Network” at www.respondus.com.Once a file is opened, the screen automatically changes to the Edit menu.Creating a FileFrom the Start menu, select the Create button to create a new file. You are first prompted to entera file name and a description for the file. Click [OK] when you are finished. Once a file iscreated, you are automatically switched to the Edit menu. This is where you add questions to thefile.Test Bank NetworkThe Respondus Test Bank Network contains the official test banks for thousands of publishertextbooks. Instructors who adopt a participating textbook can access the accompanying test bankfrom within Respondus by selecting the Test Bank Network button on the Start menu.Note: all interactions with the Test Bank Network require an internet connection.The Test Bank Network wizard allows instructors to search for a publisher test bank, submit arequest form for the test bank, register a test bank using the registration code and password sentby the publisher, and finally, select questions from the test bank for use in a Respondus file.6
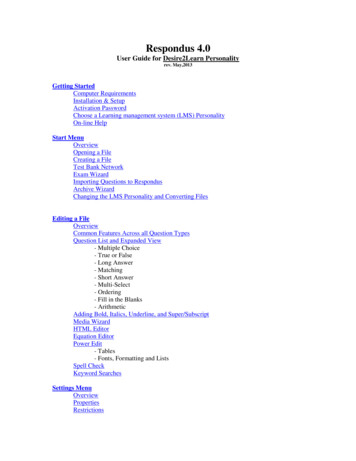
The first selection “Search for a publisher test bank” will open a browser window and enableinstructors to search for textbooks adopted for their classes. Once a textbook is located, a requestform is filled out and submitted. This information is sent directly to the publisher for verification.The textbook publisher will send an email to the instructor containing a “file code” and passwordfor registering the test bank using the Respondus software. The instructor should then return tothe Test Bank Network wizard in Respondus to register the test bank, which is the second optionlisted: “Register a test bank using a file code and password”.7
In the next step of the wizard, enter the “File Code” and “File Password” (if required) providedby the publisher, along with the information requested. This will register the test bank with thiscopy of Respondus. It won’t be necessary to repeat the process on this computer.Once the test bank has been registered in Respondus, the third option on the Test Bank Networkwizard become available: “Select question from one of the following publisher test banks:”.8
The next page of the wizard allows the selection of a registered test bank and then a specificchapter file from the test bank.Questions can be manually selected or automatically selected depending on the QuestionSelection toggle. With Manual selection, individual test bank questions can be previewed andcopied to the current Respondus project. To do so, simply select the box to the left of thequestions wanted and click the “Add to End of List” or “Insert into List” button.Each question listed has a context menu that provides the following operations:Preview – Preview the question.Add to End of List – Add this question to the end of the list.Insert into List – Insert this question into a specific point in the list.Flag this item – Flag this question as being incorrect or unclear.Properties – View the properties for the question.9
Questions that have been flagged (by any instructor using the test bank) will appear with a flagnext to the item in the list. The contents of the flag can be viewed by hovering the mouse over theflag or clicking it.When Automatic selection is used, the number of available questions of each question type isshown. Enter the number of questions to be selected for each question type and the point value tobe assigned to it.Questions copied from the test bank using either Manual or Automatic selection will be copied tothe currently open Respondus file.10
Exam WizardThe Exam Wizard helps familiarize new users with the basic functions of Respondus. In addition,the Exam Wizard is the best way to create an exam using questions contained in one or moreRespondus files, such as a publisher test bank. The Exam Wizard allows questions to berandomly selected from other files and point values to be assigned across an entire question type.To begin, select the Exam Wizard button from the Start menu. The first page of the wizardoffers three choices. Select the top choice that states “Create a new exam and then copy questionsto it from a question bank or Respondus file” and click [Next]. The next page of the wizardrequires you to provide a name and description for the exam being created. Click [Next] once thisinformation has been entered. The next page of the wizard prompts you to select the Respondusfiles from which the questions will be copied. Highlight a file and click the [Select] button.Repeat this process until all files from which you want to select questions are selected. Click[Next] to continue.The next page of the wizard prompts you to select one of the source files chosen in the previousstep. You then have the choice of using Automatic Selection or Manual Selection. WhenAutomatic Selection is chosen, the current number of questions for each question type isdisplayed in the “Available to Select” column. In the next column, enter the number of questionsyou want selected for each question type. Then enter the point values to be assigned to eachquestion type (this step is optional--if you leave the “points per question” field blank, the pointvalues from the original file will be used). When all entries are finished, click either the [Add toEnd of List] button or the [Insert Into List] button. Repeat this process for each source file.The Manual Selection option allows the questions for each file to be viewed before making aselection. In fact, you can preview individual questions by clicking the title of a question, or bysearching the entire list of questions by clicking the [Keyword Search] button at the top right. Toselect questions from this list, simply click in the column furthest to the left--a checkmark willappear next to the question. When finished with your selections, click either the [Add to End ofList] button or the [Inser
The [Test Bank Network] button is used to start the Respondus Test Bank Network wizard. The Respondus Test Bank Network contains the official test banks for thousands of publisher textbooks. Instructors who adopt a participating textbook can access the accompanying test bank directly within Respondus (following a registration process). For complete details, see the