Transcription
K-Box CGI M271 EVO Installation ManualRev 280213
Installation Manual for Mercedes-Benz 1.8l M271 EVO180/200/250 CGI TurbochargedThis instruction manual provides a step by step process for installing the KLEEMANN K-Box CGI M271 EVO. It is recommended that you read the instructionmanual completely before starting the installation of the K-Box to gain an overview of the entire process. If questions arise during the installation, you arewelcome to contact us directly. We are ready to provide answers and assistance. It is essential for all involved that the installation is done correctly, the carperforms flawlessly and the customer is satisfied.Kleemann A/SRugmarken 27BDK-3520 FarumDenmarkKleemann USA Inc.3455 Fillmore Ridge HeightsColorado Springs , CO 80907USAphone 45 70 109 109fax 45 70 109 108phone 1 719 473 6441fax 1 719 578 0345!!sales@kleemann.dk!!sales@kleemannusa.com!!2
PreparationMake sure the ignition is turned off and the key has been taken out.Before you disconnect the 2 sensors at the engine, you should open thebonnet, close all doors and lock the vehicle. Please wait about 4-5 minutes(on most cars you can hear a resounding “click” in the enginecompartment) until the timer function of the Engine Control Unit is turnedoff.!
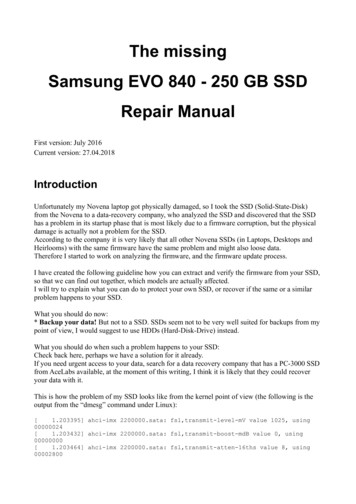
InstallationAs shown in the picture, release the connectors to 2 sensors and remove it.Now plug the wiring harness between the sensor and the original plug (click).!It does not matter which of the cable sets are used on the sensors.Please make sure to attach the cable with cable ties and the KLEEMANNmodule, to have sufficient space to parts of the engine (exhaust gasrecirculation, turbocharger, exhaust manifold etc.)!Now connect the control unit with 25-pin connector on the wiring harness.Check all cable connections and make sure they are secure and correctinstalled.The KLEEMANN module is essential to an appropriate place of install. Free fromwater, vibrations, protected from corrosive liquids (battery acid fumes).!Damage due to improper installation of the KLEEMANN module, will void anyclaim for damages.!Install engine cover and possibly other removed parts again.Sensor 1Before driving, please use the self-test, which you will find on the next page.!Super Plus 98 Octane or 100 Octane to ensure the performance.Sensor 2
Self Test DescriptionECUThis description is used as a supplement to the instructions for KLEEMANN chip tuning boxand explains the additional features of the model V6.!Self-test and functional test (in the installed state)!Turn on the ignition, LED3-PWR begins to shine on the bottom - LED2- CH1 and LED1-CH2flash for about 5 seconds alternately. Start the engine - enter idle and press hard thethrottle, LED2-CH1 begins to shine on the bottom - thats it. (Depending on engine type andoccupancy of the channels can additionally LED1-CH2 shine!)!!LED3-PWR shine 5V power supply of the sensor active.!!LED2-CH1 shine signal acquisition, self-test and the communication of the activechannel is okay. (Depending on engine type and occupancy of the channels canadditionally LED1-CH2 shine!)!!The engine can be switch off. The self-test and functional test was successful.
This description is used as a supplement to the instructions for KLEEMANN chip tuning box and explains the additional features of the model V6. ! Self-test and functional test (in the installed state) ! Turn on the ignition, LED3-PWR begins to shine on the bottom - LED2- CH1 and LED1-CH2 flash for about 5 seconds alternately. Start the engine - enter idle and press hard the