Transcription
Data EntryOracle FLEXCUBE Universal BankingRelease 11.11.0.0.0[May] [2022]Part No. F55411-01
Data EntryTable of ContentsERROR! CANNOT OPEN FILE REFERENCED ON PAGE 1ERROR! CANNOT OPEN FILE REFERENCED ON PAGE 11.ABOUT THIS MANUAL. 1-11.1INTRODUCTION . 1-11.1.1 Audience . 1-11.1.2 Organization . 1-11.1.3 Related Documents . 1-21.1.4 Glossary of Icons . 1-22.AN OVERVIEW OF DATA ENTRY MODULE . .22.43.INTRODUCTION . 2-1Organizing Transactions into Batches . 2-1CROSS-CHECKING MECHANISMS. 2-2Specifying an Exchange Rate Variance . 2-2Enforcing Signature Verification . 2-2Indicating Values to be Rekeyed during Authorization. 2-2Defining Transaction and Authorization Amount Limits . 2-3Online Authorization for Overdrafts . 2-3OTHER FEATURES . 2-3Account Statements . 2-4Opting to Track Denominations involved in Transactions . 2-4RETRIEVING INFORMATION . 2-4MAINTAINING DATA SPECIFIC TO DATA ENTRY MODULE . 3-13.1INTRODUCTION . 3-13.1.1 Maintaining Static Data. 3-13.2MAINTAINING DATA ENTRY BRANCH CONDITIONS . 3-13.2.1 Branch Conditions that can be Defined . 3-23.2.2 Defining Branch Conditions . 3-23.2.3 Opting for Denomination Tracking . 3-43.2.4 Maintaining Templates for Multi-Offset Transactions . 3-53.2.5 Specifying Details for the Offset Leg of Transactions . 3-84.BEGINNING AND END-OF-DAY OPERATIONS . 4-14.1INTRODUCTION . 4-14.2BATCH OPERATIONS . 4-14.2.1 Purpose of Batch. 4-14.2.2 Opening Batch . 4-24.2.3 Maintaining Error Codes. 4-34.2.4 Reopening batch . 4-44.2.5 Deleting batch . 4-54.3END-OF-DAY CASH DISPENSER VALIDATIONS . 4-55.DATA ENTRY OPERATIONS . 5-15.1INTRODUCTION . 5-15.1.1 Beginning-of-day Teller operations . 5-15.2SAVING TRANSACTION . 5-15.2.1 Transaction Reversal . 5-25.2.2 Transaction Delete . 5-21-1
.15.6.25.6.36.In case a Wrong Check Total has been Entered . 5-3CLOSING BATCH . 5-3OTHER OPERATIONS ON BATCH . 5-3Reopening Batch . 5-3Deleting Batch . 5-4Teller Till Balancing . 5-4ENTERING JOURNAL TRANSACTIONS . 5-5Saving Transaction . 5-8Batch Close . 5-8Deleting Journal Transaction . 5-8ENTERING MULTI-OFFSET TRANSACTIONS . 5-9Entering a Multi-offset Transaction. 5-9Entering Details of Main Leg . 5-10Deleting Transaction . 5-14DATA ENTRY CONTROL OPERATIONS . DUCTION . 6-1BATCH AUTHORIZATION . 6-1Authorizing Batches . 6-1REASSIGNING BATCH . 6-2Reassigning Batch . 6-3PROCESSING JOURNAL BATCH . 6-4Viewing Journal Batches . 6-4Unlocking Journal Batches . 6-5Reserving Journal Batches . 6-5Maintaining Journal Upload Preferences . 6-7This software or hardware and documentation may provide access to or information on content, products and servicesfrom third parties. Oracle Corporation and its affiliates are not responsible for and expressly disclaim all warranties of anykind with respect to third-party content, products, and services. Oracle Corporation and its affiliates will not beresponsible for any loss, costs, or damages incurred due to your access to or use of third-party content, products, orservices.1-2
1.1.1About this ManualIntroductionThis manual is designed to help you quickly get acquainted with the Data Entry module of OracleFLEXCUBE.It provides an overview to the module, and provides information on using the Data Entry module ofOracle FLEXCUBE.Besides this User Manual, you can find answers to specific features and procedures in the Online Help,which can be invoked, by choosing ‘Help Contents’ from the Help Menu of the software. You can furtherobtain information specific to a particular field by placing the cursor on the relevant field and striking F1 on the keyboard.1.1.1 AudienceThis manual is intended for the following User/User Roles:RoleFunctionBack office clerkInput functions for contractsBack office managers/officersAuthorization functionsProduct ManagersProduct definition and authorizationEnd of day operatorsProcessing during end of day/ beginning of dayFinancial Controller / Product ManagersGeneration of reports1.1.2 OrganizationThis manual is organized into the following chapters:Chapter 1About this Manual gives information on the intended audience. It also liststhe various chapters covered in this User Manual.Chapter 2An Overview of the Data Entry Module is a snapshot of the features thatthe module provides.Chapter 3Maintaining Data specific to the Data Entry Module gives information onbasic information that needs to be maintained in the system beforebeginning operations in the DE module.Chapter 4Beginning and End-of-Day Operations explains the beginning and end ofday operations for the data entry module.1-1
Chapter 5Data Entry Operations described in this chapter is the procedure to processall types of Data Entry, Teller type and Multiple Off-set entry transactions.Also explained is the method of associating a DE product with a DEcontract. The advantage of defining products is highlighted in this chapter.Chapter 6Data Entry Control Operations details the data entry control operations forthe Data Entry module.Chapter 7Report provides a list of reports that can be generated in this module andalso explains their contents.1.1.3 Related Documents Settlements User Manual Products User Manual Charges and Fees User Manual Tax User Manual User Defined Fields User Manual1.1.4 Glossary of IconsThis User Manual may refer to all or some of the following icons:IconsFunctionExitAdd rowDeleterowOptionList1-2
2.2.1An Overview of Data Entry ModuleIntroductionThe Data Entry module is a sub system of Oracle FLEXCUBE. This module is designed, primarily, for theuse of the tellers in your bank.Typically, the different operations that a teller performs in the course of the day are the: Disbursement and receipt of cash Processing of checks for clearing Sale and purchase of travelers checks Transfer of cash between accounts Passing adjustment entriesFor the sake of convenience, these operations are classified in the Data Entry module of OracleFLEXCUBE as: Teller type transactions Journal entries Multiple offset entry transactionsThe sale and purchase of traveler’s checks, foreign currency transactions, check transactions, and cashdeposits and withdrawals, are examples of teller transactions. These are transactions that are typicallyprocessed across the teller counter.When a transaction involves one debit entry and multiple credit entries, or vice versa, it is referred to asa multi offset entry transaction. Examples of such transactions could be the posting of entries forclearing transactions: where you credit your customers’ accounts for incoming checks and debit theclearing account.Classifying teller operations in such a manner helps your teller easily access the appropriate input screenrequired to perform an operation. Each screen, in turn, is streamlined to capture only the data peculiarto the operation. For example, if a teller has to debit an account and credit several other accounts (forsalary purposes) she can access the multi-offset transaction input screen and enter only the requireddata. Similarly, for a cash withdrawal transaction, the appropriate screen is easily accessed and onlydata specific to the transaction captured.2.1.1 Organizing Transactions into BatchesBatches help you organize information (and therefore, simplify teller operations).In a manual accounting system, you may maintain the details of transactions in a register. For easyretrieval, you may write down all transactions belonging to one type on a page. For example, you maywrite details of all Teller transactions on one page, loan transactions on another page, and so on.2-1
In Oracle FLEXCUBE, this is achieved by grouping transactions as ‘batches’. Each ‘batch’ corresponds to a‘page’ in the register. The accounting entries that are generated by transactions of a particular type aregrouped under a batch. For example, a teller could choose to post the multi-offset transactions enteredduring the day into a batch, all cash withdrawals into another, and so on. This facilitates quick retrievalof information and easy balancing of books.Grouping transactions into batches also helps you to authorize transactions in batches. In OracleFLEXCUBE all operations performed by a user should be authorized by another user with the requisiterights. At the end of day, you do not have to authorize transactions individually. If you print thetransaction journal for the batch, you can authorize transactions in batches.2.2Cross-checking MechanismsThe Data Entry module of Oracle FLEXCUBE is designed not only to simplify, but also to ensure theaccuracy of the operations that a teller performs. There are a host of cross checking mechanisms thatyou can opt to ensure the accuracy of the financial details that the teller enters into. For example, youcan Define exchange rate variance limits Specify the limit over which signature verification is required Specify the values that the authorizer of a transaction has to rekey before the completedetails of a transaction are displayed Specify transaction (amount) limits Display online override for overdrafts2.2.1 Specifying an Exchange Rate VarianceWhen a transaction involves a currency conversion the rates defined for the Rate Type, specified for theproduct, will be picked up by default (examples for Rate Type could be TC buy rate, cash rate, etc.,). Thisdefault can be changed. You can impose some restrictions on this changed rate, as follows:Normal VarianceIf the exchange rate variance exceeds the exchange rate for the Rate Type by this value (normalvariance), the system will ask the teller for an override before proceeding to apply the exchange rate.This override will be recorded and retrieved along with the transaction. Further, the transaction has tobe authorized by another user with the requisite rights before it is stored.Maximum VarianceA teller cannot apply an exchange rate (on a transaction involving the product) that is greater than thevalue that you specify as the Maximum Variance. If the teller specifies an exchange rate that exceeds thestandard rate by the maximum variance you have defined for the product, the system will not store thetransaction.2.2.2 Enforcing Signature VerificationYou can opt to enforce the verification of a customer’s signature for transactions that exceed a limit thatyou specify. The system will enforce verification of the customer’s signature if the transaction amountexceeds the limit that you specify.2.2.3 Indicating Values to be Rekeyed during AuthorizationAll operations on a transaction (input, modification, etc.,) have to be authorized:2-2
By a user other than the one who carried out the operation It should be done before you can begin the end-of-day operationsTo ensure that an authorizer is calling the correct transaction, you can specify that certain transactiondetails should be entered before the other details are displayed. For example, you can specify that youwould like the authorizer of a transaction to rekey values such as the transaction amount, thetransaction currency, the transaction account, and so on. The complete details of the transaction will bedisplayed only after the authorizer enters these values. This is called the re-key option. The fields forwhich the values have to be given are called the re-key fields.The details of a transaction will not be displayed for authorization (even if the authorizer of thetransaction enters them correctly) if the teller had captured erroneous values while entering thetransaction. A transaction will be displayed for authorization only if the values entered by the teller andthe authorizer are identical.If no re-key fields have been defined, the details of the transaction will be displayed when the authorizercalls the transaction for authorization.2.2.4 Defining Transaction and Authorization Amount LimitsYou can define the transaction amount limits for the teller products that you create. A teller cannotenter into a transaction that exceeds the limit defined for the product, which it involves. By definingtransaction and authorization limits for tellers and supervisors, you can control the teller transactionsthat are entered and authorized in your branch.2.2.5 Online Authorization for OverdraftsYou can define whether an online authorization is required when an account gets into overdraft. When ateller inputs a transaction and the account goes into an overdraft, the teller should have the transactionauthorized by a supervisor. The transaction cannot be saved without an authorization from thesupervisor. A transaction that results in an overdraft should be authorized by a third personsubsequently. In effect, such a transaction will have to be authorized twice as against the mandatoryauthorization required for normal transactions.2.3Other FeaturesThe following are some of the other salient features of the Data Entry module: You can define the format of the account statements to suit your requirements. You can opt to track the denominations involved in transactions. You can retrieve information relating to transactions in the form of reports.2-3
2.3.1 Account StatementsYou can maintain the format of account statements to suit your requirements. You can generate theaccount statement at regular intervals or when required. The account statements that you provide yourcustomer will contain details of all the transactions involving the account. You can choose to view anaccount statement (without actually printing it) to provide your customer with transaction details for anaccount.2.3.2 Opting to Track Denominations involved in TransactionsYou can opt to track the denominations involved in cash transactions. If you choose to enforcedenomination tracking, tellers also have to specify the denominations involved at the time of enteringcash transactions and transferring cash between tills and vaults.2.4Retrieving InformationDuring the day, or at the end of the day, you may want to retrieve information on any of the severaloperations that were performed during the day in your bank. This information may be generated in theform of reports.A report is information retrieved mostly in a printed format. However, you can direct a report to one ofthe following destinations: The printer The screen (as a display) A spool file (stored as a spool file to be printed later)The reports that you have spooled can be printed, or viewed, through the ‘Reports Browser’ screen.The following are the reports specific to teller operations that you can generate. Batch totals Currency positions Till/Vault positions Teller transactions for the day Exchange of denominations Cash transactions for the day Till liquidation Till closing report Till balancing exceptions2-4
3. Maintaining Data Specific to Data Entry Module3.1IntroductionBefore you begin operations in the Data Entry module of Oracle FLEXCUBE you must maintain certainbasic information in the system. For example, you must maintain the following: Branch specific parameters (you can opt to enforce denomination tracking) Till/Vault/Cash Dispenser details of your branch Bank codes (for other banks)This data is maintained first since it is required to create your teller products, enter teller transactions,and so on. In other words, this is the foundation on which you build the superstructure ‘Products’ towhich, you can link transactions.3.1.1 Maintaining Static DataStatic data, which is maintained in Oracle FLEXCUBE, can be either common to several modules orspecific to a module. For example, data relating to exchange rates is common to modules like ForeignExchange and Money Market. Static Data that is commonly accessed by several modules is maintainedcentrally.Data that is specific to a module is maintained in the module itself. For example, data relating to Tills,Vaults and Cash Dispensers is specific to the Data Entry module. It is therefore maintained in the DataEntry module.You can maintain static data specific to the Data Entry module in three different screens: Data Entry Branch Conditions screen Till/Vault/Dispenser Maintenance screen Clearing Bank Code Maintenance screenThe procedure to invoke and maintain the tables is explained below.3.2Maintaining Data Entry Branch ConditionsThe mandatory operations and the default parameters that you can define for your branch are referredto as Branch Conditions.For example, you can establish operational controls in your branch such as: Enforce rekey of important values of a transaction at the time of authorization Set default parameters for your branch such as enforcing the input of currencydenominations for teller transactions Defining an exchange rate variance (explained below) for your branch which will apply tojournal and multi offset transactionsThe advantagesThe ‘Rekey at authorization’ facility is a cross-checking mechanism, which has been provided in OracleFLEXCUBE. By rekeying the values of a transaction the authorizer can ensure that a transaction is errorfree.3-1
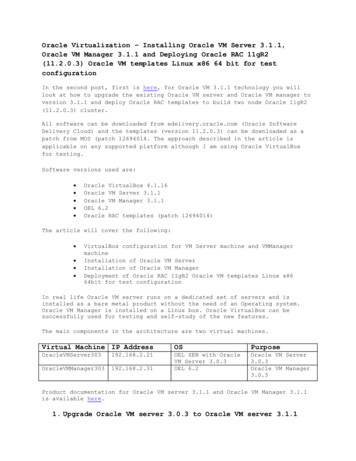
ExampleYou have debited a sum of 100 USD from a customer account. The account number of the customer isUSDUS100003D. The Value Date of the transaction is 20/12/99.The authorizer of the above transaction will have to rekey, for example, the Account Number of thecustomer; the Amount of the transaction; and the Value Date of the transaction if you have indicated thatthese values have to be rekeyed at the time of authorization.By doing so the authorizer can ensure that the transaction is error free.3.2.1 Branch Conditions that can be DefinedYou can define the following branch conditions in the Data Entry Branch Conditions table: Rekey at the time of authorization of journal and multi offset transactions Transaction codes for cash transfers amongst Tills Vaults and Cash Dispensers Exchange Rate Variance Local currency equivalent of the Exchange Rate Variance Denomination input for teller transactions Use Exchange rate history Allow Cash Dispenser functionality and define the minimum dispensable amount Defining the maximum amount to be dispensed during an alarm situation.3.2.2 Defining Branch ConditionsYou can invoke the ‘Journal Entry Branch Parameters Maintenance’ screen by typing ‘DEDBRCON’ in thefield at the top right corner of the Application tool bar and clicking the adjoining arrow button.Select ‘New’ from the Actions menu in the Application tool bar or click new icon. You can now maintainthe branch conditions for your branch.Branch CodeSelect the branch for which you are maintaining the parameters.3-2
3.2.2.1 Specifying Journal Entry and Multi Offset EntryYou can specify the values that the authorizer of a transaction has to rekey when authorizing it.All operations on a transaction (input, modification, etc.,) have to be authorized: By a user other than the one who carried out the operation Before you can begin the end-of-day operationsWhen you invoke a transaction for authorization—as a cross-checking mechanism to ensure that you arecalling the right transaction—you can specify that the values of certain fields should be entered beforethe other details are displayed. The complete details of the transaction will be displayed only after thevalues to these fields are entered. This is called the ‘re-key’ option. The fields for which the values haveto be given are called the ‘re-key’ fields.If no re-key fields have been defined, the details of the transaction will be displayed immediately whenthe authorizer calls the transaction for authorization. The re-key option also serves as a means ofensuring the accuracy of inputs.You can specify the values of Journal and Multi-offset transactions that the authorizer should rekey inthis screen.Under Journal Entry (on the top left corner) and Multi-Offset Entry (top right corner), you will find thefollowing option: Rekey Required Under this option you will see two buttons against ‘Yes’ and ‘No’respectively.Click on the button against Yes if you want the authorizer of journal transactions to rekey values.Similarly, click on the button against Yes if you want the authorizer of multi offset transactions to rekeyimportant fields.Click on the button against No, in these fields, if you do not want the authorizer to rekey values at thetime of authorization.3.2.2.2 Indicating Re-Key and Multi Rekey FieldsUnder Journal Entry and Multi Offset Entry respectively, you will see a list of re- key fields. Check againstthe fields that you want to be re-keyed at the time of authorizing for Journal and Multi Offset entries.The fields that can be re-keyed for journal entries are: Value Date Amount Transaction Code AccountThe fields that can be re-keyed for multi offset entries are: Value Date Main Transaction Code Offset Transaction Code Amount3-3
3.2.2.3 Specifying Exchange Rate VarianceYou can maintain exchange rate variation limits for Journal and Multi offset transactions. When youinput a Journal transaction, the exchange rate (which you maintain at the beginning of day in thecurrency table) will be applied. This is referred to as the default exchange rate.However, for a special customer or in special cases, you may want to use an exchange rate that isgreater than the default exchange rate. In this field, you can specify the maximum and minimumpercentage difference of the special rate from the default rate. In other words, you can specify theMaximum and Minimum Exchange Rate Variance.When you enter a transaction, the system will not seek an override if the Exchange Rate that youchoose to apply is lower than the Minimum Exchange Rate Variance specified in the Minimum ExchangeRate Variance field. If the Exchange Rate is between the Minimum and the Maximum Exchange RateVariance defined, the system will display an override message. The system will not store a transaction ifyou apply an Exchange Rate that is more than the Maximum Exchange Rate Variance defined.3.2.2.4 Specifying Local Currency Equivalent Variable LimitAnother parameter that you can define for Teller and Journal type transactions, in this screen, is the LCYEquivalent Variance Limit.When a teller enters a transaction (Teller/ Journal/ Multi offset) she can change the local currencyequivalent for the transaction (if it is a foreign currency transaction). The input in this field determinesthe variance in number of units (note NOT percentage) between the default valu
that the cash that is left in the till is the right amount. In other words, Till balancing involves checking the physical balance in the Till (actual balance) against the balance in the Till according to the system. Refer the chapter 'Beginning and end-of-day operations' in this User Manual for further details.