Transcription
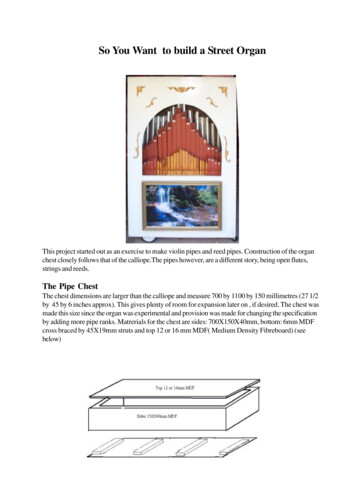
So You Want to build a Street OrganThis project started out as an exercise to make violin pipes and reed pipes. Construction of the organchest closely follows that of the calliope.The pipes however, are a different story, being open flutes,strings and reeds.The Pipe ChestThe chest dimensions are larger than the calliope and measure 700 by 1100 by 150 millimetres (27 1/2by 45 by 6 inches approx). This gives plenty of room for expansion later on , if desired. The chest wasmade this size since the organ was experimental and provision was made for changing the specificationby adding more pipe ranks. Matrerials for the chest are sides: 700X150X40mm, bottom: 6mm MDFcross braced by 45X19mm struts and top 12 or 16 mm MDF( Medium Density Fibreboard) (seebelow)
The RegulatorA regulator valve is fitted on the base of the chest to spill excess air and is adjustable to set the required pressure. The cone shaped design was found to be better than a trap-door type because thehigh air volume tended to draw it closed due to the Bernoulli effect.The ManometerThis is a fancy name for the pressure measuring device. It consists of a backboard on which is mounteda U-tube ( piece of plastic tubing) with some coloured water in the bottom. In the centre is a rulermarked in inches, that slides up an down to measure the column displacement. One end of the tube isplugged into a pipe hole in the chest and the valve opened. Water will rise in one arm of the tube andlower in the pressurised arm. Slide the ruler so that the zero is aligned with the pressure end and thenread off the displacement in the other arm.
The top is hinged at the back with a piano hinge to allow the top to be lifted with pipes attached formaintenance and/or repairThe CabinetThe frame for the cabinet is made from 25mm (1 inch) square aluminium tube with plastic joiners at thecorners. The frame was covered in 6mm MDF which makes it quite heavy, plywood would be lighter.Doors were made for the rear from 6mm MDF with a 45X19 mm frameThe dimensions of the cabinet are 1104mm wide, 1600mm tall and 800mm deep plus the doors of25mm. Strips of Aluminium angle were attached inside the sides to provide support for the pipe chestand allow the whole chest to be slid in from the back. Because the organ is experimenal, this featureallows chests of varying configurations to be fitted inside the same cabinet. It also allows easy removalfor repairs or maintenance Wheels were attached under the front and castors at the back.The BlowerThe blower is an old vacuum cleaner motor housed in a box and surrounded by sound absorbant plasticfoam. The foam is fairly expensive but worth it as the sound of the unmuffled motor is quite loud .Muffled, it will still not be silent but when the organ is playing it drowns it out
The Solenoid ValvesThere are several suppliers of suitable valves, or you can make your own. The easiest is to purchasethem and the valve illustrated below is from the Peterson organ Supply Co of Chicargo, USAI believe that these are available for about 5 eachThe outline of the operation appears above. The valve is attached to the armature which is pulled downwhen the coil is energised allowing air to enter the pipe. The return spring closes the valve when the coilis disconnectedBelow is the pipe arrangement of the organ, The front rank contains violins and flutes, the next rankback is flutes, behind that are bourdons and clarinets and finally bass trombones at the back. The backview shows the trombones, blower, computer and control electronics
SpecificationThe organ is based on 48 notes from tenor C (an octave below middle C) but later I added bass reedsto take it down another octave but this octave is not chromatic, it only contains C,D,E.F.F# G A A#and B making it 57 notes in all. I also added a string section from G above middle C for 18 notes.String (violin) pipesThese string or violin pipes again were experimental but seemed to work OK, although they take somedelicate adjustment to get them to speak properly.Generally speaking, violin pipes are half the width and depth of open flute pipes. The feature of thesepipes is that they overblow by screeching at an octave above and have to be bought back by theaddition of an harmonic bridge or Harmonic frein applied to the mouth to modify the air flow (seediagrams)String (violin) pipe mouths showing the harmonic freinReed PipesReed pipes, as their name suggests, rely on a vibrating reed to produce the sound, as in a clarinet. Thereed is usually made of hardened brass. Shim brass of 0.005 inches (about 0.2mm) thick is usually OKbut you might need thicker for the bass reeds, about 0.5mm. You can usually get such thicknesses fromhobby shops, shim brass from engineer’s supplies, otherwise tongue brass from organ suppliers is bestbut expensive!The reed block is turned from Australian hardwood. The cylinder long enough to accept the reed about 3 or 4 inches long plus the shoulder and should fit snugly inside a plastic pipe 11/4 inches in diameter. The block carrying the reed is called the eschalot and the covering plastic pipe, the boot. The bootshould be about twice the length of the eschalot. At the base of the boot is a wooden plug carrying a 1/2 inch piece of copper pipe about 1” long for the inlet.The reed needs to be slightly curved in order thatit will spek properly. This is usually done by burnishing, that is, the reed is held on a flat or slightlycurved surface and vigorously stroked lengthwise with a bright steel rod about 6 or 9mm in diameter.
The reed, when fixed to the block should have a gap at the tip and display a slight curve from the base.The tuning wire consists of a 2mm brass rod or lighter piano wire bent into a T- shape with the top bentunder to bear across the reed to keep it pressed on to the eschalot.The wire protrudes through a hole inthe top of the reed block and is bent at right angles to provide a means whereby the wire can be raisedor lowered by tapping to change the vibrating length of the reed for tuning. You will probably have toexperiment with burnishing to get the right amount of curvature so that the pipe will speak cleanly andpromptly. Only experience can determine the “right “ amount of curvature.The resonators are made from plastic pipe and the length is the same as that for stopped pipes. Youmight need to modify the volume of sound by plugging the top by cutting a slot at the top of the pipeabout 3/4” wide and 1” to 2” long then cover with a sleeve cut from plastic pipe, slit lengthwise andslipped over the top to modify the size of the opening.(see below)adjustable clarinet resonatorVariousmethods of Mitring bass reed pipesThe bass reeds are tapered to give a trombone sound. The taper is about 1” to every 2 ft ( 25mmevery 600mm). Theywill need to be mitred in order to fit them inside the organ case (see above). Thevolume of sound may need to be reduced and this can be accomplished by plugging the ends andcutting a slot in the end at the top that can be covered by an adjustable metal plateReed Eschalot showing reed tongue deflection
Open Flutes and ViolinsThese were made from 6mm MDF and give a satisfactory tone. The dimensions for the pipes are givenin Tables 1 & 2. Stopped flutes follow the same basic plan but differ in that there is no tuning slide atthe top but a moveable plug The base is made from Australian hardwood - jarrah or red gum. I havefound these to be a very stable timbers and give good results. The block is 45mm long, of squaresection and dimensioned for the particular inside measurements for the pipe being made. A v-notch iscut near the end, leaving a lip of about 1mm wide. The inlet hole is bored from the opposite end tointersect the notch (see photo)pipe base blockthe sides are cut to the length given in the table and exactly the same width as the base block. The backand sides are cut 12mm wider than the sides.Assembly:Glue the back of the base block to the pipe back then apply glue to the sides of the block and run abead of glue along either side of the back for the sides. Place a block of the same dimensions as thebase block at the top and place the sides in position, rubbing back and forth to spread the glue. Then tieall together with rubber bands ensuring that everthing is square. The top is left for the moment and thecap is cut from it the same length as the base block and an end squared off and sanded smooth at theend for the lip. Set the assembly aside for the glue to set. It is often a good idea to lightly clamp thecentre of the sides to the back, a block of the same dimensions as the base block in the centre wouldsuffice, fastened with rubber bands.Alternatively, sliding wedges can be used.Simpl;y insert the wedgeswith the ramps together and slide against one another th achieve the desired thickness.
The pipe top needs to have the tuning slot cut (see table), make it slightly narrower than the inside widthof the pipe, and the bevel or ramp is cut with a sharp chisel, the same width as the inside of the pipe.The sides of the ramp can be incised with a hacksaw blade as are the tuning slide grooves.The cut-up or mouth is made as in the table. A rule of thumb is 40% of the pipe width but this can varyaccording to the pressure used(see below). The edge need not be absolutely sharp but needs to be verythin. Once the glue is dry, paint the inside of the pipe with shellac or varnish to seal it. Also paint theunderside of the top to the inside width. The gaskets for the cap are now cut. For these, I used 3 layersof plasterer’s paper tape to give a gasket of 1/32nd inch thick or 0.6mm. Any paper type gasket of theright thickness will do (blotting paper is good). The gaskets are U-shaped and cover the sides and baseof the block .The tuning slide is made from thin metal sheet, galvanised iron is OK. Stainless steel or aluminium about1/32nd or 0.6 mm or slightly thicker is good. The tab at the top is bent forward to provide for movingthe slide up or down for tuning. The cap is glued in position over the gasket and the edge set slightlyback from the edge of the block, less than 1mm. The top can now be positioned and fixed with rubberbands. Now test blow, making sure that there are no gaps in the join. If a good tone is achieved, the topcan now be glued on. After the glue is set, bevel the edges of the mouth towards the cap.Finish off bysanding smooth and cover with clear laquer or shellac.I made the inlet (foot) from copper tube of 1/2inch dia for the larger pipes and 3/8 inch for the smaller ones ( the top octave).A word about Pipe ScalesFor fairground and small organs, the scale refers to the range of pipes used and is usually not chromaticbut for larger pipe organs, the scale of an organ pipe refers to the ratio of the width to length. A short fatpipe will produce the same note as a more slender and longer pipe but the harmonic structure will bequite different. Thus we have various names for pipes of different scale e.g. Diapason, Clarabella,Waldflute etc etc. A wide pipe will produce a more hollow sound and will be poorer in harmonics,producing more odd harmonics. A narrower pipe will be richer in harmonics and will sound “stringier”the ultimate being violin pipes that need roller bridges or harmonic freins to make them sound properly.A stopped flute will produce only the odd harmonics, the hollow sounding theatre organ Tibia is a goodexample. Pipe organ builders soon found that pipes producing higher notes became impossibly narrowand didn’t sound “right”, the further up the diatonic scale they went so they devised pipe scales thathalved the width about every 16th, 20th or 22nd pipe so that pipes could more easily be made toproduce the required note (see below)The pipe mouth also has a relationship to the width of the pipe. The lower the wind pressure, thenarrower the mouth and several rules of thumb have been produced for the mouth at 30, 40 or 50% ofthe pipe inside width. There is a mathematical relationship and formulas for this and a wealth of otherinformation can be found on the World Wide Web, particularly at the Mechanical Music Digest web siteat http//mmd.foxtail.com/tech/index.html. So there is no reason why you cannot devise your own scaleto produce pipes with a distinctive sound - The following is part of a table of pipes halving at the 16thgoing from middle C to E an octave above.The tables 1 and 2 give dimensions for two different scalesbut either will work quite wellNote EqualQuad EqualQuadNote EqualQuad EqualQuadSquare(ins)(ins)Square(mm)(mm)Square (ins) (ins) Square (mm) 4.3
Table 1Pipe Dimensions for open flutes Halving on the 20th notedimensions in 661.217601864.71975.52093C-C al dth Tuner .618.335.317.734.117.032.916.531
This project started out as an exercise to make violin pipes and reed pipes. Construction of the organ chest closely follows that of the calliope.The pipes however, are a different story, being open flutes, strings and reeds. The Pipe Chest The chest dimensions are larger than the calliope and measure 700 by 1100 by 150 millimetres (27 1/2