Transcription
GRAND CANYONMultifunction Delay & LooperCongratulations on your purchase of the Grand Canyon, a superior sounding,massively powerful Delay and Looper pedal. Within the Grand Canyon are a vastarray of awe-inspiring effects. Explore a wide range of delays and textures,including pristine or bitcrushed digital, exquisite Deluxe Memory Man, rhythmicdrum, warm tape, plate reverb, polyphonic pitch shift, and ethereal shimmer. TheGrand Canyon even has a full-featured looper which can be used simultaneouslywith any of the delay effects to conjure lush, layered soundscapes. Fine tune theeffects with a broad array of intuitive controls, and you’re in for a truly inspiringand grand experience.WARNING: Your Grand Canyon comes equipped with an Electro-Harmonix 9.6DC-200BIpower supply. The Grand Canyon requires 150mA at 9VDC with a center negative plug.Use of the wrong adapter or a plug with the wrong polarity may damage your GrandCanyon and void the warranty. Do not exceed 10.5VDC on the power plug. Power suppliesrated for less than 150mA will cause the Grand Canyon to act unreliably.- FEATURES 12 Delay Types yield a wide range of delay and echo effectsUp to 3 seconds of delay timeTAP footswitch with 9 Tap Divide settings for precise delay timesStereo output produces stereo delay and ping pong effectsUp to 16 minutes of recording time on the full-featured looper which includesunlimited overdubs, undo/redo, a dedicated stop button, loop fade-out,reverse, and speed adjustmentThe Looper can record and overdub the internal stereo delay effectsLoop audio remains in the Grand Canyon until you erase it, even after removingpower from the unitEasy pushbutton access to extra features like delay tails, momentary effectmode, and ping-pong output13 Presets may be saved and recalled: one preset for each delay type and onefor the looperProgrammable expression pedal settings allow you to control any combinationof the Grand Canyon’s knobs with an external expression pedalConnector for external 1-, 2- or 3-button footswitch allows for added controlHigh quality buffered analog bypass and soft switching1
TABLE OF CONTENTSNotes and Specifications3Delay Types and Descriptions3Quick Start Guide4Controls and LEDsDelay / Looper Modes, Button, and LEDsControl KnobsDelay Type Knob, Preset LED, and Mini KnobsIlluminated ButtonsTap Divide Button and LEDsFootswitches and LEDs77810111213Connections15Delay Type and Mini Knob Details16Using the Looper Mode24External Footswitch Functionality27Expression Pedal Use and Setup28Tap Tempo on the Grand Canyon30Preset Use and Setup32Secondary Mode Functionality34Restoring Factory Settings35Warranty Information and Compliance362
NOTES AND SPECIFICATIONS Audio input impedance: 2M Audio output impedance for each output: 550 Current draw: 150mAMaximum input signal level: 11 dBuBypass: high quality analog buffered bypass when TAILS modeis disabled. DSP bypass when TAILS is enabled.DELAY TYPES AND DESCRIPTIONSDELAY E/HOLDDRUMDOUBLERDESCRIPTIONPristine 24-bit digital delay with available high or lowpass filtering and bit crush/sample rate reduction.Digital delay with modulated delay time yielding flanger,chorus, vibrato, warble and more.Multi-tap delay where you can set the exact number ofecho repeats (up to 31). Includes adjustable swell ordecay volume envelopes on repeats.An easy-to-use reverse delay with an intelligent pluckdetector algorithm for great sounding reverse echoes.Faithful emulation of the classic Electro-Harmonix DeluxeMemory Man analog delay with available modulation.Faithful emulation of classic tape-based delays. Includestape distortion and Wow & Flutter warble modulation.Lush plate reverb plus echo. Together they createreverberant echoes and smooth spacious reverbs.EHX’s heralded polyphonic pitch shifting digital delaycreate pitch-shifted echoes and cascading echo repeats.A mixture of octaves and modulated delay pluscompression creates shimmering cascaded soundscapes.Play a note or strike a chord; the Grand Canyon repeatsthe echoes indefinitely until your next note or chord.Faithful emulation of a magnetic drum echo with a hostof playback head configurations for creating musicalrhythmic echo patterns.A short digital delay that thickens up a mono signal orcreates a stereo spread. Includes detune and delay timeoffset of the left and right outputs.3
QUICK START GUIDEPLUGGING IN THE GRAND CANYON1. Connect the supplied EHX9.6DC AC Adapter into the 9V jack at thetop of the Grand Canyon. Plug the AC Adapter into an AC outlet.2. Connect your guitar or other instrument into the INPUT jack using astandard 1/4” instrument cable. Connect the L OUT jack to your ampwith another standard 1/4” instrument cable.3. For stereo operation, connect R OUT to another amp.DIALING IN A STANDARD DIGITAL DELAY EFFECT1. Ensure none of the buttons at the top left of the Grand Canyon, likeTAILS, are lit. If any button is lit, press the button once to disable it.2. Ensure that only the DELAY mode LED is lit. This LED is located in thecenter of the unit, just to the right of the DELAY knob. If the LOOPERLED is lit, press the small white Mode button located near the DELAYand LOOPER LEDs until only DELAY is lit.3. Rotate the DELAY TYPE knob clockwise to the ECHO setting for astandard digital delay.4. Set the two smaller knobs to the right of the DELAY TYPE knob totheir middle positions.5. Set the number of repeats with the FEEDBACK knob, the delay timewith the DELAY knob, and the delay volume with the DELAY LVL knob.TAPPING IN THE DELAY TIME1. Check that the TAP DIV setting is set to quarter note. If it is not, pressthe TAP DIV button until only the quarter note LED is lit.2. Ensure that you are in Delay-only mode, and the LOOPER LED is off.3. Press and release the TAP/LOOP footswitch two or more times. Thedelay time will now be equal to the time difference between your lasttwo presses of the TAP/LOOP footswitch.4. TAP DIV can now be pressed to choose different Tap Divisions.CHOOSING A DELAY TYPE1. Rotate the DELAY TYPE knob in either direction until the desiredDELAY TYPE LED is lit.2. Check the parameter table on the Grand Canyon to see theparameters that can be adjusted by the two Mini Knobs for the chosenDELAY TYPE. Try turning the Mini Knobs to experiment with differentdelay effects.4
CREATING A LOOP1. To create a loop, the LOOPER LED in the center of the Grand Canyonmust be lit.2. To cycle through the three modes – Delay, Delay Looper and Looper– press the small white Mode button within the DELAY/LOOPER group.3. If you want to record a loop with the Grand Canyon’s internal delayeffects, make sure both the DELAY and LOOPER LEDs are lit.4. If you want to record a loop without the Grand Canyon’s effects, onlythe LOOPER LED should be lit.5. To record your loop, press and release the TAP/LOOP FSW. The GrandCanyon begins recording immediately.6. When you are ready to end loop recording, press the TAP/LOOP FSWagain. The loop will begin playing back. The MEM and PLAY LEDs willnow be lit.7. To overdub over the loop, press the TAP/LOOP FSW while it is playing;the REC LED will light.8. To stop loop playback double-tap the TAP/LOOP FSW. You may alsostop by pressing the BYPASS/STOP FSW while in LOOPER only mode.ADJUSTING LOOP PARAMETERS1. Once a loop is recorded you can change loop parameters. Make sureyou are in Looper mode; the DELAY LED should be off.2. While in Looper mode, the white knob functions are detailed by thesecond row of orange lettering. The following controls are active: DRY CUT - sets the volume of your dry signal LOOP LVL - sets the volume of loop playback DUB LVL - sets how much of previously recorded loop audiois preserved when overdubbing FADEOUT - sets how long it takes for a loop to fade out whenplayback is stopped3. The mini knobs on the right side of the Grand Canyon control thedirection and speed of the looper’s playback. You may overdub in anyspeed or direction.5
USING AN EXPRESSION PEDAL1. Connect your expression pedal to the EXP jack.2. While the EXP MODE button is off, the expression pedal acts like avolume control for your dry signal before it enters the Grand Canyon.3. While the EXP MODE button is enabled, the expression pedal sweepsall parameters that are assigned to it for the currently selected DelayType or Looper mode.4. You may assign any knobs you like to be swept by the expressionpedal. Additionally each knob may have a custom range and direction.See page 29 of the manual to learn how to create an ExpressionSetting for each Delay Type and for the looper.SAVING A PRESET1. Once you have created a sound that you would like to save, press andhold the DELAY TYPE knob.2. After about half a second, the PRESET LED will begin blinking rapidly.Continue holding down the DELAY TYPE knob.3. After two seconds of holding down the DELAY TYPE knob, the PRESETLED will stop blinking and light up solid. You can now release theDELAY TYPE knob.4. Your preset is saved in the currently selected Delay Type. You maysave one preset for each of the 12 Delay Types and one preset forLooper mode.RECALLING A PRESET1. Turn the DELAY TYPE knob to the Delay Type you want to recall.2. Press and release the DELAY TYPE knob. The preset sound loads andthe PRESET LED lights solid.3. If you turn a knob or change a button setting, the PRESET LED willblink rapidly to indicate a preset is loaded but the setting has beenaltered.6
CONTROLS AND LEDS- DELAY / LOOPER MODES, BUTTON, AND LEDS The Grand Canyon has three functional modes:Delay, Delay Looper, and Looper. To theright of the DELAY knob there is a small whiteMode button and two LEDs labeled DELAY andLOOPER. Pressing the Mode button cycles youthrough the three modes, allowing you to seamlessly integrate delayeffects into your looping. You can also use an external footswitch to movebetween modes; see page 27 for more details on external footswitches.Tip: double tap the Mode switch to continue overdubbing when switchingfrom Looper mode to Delay Looper mode.DELAY Mode: Active when DELAY LED is lit / LOOPER LED is unlit All controls modify the delay effects according to the red labels. The LOOP LVL knob sets loop volume if a loop is playing back. The TAP/LOOP footswitch works as a tap tempo button. Press andhold the TAP/LOOP footswitch to ramp up to maximum feedback. The BYPASS/STOP footswitch toggles between effect and bypass.DELAY LOOPER Mode: Active when DELAY and LOOPER LEDs are lit The delay effects are still active in Delay Looper mode but you cannow access the looper function using the TAP/LOOP footswitchwhich no longer performs the tap tempo function. The TAP/LOOP footswitch handles the following Looper functions:Play, Record, Overdub, Undo, Redo, Stop and Erase. See page 13. Play along with your loop while using the internal delay effects, andthe looper can record and overdub all stereo delay effects. The delay controls labeled in red remain active; the LOOP LVL knobsets loop playback volume. The BYPASS/STOP footswitch toggles between effect and bypassmodes for the delay effect and can function as a tap tempo switch.LOOPER Mode: Active when LOOPER LED is lit / DELAY LED is unlit The Grand Canyon’s delay effects are deactivated in this mode. The four white knobs control the looper, with their functions listedin the second level of orange text beneath the knobs. The TAP/LOOP footswitch handles the following looper functions:Play, Record, Overdub, Undo, Redo, Stop and Erase. See page 13. The BYPASS/STOP footswitch stops the loop with one press.7
- CONTROL KNOBS -The four knobs on the left side of the Grand Canyon control the mainparameters of the delay effects and the looper. These knobs have differentfunctions depending on the current mode. The top row of red labelsspecifies the delay-specific functions of the knobs, while the bottom rowof orange labels specifies the looper-specific functions of the knobs. Thechart below lists which functions are active in each mode:ModeDelay ModeDelay LooperLooper ModeDELAY LVLDELAY LVLDRY CUTKnob FunctionsLOOP LVL*FEEDBACKLOOP LVLFEEDBACKLOOP LVLDUB LVLDELAYDELAYFADEOUT*Note: In Delay Mode, the LOOP LVL control is only active if a loop wasplaying before entering Delay Mode.Delay parametersDELAY LVL – Wet/dry control that sets the balance between your drysignal and the delay effects produced by the Grand Canyon. When thisknob is at the minimum position, the output is only your dry signal. Asthe knob is turned up, the delay output increases in volume. As the knobis turned past 2 o’clock, the dry signal decreases in volume. When theknob is at the maximum position, the output is only the delay output.Note: in Sample/Hold, the dry signal remains at unity volume even asDELAY LVL is turned to maximum.FEEDBACK – Controls the number of repeats of the delayed signal. Asthis knob is turned clockwise, the number of repeats increases.DELAY – Controls the delay time of the Grand Canyon for all DelayTypes. Turn this knob clockwise to increase the delay time. Most DelayTypes range from 5 milliseconds to 3 seconds but some Delay Typeshave different ranges.8
Looper parametersDRY CUT – Works as a reverse volume control for your dry signal. Yourdry signal is loudest when the knob is turned down to its minimum orcounter-clockwise position. The DRY volume decreases as the knob isturned clockwise.LOOP LVL – Controls the output volume of the looper’s playback. Note:In Delay mode, this knob is only active if a loop was already playingbefore switching to Delay mode.DUB LVL – While overdubbing in LOOP mode, this knob acts like afeedback control for the looper. While overdubbing, older layers of loopaudio may lose volume each cycle based on the setting of the DUB LVLknob. Rotating the knob counter-clockwise progressively lowers thevolume of the previously recorded audio with each loop cycle. At themaximum knob position, previous loop audio levels remains constantduring overdub. Upon exiting Looper mode, the DUB LVL knob settingremains fixed until you return to Looper mode and move the knob again.FADEOUT – When a loop is stopped, this knob sets the loop’s fadeouttime from the current volume level to silent. As you turn FADEOUTclockwise, the fadeout time increases, ranging from instantaneous in thefully counter-clockwise position to 60 seconds in the fully clockwisesetting. Upon exiting Looper mode, the FADEOUT knob setting remainsfixed until you return to Looper mode and move the knob again.9
- DELAY TYPE KNOB, PRESET LED, AND MINI KNOBS -DELAY TYPE KnobThis knob is a rotary encoder that selects which of the Grand Canyon’sDelay Types is active. The list ranges from ECHO at the top to DOUBLERat the bottom.One preset can be saved for each Delay Type and for the looper using theDELAY TYPE knob. Press and hold DELAY TYPE to save a preset in thecurrently selected Delay Type, or for the looper while in Looper mode.Press and release DELAY TYPE to recall the preset for the selected DelayType or for Looper mode. The PRESET LED provides a visual indication forthe current preset state:PRESET LED Off: You are in What You See Is What You Get(WYSIWYG). All current knob positions represent the effect beinggenerated.PRESET LED On: The preset is loaded for the currently selected DelayType, or if LOOPER mode is selected, then the looper preset is loaded.PRESET LED Blinking: There are two situations where the PRESETLED blinks: 1) while saving a preset or 2) changing a knob or buttonsetting after loading a preset. If you load a preset and then move aknob, the new knob position takes over for only that particularparameter and the PRESET LED blinks. If you return the recently movedknob to the position that is saved in the preset, the PRESET LED lightssolid again.Miniature Parameter KnobsTo the right of the DELAY TYPE knob are two Mini Knobs whose functionschange depending on the selected Delay Type. On the face of the GrandCanyon, below the Mini Knobs, there is a table listing the available MiniKnob functions for each Delay Type. Detailed descriptions of each functionstart on page 16 of this manual. Looper mode also has two parametersassigned to the Mini Knobs. Upon exiting Looper mode, the loop’s MiniKnob positions remain fixed until you return to Looper mode.10
- ILLUMINATED BUTTONS -EXP MODE Button – When this button is lit, EXP MODE is enabled. Whenan external expression pedal or control voltage is connected to the EXPjack on the rear of the Grand Canyon, you can control any combination ofknob parameters with your foot. When the EXP MODE button is disabled(button is not lit), the external expression pedal acts as a volume pedalfor the dry signal and the signal into the delay effect. This button is alsoused to set up Expression Settings (see page 29 for this procedure).MOMENT Button – While in Delay or Delay Looper modes, enablingMOMENT changes the function of the BYPASS/STOP footswitch to onlyallow the delay effects while the footswitch is pressed down. The delayeffects are bypassed when the footswitch is released. When MOMENT isdisabled, the BYPASS/STOP footswitch works like a normal latchingfootswitch, toggling between bypass and effect modes with each pressand release of the footswitch. The MOMENT button has no function inLooper mode. TIP: Use the MOMENT button in conjunction with tails topinpoint exactly which notes or segments of a phrase receive delay effects.TAILS Button – When TAILS is enabled, the echoes continue to repeatafter the pedal switches to bypass or to Looper mode, with the number ofrepeats set by the FEEDBACK knob. Anything you play after enteringbypass will not go through the delay effect. If the pedal is set for infinitefeedback (i.e. the FEEDBACK knob is set to maximum), the repeatscontinue until you turn down the FEEDBACK knob or switch to a differentDelay Type. When TAILS is disabled, all repeats stop as soon as the bypassswitch is pressed or the pedal enters Looper mode.Note: In Sample/Hold, repeats will not continue indefinitely when Tails areON. The repeats will fade out over half a second upon entering Bypass.PING PONG Button – The PING PONG function bounces each delayrepeat back and forth between the left and right outputs. When PINGPONG is disabled, each repeat is sent to both the left and right outputs.The PING PONG button has no function in Looper mode.11
- TAP DIVIDE BUTTON AND LEDS -The TAP DIV function sub-divides the tempo tapped in via the TAP/LOOPfootswitch to create shorter or longer delay times in sync with your taptime. It assumes that what is tapped is a quarter note. TAP DIV thendivides the quarter note to produce delay times rhythmically in time withthe tap tempo.The current DELAY knob setting can also be divided by the TAP DIVbutton. When you turn the DELAY knob, the range is always based on aquarter note length. After you set the DELAY knob, pressing the TAP DIVbutton selects the divide ratio of the delay time for each TAP DIV setting.The TAP DIV button cycles through the nine available Tap Divide settings.There are three main divisions: quarter note - , eighth note - , andsixteenth note - . Each division can be further broken down into its tripletand dotted versions. The TAP DIV LEDs will light to show the current tapdivide setting, and once set will blink at the current delay time.The following table provides an example of how each Tap Divide changesyour delay time whether the delay time is set by the TAP/LOOP footswitchor DELAY knob. The tapped time in this example is 600ms.TAP DIV ModeGraphicQuarter NoteDivideRatio1/1Delay Time (for 600 msTAP time)600 msQuarter Note Triplet 32/3400 msDotted Quarter Note DOT3/2900 msEighth Note1/2300 msEighth Note Triplet 31/3200 msDotted Eighth Note DOT3/4450 ms1/4150 msSixteenth NoteSixteenth Note Triplet 31/6100 msDotted Sixteenth Note DOT3/8225 ms12
- FOOTSWITCHES AND LEDS The Grand Canyon’s two footswitches have different functions dependingon the current mode. The red labels describe the Delay-specific functionsof the footswitches, while the orange labels describe the looper-specificfunctions. The chart below lists which functions are active in each mode:ModeDelay ModeDelay LooperTAP/LOOPTap Tempo Feedback rampLoopingLooper ModeLoopingBYPASS/STOPBypassBypass Tap TempoStop loopingDelay Mode Footswitch FunctionsTAP/LOOP – While in Delay mode, press and release the TAP/LOOPfootswitch two or more times to set the delay time with your foot. Thetap time and the current TAP DIV setting determine the actual delaytime. After tapping in a delay time, you may cycle through the TAP DIVsettings to find the desired delay timing.Press and Hold TAP/LOOP to ramp up to the maximum feedback setting.Release TAP/LOOP to ramp back down to the current feedback setting.BYPASS/STOP – The BYPASS footswitch works like a standard latchingfootswitch when the MOMENT button is not lit: press and release totoggle between bypass and effect modes. When the orange LED inGrand Canyon graphic is lit, the unit is in effect mode.If the MOMENT button is lit, then the Grand Canyon is normally in bypassmode unless you press and hold the BYPASS footswitch, at which pointit goes into effect mode. Release the BYPASS footswitch and it returnsto bypass mode.Delay Looper Mode Footswitch FunctionsTAP/LOOP – The TAP/LOOP footswitch controls many of the looper’sbasic functions such as record, play, overdub, undo, redo, stop anderase. See the chart on page 14 describing how to control the looper.Bypass/Stop – In Delay Looper mode, the BYPASS/STOP footswitchcan also be used for tap tempo, in addition to the bypass functions listedabove. Tap the BYPASS/STOP footswitch to set the tempo inDelay Looper mode. This feature can also be disabled if desired. Seepage 30 for more details on tap tempo with this footswitch.13
Looper Mode Footswitch FunctionsTAP/LOOP – In Looper mode, the TAP/LOOP footswitch works thesame as in Delay Looper mode.Bypass/Stop – In Looper mode only, press and release theBYPASS/STOP footswitch to stop the loop or begin loop fadeout. If youpress the STOP footswitch while in the middle of loop fadeout, the looperimmediately ends fadeout and stops the loop.Starting with an empty loop, the following chart describes what happenswith each press of the TAP/LOOP footswitch (and some cases theBYPASS/STOP footswitch when set to LOOPER-only mode):Looper StateEmpty loopRecording initialloopLoop PlaybackLoop OverdubLoop PlaybackLoop Playback orOverdubLoop Fade-OutLoop StoppedLoop StoppedTAP/LOOPFootswitch ActionPress/ReleasePress/Release(or BYPASS/STOP FSWPress/Release)Press/ReleasePress/ReleasePress and Hold for onesecondDouble-Tap, or BYPASS/STOP FSW Press/ReleasePress/Release (or DoubleTap TAP/LOOP FSW orsingle BYPASS/STOP FSWPress/Release)Press/ReleasePress and Hold for 2.5secondsNew Looper StateRecording initial loopLoop Playback, and looplength is set (or Stops loopand sets loop length)Loop OverdubLoop PlaybackUndo last Overdub layer orRedo last Overdub layerStop loop or begin Fade-OutCancel loop Fade-Out andrestore Loop Playback at fullvolume (cancel loop Fade-Outand immediately Stop Loop)Loop PlaybackErase loopLOOP LEDs: MEM, PLAY and REC:Three LEDs display the current state of the looper:MEM LED: lights to indicate that a loop is currently in memory.PLAY LED: lights whenever a loop is playing or overdubbing. The PLAYLED blinks once when the loop cycles, blinks twice to indicate undo orredo and blinks continuously during a fadeout, shutting off once the loophas finished the fade-out and stopped.REC LED: lights whenever a loop is recording or overdubbing. The RECLED blinks rapidly for half a second just prior to erasing a loop.14
CONNECTIONSINPUT Jack – This ¼” jack is the audio input to the Grand Canyon. Theinput impedance is 2M .L OUT Jack – Use this output for a mono setup. In a stereo setup this isyour left output. The output impedance is 550 .R OUT Jack – This is the right output jack in a stereo setup. The outputimpedance is 550 .FSW Jack – Connect an external momentary footswitch to this ¼” jack.The external footswitch may be either a single footswitch (TS plug), a dualfootswitch (TRS plug), or a triple footswitch (TRS plug) such as theDigiTech FS3X. The external footswitches must be momentary andnormally open so that when the switch is pressed down a connection ismade between the sleeve and either the tip, ring or both. See page 27 fora description of all functions available on the external footswitches.EXP Jack and Expression/CV Specifications – Connect an expressionpedal with a TRS plug to this jack to allow external control over any of theGrand Canyon’s knobs, or use it like a volume pedal on the dry signalbefore it hits the delay effects. See page 28 for a description on how toset up and control the Grand Canyon with an external expression pedal.The polarity of the expression pedal’s plug must have the Sleeveconnected to the heel position (usually GND), Ring connected to the toeposition and the Tip connected to the wiper. The nominal expression pedalimpedance is 10kΩ though most other values will work fine. Please do notgo below 6kΩ on your expression pedal’s potentiometer impedance. Somesuggested Expression Pedals: EHX Expression Pedal, M-Audio EX-P,Moog EP-2 and EP-3, Roland EV-5 or Boss FV-500L. Additionally, theEXP IN jack can be connected to a CV source using a TS plug; theacceptable control voltage range is 0V to 5V.9V Power Jack – Plug the output of the Grand Canyon’s suppliedEHX9.6DC 200mA AC adapter to the 9V power jack located at the top ofthe pedal. The Grand Canyon requires 150mA at 9VDC with a centernegative plug. Do not exceed 10.5VDC on the power jack. Note: Expectunreliable behavior if the power supply rating is less than 150mA.15
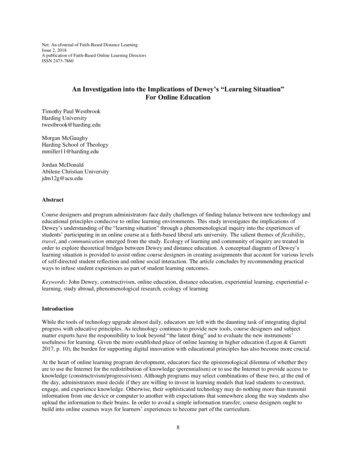
DELAY TYPE AND MINI KNOB DETAILSECHO – Digital DelayAccurate 24-bit digital delay that offers either lowpass or highpass filtersin the feedback loop and a bit crusher effect prior to the delay line.FILTER: Turn this knob counter-clockwise from noon for a lowpassfilter and clockwise from noon for a highpass filter. The lowpass filterattenuates high end while the highpass filter attenuates low end.Starting from the noon position, as you turn counter-clockwise, thecutoff frequency goes down. Turn clockwise and the cutoff frequencyrises. Both filters are bypassed in the noon position.BIT CRUSH: Turning this knob counter-clockwise from noonproduces sample rate reduction down to 220Hz at 24-bit resolution.Turn clockwise from noon for 2-bit resolution with sample ratereduction down to 220Hz. The Bit Crusher effect is bypassed at thenoon position.16
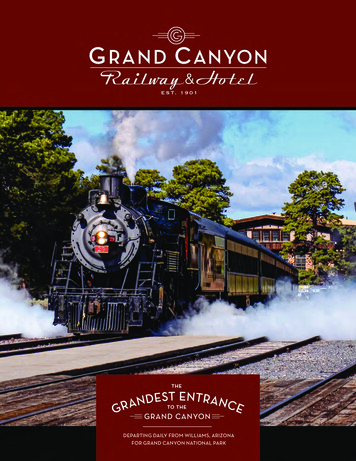
MOD – Modulated delaySame digital delay as in ECHO mode but Filter and Bit Crush have beenreplaced by modulation parameters.MOD RATE: As you turn clockwise, the modulation rate increases.The modulation rate ranges from 0.1Hz to 163Hz.MOD DEPTH: As you turn clockwise, modulation depth increases. Atfully counter-clockwise, mod depth is 0.MULTI – Multi-tap delayA multi-tap delay where the FEEDBACK knob sets the exact number ofecho repeats from 1 to up to 31. As the delay time increases the maximumnumber of repeats decreases. Shorter delay times allow for a maximum of31 repeats. Very long delay times ( 2s) may have only two repeats.FILTER: Turn this knob counter-clockwise from noon for a lowpassfilter and clockwise from noon for a highpass filter. The lowpass filterattenuates high end while the highpass filter attenuates low end. Thefurther you turn counter-clockwise, the lower the frequency. Thefurther you turn clockwise, the higher the frequency. Both filters arebypassed at the noon position.DECAY/SWELL: Controls the volume envelope of the echoes. At thenoon position each echo repeat is at the same volume. As the knob isturned counter-clockwise from noon, the decay envelope engageswhere each subsequent repeat is quieter than the previous repeat. Asthe knob is turned clockwise from noon, the swell envelope engagesso that each repeat is louder than the previous repeat. The fartheryou move from the noon position the more intense the volumeenvelopes become.REVERSE – Reverse delayAn intelligent reverse delay that studies your playing to produce reverseechoes that best suit your delay time setting .SENSITIVITY: This knob adjusts the threshold for an intelligentpluck detection algorithm. As you turn clockwise your plucks aredetected more readily. In the minimum position only loud notes willbe detected. The REVERSE LED blinks each time a valid pluck isdetected.MOD DEPTH: Use this knob to add modulation to the reverse delay.As you turn clockwise, the modulation gets wider. Set to fully counterclockwise for no modulation.17
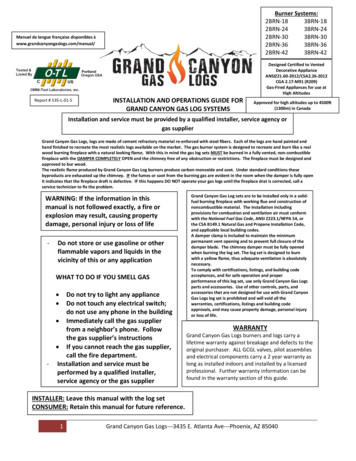
DMM – Deluxe Memory ManA faithful emulation of the EHX Deluxe Memory Man, expertly reproducingthe beloved tone of the classic bucket brigade analog delay. Organicechoes transform as they repeat while lush modulation—ranging fromsubtle to oceanic—massages each note. The Grand Canyon also recreatesthe DMM’s renowned FEEDBACK control, which provides a musicalrunaway effect when maxed and the ability to bend the pitch of echoes asyou turn the DELAY knob.MOD RATE: As you turn clockwise, the DMM’s modulation rateincreases. The noon setting is equivalent to a DMM's chorus setting.Range: 0.1Hz to 50Hz.MOD DEPTH: As you turn clockwise, the DMM modulation depthincreases. At fully CCW, modulation is off.TAPE – Tape delaySimulates the prized analog tape echo units of the 1970s. Echoes degradeand distort as they repeat. Tape Wow and Flutter provide the characteristicwarble that tape delay is known for.DISTORTION: Sets the amount of tape distortion. As you turnclockwise, you get more tape distortion.FLUTTER DEPTH: Sets the wow & flutter depth. Turning clockwiseincreases the amount of modulation.REVERB – Reverb plus delayA reverberant echo where each repeat is followed by a wash of smoothPlate reverb. For a pure reverb setting, turn down FEEDBACK to itsminimum position and DELAY below 9 o’clock. TIP: u
3. If you want to record a loop with the Grand Canyon's internal delay effects, make sure both the DELAY and LOOPER LEDs are lit. 4. If you want to record a loop without the Grand Canyon's effects, only the LOOPER LED should be lit. 5. To record your loop, press and release the TAP/LOOP FSW. The Grand Canyon begins recording immediately. 6.