Transcription
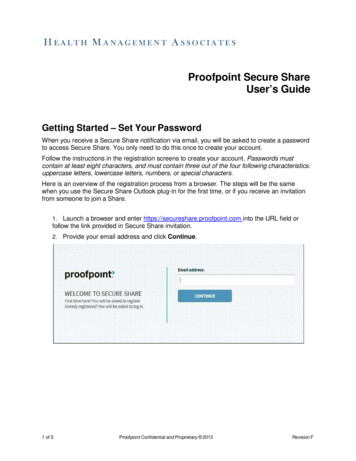
Proofpoint Secure ShareUser’s GuideGetting Started – Set Your PasswordWhen you receive a Secure Share notification via email, you will be asked to create a passwordto access Secure Share. You only need to do this once to create your account.Follow the instructions in the registration screens to create your account. Passwords mustcontain at least eight characters, and must contain three out of the four following characteristics:uppercase letters, lowercase letters, numbers, or special characters.Here is an overview of the registration process from a browser. The steps will be the samewhen you use the Secure Share Outlook plug-in for the first time, or if you receive an invitationfrom someone to join a Share.1. Launch a browser and enter https://secureshare.proofpoint.com into the URL field orfollow the link provided in Secure Share invitation.2. Provide your email address and click Continue.1 of 5Proofpoint Confidential and Proprietary 2013Revision F
3. Fill in the registration and Captcha fields. Select the Terms of Service check box.4.2 of 5After you click Register, look in your inbox for an email to complete your registration.Proofpoint Confidential and Proprietary 2013Revision F
5. You will see a “Registration Successful” message.The first time you log in to Secure Share from a browser, you will see a welcome message. Itlooks similar to this:3 of 5Proofpoint Confidential and Proprietary 2013Revision F
Uploading Files1. Fill out data summary file as per instructions in data submission file layout.2. File Naming convention : HH ID# Clinic/Org Name PCP or CMHC CollectionStart End Date ** The name of the clinic/organization providing the servicesFile Name Example:1111 St Johns Medical PCP 012016 062016.xlsFile Name to start with theHealth Home ID number.Name of the Health HomeIdentify if PCP or Identify the collection startCMHCand end date3. When uploading files that you want to share you can either drag the files in the Drag fileshere box or select the link to add files from your computer.4 of 5Proofpoint Confidential and Proprietary 2013Revision F
4. After the files have been uploaded you must complete the transfer by clicking DONE asshown below. Your files will be securely wiped if the DONE button is not selected.5 of 5Proofpoint Confidential and Proprietary 2013Revision F
when you use the Secure Share Outlook plug-in for the first time, or if you receive an invitation from someone to join a Share. 1. Launch a browser and enter https://secureshare.proofpoint.com into the URL field or follow the link provided in Secure Share invitation. 2.