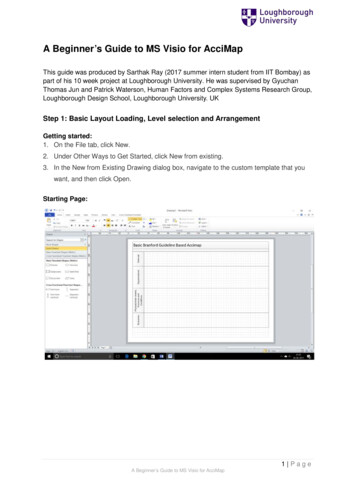
Transcription
A Beginner's Guide to the YaesuFT-60R/E Handy-Talkie, version 3.6By R. G. Sparber KG7MQLCopyleft protect this document1.This is a work in progress. Please send me your comments, corrections, andquestion. Rick KG7MQL@gMail.comBackgroundI am a proud owner of a Yaesu FT-60R VHF/UHF Dual BandTransceiver. To say this radio does a lot is an understatement. The unitcomes with an Operating Manual that is about ¼" thick. I thought I hadseen such manuals before. You get 5 pages in English and the rest inother languages. Well, in this case, it was all in English and allimportant. That is a lot to absorb.The best way I know of learning a subject is toexplain it to others. This guide will help me learn.And who knows, maybe some beginner out therewill find value in it too.You have my permission to take a black marker and blot outwords like "simple" and "easy" from the Operating Manual.Using these words is like going to a restaurant that has asign telling you the food tastes "good". I guess eating theirfood would not inform you of the fact. Nothing is simple oreasy if you don't know what to do!Appendix 2 contains an alternate Table of Contents forthe Yaesu FT-60R/E Operating Manual. This might bethe most useful part of the Beginner's Guide.1You are free to distribute this document but not to change it.R. G. Sparber KG7MQLAugust 11, 2020Page 1 of 52
ContentsBackground.1You Will Need .5Overview .7Operation: Switching Power On and Off [12] .8Operation: Adjusting the Audio Volume Level and Squelch Settings [12].8Operation: Selecting the Operating Band [13] .9Operation: Frequency Navigation [13] .10Operation: Transmission [15].13Advanced Operation: Keyboard Locking [16] .14Advanced Operation: Keypad/LCD Illumination [17] .14Advanced Operation: Disabling the Keypad Beeper [17].14Advanced Operation: RF Squelch [18] .14Advanced Operation: Checking the Battery Voltage [18] .14Repeater Operation .15Manual Repeater Shift Activation: Checking the Repeater Uplink (Input)Frequency [21].17Repeater Operation: Repeater Shifts [19] .18Repeater Operation: Automatic Repeater Shifts (ARS) [19] .18Repeater Operation: Manual Repeater Shift Activation [20].19Manual Repeater Shift Activation: Checking the Repeater Uplink (Input)Frequency [21].19CTCSS/DCS Operation: CTCSS Operation [22] .19CTCSS/DCS Operation: DCS Operation [23] .20CTCSS/DCS Operation: Tone Search Scanning [24] .20CTCSS/DCS Operation: Split Tone Operation [25] .20CTCSS/DCS Operation: Tone Calling (1750 Hz) [26].20Memory Mode [27] .21Memory Mode: Memory Storage [28] .23Memory Mode: Storing Independent Transmit Frequencies ("Odd Splits") [28] 23Memory Mode: Memory Recall [29] .24R. G. Sparber KG7MQLAugust 11, 2020Page 2 of 52
Memory Mode: HOME Channel Memory [29] .26Memory Mode: Labeling Memories [30].27Memory Mode: To Display the alpha-numeric "Tag" (label): [30] .30Memory Mode: Memory Offset Tuning [31] .31Memory Mode: Deleting Memories [32] .32Memory Mode: Moving Memory Data to the VFO [32] .32Memory Mode: Memory Bank Operation [33] .33Memory Mode: Assigning Memories to a Memory Bank [33] .34Memory Mode: Memory Bank Recall [33].35Memory Mode: Removing Memories from a Memory Bank [34] .36Memory Mode: Memory Only Mode [34] .36Weather Broadcast Channels [34] .37Scanning [35].38Scanning: VFO Scanning [35] .38Scanning: Memory Scanning [37].40Scanning: How to Skip (Omit) a Channel during Memory Scan Operation [37] .40Scanning: Preferential Memory Scan [38] .40Scanning: Memory Bank Scan [39] .41Scanning: Weather Alert Scan [39] .41Scanning: Programmable (Band Limit) Memory Scan (PMS) [40] .41Scanning: "Priority Channel" Scanning (Dual Watch) [41] .42Scanning: Priority Revert Mode [42] .43Scanning: Automatic Lamp Illumination on Scan Stop [43] .43Scanning: Band Edge Beeper [43] .43EPCS (Enhanced Paging and Code Squelch) [44] .43Emergency Features: Emergency Channel Operation [46] .43Smart Search Operation [48] .43Internet Connection Feature [49] .44ARTS (Automatic Range Transponder System) [51] .44Dual Tone Multi Frequency (DTMF) [54,55] (Echolink) .45R. G. Sparber KG7MQLAugust 11, 2020Page 3 of 52
Reset Procedure [64] .45Acknowledgments .46Appendix 1: Operation Reminders .48Appendix 2: Alternate Table of Contents for the FT-60 R/E Operating Manual .48R. G. Sparber KG7MQLAugust 11, 2020Page 4 of 52
You Will NeedThe guide is intended to supplement the FT-60 R/EOperating Manual. This booklet should be marked onthe back cover with a copyright of 20132. This isimportant because I am linking to specific pages.As you read, look for square brackets with one ormore page numbers. For example, [6,7] points you topages 6 and 7 of the Operating Manual.Along with a copy of the Operating Manual, you need tohave your FT-60R or FT-60E in hand. It is pointless toread about a function and not try it out at the same time.If you have an older version of the Operating Manual,the Beginner's Guide may still be of help but the pagenumber may not match. You can locate older versionsof the Operating Manual by searching the internet for"FT-60 Operating Manual" followed by the desiredcopyright date.All procedures in this book were tested on my FT-60R which I bought in theUSA. The FT-60E is for use within the European Union. They differ by thepermanent data related to frequencies and signaling for each jurisdiction.If you find that something does not work as specified, you may need to partiallyor fully reset the radio. See page 45 for details.2Barry Meyer WA9EQL tells me the 2015 version is identical.R. G. Sparber KG7MQLAugust 11, 2020Page 5 of 52
At the bottom of some sections is a reminder of the key and knob sequence. If thereminder starts with "VFO-" it means you must be in VFO mode. "MEM-" meansyou must be in Memory mode. If neither is present, then the sequence works inboth VFO and memory modes. All of these reminders have been collected andare presented in Appendix 1.Each action is followed by a "/" except the last one."Dial" means you turn the Dial knob to select some parameter or state.If only a key is shown, then you press it briefly. If the key is followed by " 1s" itmeans you press the key for about 1 second.Appendix 2 holds an alternative Table of Contents for the FT-60 R/E OperatingManual. The topics have been organized in a different sequence so the pagenumbers are not always in order.R. G. Sparber KG7MQLAugust 11, 2020Page 6 of 52
OverviewThere are a huge number offunctions available on theFT-60 and a limitednumber of keys and knobs.The solution chosen by thedevelopers was to givealmost every key threemeanings [6,7]. Somemeanings are selected bycontext while others dependon how long you hold downthe key.This time aspect was very confusing to me. You think you are pushing the rightkey but linger a little too long. Suddenly you are accessing a function you neversaw before and have no idea how to escape. I will attempt to cover theseunintended side trips as we move through the manual.One critical thing to remember: no combination of key pushes candamage your radio with one exception.Never press thePush To Talk key with the antenna disconnected.This can cause the transmitter part of the FT-60to be damaged.R. G. Sparber KG7MQLAugust 11, 2020Page 7 of 52
Operation: Switching Power On and Off [12]If you have big fingers, it can be hard to turnthe volume and power knobcounterclockwise in order to turn the radiooff. Listen for the click and don't be afraidto turn hard.Operation: Adjusting the Audio Volume Level andSquelch Settings [12]The left knob adjust audio volume.The right Dial knob has aring under it which controls squelch. This Dial knob isused for many functions and it is easy to let yourfingers slip and turn the ring. If you find the radio isblasting noise or not picking up any conversation,check that the squelch knob setting is right.R. G. Sparber KG7MQLAugust 11, 2020Page 8 of 52
Operation: Selecting the Operating Band [13]If you see a number in the upper left hand corner,you are in Memory Mode so must change toVariable Frequency Oscillator mode.Press the V/M key (Variable frequencyoscillator mode/Memory mode) briefly andthe number should go away. If V/M is helddown too long, the radio will start scanning.No harm done, just let go of the V/M keyand press it again briefly. You may need topress it briefly a second time.With no number displayed in the upper leftcorner, you are in VFO (VariableFrequency Oscillator) Mode. The radio canmonitor any frequency from 108.000 MHzto 520.000 MHz and from 700.000 MHz to999.9875 MHz. These two ranges arebroken up into 5 bands. Note that the tableshown here is slightly different from thebook. All numbers are in MHz.Band144250350430850Frequency Range108.000 - 200.000200.050 - 299.9875300.000 - 399.9875400.000 - 520.000700.000 - 999.9875Knowing the correct top and bottom ofeach band is necessary if you plan to set upto scan an entire band [14]. For example,if you start your scan at 200.000 MHz, youwill be scanning the 144 MHz band. But ifyou start at 200.050 MHz, you will bescanning the 250 MHz band. An alternateway to scan an entire band is presented onpage 39.Selecting the Operating Band: VFO- BAND repetitivelyR. G. Sparber KG7MQLAugust 11, 2020Page 9 of 52
Operation: Frequency Navigation [13]It is essential that you are in the VFO mode beforefollowing these instructions. See page 9 for how toget to VFO mode.1) Tuning Dial knobAs you turn the Dial knob clockwise,each click of the Dial knob moves you upin frequency. How much you move up isdetermined by the STEP parameter [77].Counterclockwise moves you down infrequency by the same step size.When the FW (Function or memory Write)key is active,a small F appears in the lower left cornerof the display in reverse video.If you briefly press the FW key and thenturn the Dial knob within 3 seconds, eachclick of the dial moves you 1.0000 MHz.As long as you move the dial again within 3 seconds, you will continue to movein steps of 1.0000 MHz. If you press FW and within 3 seconds press it again, youwillhave turned off the effect of the FW key.Frequency Navigation: VFO- FW/DialR. G. Sparber KG7MQLAugust 11, 2020Page 10 of 52
If you hold down the FW key too long,a number will start flashing in the upperleft corner of the display and a series ofdashes will appear where the frequencywas displayed. Briefly press the Push ToTalk key to abort3. You will nottransmit.2) Direct Keypad Frequency Entry [14]You do not enter the decimal point as you enter thefrequency.If you start to enter a frequency and then change yourmind, press the Push To Talk key to abort4. You will not transmit.If you enter a frequency that is not a multiple of the step size [77], the radio willround it to the nearest valid value. For example, given a step size of 12.5 KHz, ifyou try to enter 145.5630 it will display as 145.5625 before you get a chance toenter the zero.If you were using the VFO scanning function (see page 12), and the displaystopped at an active frequency, youcannot enter a new frequency. You mustfirst briefly press theUp orDown key before you can directly enter afrequency.If you try to enter a frequency outside of the specified bands, the display willshow ERROR for about 1 second and then revert back to the last validfrequency.34This is an "Easter Egg" sent to me by Steve Balch. It is a function not found in the Operating Manual.This is another "Easter Egg" sent to me by Steve Balch.R. G. Sparber KG7MQLAugust 11, 2020Page 11 of 52
3)Scanning[14]You must be in VFO mode to scan a range of frequencies (see page 9). If you arein Memory mode, you will scan a set of stored frequencies [37].The scanning will begin at the currentVFO frequency. If you push theUp key for about 1 second, the frequencywill increment until it detects an activefrequency or reaches the top of the band(see page 9). Then it will wrap around tothe lowest frequency in that band.Similarly, if you press the Down key, thefrequency will decrement until it reachesan active frequency or the bottom of theband and then wrap around to the top.If you press the up (or down) keys for less than 1 second, the displayed frequencywill increase (or decrease) by the step size [77]. If you press the up or down keysfor more than 1 second, scanning begins as if you let up on the key after 1second.R. G. Sparber KG7MQLAugust 11, 2020Page 12 of 52
Operation: Transmission [15]While you can listen to all of these bands:Band Frequency Range144108.000 - 200.000250200.050 - 299.9875350300.000 - 399.9875430400.000 - 520.000850700.000 - 999.9875you can only transmit on the 144 MHz and 430 MHzbands. The 144 MHz band is also called the 2 meter bandand the 430 MHz band is also called the 70 centimeterband.The FCC expects you to use the least amount of powernecessary to communicate. This goal also extends theoperating time of your battery.If you press the FW key and then the TX PO (TransmitPower) keys and nothing happens, you might haveselected a frequency outside of the valid transmit bands.One thing that confused me wasthat if you select LOW or MID(medium) power levels, the displaywill showLOW.Transmitting at full power for longperiods of time can make the radiotoo hot to hold. If there is also a poor match between radio and antenna, thereflected energy can further add to the heat. In the worst case, the radio willindicate thermal overload and shut down.Transmission Power: FW/TXPO/DIAL/FWR. G. Sparber KG7MQLAugust 11, 2020Page 13 of 52
Advanced Operation: Keyboard Locking [16]Advanced Operation: Keypad/LCD Illumination [17]Advanced Operation: Disabling the Keypad Beeper [17]Advanced Operation: RF Squelch [18]Advanced Operation: Checking the Battery Voltage [18]R. G. Sparber KG7MQLAugust 11, 2020Page 14 of 52
Repeater OperationMany of the features of the FT-60 involve communicating via repeaters. Beforewe get into the settings related to repeater operation, let's review the youAll of the repeaters I use have a specified frequency and offset.Say the frequency is 440.000 MHz with a positive offset of 5.000 MHz. Before Ipress the Push To Talk key, the display shows 440.000 MHz. While I press thePTT key, the frequency rises to 445.000 MHz, a change of 5.000 MHz. This isthe positive offset in action. I receive on a given frequency and transmit on afrequency 5 MHz higher. Why do that?Consider what is happening at the repeater.While I transmit from my FT-60, I am on 445.000 MHz (which is 440.000 5.000 MHz). The 440.000 MHz repeater is set up to receive at 445.000 MHz .The output of the repeater's receiver is connected to its transmitter. Whatevercomes in on the receiver immediately goes out via the transmitter but at 440.000MHz.By having the repeater receive at one frequency and simultaneously transmit on adifferent frequency, it can receive and transmit at the same time without havingits receiver hearing what it is transmitting. If the repeater transmitted at the samefrequency as it received, it would just spend its days listening to itself andignoring you.R. G. Sparber KG7MQLAugust 11, 2020Page 15 of 52
Let's think a minute about transmitting to a repeater. Say you use ½watt of transmit power. You receive a report from your contact thatyour signal is "scratchy". The repeater's receiver performs a functioncalled automatic gain control. If it receives a voice signal much largerthan the background noise, it can reduce gain which reduces both yourvoice and the noise mixed in with it. If it receives a weak voice signal,it will amplify the weak voice signal along with the noise mixed inwith it. This is why a strong signal sounds clear and a weak signalsounds noisy.Regardless of the quality5 of the signal into the repeater's receiver, theextracted audio passes to the repeater's transmitter. From there, theaudio is transmitted at full power to your contact. The contact mightreceive a nice, strong signal but it might still be noisy if the audio outof the receiver was noisy.You raise your transmit power to 2 watts and the report comes backthat you sound fine. This means that the repeater's receiver got a signalfrom you much larger than the background noise. This is often called"full quieting". The clean signal is sent to the repeater's transmitter asbefore but now the contact hears a clear signal.What if you raise your transmit power to 5 watts? Well, 2 watts wasenough to get full quieting. Going higher in power simply wastespower. Your battery won't last as long. If you live in a hot climate, likeI do here in Phoenix, Arizona, the radio can become too hot to holdwith a bare hand. Using more transmit power than necessary is alsocounter to FCC guidelines.5Your signal does have to be strong enough to be recognized by the repeater but that doesn't mean it sounds verygood.R. G. Sparber KG7MQLAugust 11, 2020Page 16 of 52
Manual Repeater Shift Activation: Checking theRepeater Uplink (Input) Frequency [21]Consider the case where the signal coming into the repeater is so strongthat you can receive it directly. Communicating without the repeater iscalled "Simplex" operation.Say you are receiving a signal from the repeater and want to see if youcan directly receive the signal being broadcast to the repeater. Therepeater's transmitted frequency is offset from the frequency of thesignal being received by the repeater as explained on page 15. By usingthe HM/RV key [21], you can jump from the repeater's transmittedfrequency to the repeater's received frequency. The - indicator flashesuntil you press HM/RV a second time.If you found that the signal being received by the repeater wassufficiently strong, you could move to a nearby frequency and free upthe repeater for others to use.R. G. Sparber KG7MQLAugust 11, 2020Page 17 of 52
Repeater Operation: Repeater Shifts [19]Repeater Operation: Automatic Repeater Shifts (ARS)[19]You must be in VFO mode (see page 9) in order to access this function.In many cases you lock in a choice by pushing FW orV/M. But here you press thePush To Talk key to lock in your Automatic RepeaterShifts choice and return to VFO mode. In this case,pressing the PTT key does not cause the radio totransmit.If you manually set an offset for a channel but haveARS active, then after you move to a different channel,ARS may change your manual setting if it does notagree with it.R. G. Sparber KG7MQLAugust 11, 2020Page 18 of 52
Repeater Operation: Manual Repeater ShiftActivation [20]Manual Repeater Shift Activation: Checking theRepeater Uplink (Input) Frequency [21]See page 17.CTCSS/DCS Operation: CTCSS Operation [22]Use the Dial knob.I was confused by the Yaesu FT-60 Operating Manual’s paragraph labeling ofthis section until I made the following changes: Step 2: put "a" after the 2 Step 3: cross out 3 and put "b" in its place Step 3-1 ("You may notice a REV TN") cross out "1)" and put "c" in itsplace Step "2)" ("You may notice a DCS") cross out "2)" and put in "d" in itsplace Step 4: cross out 4 and make it 3 Step 5: cross out 5 and make it 4 Step 6: cross out 6 and make it 5 Step 7 [23]: cross out 7 and make it 6With this new labeling, it is clearer to me that rotating the Dial knob brings upvarious options.I once ran into a repeater that supposedly required a CTCSS tone that was not inthe table. I know of no way to set such a tone on the FT-60.CTCSS Operation: FW/1/DIAL to TONE/PTT/FW/2/DIAL to PL/FWR. G. Sparber KG7MQLAugust 11, 2020Page 19 of 52
CTCSS/DCS Operation: DCS Operation [23]CTCSS/DCS Operation: Tone Search Scanning [24]CTCSS/DCS Operation: Split Tone Operation [25]CTCSS/DCS Operation: Tone Calling (1750 Hz) [26]R. G. Sparber KG7MQLAugust 11, 2020Page 20 of 52
Memory Mode [27]We have a memory space that contains userdefined frequencies. Each address is called aChannel and they are numbered from 000 to999. Each Channel holds a frequency plus otherparameters. Let's focus on just frequencyfor now.Channel 000Channel 001Channel 002Channel 003Channel 004145.000 MHz145.500 MHz435.000 MHz435.500 MHz145.800 MHzIf I retrieve the data held in Channel 002, I will get 435.000 MHz in thisexample.This channel memory space doesn't really have a name. The figure on [27] justrefers to the individual channels and calls them Standard Memory Channels.We also have a memory space that contains collections of what I call "pointers".A pointer is just a channel number. This space is divided into 10 Memory Banks.For example, I could have a Memory Bank like this:Pointer to Channel 010Pointer to Channel 007Pointer to Channel 042Pointer to Channel 073Pointer to Channel 128I added "Pointer to" in the above table in order to differentiate these entries fromthe Channel Memory shown at the top of this page.By selecting this Memory Bank, I will have access to only channels 10, 7, 42, 73,and 128. This would be handy if only these channels are operational within agiven town. Change towns and I could change Memory Banks.Any of the Memory Banks can contain a pointer to any Channel. So if you liked,all 10 Memory Banks could point to Channel 042.The diagram on [27] implies that you can store both Standard Memory Channelspointers and PMS Memory Channel pointers in one or more Memory Banks. Thisis not correct. You can only store Standard Memory channels to Memory Banks.R. G. Sparber KG7MQLAugust 11, 2020Page 21 of 52
Referring to the figure on [27], you see that following the Standard MemoryChannels there are the PMS Memory Channels. As you turn the tuning knob tosequence through the channels, you should see 1 through 999, then 0 which isreally 000, and then the L/U pairs of registers6. When I first got my radio, I seemto remember seeing the L/U pairs. But when I recently looked for them, theywere gone. A partial reset of the radio restored them (see [64] and page 45).Lesson learned: if the radio does not work as described, there might be damage tothe data and/or software image that can be corrected by a reset. See page 44 fordetails on the different levels of reset. Doing a factory reset should be a last resortas this will erase your data.Not shown in the figure on [27] is another set of memories used by the SmartSearch Operation [48]. See also page 44.6See page 25 for an explaination of L/U.R. G. Sparber KG7MQLAugust 11, 2020Page 22 of 52
Memory Mode: Memory Storage [28]This section deals with storing frequencies and associated data into channels. It isnot dealing with storing pointers. The task is performed in VFO mode.If you are rotating the tuning Dial knob clockwise starting at Channel 1, thenexpect to see 1 through 999, then 0, and then the L/U pairs of registers.Note: Channel 1 has a special meaning if you plan to use the Memory ChannelPriority function. You may want to leave it blank for now (see page 42 fordetails).Memory Storage: MEM- FW 1s/DIAL/FWMemory Mode: Storing Independent Transmit Frequencies("Odd Splits") [28]R. G. Sparber KG7MQLAugust 11, 2020Page 23 of 52
Memory Mode: Memory Recall [29]If you do not see a number in the upper leftcorner, then you are in VFO mode. Briefly pressthe V/M key and a number should appear.If you see a number in the upper left corner, thenyou are in Memory mode and can proceed.Note that BANK is displayed below the number.This means that within Memory mode you arewithin one of the 10 Memory Banks. You arelimited to scrolling through the channels stored inthe selected BANK. See page 35 for how to selecta Memory Bank.If you do not see BANK displayed below thenumber, then you are in Memory mode but "NOBANK" has been selected. This state lets you scrollthrough all Channels which is handy if you can'tremember the channel numbers. See page 35 for how to select NO BANK.Regardless of what Bank you are in, you can recall channels 1 through 999 byentering the Channel number and then pressing FW. To recall channel 000 youmust enter 1000.If you look back to the figure on [27], you will notice a dashed line joining theStandard Memory Channels to the PMS Memory Channels. The reason for thisline becomes evident as you recall PMS Memory Channels. The last paragraph ofMemory Mode: Memory Recall [29] explains the details. I can't say that it is allthat user friendly.Memory Recall VFO- VM/DialMemory Recall: MEM- DialMemory Recall: MEM- keypad numbers/FWR. G. Sparber KG7MQLAugust 11, 2020Page 24 of 52
Mapping of channel names to key strokesThis is useful when directly entering memory locations via keypad.Channel12 999000Numberto accessthischannel12 9991000Note: Channel 000 will display in the upper left corner as 000 and not as 1000.See [40] for how Lower and Upper Program Memory Channels are used.LowerProgramMemoryChannelL01L02L03 L50Numberto accessthischannel100110031005 1099UpperProgramMemoryChannelU01U02U03 U50Numberto accessthischannel100210041006 1100In the general cases we have:𝐿𝑜𝑤𝑒𝑟 𝑐ℎ𝑎𝑛𝑛𝑒𝑙 𝑎𝑐𝑐𝑒𝑠𝑠 𝑛𝑢𝑚𝑏𝑒𝑟 999 2𝑥 andUpper channel access number 𝐿𝑜𝑤𝑒𝑟 𝑐ℎ𝑎𝑛𝑛𝑒𝑙 𝑎𝑐𝑐𝑒𝑠𝑠 𝑛𝑢𝑚𝑏𝑒𝑟 1Where x is the channel number for the L/U pair.For example, if we want to store data in L03 and U03, x 03 so theLower channel access number 999 (2 3) 1005 and theUpper channel access number is 1006.R. G. Sparber KG7MQLAugust 11, 2020Page 25 of 52
Memory Mode: HOME Channel Memory [29]Step "6" will only work if step "1" was previously executed. However, ifREV/HM is set to REV, you can press FW and then HM/RV to bring up theHOME channel.R. G. Sparber KG7MQLAugust 11, 2020Page 26 of 52
Memory Mode: Labeling Memories [30]The sequence works but I will add a few comments that might make it clearer.Along with the generic steps necessary to label a memory, I will use ChannelMemory 000 to illustrate the steps.Step 2: briefly press the FW key, and then hold downthe 0 key until the display changes.This new display will havea number in the upper left corner andsome text.Step 3: When you rotate the Dial knob, thenumber and text should change. Stop whenyou get to 28, NaMe WRiTe. There does notseem to be a time limit for how long you stayin the SET mode.Step 4: It says to "press theFW key momentarily to display thepreviously stored label (if any)". Even if youdo not want to see the previously stored label,you must execute this step.In Step 1, I selected Channel Memory 000.Here you see the previous name assigned tothis address.R. G. Sparber KG7MQLAugust 11, 2020Page 27 of 52
Step 5: I briefly pressed the FW key which replaces the previous name with alldots.In the upper left corner it says SEt.Step 6: I rotated the Dial knob and now see "A" as thefi
FT-60R/E Handy-Talkie, version 3.6 By R. G. Sparber KG7MQL Copyleft protect this document1. This is a work in progress. Please send me your comments, corrections, and question. Rick KG7MQL@gMail.com Background I am a proud owner of a Yaesu FT-60R VHF/UHF Dual Band Transceiver. To say this radio does a lot is an understatement. The unit